
Nintendo published a handy video guide to a New Nintendo 3DS system transfer, but here we're providing a written equivalent that somewhat matches the pace of the process. Trust us, this'll take you longer than three and a half minutes, and we'll also aim to cover off any gaps in the information that need to be taken into account.
Like the video we'll be providing instructions for the best transfer option, that which uses a PC in the process. If completing a transfer wirelessly - which will take many hours - the process is largely the same just with tweaks after that step. We highly recommend the PC-based approach, however, even if you need to temporarily access one belonging to a friend, family member or particularly kindly neighbour. The main hassle, this time, is the transition from SD to micro-SDHC, areas we hope to cover off here.
 Watch on YouTube
Subscribe to Nintendo Life on YouTube845k
Note: This guide is for a first transfer from an original 3DS to a fresh New Nintendo 3DS / XL. We'll post updated tips for New 3DS to New 3DS and any other variations besides in the future.
So, let's get to it.
Getting Started
It's worth making sure you've got the following, if applicable, before you even contemplate kicking off the process.
- A small screwdriver (various types work) that'll loosen the back end of the New Nintendo 3DS.
- A micro-SDHC card with at least the same capacity as your current SD card.
- An SD to micro-SD converter - typically PCs or laptops either have an SD card slot or use adapters, so a converter (which is the shape of an SD card in which you slot the smaller media) is a must.
- An SD adapter for the PC, if required - USB options can be found for just a few dollars online or at relevant stores.
- A PC, laptop, Mac with enough hard drive space to accommodate your SD card content.
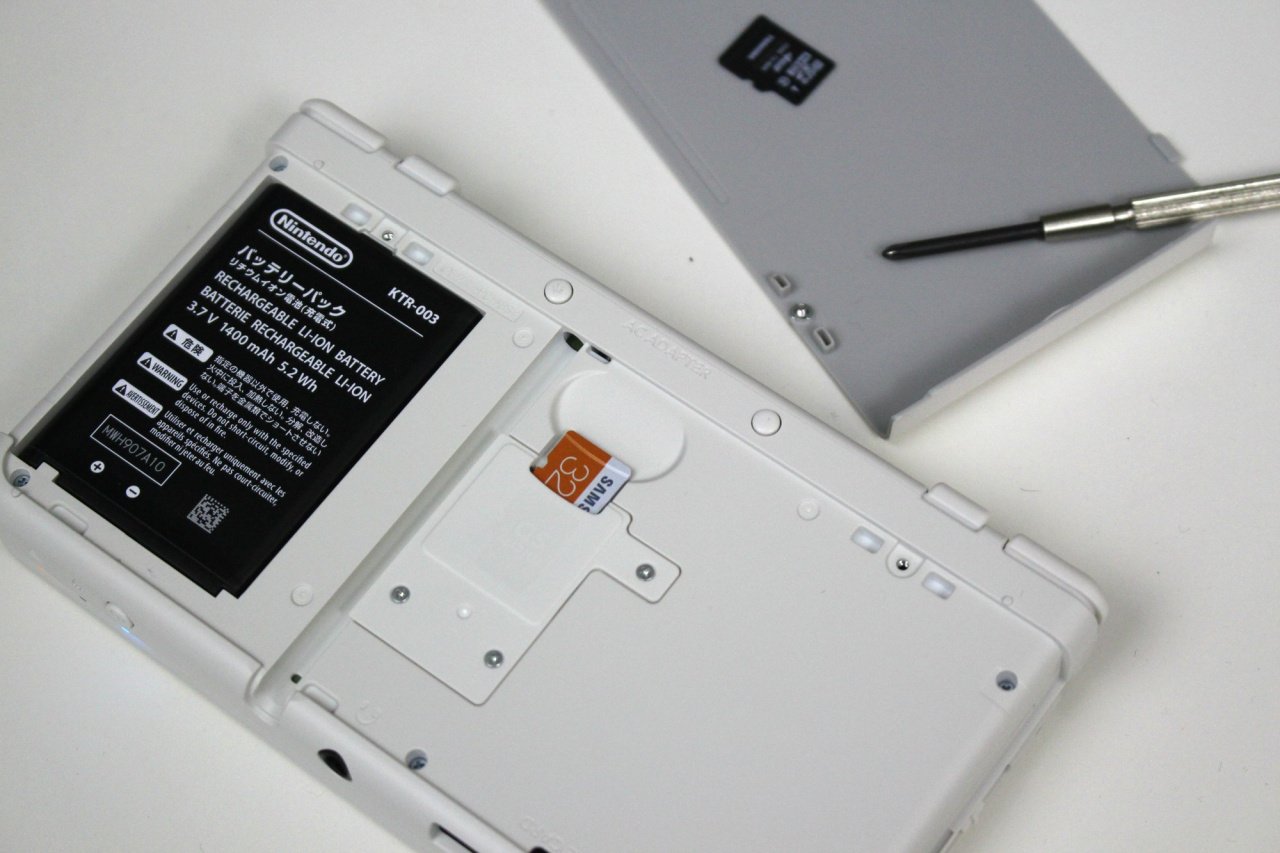
- We suggest that prior to starting and booting up the New 3DS you place your new micro-SDHC (if you're not using the 4GB card that comes with the system) in the console. You unscrew the back and slide it in the slot. This isn't essential - we swapped out the micro-SDHC with a 32GB capacity card later in the process - but it's perhaps an extra fail-safe worth completing. IF you have a New system with a pre-installed game, follow the extra step below.
- This bullet point only affects those that have a bundle with a pre-installed game. Simply put the packed-in New 3DS 4GB micro-SDHC into your PC and copy all contents onto that computer. Now, ensure your larger micro-SDHC is completely blank, and copy the data from the packed in card to the new micro-SDHC. Now pop the larger capacity card into the New 3DS.
Starting the System Transfer
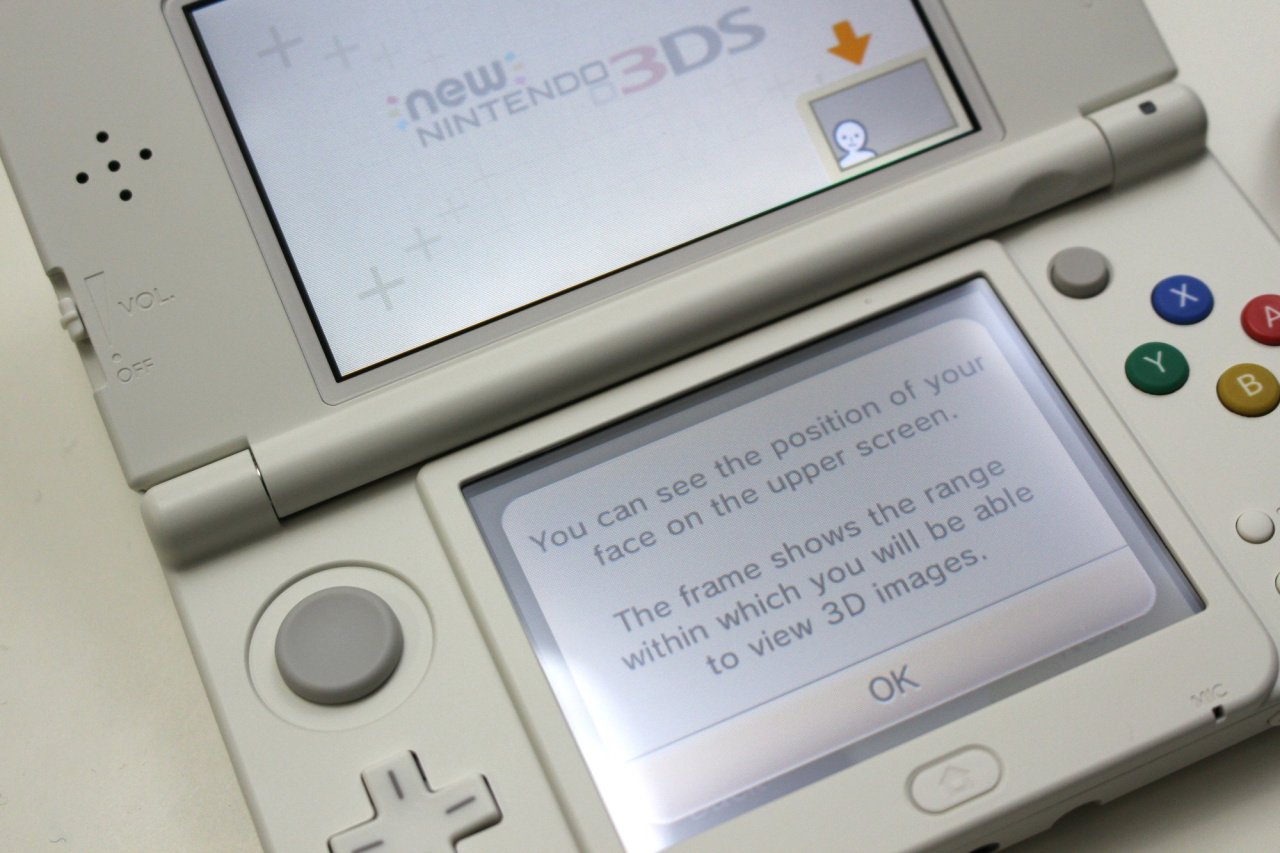
Moving onto the business end now, the first thing to do is to fire up your New Nintendo 3DS - plugging it in is a good idea - and work through the initial setup. This will involve picking a system name, applying a time / date and calibrating the 3D effect, among other things.
You shouldn't be prompted to set up or link a Nintendo Network ID in the early screens, but ensure that you do not setup an NNID under any circumstances.
Once initial setup is complete and you're on the familiar home screen, head into System Settings, Other Settings and select System Update, just to check it's on the latest firmware.
Once that's complete, boot up your old 3DS and get both systems to the main screen; head into System Settings, then Other Settings.
Select System Transfer on both consoles.
Step-by-Step
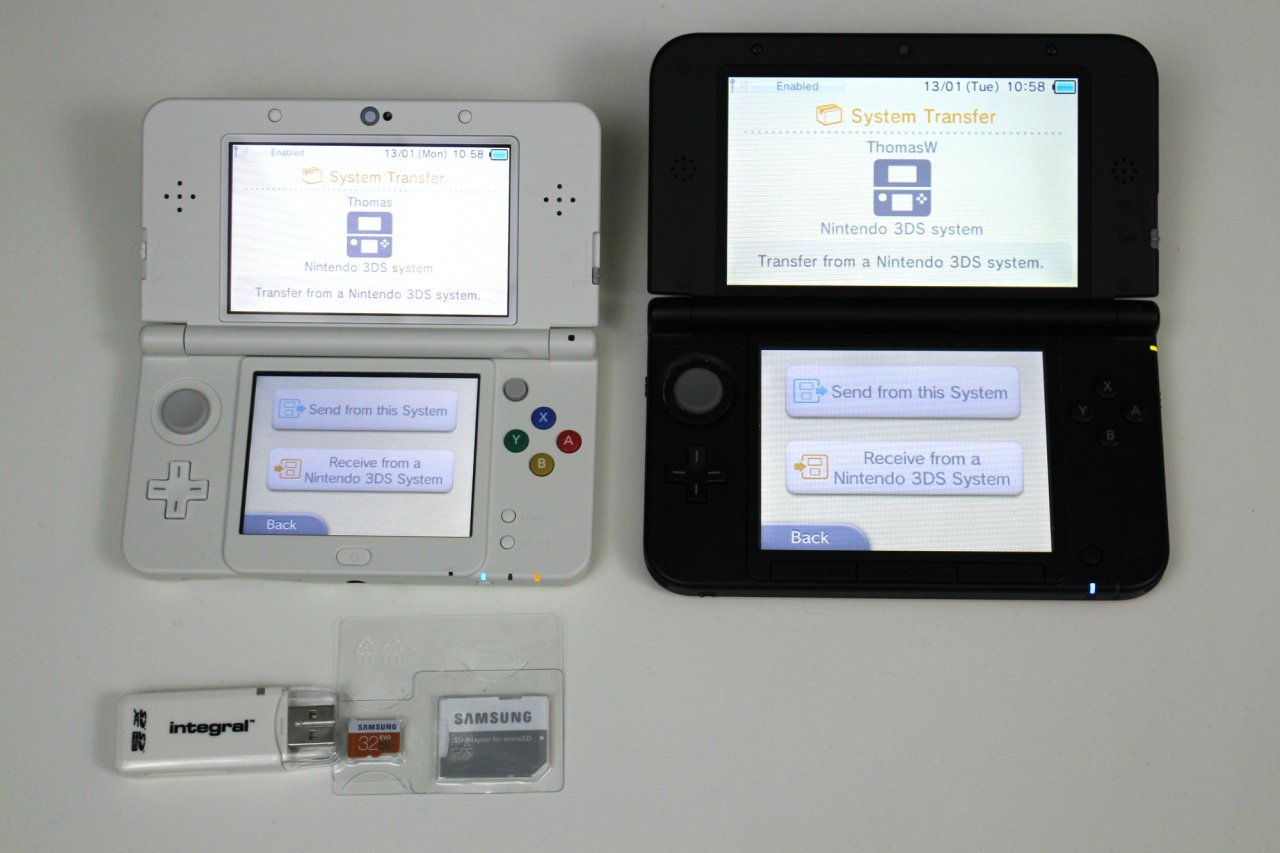
- Once the process begins select 3DS family transfer on both machines - you'll be hopping between the two screens frequently.
- Select "Send from this system" on your old 3DS, and "Receive from Nintendo 3DS" on the New Nintendo 3DS.
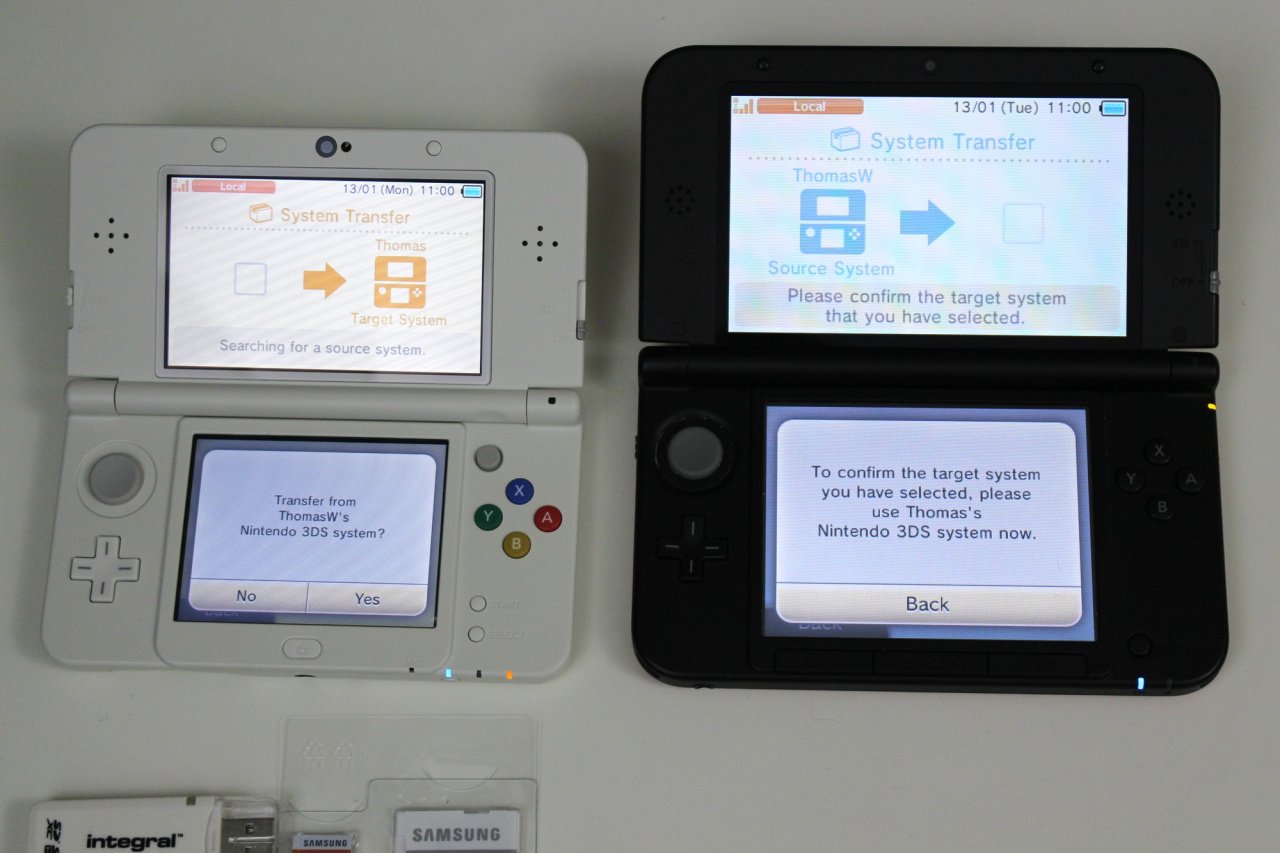
- Your old 3DS will show the name you gave the New hardware, tap this. Then tap Yes on the following prompt on the New 3DS. Prompts on your old portable will then advise you that, following the transfer, all data will be moved and therefore deleted from the source, while any data on the New 3DS will also be overwritten. This cannot be undone. Say yes at the prompts and tap "Transfer" on the old 3DS when it appears.
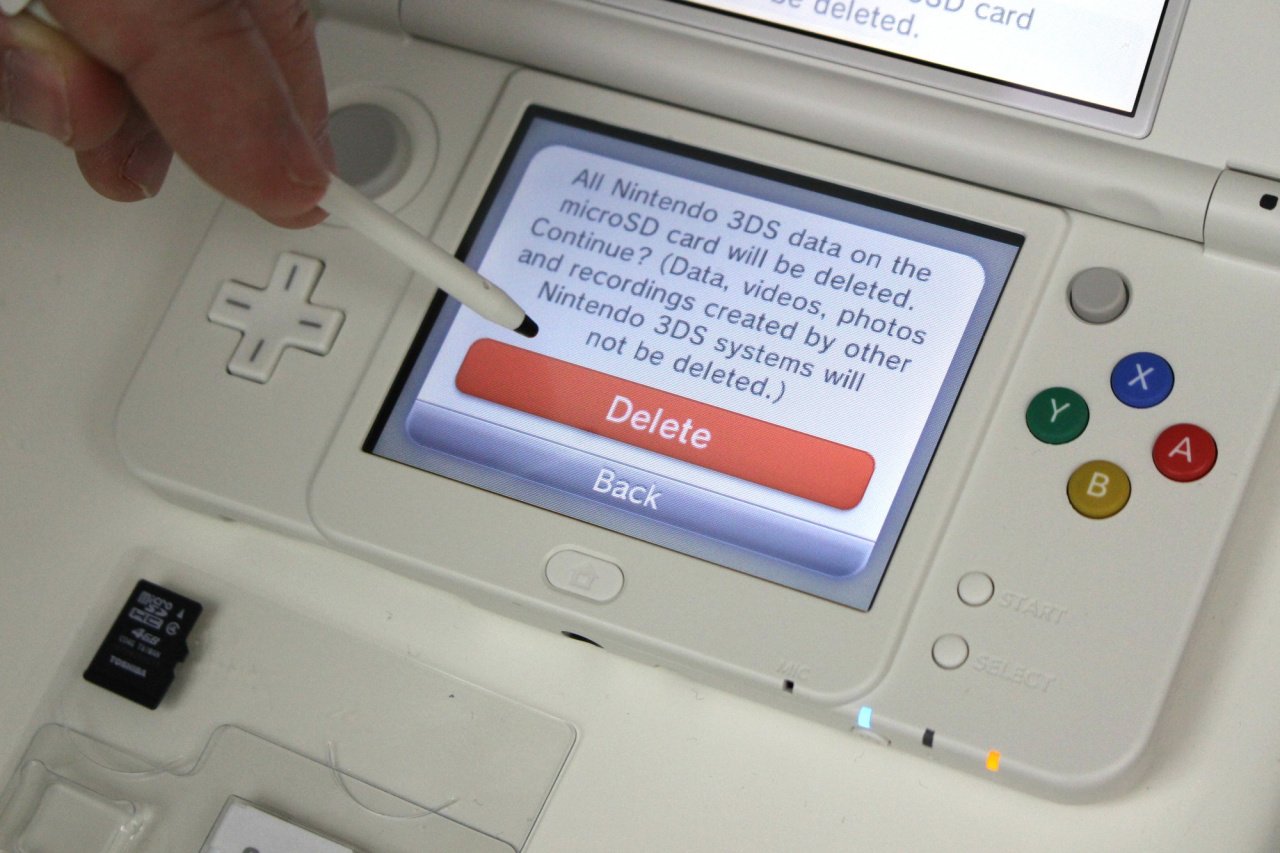
- At this point the New 3DS will prompt you to delete any data on the micro-SDHC - whether re-using another card or starting with a new (blank) one, you need to agree and tap "Delete".
- When asked on the New 3DS whether any other microSD cards have been used with the system, say "No".
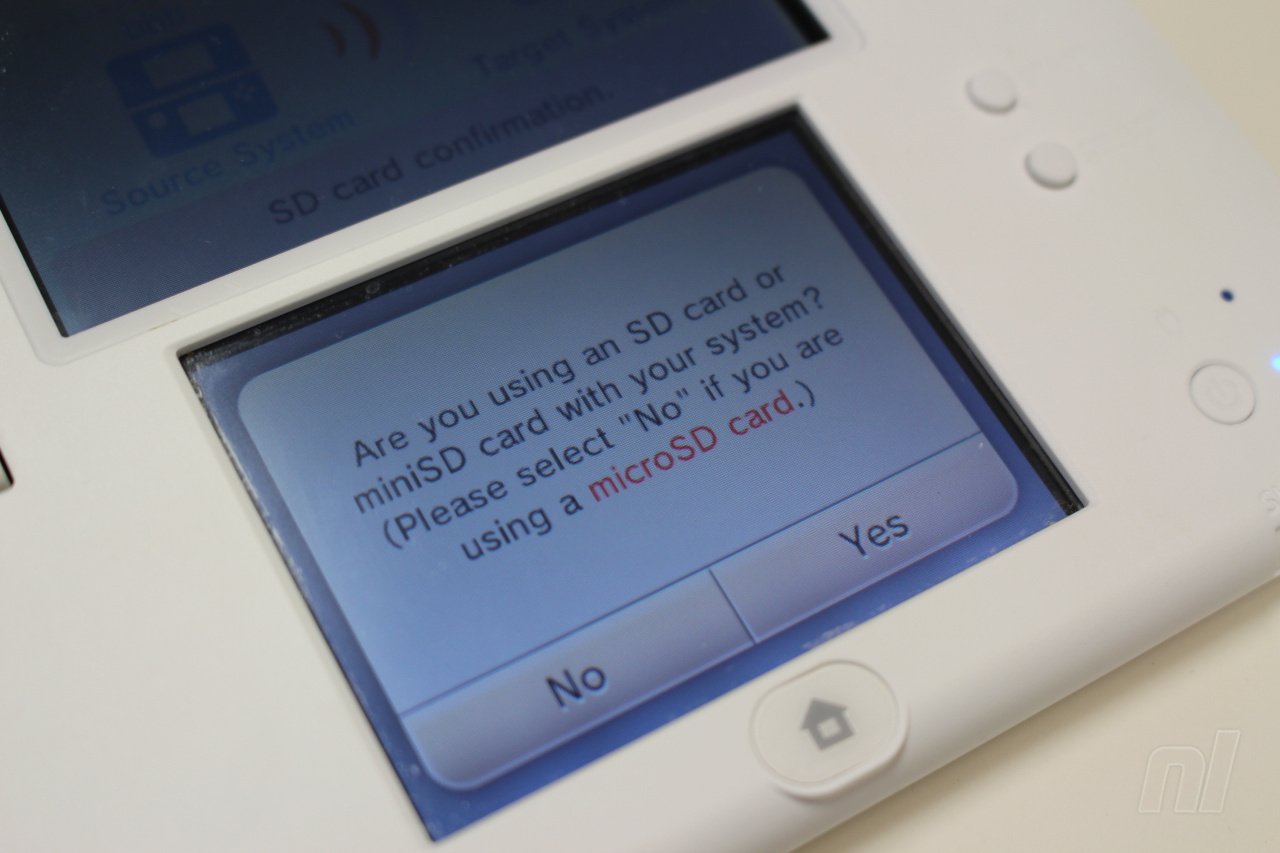
- The next screen on the old 3DS is the most confusing, so be careful. If you're transferring from a standard 3DS / XL with an SD card, select Yes. This is easily the most poorly worded part of the process, but select Yes to state that you have a standard SD card in the old 3DS.
Continuing with a micro-SDHC already used in an original 3DS
If you are actually using a micro-SDHC card in your old 3DS (with an adapter) and want to keep using that same memory, then select No and the process below will be slightly different (easier, actually) as you'll be replicating the simple act (at the right time) of letting the systems process before simply moving your card into the New system.
Though the prompts will be different, the process should actually be simpler, as you won't be required to move files onto a PC and then onto a new card. Follow the prompts for a limited wireless transfer between the two units and, only when told to do so, switch both machines off and move the micro-SDHC across to the New Nintendo 3DS. This is far more reminiscent of the original System Transfer process.
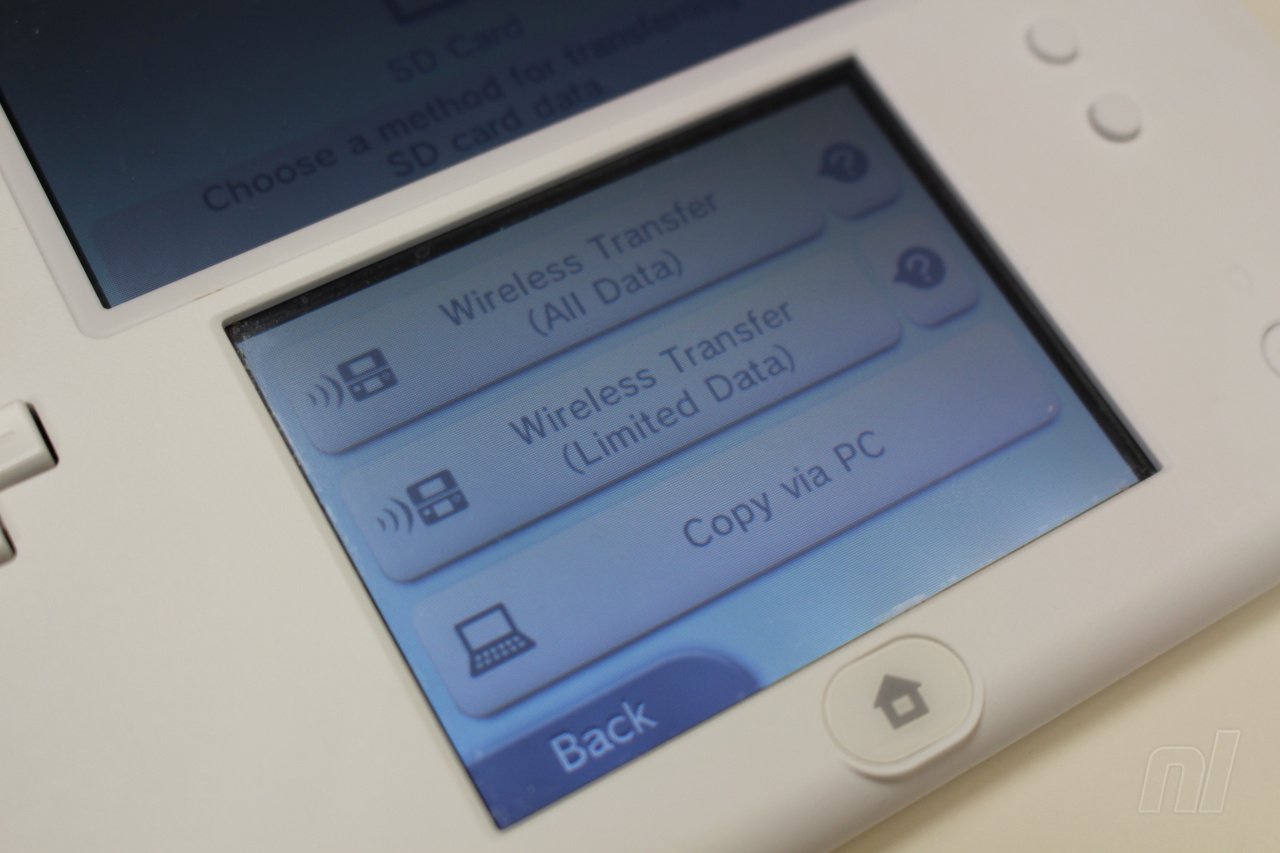
- The next screen on the old 3DS offers three transfer options - Wireless, Low-Capacity micro-SD card transfer and PC-based transfer. Wireless is a poor option, as it takes an exceptional amount of time for the two systems to transfer everything locally, while the second option is improved but still relies on some local transfer. As highlighted above, the PC-based transfer is the best option. Select it.
- Tap Move to kick off the process.
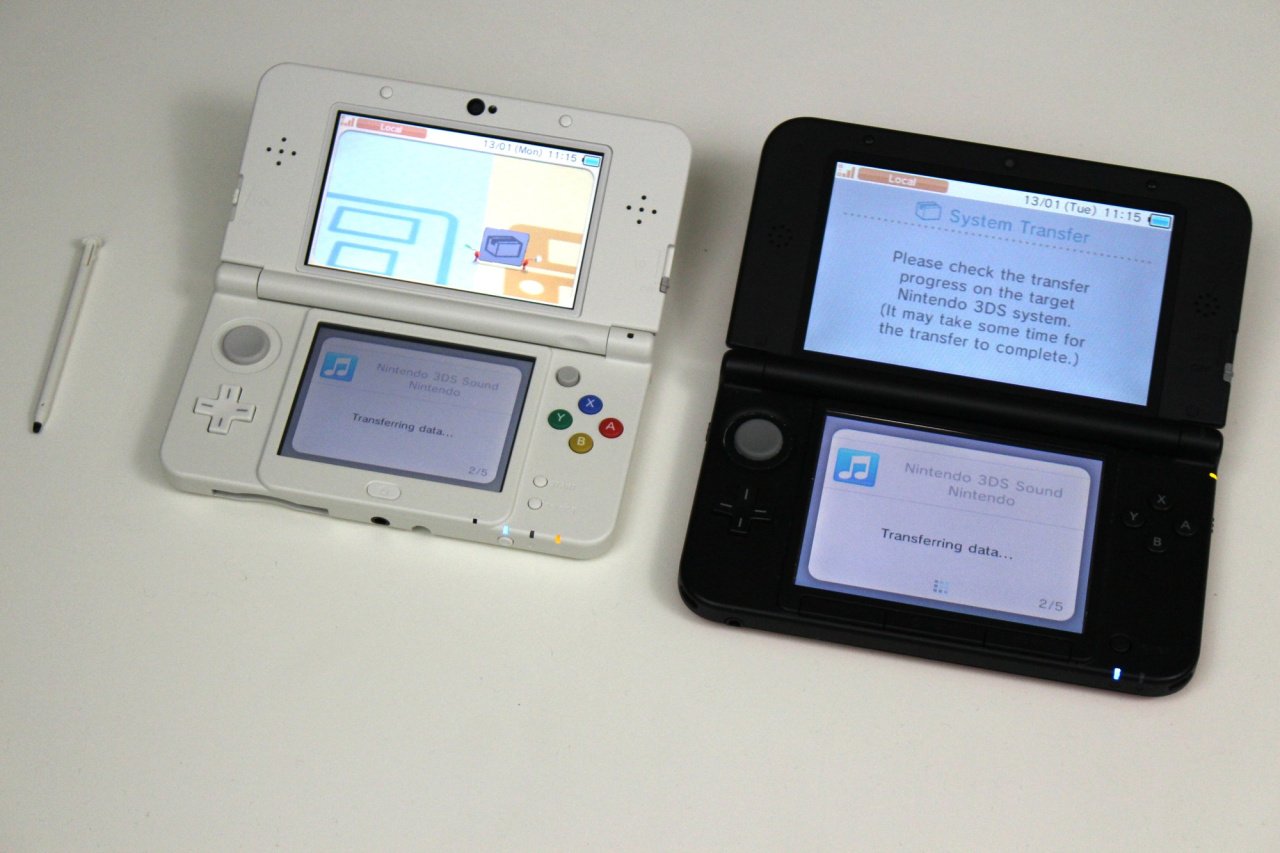
- Go and get a refreshing beverage as miniature Pikmin transfer basic data for system apps.
- Once finished, tap OK on both systems. The old 3DS will be entirely reformatted, just as it was the day you first got it. The New Nintendo 3DS will restart.
- Now, turn off both systems.
- Take your SD card and plug it into your PC. Copy the contents of the SD card onto the computer.

- Now connect your micro-SDHC card to the computer and simply copy/paste/move that former SD card content onto it.
- Put the micro-SDHC card back into the New Nintendo 3DS / XL, boot it up and all of your content, Nintendo Network ID and so on will have transferred. Some demo and video content may get lost in the transfer (but can be re-downloaded from the eShop), but otherwise you should be able to kick off and continue gaming on the new hardware.
- Play video games.
Accessing Pre-Installed Games After a Transfer
If you buy a Nintendo Nintendo 3DS that comes with a game pre-installed - at launch some specific systems come with Monster Hunter 4 Ultimate or The Legend of Zelda: Majora's Mask 3D, varying by region - then it will be wiped as part of the System Transfer process. Nintendo's support page states that you will simply be able to re-download the affected game from the eShop. Simply find the game's page on the eShop and it should provide an option to re-download, or go into Menu / Settings / Other / Redownloadable software.
Finally, below we have Nintendo's official video guide, which is pretty useful.
If you have any remaining questions about the transfer be sure to let us know in the comments below.


Comments 240
So, if you have a micro SD card with an SD adapter in your old 3DS, do you still select Yes at the screen that asks?
But what if I do have a MicroSD card in my current 3DS? (Which is the case I'm in.) Would I tap "No" on the screen that says "Are you using an SD card or MiniSD card with your system? (Please select 'No' if you are using a MicroSD card.)"?
Since I already have a MicroSD card (With an adapter, of course) I feel like the process should be a little bit simpler, since I don't need to transfer everything through a PC. I just take out the MicroSD and stick it in the New 3DS.
My first 3DS: Is there some pre-installed software or files in that 4gb micro SD card that comes with the system (not bundle/LE) that I should copy on my 32gb card? Or I could remove it straight up and put the 32GB card? Should I format first on a computer or the 3DS has it on the OS?
This should not be as hard as it is.
Is there any way to do this when the old 3DS is broken (powers on but just black screens)?
What would I be rescuing if I just transferred what's on the SD via computer? Save data for games?
@ThomasBW84 I guess this would only be suitable if you're have a New 3DS without preinstalled software.
I agree that it shouldn't be hard like it seems, but really, there is no other option. This uses a micro SD card which makes sense technologically, so you have to transfer the data anyway via PC to make it easy, and that's really the only cumbersome part. Then having to download MH4 into the system you just bought with preinstalled MH4 is annoying but I don't see a way around it probably. So I don't blame Nintendo for this. There is nothing you can do to make it easier. Stuff based on SD cards is just that - it's like replacing harddrives. What can you do.
I think I want to do the wireless transfer, to be safe (Also, I don't want to have to buy a micro SD card adapter). I don't mind I'll mind the wait, but about how long would it take to transfer 4GB of data wirelessly?
Thanks guys, I'm going to need this on friday
I got my MM3ds console today, and did the transfer using wireless rather than messing about with the SD cards.
@Nicolai It took me about an hour - i only have 2 full games downloaded though
I then went onto the eshop and it let me redownload MM for free.
Hope this helps anyone out?
@MrJm3 Thanks. I have a lot of little games downloaded, and some paintings I made on Colors! 3D that take up a lot of space, so I'm about full. If it takes two hours, I definitely won't mind.
A very unfortunate transfer process, but it's....something I guess. Just anywhere between 5-20 years before Nintendo catches up to where the industry was nearly a decade ago.
I have a question - On my XL I'm already using a 16GB micro SD card, with a converter. So will it be quicker for me to do the transfer? How will I go about doing that?
Question?
Does anyone know the answer?
Does everything have to be transferred to the new 3ds.
I am giving my old 3ds xl to another member of my family. I don't want all of the games that are on it, but they would like to play them. Can I leave or put these games back on to the old 3ds xl?
Did mine on January 12th (Ambassador) Seamless process. Although, saying that, I had a micro SD card in an adaptor in my 3DS already so that helped. Majoras mask special edition came in the post today but nobody was home to collect it
@Grumblevolcano If it works like 3DS, I signed into eshop before I did a full system transfer on my 3DS XL. It worked fine.
To those who currently have a MicroSD already in their Current 3DS, this is what I saw directly off of Nintendos site:
If you are already using a microSD card with your current system, then you will be able to physically move your current microSD card to the new system. In order to do this, you will need to use a size #0 Philips head screwdriver to remove the battery cover of the New Nintendo 3DS XL, so be sure to have one handy before you attempt to transfer your content.
http://en-americas-support.nintendo.com/app/answers/detail/a_id/13996/~/what-you-need-to-know-before-performing-a-new-nintendo-3ds-xl-system-transfer
@zool It's all or nothing, unfortunately. It would be nice if they let you choose some games to leave behind, but then they may not be able to sell you many copies of the same game.
No USB to backup Micro SD data into a PC? So I basically will need a screwdriver everytime I'll transfer some photos to mu PC? Bravo Nintendo, bravo.
@rushiosan
(http://www.nintendo.com/3ds/new-nintendo-3ds/ - Scroll down to "Easy data sharing")
"Easy data sharing
You can transfer your photos, music, and other files between a PC and your system’s microSDHC** card via a wireless network. No need to remove the microSDHC card!"
Now how this works, I will get that chance once the New 3DS comes this Friday.
New user, I just pre-order a mh4u 3ds bundle but I want to use a 32GB card but the games is pre-installed so How do I transfer the game to the new micro sd card?
@Byron-3D Lucky!
A word of warning about this guide, specifically this bit:
"Now connect your micro-SDHC card to the computer and simply copy/paste/move that former SD card content onto it."
Absolutely do NOT just do this. You have to initialise the new card on your 3DS first, then merge some of the folders from the old one with some on the new one (and they're specific folders - so be careful).
If you don't, and the official Nintendo guide doesn't do this step either, you may find data goes missing. Stuff like some game "extra" data, photos, streetpasses, progress in Streetpass Quest, some game saves, some downloaded content, etc.
What if i were to use wireless transfer though? I can wait 24 hours, i dont care as long as i dont have to physically remove sd card(s) and use adapters i dont have and whatnot. By doing a wireless transfer can i skip removing any sd-cards and itll transfer the data that way?
Edit: im a physical gamer anyway so all that would get transferred are a few vc games and saves..
@Nicolai Ages. I did the PC transfer, which took 15 minutes to transfer 40GB of games.
@Grumblevolcano If you have pre-installed software you can just go onto the eShop after the transfer and re-download. I'll add that in
@DDStuff It essentially turns your 3DS into a NAS. Unfortunately the version of the SMB protocol they decided to use means you can't access it with a Mac. And it's really sloooooooow.
@rushiosan I transfer photos by emailing them from the 3DS, or by posting them on Tumblr. You'd need to take the card out to properly back it up every now and again though.
So just to confirm (because I've seen a few people asking)..
If I have a new console that comes with Monster Hunter 4 pre-installed, and the first thing I do is swap out the standard 4GB card that comes with the console for a formatted 32GB card, then perform a transfer, the eShop will still know that and allow me to redownload it again once the transfer is completed? There's no requirement to transfer something form the 4GB to the 32GB before you start the transfer?
@Maxmike33 You don't need to - you can just redownload it from the eShop.
@jshcamisado If the only thing on the card is MH4 and you don't care about keeping anything else (or your MH4 save), then no - you don't need to do anything else.
I always wondered something.
Is the data saved/created/downloaded like eshop games on the 3DS you will transfer will be deleted?
One of my friends has a 3DS that he barely uses it at all, and he has the ambassador games.
Wondering if its possible to bring them over to my 3DS and keep my current downloads.
@deKay
The 4GB card will have MH4 pre-installed, and I want to put in a new 32GB card that has nothing on it BEFORE I actually perform the transfer to move all the stuff over from my current 3DSXL. I'll still be able to re-download MH4 from the eShop once all the transferring is done?
@Funbunz I though so. One reason why I am against downloading games. The two games Animal Crossing and Prof. Layton were free reward games which I did not like after giving them a go. Had I paid for them, what a waste of money that would have been.
With hard copies At least I can give them to another member of the family. Or would Nintendo rather each person in the family download their own copy?
If I download a movie the whole family watch it.
@jshcamisado Yep!
@deKay
You are a wise scholar of our times and you have my gratitude!
Srsly thanks <3
Hello all,
I've added a section for those with bundles that have pre-installed games (thanks @deKay)
@deKay I believe at the point you do this (after the transfer process already has done its thing and completed the main phase) the initialisation has already been done (at least that seemed to be the case for us). I think that's the whole point of what it's doing once you've selected the PC transfer option.
Happy to know what step's missing though
Hey i just thought of something!!! Can i delete all games (redownloadable on my current 3ds) and then do a wireless transfer (3ds to new3ds) ? That would transfer my saves, my nnid AND my purchase history/redownload list RIGHT? And by deleting the games the wireless transfer would be a lot faster.
@mystman12 Absolutely, select No, as you'd simply be moving it across (sans-adapter) to the new hardware through a different process.
@ThomasBW84
Can you help us out regarding those who already use a microSD with their old 3DS systems (through SD adapter)?
someone mentioned that I can simply move the microSD to the new 3DS system but didn't explain the details about system transfer.
@Xenjamin That's really smart!
@H_Hunter I've updated that section. If you do have a micro-SD card in your old 3DS (it never occurred to me anyone would, the internet's always handy for that) then you answer No at the appropriate time. The process is actually a bit easier then, as there's less messing about and copying of files.
When I chose No by accident, though, I had a bit of a sweat on before I managed to salvage the situation
Has anyone else transferred wirelessly? I've seen two differing reports on how long it takes. One person said 4 gbs took about an hour. Another person said 4 gbs took closer to 5. That seems insanely long.
Can anyone else who has done a wireless transfer remember how long it took?
@deKay
I think you might be mistaken telling people to not copy SD contents. The contents of your current SD card are what they are. When you copy the entire root of the SD, you're getting everything. Nothing is being changed. It's the exact structure currently in use, and will continue to work as the structure in use on the new card.
I've copied content from SD to SD more times than I can recall. There's nothing to worry about when transferring the data. Any content on the new card will be overwritten by the old.
The card does not get formatted by the 3DS, so any "initialization" would simply be the 3DS writing some core files for use with the system. But by copying everything, you're getting those files already. And even if you didn't, the 3DS would simply detect that and re-write any needed system files.
@Klimbatize
I've transferred wirelessly at least 3 times and I can tell you this article is definitely not accurate with regards to wireless transfer times, unless you have prehistoric bandwidth of course. From personal experience, I transferred about 100+ games' worth in half an hour, give or take.
I have 60mbps bandwidth speed, just so you have a frame of reference. If you're in the US, I think 60mbps is the slowest speed you can get through Charter now, so I imagine most would be able to transfer in a similar time frame. Of course it will vary slightly from person to person, and I'm not sure if speeds in Europe are as fast. Even so, I find it hard to believe it would take "hours" anywhere provided you're not using dial up or something.
Just got my new 3ds with mm, will I have to wait till Friday to re download it or is it on the e-shop now?
Thanks you @deKay
@CaveDweller I recently got myself a microSD card for my old 3DS XL.
The process is much easier then doing the transfer from an SD card to microSD. Like the Step-by-Step above where it ask's if your using an SD or miniSD card you'll select "NO" because your already using a microSD card. It really is poorly worded because it's asking you what your old 3DS is currently using.
When you select NO, the process is truly easier because your doing a regular transfer. I don't believe the PC is required at all since you simply switch the MicroSD cards from both systems just like you would when upgrading from the 3DS to 3DS XL.
If you have the bundle of MH4U or MM(some regions have MM included) and you do the transfer you'll need to re-download the game no matter what. It's just very important that on your New 3DS XL that you "DO NOT" create an NNID account when you start up the system. Your current account will transfer over and the game MH4U or MM will merge with your account.
Question!!
I sold my Nintendo 3ds xl and will buy a new one at 13... What can I do if I want my downloaded games again??? Need you help plx.. I didn't know about it.
@Zyon
Ah, I was hoping that would be the case. Much appreciated!
@JaxonH Sorry to disagree, but I disagree. What you're saying is logically true, but isn't actually the case. I have first hand experience (several times over) and have helped hundreds (literally) of people recover missing data by re-doing the SD transfer but using the initialise then merge folders method.
@JaxonH 60Mb! Luxury! Mine's 3
@deKay Yeah, but how long is ages? Not thousands of years obviously. For those willing to do the wait, we'd like a rough estimate.
@Nicolai Depends on the speed of your card, speed of your wireless, speed of your internet connection, and how many files you have (and how big they are). I saw someone on Twitter transfer a nearly full 8GB card and it took more than 6 hours. Also, if you have some DSiWare titles, they transfer separately and seem to take longer (despite being generally smaller).
@asgarod21 They're all gone. You can't get them back unless you beg and plead with Nintendo.
will a SanDisk Ultra® PLUS microSD work for the new 3DS and/or xl systems?
@jshcamisado If your simply wanting to upgrade to a 32GB microSD card, might I suggest putting that in your old 3DS first. Whether your already using a microSD or not, having an microSD card in your old 3DS before the transfer will actually make the process a lot easier.
The PC isn't required when transferring if you do this. It'll just be a regular transfer by switching the microSD cards then going through the process of using the PC to move everything.
@majinx07 Yes, but you'll need a microSD to Sd adapter for a normal 3DS or 3DSXL.
Every one of these NEW 3DS articles is like a danger in the heart, knowing that my order was screwed up and I wont be receiving mine for a few weeks. Yet I still read every one in anticipation! Haha
There is no way to do a data transfer from a 3DS xl onto a New 3DS xl without a computer?
Nintendo gaming has become PC gaming
@deKay
Oh dear. I remember back when speeds were only 3mbps here. Now you can't get slower than 60 unless you go DSL. They already offer 100 and are building high speed fiber optic network to bring even higher speeds in the future.
About the SD cards, not sure what's going on there, but I do know that copying the entire root is the same thing as using the same SD card. For data to go missing it would have to actually be deleted from the card by the new 3DS. It's possible I guess, no technology is perfect, but I would think that sort of thing would be pretty uncommon.
Complicated process but at least it beats sending the thing back to Nintendo to do the transfer for you. Fortunately with an account system already in place, you would think Nintendo would had just let us transfer our account to the new system rather than just remove and copy every piece of data.
@asgarod21
Dude, did you really sell it before transferring? All your stuff is gone man. Sorry!
@JellySplat what happened with people who the 3ds is broken or something?? Are the stuff gone too? This is crazy!
@JaxonH The data doesn't get deleted - the 3DS just creates a new folder for it but doesn't move it in there. I don't know why it does this, but it does. Some of the data is something you might never notice - some street passes, or extra data for a game you no longer play, but plenty of people HAVE noticed, and merging the folders fixes it.
@asgarod21 Yes, the situation is that all downloaded games can only be played on the console they were bought on until a system transfer is done of which then it's only playable on the target console.
@asgarod21 If it's broken Nintendo either repair it or replace it and transfer the licences for you. If it's stolen and you provide them with a crime number, they have been known to transfer licences then too. If you sold it, it's gone.
@asgarod21
Depends on what breaks. If you drop it off a cliff, and the central processor breaks, then yes. That's why I don't go rock climbing with my 3DS lol! IDK if Nintendo can help you, but you can always call them. Did you delete the NNID on your old system? If not, (and assuming the new owner hasn't) then there is a chance that they could transfer the NNID over to your new system, and if you transfer the NNID then you'll get your games back, in theory.
Good luck! Call them ASAP if you can.
Does the 3DS to New 3DS tranfer also all DSi data or we need to do another tranfer?
@asgarod21 It's not gone. You have to call Nintendo and ask them to release your Nintendo Network ID from the old sold system. They'll do it and it takes about a day. Then you can sign into the new 3DS with your NNID and redownload your games. I did this process just a few weeks ago when i replaced a lost/stolen system and it was seemless. I have all my games i had bought from the eShop.
Call them and request a transfer when you get your new system.
@JellySplat yes I deleted my NNID on my old console cuz I thought that I can continue using the same NNID and password on my new console .. Well I'll call Nintendo tomorrow... I hope they can help me!! I bought a lot of games.. I'll be really angry if can't get them back.
@ericwithcheese2 thank you so much .. I have a new hope... Do you think is it a good idea to said that I sold my old 3ds or that I lost or something?
@DarkEdi It transfers the DSi data too. If you do it via the "PC" method it actually transfers the data from the system memory (where DSi titles live) to the SD card, and then from the SD card into the system memory of the new 3DS.
Good guide!
Guys, don't erase nor format your old 3DS, after the transfer the old system will format anyway.
I assume DSiWare games and Ambassador games are transferred to the New 3DS, is that right?
@VanillaLake Yes for Ambassador games, I'm unsure about DSiWare(I'm sure someone else can answer that instead).
All you simply need to do is go through the transfer process. Depending upon which option you choose from they'll be set up on your game already or you'll need to redownload them again. Since your NNID account transfer over to the New 3DS XL you'll be able to redownload them all by going to the eShop and going to your account settings.
Just note when you start up the New 3DS XL "DO NOT" create or sign in with your existing NNID you will screw up being able to transfer between the systems.
@asgarod21
Man, if you deleted your NNID, then there's most likely no chance that you'll get your games back. Sorry...
But whatever the outcome, I must ask that you tell me what happens! I've also thought about deleting my NNID for my own reasons, and if your able to get them back I'd love to know!
The only downloads I don't want to lose, are my Ambassador Program downloads,
@asgarod21 It shouldn't matter. I said i lost mine, and the guy cheerfully offered to move my id over.
Although if you actually deleted your id ... not just did a system restore/reset, then it would be unrecoverable. A screen would've popped up and mentioned that you would not be able to recover your stuff. if you just did a system wipe, the ID is still active on their end and they can transfer. If you deleted it, then it's actually gone completely.
.
@Zyon @deKay
I do have an microSD card adapter. Would it be easier for me to transfer from my old SD to microSD in my current system first?
@jshcamisado yes
@deKay
Ahh, I see. Gotchya. I've never had that happen but it sounds like something that could happen.
@jshcamisado Yes, and in return it will make the transfer process a lot easier. Like I said your just doing a regular transfer by switching the microSD cards
Since you already have an adapter just simply move the files from your SD card to the MicroSD card w/adapter using your computer. After that put the microSD card w/adapter and put it in your old 3DS. When your New 3DS XL comes just do the transfer and switch the MicroSD cards.
To me upgrading the New 3DS XL's microSD card before when your old 3DS still has an SD card is just adding more work for you to do.
@JaxonH
Even if you got 100 Mb internet is Waste (for 3ds ofc)
Because 3ds/new 3ds only supports wifi "g" (technical speed limit is 54 mb, in theory its about 20-24 mb per secound (2,5 MB -3 MB per second)
So slow.
@Zyon Thanks. This is the most complicated systems transfer ever. Now I only need that screwdriver, I think it should have been included with the console. I hope to find one easily (locally).
@grumblebuzzz "This should not be as hard as it is." I'm pretty sure Nintendo agrees with you. But, you know, pirates.
@DontPlayDumb
Ya I know the 3DS has a slow internet speed, but home speed has to factor in because I can transfer my entire system in half an hour while others are claiming it takes them hours, and I'm probably in the top 1% in terms of sheer amount of content on my system.
But ya, that's one of the reasons I'm looking forward to the new3DS- the current model is SO dang slow lol...
So I would just hit "No" on the screen that asks if I'm using a standard SD card, since I'm currently using a microSD card in an adapter. So once they're done transferring, I would just take my microSD card out of the adapter and just plug it into the New 3DS, no PC required. Am I understanding this right?
@TossedLlama I predict even more complaining that the new 3DS they bought isn't a New 3DS, and trying to complain to the hapless staff in Game that there's a difference between a "new 3DS" and a "New 3DS". Stupid naming. In 10 years time it'll still be called "New 3DS" even though it'll have been superseded at least twice by then.
I'm getting the MM N3DS XL Edition, with MM3D pre-installed. I'm also getting the MM3D SE physical copy, so I don't actually want the digital version. Is there any way I can just give the digital copy to my girlfriend for her 3DS, or will I be stuck with it?
I got my majora's mask one today but can't get the back off. Anyone have a dummies guise of how to do it. I've used a Philips 0 and Philips 00.
@VictoryStar06 you just unscrew the two screws. Or am I missing something?
@Crimson_Ridley If she has a New 3DS or New 3DS XL, then you can do a system transfer from her machine to your new one, then wait a number of days (I think it's 14, but not sure) before it will allow you to transfer it back to hers complete with the game. If she has a "not New" 3DS/XL then you can't do this as you can't do a system transfer from the New 3DS to the not-New 3DS.
@TossedLlama I'll stick with the ORIGINAL name - Sega Megadrive
@deKay She has a 2DS, so that's a bummer. I guess I'll give her the cartridge and I'll just have the DC. Why couldn't it just be a code like with ALBW...
I think they should create a proper accounts system, to access games on both consoles if I own two, and to avoid all this. Puts me off buying digitally from Nintendo anyway.
can i load up my new micro SD card now? like, before I buy the new 3DS?
What's the "limited transfer" option do?
@gojiguy yes.
@DL-6 transfers data and licences, but not the actual games. You have to redownload them.
@Crimson_Ridley because everyone was selling them on eBay
Hi Guys so my ambassador 3DS micro sd card slot doesn't lock the card in and keeps popping out. im tempted to open up that gate and fix it myself as i have to wait for it to be released before i can send it off for repair
but i can't wait..... should i do it myself or wait and send it lol
@deanwig if it's a pre installed copy you'll be fine.
@deKay Thanks, when you say data do you mean just things like streetpass, or eshop game progress too?
@DL-6 I don't know for certain, sorry. I'd expect it to be licences and Streetpass stuff, but who knows?
@JaxonH Thanks for the info.
@deanwig
Did you get an answer to your question?
When I receive my New 3DS a month ago, I only had to run the system transfer like a 3ds to another 3ds because I was already using a Micro SD in my 3ds xl.
@DarthNocturnal
im with you on that one! I'll do it the wireless way since its the easiest and i too havent got a lot of stuff on mine (physical gamer.)
The SD card I'm using currently is 16 GB capacity, but I actually have less than 4 gigs of stuff on it. Will I be able to transfer to the 4 GB microSD that comes with the system, or do I HAVE to get a 16 gig micro?
@emayer I had the same question... I doubt it will matter though
@deKay
There are ways to us most SMB device with OSX; version 2 is the default, but version 1 is still there- you just need to manually connect with CIFS
http://www.tuaw.com/2013/10/27/did-mavericks-kill-your-network-drive-access-heres-a-fix/
Ouch.. 1 hour for 4gb? I was gonna do the wireless transfer, but i probably have more like 20-30gb to transfer, i dont own a SD card adapter.. guess its gonna be a long friday.
Despite my usual grumpy butt attitude, im really excited to pick up my MM 3ds this week! (And the game itself of course lol)
I hope Nintendo has lots of extra staff on hand in their technical support call centers, because they're gonna need all the help they can get.
I seriously also hope that Nintendo's next systems are infinitely more user friendly when it comes to this stuff. It's such an unnecessary hassle.
@ThomasBW84 I'm getting more and more confused as I read more about this as people keeps giving away different information.
I'm already using a 32g Micro SD card with my old 3DS. I'm getting the Majora's Mask Limited edition that comes with the game pre-installed. Now, if I do the system transfer and select "No" when when asked if I'm using an SD card with my system (as I already use a Micro SD card with an adapter), will I be able to redownload Majora's Mask after the system transfer is complete?
Is the Animal Crossing saving data issue true? That you have to delete the game from your console and create a unique save data backup (that from what I hear can't be made in any other way, as far as I know it only goes for Animal Crossing and Pokémon) before you transfer the games to your new console, if you are going to use Wireless Transfer (Limited Data) and maybe other Transfer methods as well? I'm not too concerned if I can put my current Micro SD card in my New 3DS, but I know others wonders about this as well...
Is the second wireless transfer option just save data? How much time should that typically take if you have nearly 4GBs of game content? I don't mind re downloading all my eShop purchases on my own time. But I really need an efficient way to transfer at the place I'm trading in my old 3DS.
So when I got my XL, I did the transfer from my old 3ds to the XL where my old 3DS has the 32 GB card and I put that card to the XL.
So now when I do the transfer from the XL to the new one, do I have to say yes to the old one that other SD cards were used or just say no?
@Jim_Purcell The second option is basically sending your NNID account to the new system and then you'll need to redownload everything again. It'll be faster as far as the transfer goes but yet you'll need to spend the time redownloading everything again. If that's not something you mind doing then go for it.
@Artwark It only asks that question on the system your transferring to, in this case is the New 3DS XL. You say yes if you upgrade the pre-installed 4GB micro SD card to a larger card.
Considering you say that you have a 32GB SD card right now you probably already know that you need to pick up a 32GB micro SD card, yes?
My suggestion when you do, is to go ahead and upgrade your old 3DS's SD card verses upgrading the New 3DS XL's micro SD card before doing the transfer. This will make the transfer process much easier. To upgrade simply do the same process of moving files from one SD to another, when you buy the micro SD card your should also get an SD card adapter use that for both your computer and old 3DS. Once you've done that and have your New 3DS XL start the process and when it ask's you if your using an SD card or miniSD card select "NO" because your using a micro SD card. The process should then be like a regular transfer by simply switching the micro SD cards and boom your can play. Much easier messing around on the computer now verses doing it later during the transfer, imo anyways.
So I only plan on downloading a few of my games to the New 3DSXL (MH4U version), so I'm thinking I'll just do the low profile transfer to get my saves and account over, then take the 4gb micro sd out of the system, back up those newly transferred files to a PC, then move em into a 32gb micro sd. Would this work? I don't mind downloading the games I want to. I just want my saves and account to move over.. And preferably not have to redownload MH4U..
Oh, I didn't know one has to open the back plate to get to the SD card... Scratch that, I'll stick with my old 3DS. I want to be able to take out the SD card on a whim, just like with any other digital device that has offered memory card support over the past 10 years...
Oh, it does say "SD or mini SD" versus "micro SD", so it may be something one glosses over if one reads too quickly. Certainly, it's something that someone who is not tech savvy might not be keen about. The instructions all make perfect sense to me. If you don't know the difference between mini and micro... well... micro is smaller than mini. I'm pretty sure that's taught in high school geometry...
Can you use 64GB Micro SD?
Hmmm, so if i don't want to transfer over my old data, but i wanna use my old nnid on the new system, what do i do?
@GamerFromJump Yes but you have to convert it to FAT32 format first.
@tux_peng Yes, I know about that - it still doesn't work. Can't connect from my Yosemite Mac, my Mavericks Mac, my Snow Leopard Mac, either of my two Linux boxes, or my Synology NAS.
@xelloss remove your NNID on your old one, then add it on your new one. You'll lose everything tied to it on your old one, though.
@PlywoodStick With a 64GB card you'll never need to take it out, unless you want to back it up.
@deKay thanks! Does that mean I'll be unable to access all my downloaded games on my old 3ds once i remove the nnid?
@oHOWEo Did it last nite & just went to the re-download section on the e-shop so all is good
@xelloss unless you actually do the transfer (rather than just remove and add the NNID) you'll be unable to access anything on either.
Oh Nintendo, why do you make things so awkward?
I just randomly clicked next until I had all my games and savegames on the N3DS. No problems here.
@deanwig
Awesome, Im hoping mine tips up today
Phew, so no new download of each and every title needed like on the Wii U. That's quite a relief.
So, my old 3DS will be formatted. That's very sad.
I just realized Nintendo is launching the new 3ds here in the states on Friday the 13th. I'm not superstitious, but it seems like companies normally avoid that sort of thing.
@mjc0961 My daughter does stop motion animations with it.
@Phle Ok, I've added a new section that I hope will help
@MrJm3 Good to know. I plan on transferring wirelessly. I only have about a dozen or so little Virtual Console games downloaded. No full retail games. So I'm hoping it doesn't take more than an hour.
@ThomasBW84
wait, does it delete your New 3DS' data BEFORE you even perform the transfer?? So before I even do anything I should put all my files from my original 3DS SD card to my PC... Then select PC transfer, let it move the basic apps, put my stuff on a new 64/32GB micro SD, take out the 4GB from the system and replace it with a new 64/32GB microSD? I really need to know, because I'm worried I'll screw something up and lose Monster Hunter in the process.
@Ps4all Friday the 13th isn't that bad, I join this site on Friday the 13th too and I'm glad both Majora's Mask 3D and New 3DS launch on this date.
I can see why some people defend Nintendos 'online' 'account' 'system'? This is much better than using the Cloud and being able to just deregister one system then activate another
(Falls off chair laughing)
Currently transferring, and dear God is this a slow process. Been sitting here for 15 minutes and it's not even close to 25%.
I also heard that it doesn't transfer save data. Is this true? I don't want to lose all my game progress.
@deKay That's exactly what I want to do, and then some. It would also be tedious if every time I wanted to change up my music files in the Music app, or pull off a document from the root folder, I had to reach for a screwdriver. (Remember, the more stuff you put onto the 3DS, the longer certain apps take to load, long before the data storage cap is reached.) Not to mention, I have taken 100's of pictures with the 3DS... ever tried deleting 100's of bad/obsolete photos in the 3DS Camera App? I certainly wouldn't, so a computer is needed to sift through them.
Even these are just a few of several examples in my case. I'm kind of OCD when it comes to things like this, enough so that this is one of the dealbreakers for me to not get the New 3DS and just stick with my 4 year old one.
@PlywoodStick I am genuinely amazed anyone uses the music app I've hundreds of photos too, but I've plenty of space on the card (and due to the low resolution they're minutes anyway) so I just leave them on.
Anyway, if you think that's bad, you never have managed with the Nokia N-Gage!
@Yosher Depends which option you chose. If you migrated to a new microSD first then did the system transfer using the "Copy via PC" option you'd have been done in minutes.
@JaxonH Over on the east coast, especially around Washington, D.C., Comcast rules a lot of the telecommunications territory around here. My current MBps is about 22 MB/s (which is about the national average according to independent speed testing sources), and the average for those with Comcast is around 27 MBps. That being said, Comcast is notorious for rampantly imposing bandwidth throttling without the consent or knowledge of the customer. Most of America has really, REALLY crappy internet service compared to other highly industrialized nations, with many places having no alternatives to the current monopolies. (Until government-run or Google fiber optics are laid...)
@deKay LOL one of my childhood friends had an N-gage, it was.... an unforgettable experience, shall we say.
@PlywoodStick
And here I was hoping to see Comcast move into the Midwest to compete with Charter :/
Guess I had it better than I realized. Nobody likes Charter, or the monopolies of cable/internet, but I do admit their speed last are nice
@JaxonH Yeah, even if you do have a monopoly in your area, at least it's the (relatively) good type of monopoly.
Is it necessary to use a micro SD card for your New 3DS that has a higher capacity than your old SD card? Because my old SD card's 32GB, but I plan on using a 16GB micro SD card for my New 3DS (which is plenty of space for me).
In case there are a few DSiWare games and apps available on the old system's native memory (due to the fact DSiWare cannot be launched directly from the SD card), it is imperative to transfer all DSiWare to the SD card prior to transferring system data between old and New systems?
@CB85 Nope, as long as you haven't used more than what that 16GB requires, it's fine. Just keep in mind that when you do an SD or miniSD transfer to microSD, you may only keep certain downloads (e.g. Streetpass) and game save data, so you may need to download your games from the eShop again.
@Fuz After it had done it's thing and the old 3DS was effectively wiped, I followed the New 3DS instructions while it moved my DSiWare. When it was finished I turned it off and shifted my SD content to the PC, then moved it from PC to the microSDHC. Luckily it seemed to work, as I guess enough formatting had been done. When I had moved everything and turned the New 3DS it was all fine.
So try finishing up and then transferring the SD data. I hope it works for you.
Will the connection be disrupted if I close the 3DS during a system transfer? I usually get burned in pixels when the screens displays the same thing for a while, and would like to avoid that.
"Wireless is a poor option, as it takes an exceptional amount of time for the two systems to transfer everything locally". How much time is "exceptional amount of time"? Minutes?, hours?, days?, when I retire?. Please tell me,
Worked great! Thanks for the article.
The hardest part for me was getting those darn screws out.
I chose the wireless option. Damn it's taking a lot of time. Still transferring at this time of writing (it's been almost 2 hours now).
So let me get this straight, I took the SD card from my old 3DSand copied the folder Nintendo 3DS on my computer. Then I took my Micro-SD card and put the folder on it. I tried it on my old 3DS and everything was there. Tomorrow when I get my New 3DS XL, when I put in the Micro-SD card will I have to do something else or I'm done?
@MrJm3 Hi! Any idea how eShop knows you have MM linked to your account if you never link it before system transfer?
I guess I'm just irrationally afraid of erasing the micro SD data and then not being able to download MM
@stevie123c my understanding is that when you transfer your network id it links everything on the new 3ds to that account ... Unless you have already linked it to a new network Id then you would lose it. the only reason you need to redownload it is because it overwrites the new sd card with a your old data
@stevie123c When doing your transfer it probably notices the preinstalled game is there (and there is some coded indicator as such) which attaches itself to your account ID when it transfers over.
My god the transfer is SLOOOOOW....
@Jim_Purcell Thanks! I'll find out soon enough how irrational my fear is either way
So the system transfer happens after the wireless SD data transfer?
Do you keep your game save data afterwards?
@jenkje it depends on how much data you have downloaded on your 3ds.
Transferring now! So excited! The super-stable 3D is awesome. One problem with the instructions though...I went to my fridge to find a refreshing beverage as they recommended...but there was no Coke...I thought NLife somehow was going to come through for me with that.
@ThomasBW64 and
@deKay I've got a problem which I've attempted to sort out unsuccessfully twice, and I'm wondering if you or anyone else here can advise. I'm thinking of getting a New 3DSXL in the next few weeks, and as I have a free 32GB micro SDHC and adaptor, I thought I would transfer my games from my 32GB SDHC card in advance. In the past I have transferred my games from my first 3DS to my 3DSXL, and upgraded from an 8GB to the 32GB card with no problems. I have about 15GB needing transfer, so I have to go for a 32GB micro SDHC.
When I transfer my games from the 'old' SD card onto my PC, I get up a Windows 7 message at the end of the procedure saying something like "some of the file names are too long to transfer successfully". This is the folder created by Nintendo with all the game files, and clearly I have no control over those. I've done the transfer twice, and the first time I clicked on "Skip" in response to the message, rather than pressing the "Cancel" button, and the second time I just closed the window down. I have had this sort of message before when ripping and transferring music folders, and I think I may also have had it on occasion with Nintendo files when backing up in the past, but it's never affected the end result.
This time, having transferred the files onto my SanDisk Ultra 32GB Micro SDHC I, and put it in the adaptor into my 3DSXL I get a "this file is corrupted, please re-download the game" on the 3DSXL screen when I try to open a game after booting up. The background wallpaper also disappears. This has happened on both occasions I've attempted this. I have used the recommended up-to-date SD Formatter and performed a full format to FAT 32 on the micro SDHC on both occasions. The 3DSXL is quite happy when I re-install the original files on the "old" 32GB SDHC
Maybe I'm using an incompatible micro SDHC, but the warning I get about "long" file names makes me suspect that is not necessarily the cause. Any suggestions? I will need to email Nintendo Europe regarding this problem if no one here has any suggestions, but I thought it was worth asking first. Many thanks and sorry for the lengthy post.
I had to go buy a little screw driver just now because my dad took the only one we had out of town with him..
I had a little bump during my transfer in the form of a disconnection in the final stage, but I restarted everything and tried again, and it went through the second time. Nothing was lost, thankfully. System transfers sure are stressful
I got the mh4u new 3ds with the game pre-installed, did a system transfer, and tried to redownload the game, but It says I don't have enough space.... I tried deleting what I had on my old SD card but it still says Im at 6k out of 20k blocks, so I don't know what to do. If anyone knows whats going on here I'd be thankful if you could help out.
edit: I just formatted system memory and I still don't have enough space...
My micro card reads everything EXCEPT FOR:
DSiWare
Themes
Cant download from eShop
Can't play any games, all Home Screen Icons are there, but it says I need to go to the eShop and redownload everything!
What the loveyduvywuv Nintendo!
Why did you screw this up so damned bad this time!
everything transfered except smash bros...so mad right now. was super excited to use the amiibos, and i've lost all that data......crushed
and of course, it wont let me re-download smash bros either, or any of my games for that matter.
tempted to return this and just call it quits on the 3ds...
Well did the transfer and it was long even using my PC and I had only 6.75gb to transfer. Oh well everything is there so I'm good to go. Just finished charging my new red XL so it's MH4U time!
Thanks for the guide! Transfer complete.
New Nintendo 3DS Cover Plates No.056 (The Legend of Zelda Majora's Mask 3D)
http://bit.ly/1D72vG8
New Nintendo 3DS Cover Plates No.057 (Pikachu)
http://bit.ly/1KVioP4
New Nintendo 3DS Cover Plates No.058 (Kirby)
http://bit.ly/1zTio0h
^ Not cool.
Transfer complete! Had a micro sd in my original system so it was painless. Removing the back plate however, was a nightmare. I was scared I was breaking it xD redownloading MH4U now.
Transfer complete! Had a micro sd in my original system so it was painless. Removing the back plate however, was a nightmare. I was scared I was breaking it xD redownloading MH4U now.
Super infuriated!!! Followed everything here step by step (beverage included) and could not get any game to show up on my menu!!! All the folders were in tact but no game could be found. When I'd go to system menu and look up software info, there were no games to be found. Strangely, there was a 32 GB SD card plugged in and the memory space that it should be taking up was there, but no games!!!!!!!!!!
Any help
Nintendo Customer Service was supposed to be there until 9/9:30pm
I could not get a hold of anyone, call or chat since 6pm...
WTF is wrong with nintendo?
I now have an empty 3DS XL and a =NEW= XL that I can't do anything with!
I am so damned frustrated!
So I just finished transferring my old 3DS XL (with 32 gb SD card) to my New Nintendo 3DS XL(with 32 gb microSD card). The problem is, none of my eshop games show up on the New Nintendo 3DS XL, but my home screen settings and folders are how they were. Also, I lost the majority of my StreetPass puzzle pieces, but the actual Miis I Streetpassed still show up in my Mii Plaza. For example, the New 3DS XL/Majora's Mask Reggie from Spotpass is there.
So what happened? Do I have to redownload everything I ever purchased from the eshop? And are my Streetpass puzzle pieces just gone forever? Is there an easy way to see what eshop games I have purchased already? I've purchased so much that it's hard for me to remember every title I bought.
Thanks.
Ugh. So I redownloaded Animal Crossing New Leaf. But all my save data is gone-- I have to start over! Yuck. What did I do wrong? Why did only some of my data transfer? The number of coins I have and the number of steps I walked transferred over, but none of my games or apparently, my save data. Is there any way to recover that?
I'm totally lost. I have a 32gb micro SD on my Old XL. When I do the system transfer, where does this SD card need to be during the transfer? In my old 3DS, the New 3DS, or out entirely?
@topperware @idork99 I have the same issue. I had to redownload all my games, but all my saved data is gone. I did everything I was supposed to do
I wish that I did the wireless option. Only my folders show up. No themes no games and no save data. The pc method sucks. Can't get ahold of Nintendo and no one on here will help. Whoever created this guide should do something in the way of advice.
Crap my street pass data didn't transfer properly. It said something about checking if the micro sd was write protected. Lost several puzzle panels entirely. Am I screwed?
@topperware Same thing happened to me! I lost several of my street pass puzzles entirely. Though I kept the original 5 or so. If you figure out what the solution is please let me know and vice versa
I did it without a PC. It may have taken a fair amount of time but at least it was hassle free.
@idork99 @topperware @DanielHPoetry @Bizzyb
Oh my word this is getting increasingly annoying as I just redwnloaded some of my games and all the save data is gone. Why is this happening to everyone!
@Danny429 @topperware
Ok guys I figured it out! At least, this worked for me. Go into your settings and data management, connect to your pc and change your Nintendo folder properties by unchecking "read only". After the settings changed, your New3DS will automatically reboot. And hopefully your will have your data available. At least, for me, all of my puzzle swap data returned
@Bizzyb did your game saves comeback too?
@Danny429 My game saves were never an issue. Did you make sure to replace the "3DS Folder" Completely with your old 3DS folder? If you place the old folder "inside" the new folder it won't work. You have to replace the entire folder.
@Bizzyb i still have the original data on my laptop. Should I just replace all the data on my microsd card with that data again?
@Danny429 Yes. Copy your original data and paste it into your Micro SD card. Completely replace the 3DS folder on your micro SDcard with your original "3DS folder". That's what I originally did to fix it and it worked.
@Bizzyb I already redownloaded smash though, will that affect it?
@Bizzyb Thanks for the tip! I'll try this when I get back to my laptop.
Here's hoping that the "READ-ONLY" was the problem!
Nope, that didn't do it either
AAAARRRRRGGGGGGHHHHHHHHHHHH
@Bizzyb See, I did say this sort of thing happens if you don't do the merge folder method...
@me78910 Monster Hunter 4 Ultimate does take up most of a 4GB microSD card's space so really if you're downloading anything digitally you'll need a larger microSD card with the only issue being that removing the back panel is frustrating.
@Danny429 Idk why it's happening but it's completely discouraging. I have hours of gameplay that DO NOT want to start over! It makes me not even want to play again.
@Bizzyb connect the 3DS to the computer?
Mine worked flawlessly (wireless) but it took SIX hours! WTF was it doing?
@Bizzyb said: "Did you make sure to replace the "3DS Folder" Completely with your old 3DS folder? If you place the old folder "inside" the new folder it won't work. You have to replace the entire folder."
I think that's where I made my mistake. Now, I'm reformatting the SD card and doing the "Re-download everything with saves erased" option after talking to a Nintendo rep. I tried to explain that the game files were in the micro SD card but I could not open them on my N3DS. I thought maybe it had to do with my music files so I erased them all. Then I started clicking through the folders and did see that when I clicked open my "Nintendo 3DS" file, there was another file with the same name in it. I know the guide here stated to just drag the files from the desktop to the micro SD card but I don't recall if there was any indicator of erasing the folder "Nintendo 3DS" from the micro SD card that you remove after system transfer is complete through the systems. Oh well, my SD card is halfway through the formatting. Let's see what I can do to retrieve my precious little games back. Because it is all about the games. Without the games, it's just a shiny new cool looking machine #vita
@idork99 let me know if that works. When I copied everything from my sd card to my macbook I did, in fact place it in a new folder. Then I just dragged that folder to my micro SD
@DanielHPoetry @idork99 Yes, re-copying the old SD card folders on my laptop onto my microSD card worked for me!
So initially, my old 32 gb SD card had 2 folders, "Nintendo 3DS" and "DCIM." I created a folder on my Macbook, "New Nintendo 3DS Transfer," and saved both of those SD card folders ("Nintendo 3DS" and "DCIM") into this new folder, and then I dragged this new folder into my microSD card. I guess that was the problem, creating that new folder. I should have just dragged the "Nintendo 3DS" and "DCIM" folders directly to the microSD card without putting them into a newly created folder.
What I did was I took the microSD card out of my New Nintendo 3DS, put it into an SD adaptor, and inserted it into my Macbook. I then deleted the folder, "New Nintendo 3DS Transfer" that was on my microSD card, and I dragged the two folders, "Nintendo 3DS" and "DCIM" that were on my Macbook onto my microSD card, replacing the folder called "Nintendo 3DS" that was already on my microSD card.
And now I have my game saves and StreetPass puzzle pieces and home themes! The only thing that I noticed was my Rusty's Real Deal Baseball save file got corrupted, which is a bummer because I think it might make me re-buy some of those minigames.
@topperware Dope! Thanks, I'm gonna try it. Looks like we did the same thing. I'll let you know how it goes. Thanks again
@topperware
Awesome for you!!! I think that's where the trouble was! Unfortunately for Mii, I was so frustrated yesterday that I ended up formatting the system memory on my N3DS to see what it would do (idiot idea!). So now, I re-entered my NNID on my N3DS and reformatted (erased) my micro SD card. I tried to drag both "Nintendo 3DS" and "DCIM" folders onto the formatted micro SD card and connect it to the N3DS but no luck . I can access my photos but no save files nor Mii's or StreetPasses in tact!! Now, I'm reformatting the micro SD card and I'm only going to drag the "DCIM" file with the hopes of when I re download all my games, all the save states will be in tact. Crossing my fingers!!!
@idork99 @topperware IT WORKED! I got everything back! Photos, saved data, themes, AND GAMES. I didn't have to redownload anything this time. You're a life saver. Now I can play again. Good looking out
@AltDotNerd depends on what type of transfer you're doing. Since you don't have to use a different memory card, and all you're going to do is place the same one in the New 3DS, I'd go with the PC transfer.
@DanielHPoetry I finally figured it out (at 2am). I was afraid that the transfer would erase the memory on the SD card as well as the system memory. I didn't realize the SD card would be fine.
Thanks for posting this article. It certainly helped me navigate this process and transfer everything I wanted. I can now sell my old 3DSXL and help pay for the new handheld I bought at launch. The only thing not included in the article was the need to format my new micro sd card. I'm not sure if that was something I should have known, but I wasn't able to figure that out for a bit. Overall, I am happy with the new system and i'm glad all of my info is on it. Thanks NintendoLife!
FINALY GOT IT TO WORK!
Unfortunately, I had to down grade to a 32gb SDHC from a 128gb SDXC
I find it fun watching multi-color Pikmin doing my work for me.
I traded in my old xl to gamestop, so i had to call nintendo to do a transfer for me, but for some reason when i put the data of my old 3ds on my micro sd card, i still have to go and redownload the games
@TheAceofMystery that happened to a few of us here too. try reviewing some of the troubleshooting we did. it might work for you if you have any other problems
@umegames @Klimbatize @ReaperX30 @B3ND3R @No-longer-postin @bjwhit08 @Baker1000 @Bizzyb @Danny429 @No-longer-postin @deKay @Grumblevolcano @topperware @idork99 @AltDotNerd @Nintendofan83 @No-longer-postin @TheAceofMystery
Hey everyone, not trolling here, but I just wanted to let all of you know that I'm a part of this group on facebook called the 3DS Village. It's just a group of and for gamers where we talk about things Nintendo. It's kind of like what we're doing here, just more personable. Check us out https://www.facebook.com/groups/3DSVillage/
@DanielHPoetry You're right - that's not trolling. That's spamming. And Facebook? Please.
@deKay you're not interest, got it
@Nik-Davies 3ds systems system lock games on sd cards so you need to do the system transfer if you want to keep them and your saves however if you dont care about the saves then you dont need to transfer and can just log into your eshop account and redownload any games you already purchased there
For those who are still worried about the memory card space even with a 32gb microsd there is a way to get a 64 micosd to work but windows users will have to download some software to format the card. All you have to do is format the card to FAT32 with the partition size set to 32kb and it will work. More info here http://www.ign.com/wikis/nintendo-3ds/Moving_3DS_SD_Card_Data
^ Of course I recommend you test this in the New system first since this is how to use it with the old 3ds system.
How come the new 3ds xl has 28000 blocks with it's 4gb micro sdhc card and the 2ds which i also own just has 15000 blocks, which also has a storage capacity of 4gb in it's included sdhc card?
@bjwhit08 OMG!!! That's EXACTLY what happened to me!!!! I cannot begin to tell you how furious I am over this. The PC method is garbage and unreliable. Should have just done a wireless transfer but OH WELL too late for that!! My photos, videos, street pass, games, (US) ambassador info, save data, etc, etc, etc... ALL GONE!!
I HAVE HAD IT, NINTENDO!!!!!!!!!!!!!
DO NOT DO WIRELESS SYSTEM TRANSFER
I LOST ALL MY SAVE DATA.
NOT COOL NINTENDO, NOT COOL
wow neither the nlife guide nor the nintendo guide really covers what happens during the transfer.
first, i was transferring from a 3DSXL to a New 3DSXL and the transfer died at 75% every time. luckily, this didn't screw anything up and both were just as they were before i attempted the transfer. it kept giving me a "no response" "local wireless error". of course there was NOTHING on the internet to help with this problem.
finally i restarted both and tried for like the 5th time, happened to leave it at the point before the pikmin start moving stuff overnite. finished the next afternoon and it actually worked.
however, the part where you swap memory cards was really hinky, it wasnt at all like they said.
but i followed the instructions, with significant doubt, and it managed to work out just fine.
the instructions aren't very clear or specific though.
like the new 3ds but the whole having to open the battery case to get at the tiny microSD card they provide sucked, i almost had to butcher the case to get it open and the new stylus was no help at all. i sure hope i never have to get at it again.
It's been awhile since the New XLs came out and I am still stuck with the built-in 4GB card and it's very frustrating. It will not let me upgrade to a 16 or 32 no matter how I try it. Nintendo was unable to figure it out two months ago, so I'm going to see if they have a solution now. -_-
still waiting to set up my New 3ds from upgrade from 3DS. Bit worried about the transfer, but realised that I made the best move by using a microSD card in original 3DS. Worth the pain of transferring to laptop from normal SD, then to micro. Think Nintendo should recommend this method.
I spoke too soon lol! It never prompts me by asking if I am using microSD or SD, it goes straight to transfer. Has this happened to anybody else at all? Just my luck lol but appreciate any help
Yeah, I'm pretty much convinced that the wireless transfer has to be worth it for my new system after reading through this comment thread. I can wait.
Somebody help me please. I followed the exact transfer process but none of my downloaded content is appearing please help.
My old 3DS XL is dead. It won't turn on. Can I still do a system transfer to the NN3DSXL?
This guide is 100% crap and useless. I did everything there was to do in this guide, followed every step, and it didn't prompt me to change the card - it wiped everything from the old on 3DS and have to redownload everything for new 3DS and also change the f-ing card, because 4GB is not enough.
Thanks for the guide! Anyone know a way to navigate through the 3DS System Settings without a working touchscreen? Unfortunately, my old 3DS was washed in the laundry. Everything else works well enough for a transfer. Seems the only way might be to pay Nintendo to fix it
I'm having a issue with my microsd card I'm using in my new 3DS where it says when I turn my new 3DS on that the microsd card can't be read. Can anyone help me out here?
Does it matter what size the micro sd card is? Like say if I used a 400gb micro sdxc?
Show Comments
Leave A Comment
Hold on there, you need to login to post a comment...