
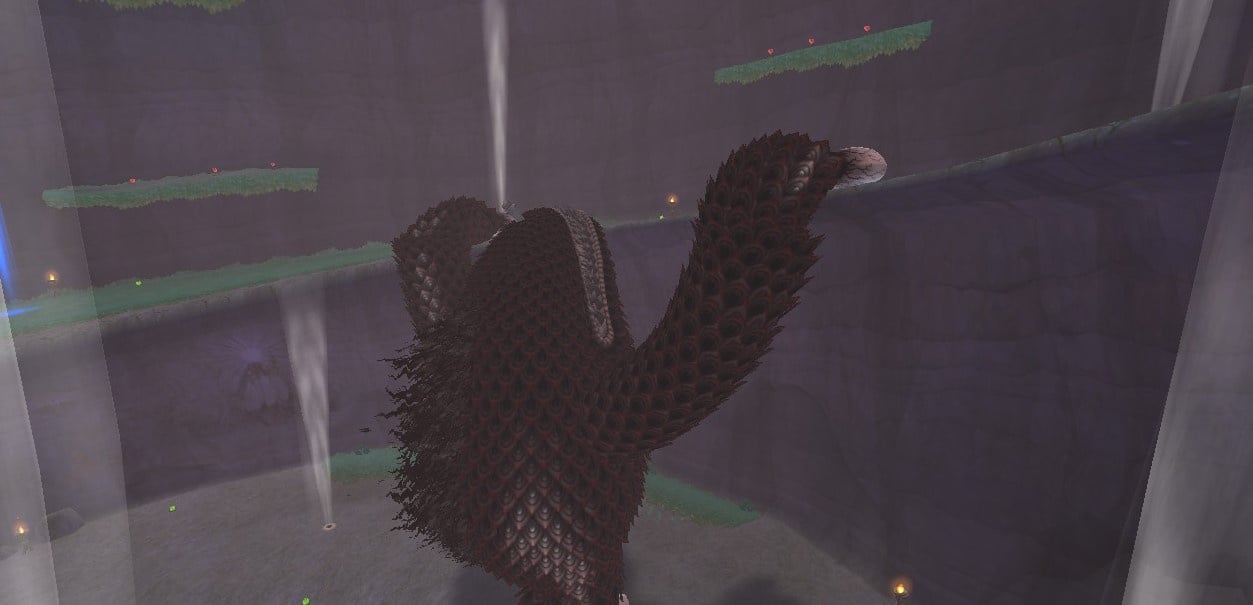
An enormous great hulking beast that's been sealed away at the very bottom of the spiral in the Sealed Grounds, The Imprisoned breaks free from its magical prison a total of three times during The Legend of Zelda: Skyward Sword HD and it's up to you to put it back where it belongs.
This bevvy of face-offs that dot the storyline as the campaign progresses have come in for some flak over the years and, we guess, it's not hard to see why, as they all pan out in pretty much the same manner.
There are a few bits and bobs added as they progress but ultimately your strategy for besting The Imprisoned doesn't change much throughout your three meetings. Oh, and you've got Groose and his Groosenator on hand to help you later on so there's no possible way you can lose.
Subscribe to Nintendo Life on YouTube845k
How To Beat The Imprisoned (First Battle)
Right from the get-go here the only thing on The Imprisoned's mind is reaching the Sealed Temple at the top of the hill. In order to stop it from doing this we're going to run after the lumbering idiot and cut off all of its toes in order to have it fall over, at which point we can drive a stake into its head. Typical Tuesday morning around these parts, really.
If you've spent much time in and around the Sealed Grounds during your time with the game you may have already noticed all of the air geysers and stamina fruits dotted around the ground. Well, this battle is what they're all here for, as your biggest enemy in this fight is your stamina gauge and ability to get in front of this enormous foe when he's taken a lead on you.
Once The Imprisoned takes off trundling up the spiral we need to get in close and start hacking away at its great big bulbous toes. For our money, it's best to start with the toes on the back of its feet first, targeting each one with ZL, getting in for three hits and lopping them off, then dashing through its legs in order to repeat this process on the front toes.
If you're quick you can take all three front toes off each foot in one mad frenzy of sword slashes and the only thing you need to take into consideration here is that as The Imprisoned stomps each foot to the ground a pulsing red shockwave is sent out around the immediate vicinity. It's fairly easy to dodge this shockwave, you just need to get into a rhythm of waiting, getting in for strikes and getting out again to avoid damage.
As we already said, your biggest enemy here really is your stamina, Link gets tired running to keep up constantly with his target, so work those stamina fruits into your strategy to stop him from flagging.
Once you've chopped all the toes off both feet, The Imprisoned will topple to the ground where you need to run under one of its legs and get around to its head, here you'll find a stake lodged into its skull that you need to bash with your sword a couple of times. Once you've done this, the cycle begins anew and you must repeat the process of cutting off the toes and driving in the stake a further two times in order to win the day.
Remember that if you mess up with your stamina, fall off a ledge or come a cropper in some other fashion, you can get back in front of your target by using the air geysers dotted around to manoeuvre ahead of it. It may sound like a lot but really this big bad boss is a bit of a pushover once you know what you're doing and you'll soon have him locked back in his box.
How To Beat The Imprisoned (Second Battle)
For the most part, the action in this second battle is pretty much identical to the first. We're back chopping off toes and looking to drive that stake into The Imprisoned's head for the win. However, there are a few things to take note of. Firstly your enemy has hands now. Yep, it's somehow gone and got itself a pair of hands - maybe it bought them from Beedle's Airshop? - and is going to use them to clamber up the walls of your spiral surroundings in order to make its journey to destroy the temple that bit shorter.
Secondly, once you knock The Imprisoned down in this scrap you are going to have to take a longer route around to its head as it no longer falls with a leg raised, instead sprawling out on the path so you either have to drop down or go up and around, using those air geysers, in order to reach that stake. Don't sweat it too much whilst doing this as the game gives you more than enough time to reposition yourself.
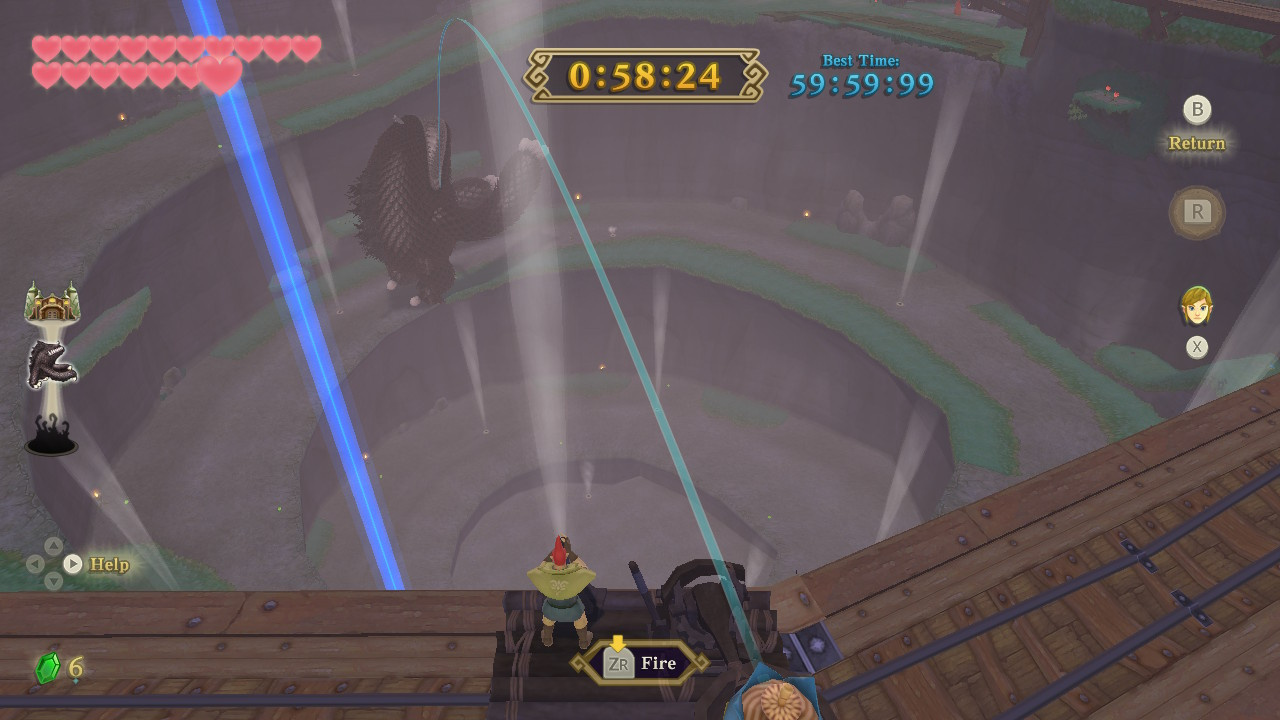
Once The Imprisoned takes to climbing a wall Link has an ace up his sleeve in the form of the magnificent Groose and his Groosenator. As the battle unfolds and you hack away at toes you'll hear Groose give the signal that this great big cannon is reloaded and ready for action and you can then hit the X button to switch to his viewpoint and fire off a volley at your enemy in order to have it fall right back down to earth from where it was climbing. Once you've done this you need to get right back in and keep at the base process and before long you'll have got this beast locked back in its cage for a second time!
How To Beat The Imprisoned (Third Battle)
It's the final face-off. The big one. Are you ready? Are you sweating? Really? Ugh.
Once again, and you'll see why this trio of fights has drawn some criticism, this battle is pretty much entirely the same as what's gone before, we're hacking toes and driving in stakes again and Groose has returned to help us.
In terms of tweaks to the formula early on, The Imprisoned moves a little quicker now and may take to his stomach to slither quickly up the hill, at which point a well-aimed shot from the Groosenator will sort him out so you can get back to regular business.
There is nothing here that's going to take you by surprise in the early stages of this battle. However, once you've caused enough damage this time around, The Imprisoned will spout a great big black halo from the top of its head. What an absolute goth! This signals that it's now developed the ability to fly.
You may panic here, he's going to reach the temple surely, he can fly, it's all over. But no. All you've got to do in this phase is forget about hitting him and hightail it to the nearest geyser. Work your way up the levels using these geysers and reach Groose as quickly as you can at which point you're going to clamber into his cannon - his ammo's got stuck behind a collapsed wall - and let yourself get fired right at your enemy's bonce in order to drive that stake home for the final time.
There are quicker ways to end this battle if you feel fancy; you can shellshock your enemy with the Groosenator then get above it, jump down onto its head as it's still upright and drive the stake in without chopping toes but, however you decide to deal with it, once you've clambered into that cannon and launched yourself at its head, this one is toast, your foe is defeated, and you never have to fight The Imprisoned again.
Congratulations, you are victorious!
Other Zelda: Skyward Sword HD Boss Guides
- Ghirahim (all three battles)
- Scaldera
- Moldarach
- The Imprisoned (all three battles)
- Koloktos
- Tentalus
- Bilocyte
- Demise
Now that you've defeated The Imprisoned, why not jump back to our Zelda: Skyward Sword HD hub for more boss guides, tips and help with the game.
There you'll find tips on the pros and cons of motion controls vs. analogue stick control, a list of the main differences between Skyward Sword on Switch and the Wii original, how to use the Zelda & Loftwing amiibo, where to find the Moonlight Merchant and the Thunder Dragon, and how to beat every boss and minigame.
You'll also find guides for all heart piece locations, all goddess cubes, and where to find every Gratitude Crystal, every upgrade treasure, every bug, and every potion recipe to fill your bottles with.


Comments 0
Wow, no comments yet... why not be the first?
Leave A Comment
Hold on there, you need to login to post a comment...