Humanity has been troubled by many great questions during its time on Earth. Why are we here? What is the meaning of life? Where do all those bloody odd socks go? However, none of these perplexing quandaries is more troubling than the ultimate question: which is the best Nintendo handheld for playing Game Boy Advance games on? You might assume this is a silly thing to lose sleep over, but when you begin to comprehend the pros and cons of the various models available, it will keep you up at night. Believe us.
The original GBA is an ergonomic dream, but lacks a backlit screen and relies on AA batteries. The GBA SP fixes both of these shortcomings but is a little on the small side for some players; it also lacks a 3.5mm headphone jack and (unless you pick up the increasingly expensive AGS-101 version) uses a crummy front-lit display rather than a superior back-lit one. The Game Boy Micro is cute and truly pocket-sized, but its screen is tiny, it can't play original Game Boy or Game Boy Color games and is so small that anyone with hands larger than those of a child is going to struggle to play it for prolonged periods.
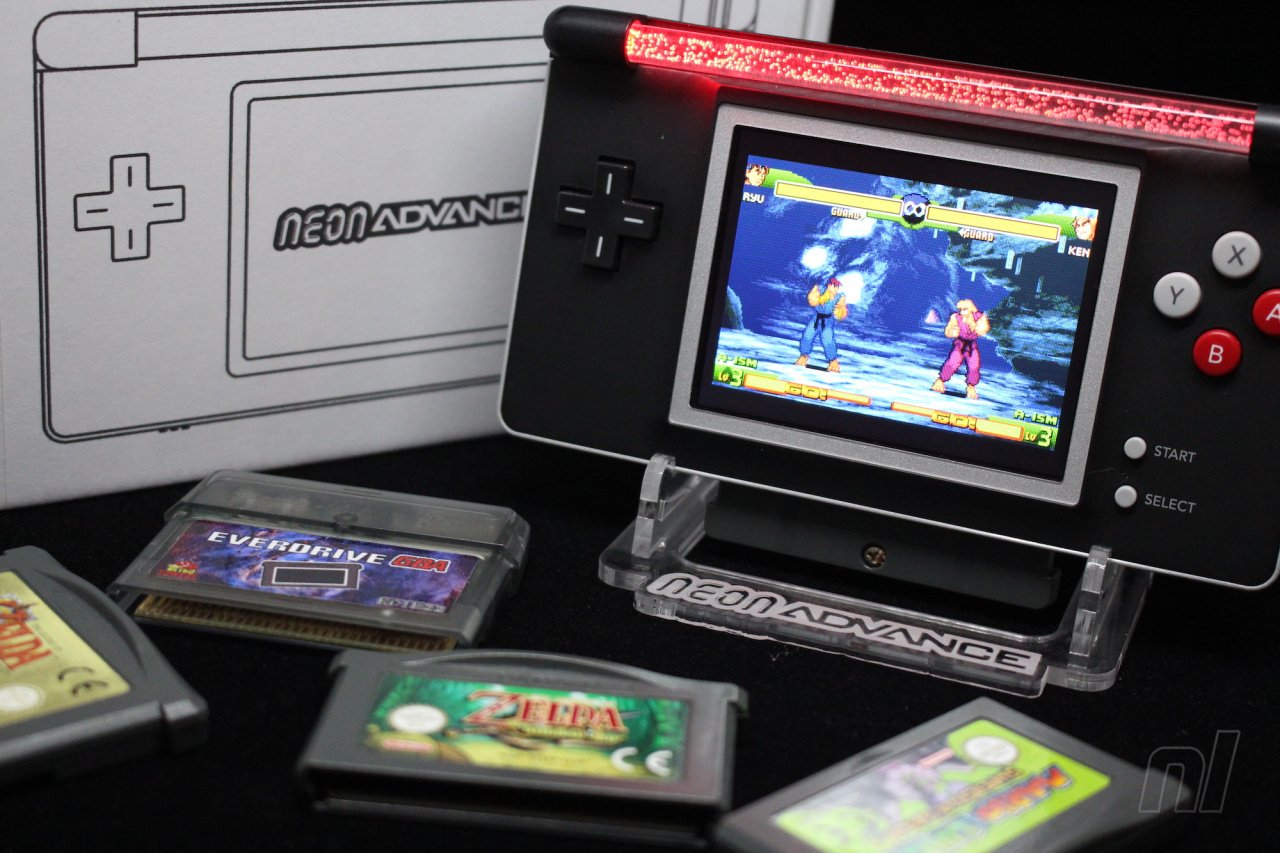
Despite the wide array of options no single version of Nintendo's handheld hardware ticks all of the boxes, which is perhaps why modders are so keen to create custom variants to suit their own personal needs and wants. You'll no doubt have heard of the 'Game Boy Macro' concept before; it's basically a Nintendo DS (Phat or Lite) with its upper screen removed – the main intent of this intentionally-crippled system is to play Game Boy Advance games on the DS' bold and bright screen. We've seen a wide range of 'Macro' models appear online, but none of them have bowled us over in the same way as the Neon Advance. We've been lucky enough to get our hands on the 13th Neon Advance ever made, as well as the chance to sit down with the man behind the magic, Joe 'Joe Bleeps' Heaton.
A prolific modder and chiptune enthusiast, Heaton crafts the Neon Advance from the broken carcasses of DS Lite systems, breathing new life into dead hardware. "In the new year I wanted to try something new after spending so much time modding Game Boys over the last few years," Heaton replies when asked how the idea came about. "So I decided to learn how to re-shell DS Lite consoles with repro shells after they had suffered from damage. I bought a few faulty job lots of these consoles and the most frequent problems were faulty top screens or broken hinges, so after doing quite a few refurbished DS Lites, I was left with a lot of functional bottom halves."
Stuck with a collection of spare parts and loathe to simply bin them, Heaton hit upon an idea. "I looked into making a Game Boy Macro, where you have a single screen unit and remove, fill, sand and paint the shell to hide where the hinge parts used to be," he continues. "However, it was such hard work and I never really achieved the professional finish I wanted." Heaton decided to take a slightly different approach and leave the hinge parts in place, making this a much neater job. Where the top screen hinge once was he has fixed a light bar which is illuminated by a single LED, found in the left-hand hinge section. While it might look like this encroaches on the display, even in a darkened room the screen's brightness ensure that the LED doesn't 'bleed' light onto it. "I remember a while back I'd seen one with a bar across the two hinge points," he explains. "I had some translucent acrylic rods, so I tried it with that and it worked well. The main reaction from my Instagram following was 'Wow! Does it light up?' so I went prodding around for voltages and eventually got to a point where I could build them with a light-up strip. It got a great reaction, so I just kept making them from there."
Another notable change relates to the bottom screen, which lacks touch input. "One of the main issues with used, broken and faulty DS Lite units is the state of the touch screen," Heaton says. "I realised that if you carefully remove the digitiser it reveals a crisp LCD underneath, so I decided that seeing as it was going to be used mainly for GBA games – and the menu can be navigated with the D-pad – it was a great way to reuse an old screen and save it from the bin." Waste not, want not.
Because the DS Lite's speakers are located on the upper screen, Heaton has had to fit a single mono speaker on the underside of the device, where the stylus would normally be found. "Audio was a challenge, especially seeing as the main appeal of this project for me was to avoid too much cutting, drilling and painting," he says. "After the first few I made, I realised that as the touch screen interface wasn't really needed, therefore neither was the stylus. I removed the stylus housing and worked out a sweet spot to position the speaker at the opening. It's only a single speaker – connected to left and right stereo outputs – and it's facing the back, which isn't perfect, but it's loud enough for general use and it doesn't interfere with the aesthetic of the console's design." Indeed, we can confirm this isn't the most powerful speaker we've heard and it's often muffled by your palm, but it gets the job done – and is obviously better than having no audio whatsoever. Of course, with this being the DS Lite, you can plug in a pair of headphones if you so wish – something that GBA SP owners need a separate adapter for.
The DS game card slot remains in place so if you insert a DS game, the console will play it as normal – but without touch screen support or that upper display, you're not going to get very far. However, you can dive into the settings and configure the console to bypass the main menu and auto-start when it's switched on with a GBA cartridge inserted, which makes it behave very much like the real thing. Speaking of software, on the original 'Phat' DS, GBA carts could be pushed all the way into the slot but on the smaller DS Lite, Nintendo was forced to make a small sacrifice to maintain this backwards compatibility – carts poke out slightly from the main body. When playing games on the Neon Advance you'll need to become comfortable with this unsightly problem, but because the unit is quite wide, the protruding cart never really gets in the way. The Everdrive GBA pokes out even more alarmingly, but you soon learn to live with it.
Speaking of which, if you're lucky enough to have one of these remarkable flash carts lying around then the Neon Advance becomes even more appealing thanks to its ability to run GBA-based emulators. Not only does this allow you to rectify one of the biggest shortcomings of the DS hardware – the lack of backwards compatibility with Game Boy and Game Boy Color software – but it also means you can play NES and Master System games. Performance isn't perfect – NES games look a little squashed, for example – but it's a neat bonus all the same.
Heaton is quite the perfectionist, and doesn't rush himself when working on these projects. "I've added lots of extra touches and I like to take my time to get it right," he comments. "I enjoy the process so I never rush. I'd say about five hours from start to finish is typical, from cleaning, repairing and refurbishing parts to boxing up the final product. Putting the shell back together without any wires pinching or the screens, switches or buttons slipping out of place is always fun. In general I've developed a sequence that allows me to get on with some tasks while I'm waiting for paint or glue to dry so the work flow is pretty good overall. Also, I'm doing my best not to use any new parts, just original casings and buttons, to keep it authentic and reduce needless waste. So in some cases, I'll have parts that are cracked or chipped and I can't use them, which is a shame. Digging around for the right part can take time." Getting the process streamlined is one thing, but Heaton still has to find the time to actually perform the operation in the first place – and like a great many of us who claim to be 'grown ups', that's often easier said than done. "I don't have a lot of free time with work and life in general, so I work on these in my down time for fun. When I might get that time is never certain!"
Each Neon Advance comes in its own box along with a USB charging cable and plastic stand. It's a very professional operation, but given the sudden surge of interest in his work, Heaton fears he may have trouble keeping up with demand. "I've been overwhelmed from the off," he admits. "Even when I posted pictures of my first few attempts, I didn't think it was anything really special or unique but the Instagram community are great; people were so positive and encouraging I just kept going and making them. There are always going to be haters and I've had a fair share of people calling me out for 'destroying' consoles because they don't really understand what I'm doing. It annoys me when I've revived and refurbished so many consoles over the years but people who've never restored or archived these systems think they are suddenly the authority on these things. I had to laugh when someone called it a 'lazy Gameboy Macro', like I should suffer for my art. I'm thin-skinned when it comes to criticism so it's as well people have been overwhelmingly lovely. It's been very surreal. I'm still amazed so many people love them."
Heaton is now being inundated with commission requests – something which he admits he wasn't expecting. "It's a personal, creative project in which I didn't expect anyone else to be interested," he says. "I've had good and bad experiences before with custom Game Boy requests but in general I'm uncomfortable working on other people's consoles in case anything goes wrong, and also sometimes people can be picky if it doesn't turn out exactly how they hoped. And sometimes people pick colour schemes or mods that I don't really like! With this it's much more personal; I like to sit and play around with parts until I find a combination I like. It's fun to surprise my followers with new ideas, and I'd rather have time to produce a completed product to show people without keeping anyone waiting."
If you want to purchase one of these unique systems, you could do a lot worse than get in touch with Heaton via his Instagram or Twitter accounts. "I'm not a business but at the same time I want these out in the world being loved and cherished instead of gathering dust in my house," he explains. "I've been selling them on to friends so far and it's helped me invest in parts and resources to be able to make more in future. It was hard to decide on a reasonable price but I hit on £70 [approximately $94 / 79 Euros] in the end, mainly reflecting the time and effort involved with creating it, and the personal touch I try and add to it. These are a labour of love; without wanting to sound pretentious it's a creative project and these are my artworks. It's not mass produced; due to time constraints it's a limited but quality production line. I'd much rather focus on that. I've been getting loads of requests and people asking if I have a store or a website but I just want to reassure people that I am planning to keep making Neon Advance. There are so many ideas I've still to try out. I've invested in lots of parts, and lots of junk consoles that would have been binned are now sitting waiting to be reborn. As I said before, I'm not a business so I'd even be open to trades in some cases. I need more games for my new Nintendo Switch!"
As for future projects, Heaton isn't in any rush to jump onto a new project any time soon. "It's still nice to mod Game Boys for my friends from time to time, but I still feel there's a lot to be done with refining the process of the Neon Advance until I feel it's foolproof. I'm still solving problems as they appear. I'd also like to do some more DS Lites with replacement shells as I've now got parts organised ready to rescue those, too. During the car boot season I'll pick up a few toys for circuit bending, that can be good fun. My main project for the Summer though is to try and build myself a shed where I can set up a proper workshop and get my Neon Advance process more organised!"


Comments 47
Wow these are pretty gorgeous honestly. If the demand wasn't so high I'd definitely try to get my paws on one
Thats a cool simple concept. Id much rather use my ds lite, but I appreciate the creativity and inventiveness
I still have a DS Lite which works, so this is how I play my GB Advanced games (especially Mario & Luigi Superstar Saga with correct characters not the generic toads of the re-make)
Looks great
This guy needs to get on Etsy or something, I would totally order one.
I've seen this "Neon Advance" on so many game sites lately but it rather irked me that they all fawned over them as though no one had ever made a game boy macro before lol, I actually really enjoyed this article and I'll admit, I was guilty of calling this a "lazy macro" but after this interview I find it totally fair what he's done. I've actually made a macro before and mine really was lazy, I wanted to do it without any soldering whatsoever! It worked though, and it really is a lovely way to play GBA games
If I were gonna buy a modded GBA, and trust me I am tempted, I would go all out with Metal Jesus' Ultimate GBA 2.0. The thing is incredible! The only thing holding me back is not having paypal at the moment to order it.
@Heavyarms55
...but is it $399.99-incredible? I mean... that's quite a sum.
Well knowing that if he can do that, that mean that the DS Lite can be repaired with 1st and 3rd party parts, I'm not that fond of it.
Ok there are currently lots and lots of DS Lite on the market, but yet a finite number.
I'm glad i still have a White NDS Lite to play GBA game.

I tried to make one of these last year, it's not easy. So I just stick with my silver DS now.
Very cool!
That’s awesome!! Can he remap X & Y to be L & R? And does he do anything with the shoulder buttons annoying tendency to stop working over time? I lost the L button on two models back in the day.
The LED bar seems like it'd be distracting as hell while gaming, especially in the dark.
I wish the DS Lite had the buttons and d-pad of the GBA SP or the DSi. It's really hard to play with them mushy buttons.
Nice.
@RetroGamerAndrew Is it honestly 400 bucks?
@citizenerased Guess what? It isn't.
@Damo metal jesus' GBA v2? Seems so:
https://www.retromodding.com/products/metal-jesus-rocks-ultimate-gba-gameboy-advance-v2
@RetroGamerAndrew Wow. I'm gobsmacked.
@Anti-Matter I’m glad I still have a ds to play GBA games
@citizenerased Yeah, that was my first though as well. Even if it isn't horribly offensive, it almost certainly is somewhat distracting and would lower perceived contrast, especially in a dark room.
@quinnbad My thoughts exactly - Game Boy Macro's have been around for quite some time. Personally, I think they look much better that way as well. Still a cool mod though.
What about speakers?
@EpicGamenator Both the Game Boy Macro's I've seen and this device utilize the empty stylus slot for a mono speaker.
DS Lite screens have the wrong color space for most GBA games, though. You can see it clearly in most of those photos: the games, fittingly, have a much more neon looking color palette. Game Boy Micro, if you're lucky enough to have one, really has the best screen for GBA. The original "fat" DS is a close second, but the color looks a little more washed out there.
I've been curious to see how a "fat" DS with v5 firmware compares, when it's flashed to allow for multiple brightness levels.
@RetroGamerAndrew If I could pay cash I'd buy one right now. Yeah it's expensive, but it would be worth if for me. I'd even shell out the additional 100 bucks on the flash cart so I could play Pokemon rom hacks on the go.
@Godzil In reality those old consoles that are broken are likely to end up in land fill. If anyone was clamouring to fix them up then he wouldn't have been able to buy job lots of them cheaply. So ultimately i think it's a fitting retirement for them!
I still have a ds lite and my gameboy micro I prefer to use the micro for gba games as I don't like how the gba games stick out on the ds lite I knock the cartridge way too often
I could see myself buying one. My local Gamestop still sells GBA games for some reason too.
I cant see why anyone would buy one of these over a Game boy micro or even a DS lite.
Terrible looking.
Still, fair play to your man for doing it. Hope he makes money.
@Heavyarms55 Unless you absolutely need some of the other perks of the Metal Jesus Rocks version, you can get a GBA modded with a AGS-101 backlit screen, repro case, and glass lens for a quarter of the cost. I have one I modded myself, and it ended up costing me about $80. It lacks the audio upgrades and rechargeable battery (Which is a plus, to me - I'd rather have AA) but the cost savings more than make up for it IMO. I've seen them on ebay for around $100. If you really need a li-ion battery, it's easy enough to mod in yourself (I did it with my GB Pocket) but you could probably find that on ebay too. Then again, if the audio + clock speed features are worth it to you, by all means, shell out for the Metal Jesus version =D
@RetroGamerAndrew that's a crazy price surely... @Damo I have been really into DS/Gameboy SP/Advance recently and trying all the different versions to play advance games and would really be into buying one of these but it doesn't seem as easy as just clicking "buy" if it was id be all over the nes version he has done looking at his insta... proper nice bit of kit that.
@Anti-Matter Would you mind telling me what game that is? I have never seen it, and my searches are not turning up anything that looks like it.
@scottienigma

Oh, i was playing K-1 Pocket Grand Prix.
That's Very Rare GBA game.
I still have my original DS. Sadly, has my eyes have gotten older, I have found the tiny screen to be...too tiny!
My solution was to get a Nintendo DSi and a SuperCard...I wasn't happy with that last part, but the GBA emulation is fantastic, and allows me to play my favorite GBA games the way I love (Yoshi's Island and Mario & Luigi Super Stars Saga!)
@Anti-Matter Thank you very much for the reply. I am a huge fan of the GBA, so I will be looking to add this one to the collection.
@Anti-Matter I saw blood in the gameplay.
BANNED
£70 is an absolute bargain for this.
Just bought a modded gba with ags101 backlit, glass screen and usb rechargable battery with custom shell and button colors for $150. Seemed like a good price. The agb feels so much nicer in the hand than the SP. Can't wait to get it in the mail.
@Anti-Matter I have the same exact DS Lite.
Personally I'd rather have an original GBA modded with a backlit screen. Lately though I seem to be playing my GBA games on the big screen via my Gameboy Player.
I got rid of my ds lite years ago after I got a famicom gba micro. Both had the best displays for gba games, but if you’re playing something intense, like the final levels on the Klonoa games, the micro really cramps you’re hands. It’s fine for quick session of most other games, which is how I most often use it. And it’s tiny size allows me to store it in my 3ds case. Still wish 3ds had a gba slot. Or at least gba on VC. I had no interest in buying those or ds games on WiiU.
Joe is a sweet guy. He got my original clear gameboy back to it's old safe.
I'd love to get one, gotta keep an eye on this guy 👍🏼
I guess I like the clamshell design of the original lite which plays GBA games just fine on the top or bottom screen. It seems to me it would get scratched too easily. Not bad looking per se, just unneeded.
one of the reasons I liked the GBA SP & DS Lite was the clamshell design, helping protect the buttons and screen/s from harm during transport or non-use, the little light bar effect being nifty aside, it's not even all that attractive, the changes to the surface are not nice looking, clean maybe, ok or not bad, I'll accept, but "gorgeous" ???
they take away the DS game function, uhmmm......righty then. dumb !!!
heck, i also loved playing the games on the SP and Lite on the higher screen, now you can't even do that
anyway, since you can buy used, excellent condition DS Lites for around $20-$30, what are they bringing to the table that would make you pay the probable $40-$60 ???
Very good... But I prefere to play those games with my ds or with a modded 3ds.
Tap here to load 47 comments
Leave A Comment
Hold on there, you need to login to post a comment...