The Landfill Layer is perhaps Donkey Kong Bananza's most dig-focused region, so you'll want to keep checking the map to make sure you've visited every area on your descent through the dirt.
And you'll want to visit every spot too, because there are 27 Banandium Gems waiting to be gobbled up. Fortunately, we've made the following map and list to help you track them all down.
For help finding the Gems in the other layers, be sure to check out our full Banandium Gem Locations guide hub.
Subscribe to Nintendo Life on YouTube848k
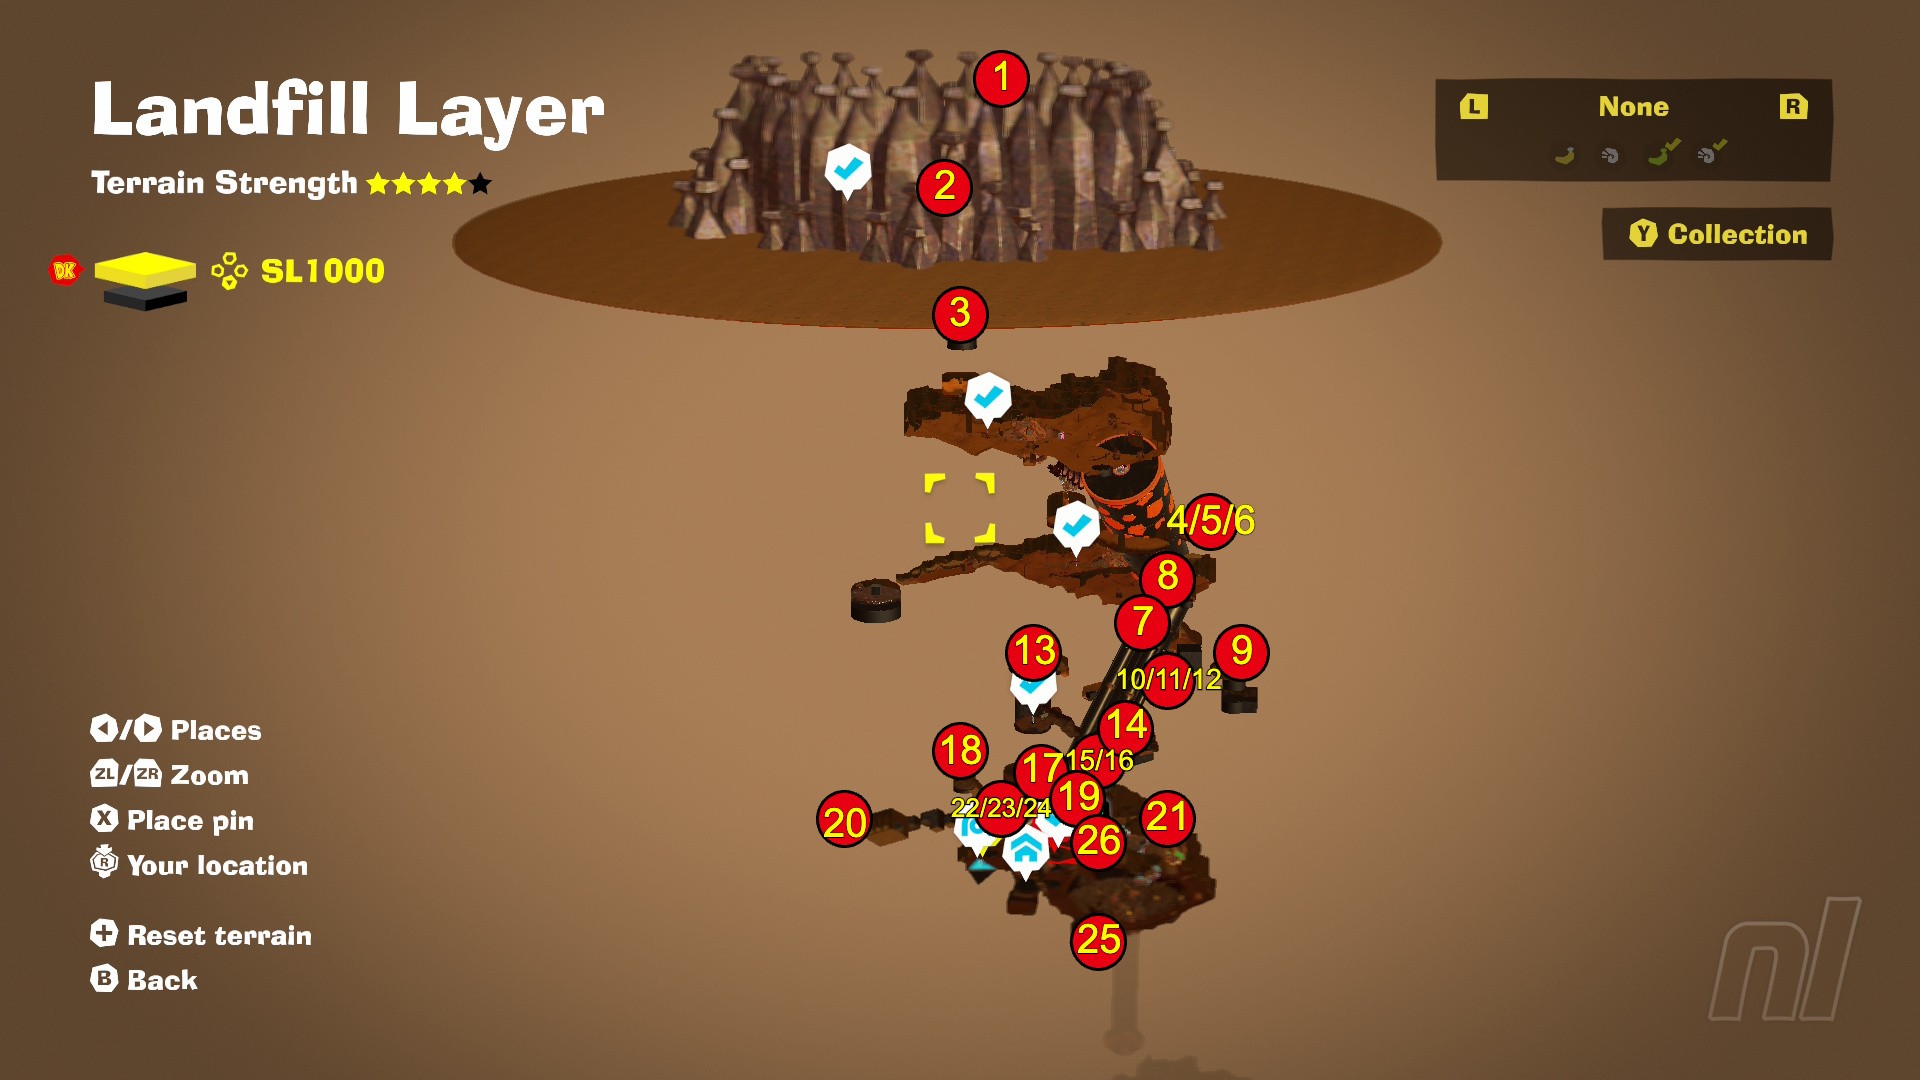
Landfill Layer Banandium Gem Locations
All of the Landfill Layer's Banandium Gems are squeezed onto SL1000, so you'll have to do a fair amount of digging to get between each of them. Some of these can be a pretty tricky find, so, alongside the following map and list, we'd recommend using your own in-game map to check out all the small rooms around the central pipe as you make your way down.
SL1000
1. Top of the Heap
On one of the metal bananas, sticking high out of the wall above the starting area.
2. Freed the Blusterwing!
Defeat the boss and dive down into SL1000.
3. Bloomed in the Landfill Layer
Dig a series of tunnels straight down from the first banana to bring the Growtone on the small platform some light.
4. Mazy-Cave Balloons
In a room roughly halfway down the giraffe-patterned pipe, you'll find the Mazy Cave: Pop Party Challenge Course. Complete the Challenge Course to get this banana.
5. Mazy-Cave Hidden Room
This banana is difficult to describe, but make your way to the back wall, and follow it along until you find a breakable concrete section. Kong Bananza through it to find the secret room.
6. Mazy-Cave Buried Banana
In a cage in the bottom-right corner of the maze. Dig down to get around its walls.
7. Buried in Rubble
In the dirt just above the challenge ruins. This banana is surrounded by bombs, so detonate one then keep your distance until they've cleared the way.
8. Up and Down, Underground
Follow the mission marker down from the Middle Pit, and you'll likely see this elevator banana through the soil.
9. Shifty Smash: Dig Deep
Complete the Shifty Smash Challenge around the pillar near the City Smash Challenge Ruins.
10. Sniffing out a Secret
Near the first bend in the central pipe, you'll see the Elephant Bananza: City Smash Challenge Ruins. The first banana is on top of the entrance.
11. Wrecked by Elephant Bananza
Demolish the building within the time limit.
12. Quickly with Elephant Bananza
Demolish the building with 20 seconds still left on the clock.
13. Battle: Search and Destroy
Head into the Crockoid x3 Battle Ruins in a small room visible on the map, near the Lower Pit checkpoint.
14. Caged by a Hungry Guard
In a caged section near the Fragmentone challenge. Wait for the enemy to retract, then roll in and nab the 'nana.
15. Landfill Fragmentone Recovery
Find Fragmentone under the small section of lava near the Lower Pit checkpoint and return one of its fragments.
16. Landfill Fragmentone Restoration
Return Fragmentone's other two fragments.
17. Nestled within the Debris
Follow the eel down from the Lower Pit checkpoint.
18. Cranky's Landfill Rant
Climb a little way up the wall behind the Trashtopia checkpoint and enter the hole with the red light emanating from it. You'll find Cranky Kong inside.
19. Landfill Smashin' Stats
Dig through 70,000m of Dirt in the layer, then speak to Smashintone in Trashtopia.
20. A Rare Treasure
Walk into the bottom left alley in the wall behind the Trashtopia checkpoint and follow the Fractones to the banana.
21. Battle: Hundred-Harasser Horde
Follow the arrow Fractone next to Trashtopia's clothes shop to the Peekaboopoid x100 Battle Course.
22. Delivery Complete
Speak to the Constructone in the alley next to the Junktopia Chip Exchange to unblock the Quick-Service Ice Treats Challenge Course. Make a path down to the bowl within the time limit to get this gem.
23. Speedy Delivery
Fill the bowl with 30 seconds to spare.
24. Beneath the Bowl
Dig down further still from the bowl to find a hidden room with the banana in it.
25. Battle: Explosive Excavation
Head through the cracked wall, right of the room with the Void Co. lock, and get the Constructone to unblock the Crockoid x3 Battle Ruins.
26. Follow the Crystal Vein
Speak to the eel directly behind the one that greets you in Trashtopia. Follow the map marker to the banana.
27. Landfill Chip Exchange
Trade your chips at the Trashtopia Chip Exchange.
That's it for the Landfill Layer's bananas, but if you're after some a-peel-ing produce on another layer, be sure to check out our full Banandium Gem Locations guide hub, or our complete Donkey Kong Bananza Walkthrough hub for even more guides.


Comments 0
Wow, no comments yet... why not be the first?
Leave A Comment
Hold on there, you need to login to post a comment...