The Canyon Layer is one of the biggest areas in Donkey Kong Bananza, so you can bet that there are a boatload of Banandium Gems to keep an eye out for while you set out exploring.
In this guide, you'll find maps and lists pinpointing all 80 Banandium Gems found across the Canyon's three sub-layers.
If you're after something similar for the other layers in Donkey Kong Bananza, swing over to our full Banandium Gem Locations guide hub for the complete rundown.
Subscribe to Nintendo Life on YouTube848k
Canyon Layer Banandium Gem Locations
While most of these Gems will be available from when you first step foot in the region, some require you to beat the Canyon's main mission first, before returning to the layer later on.
SL300

1. Tumbled into the Canyon Layer!
Right in front of you as you land in the Canyon Layer.
2. Behind Tallfall Cliffs
Pretty self-explanatory, this one. Punch down from the Tallfall Cliffs checkpoint to access a lower room, then break through the back wall.
3. Hanging in the Cliffs
Head out the left door from the Tallfall Cliffs checkpoint and drop down a level to a nearby platform. This banana is hanging from the ceiling in the room straight ahead.
4. Scenic Smokestack View
Climb the ladder in the Tallfall Cliffs tower checkpoint.
5. Shifty Smash: Cliff Valley
Complete the Shifty Smash challenge on top of Tallfall Cliffs' mine cart exit.
6. Growing from the Stone Wall
On the metal banana overhang, at the end of Tallfall Cliffs.
7. Buried in Tallfall Cliffs
Enter the tunnel on the right side of the starting area closest to the mine cart exit. Use Hand Slap near the base of the smokestack inside to find this buried banana.
8. Unpilfered Potassium
As you step off the first minecart, head into the lower floor of the house on the right to find this 'nana.
9. Stuck in a Side Cave
Head straight through the tunnel after the first minecart ride and climb right, over the cliff. You'll find a small cave below with this banana in it.
10. Pay Dirt under the Plateau
From the tunnel exit described above, go left and climb over a small wall. Use a nearby Boom Rock (or Kong Bananza) on the concrete floor to find this gem beneath.
11. Battle: Exploding Pork Platoon
Complete the Squeeloid x10 Battle Ruins in a cave next to the ladder, south of the Longneck Plateau Village checkpoint.
12. Spinning in the Stone Pillar
In the rotating stone pillar, just next to the Longneck Plateau Village Style Shop.
13. Moseyed into the Village
Right next to the Longneck Village Plateau checkpoint.
14. High Shelf Down Below
Speak to the Fractone next to the Longneck Plateau Village Stuff Shop and follow the map marker. Use Chunk Jump to reach the platform in the storage facility.
15. Sunken and Soaking
Head into the storage facility, north of Longneck Plateau Village (under the black cylinder attached to the cliff face). You'll find this banana in a small pool of water next to the central pipe.
16. Mine Your Step
Hit the bomb in the corner of the storage facility to access the Thorny Blast Cave challenge ruins. This banana is through the sand cave and across the thorns.
17. Kaboom the Hidden Room
Smash through the second thorn maze and drop down to the final thorny section. Detonate the bombs behind DK and use a Chunk Jump and mid-air roll to access the hidden banana behind.
18. Mine the Gaps
Throw a chunk of earth at the thorn bombs to clear a path to the final banana.
19. An Underground Guide
Punch the eel in the corner of the storage facility. Follow its tunnel, then punch through the wall at the end to find this banana.
20. Canyon Fragmentone Recovery
Speak to Fragmentone in the storage facility and return one of their fragments (behind a nearby grate).
21. Canyon Fragmentone Restoration
Rescue the remaining Frangentone fragments by either using sand/soft dirt to build a bridge across the water, or digging them a staircase up and around the lake.
22. Traversing the Cliff
Break into a small cave on the left side of Longneck Village Plateau, at the base of the smokestack.
23. Unplundered Produce
Head into the house down behind the Longneck Plateau Village Warp Gong and pull up the large turnip inside to find the banana beneath.
24. Wrecked by Kong Bananza
Speak to Constructone to unlock the Kong Bananza: City Smash Challenge Ruins in Longneck Plateau Village. Demolish the building in the time limit to get this banana.
25. Quickly with Kong Bananza
Demolish the building in the above Challenge Ruins with 20 seconds to spare.
26. Beneath the Central Pillar
After you've demolished the central pillar in the Challenge Ruins, dig down to find this hidden 'nana.
27. Sparkling in the Secret Storeroom
Head out the back of the Longneck Plateau Village Getaway and break through the soft spots of ground. Bomb the last wall to find this banana.
28. Banandium Gem in the House
After clearing the Void Co. lock on the Longneck Plateau Village mine cart, head halfway back down the hill and punch through a rocky doorway on the left.
29. Unstuck the Mine Cart
Clear the Void Co. lock on the mine cart and this banana will be right next to the track.
30. Big-Wheel Balloons
Pop all five balloons in the Big-Wheel Balloon Hunt Challenge Ruins.
31. Big-Wheel Basement
From the back room in the above challenge, drop out of the door you entered by and pull off a mid-air roll to get to a lower level, under the previous banana.
32. Big-Wheel Back Room
In the Big-Wheel Balloon Hunt Challenge Ruins (near the Big Stretch Peak mine cart entrance). Note the climbable material on the right of the wheel, use it to climb around the side and find this hidden gem.
33. Shifty Smash: Cliff's Edge
Complete the Shifty Smash challenge on the cliff face on the far side of Big-Stretch Peak.
34. Sleeping by the Smokestack
Through a breakable door, roughly halfway up Big Stretch Peak. Punch the pathway straight rather than rounding the corner to the fossil.
35. Canyon Smashin' Stats
Smash through 30,000m of stone in the Canyon Layer, then speak to Smashintone on Big Stretch Peak.
36. An Edible Earring
In Poppy Kong's ear in the Big-Stretch Peak stone carving.
37. Banana up the Nose
In Grumpy Kong's nose in the rock carving on Big-Stretch Peak.
38. Hidden beneath Scoundrels
Head around the back of Big Stretch Peak and punch through the concrete doorways beneath the Void Kong carving.
39. Circling in the Concrete Pillar
Use Kong Bananza to break the rotating concrete pillar, halfway up the Big Stretch Peak tower climb.
40. Battle: Sturdy Pork Platoon
Beat the Squeeloid x5 Battle Ruins, halfway up the Big Stretch Peak tower climb.
41. Finally within Reach
In one of the 'horns' of the giraffe-shaped fallen pipe, directly behind the Neckreach Smokestack Exit checkpoint
42. Battle: Explosive Laps
Beat the Stompoid x 5 Battle Challenge, straight ahead from the Neckreach Smokestack Exit checkpoint.
43. The Canyon Growtone
Feed the Growtone tree sprite 500 gold.
44. The Hungry Canyon Growtone
Feed the Growtone 1,000 gold.
45. The Sated Canyon Growtone
Feed the Growtone 2,000 gold.
46. The Lift's Secret Stop
Enter the Stompy Ascent Challenge Ruins, north of the Neckreach Smokestack checkpoint. Break through the stone wall as the lift goes up.
47. Going Up!
At the top of the first lift in the Challenge Ruins
48. Going Way, Way Up!
Complete the Challenge Ruins.
49. Cranky's Canyon Rant
Listen to Cranky's lecture, north of the Neckreach Smokestack checkpoint.
50. Canyon Hide-and-Seek
Find the four hidden Fractones, below the village near Neckreach Smokestack checkpoint. Punch through one of the flattened Fractones to get there.
51. Proximity Punching
Head to the mine cart Constructone, west of the village, and enter a nearby tunnel in the cliff. Break through the roof of the cooling tower below. Repeatedly hit the punching bag to pull in the banana, then smash it before it slides back.
52. Bust through the Giraffe's Spot
Walk towards the smokestack, north of the village, then drop off the platform to the right. Walk around the stack to a breakable mud spot, and break it to find a banana inside.
53. Behind the Moving Walls
Walk past the first turnstile on the smokestack, then punch into the moving mud walls around the corner. The banana is hiding behind them.
54. Above the Moving Walls
Walk past the final mud wall from the above banana, then turn back on yourself and climb up it when fully extended to reach a breakable wall above.
55. Slip into the Secret Room
After the spinning wall section of the smokestack, jump and roll through a square hole in a nearby wall.
56. Hanging from the Crane
Behind the Getaway, hanging from a crane on the smokestack.
57. The Crane's Precious Cargo
Inside a concrete block being held by a crane, right of the Click-Clack Smokestack Roof checkpoint.
58. Battle: Knotted-Thorn Knockout
Speak to the Constructone near the Click-Clack Smokestack Roof checkpoint and complete the Stompoid x2 Battle Challenge.
59. Foreman's Secret Stash
From the top of Big-Stretch Peak, roll, jump and roll onto the nearby island. Punch through the breakable wall at the base of the raised section to find this banana behind.
60. Canyon Chip Exchange
Cash in your chips at the Longneck Plateau Village Chip Exchange.
SL301
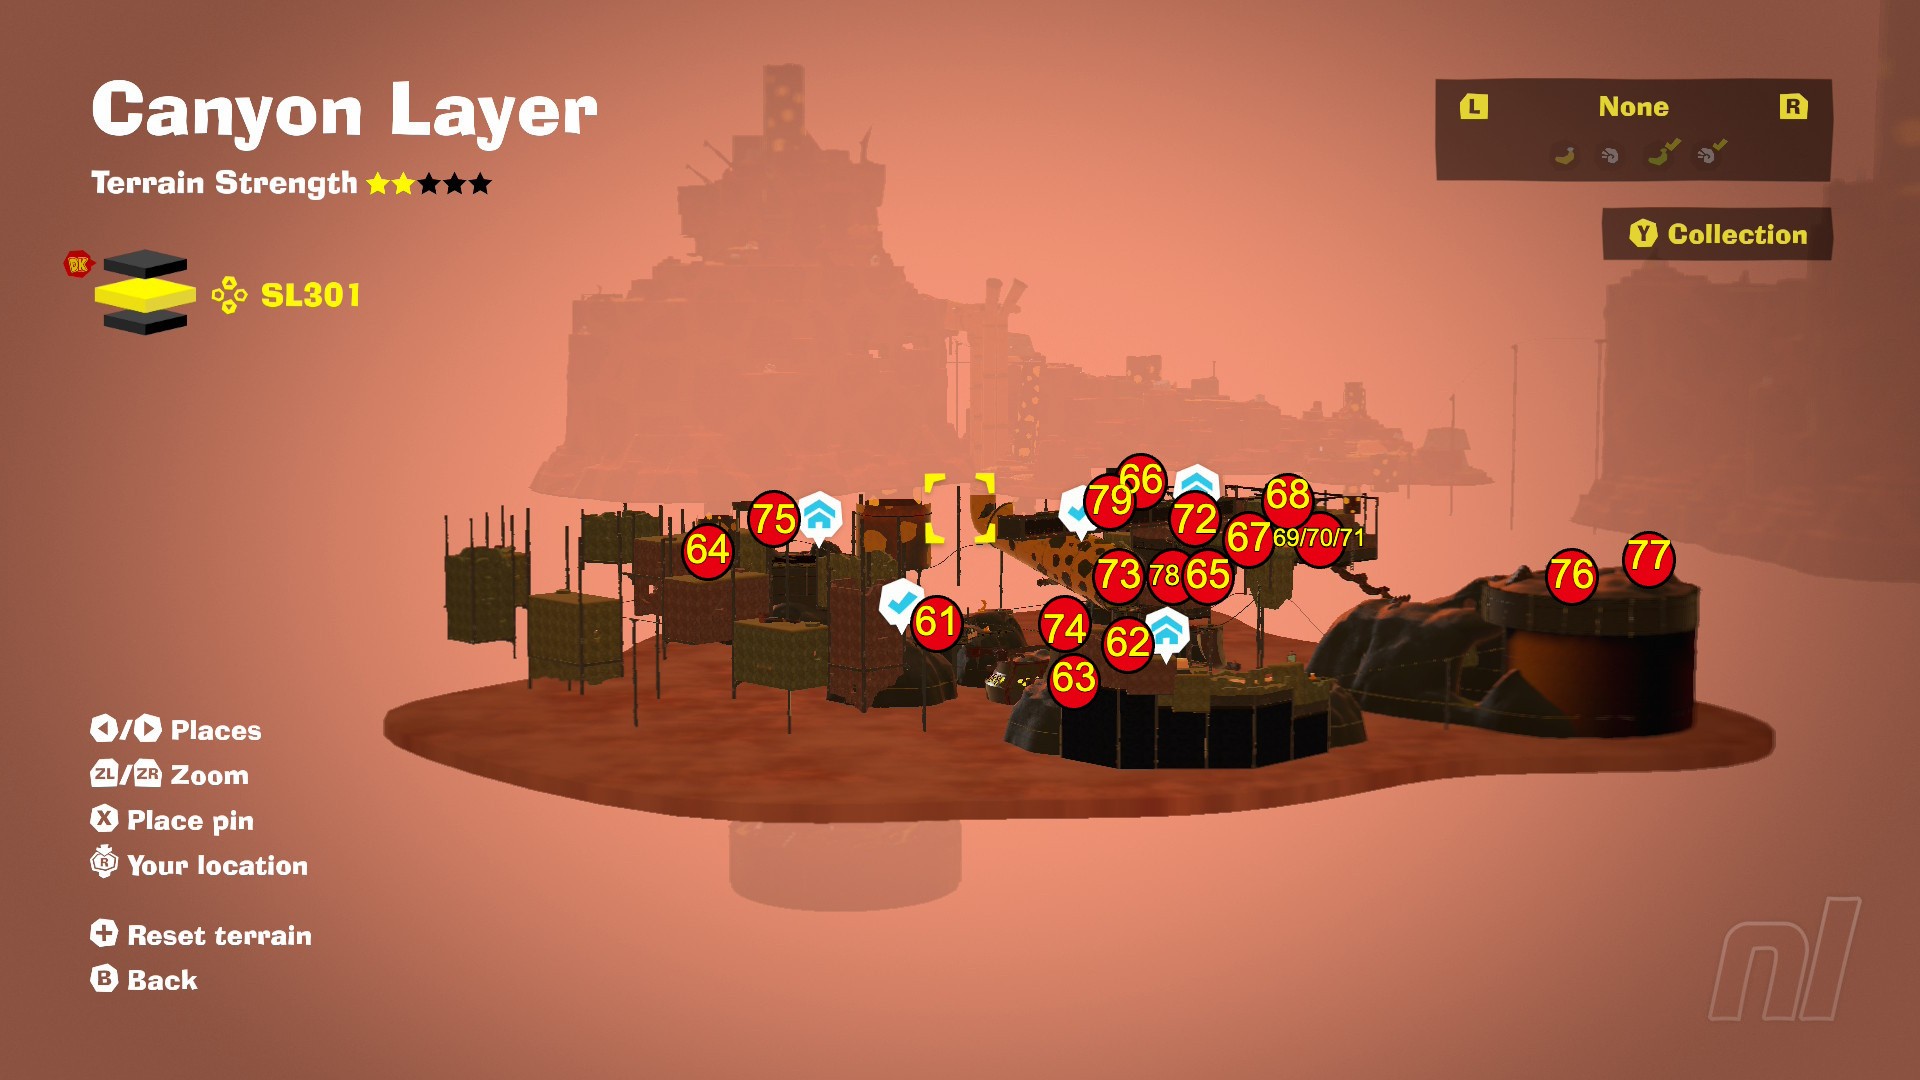
61. Beat Grumpy Kong!
Beat the first Canyon Layer boss, then descend to SL301.
62. Battle: Laser-Wall Brawl
Beat the Crockoid x3 Battle Ruins, halfway up the second ramp on the refinery's second island.
63. The Refinery's Hidden Hallway
After the first mine cart ride through the refinery, head up the ramp and through the doorway on the right, near the Void Kong posters. Blast through the hallway and find this banana around the corner.
64. Peak's Peek at the Refinery
Take the small entrance to SL301 inside Big-Stretch Peak.
65. Asleep in a Dormitory
On the small platform, left of the Staff Dorms.
66. Surveying the Staff Dorms
Use Kong Bananza to smash the concrete roof of the tall tower next to the Longneck Plateau Village Warp Gong.
67. Tucked Away in a Dormitory
In a tall stone dormitory, right of the entrance to the Spinning Laser Zone Challenge Course.
68. Battle: Leaps over the Laser
Clear the Void Co. lock on the Banandium Refinery Staff Dorms and complete the nearby Stompoid x2 Battle Challenge.
69. Laser-Zone Crossing
Head into the Spinning Laser Zone Challenge Course, just up from the Banandium Refinery Staff Dorms. Make it past the first two lasers to get this banana.
70: Laying Low in the Laser Zone
Hidden in the ground next to a Hand Slap panel on the third laser zone.
71. Laser-Zone End Point
Complete the Spinning Laser Zone Challenge Course.
72. De-Voiding the Dorms
Clear the Void Co. goo near the Banandium Refinery Staff Dorms and find this banana next to the mine cart forward.
73. Beat the Mad Mixer!
As the name suggests, just beat the Mad Mixer!
74. Mad Mixer's Parting Gift
Buried in the storage pot across the metal bridge from the Banandium Refinery Gravel Storage checkpoint.
75. Dropped into the Refinery Depths!
Jump down the Click-Clack Smokestack.
76. Shifty Smash: Moving Targets
Complete the Shifty Smash challenge in the gravel storage, ahead of the Banandium Refinery Staff Dorms.
77. Treasure by the Triceratops
Buried in the gravel storage, just ahead of the Banandium Refinery Staff Dorms checkpoint.
78. Under Twin-Horn Smokestacks
Build a mine cart track out to the island northeast of Longnext Plateau Village. Use Kong Bananza to break through the roof of the right tower and dive down to find this banana.
79. Hanging in the Hallway over the Refinery
Jump down the smokestack on the island near Big-Stretch Peak (SL300) to access this banana.
SL302
Along with the other Glamtone challenges, we only found this bonus SL302 after rolling credits. So go and enjoy the rest of what Donkey Kong Bananza has to offer, then come back for this one at the end!
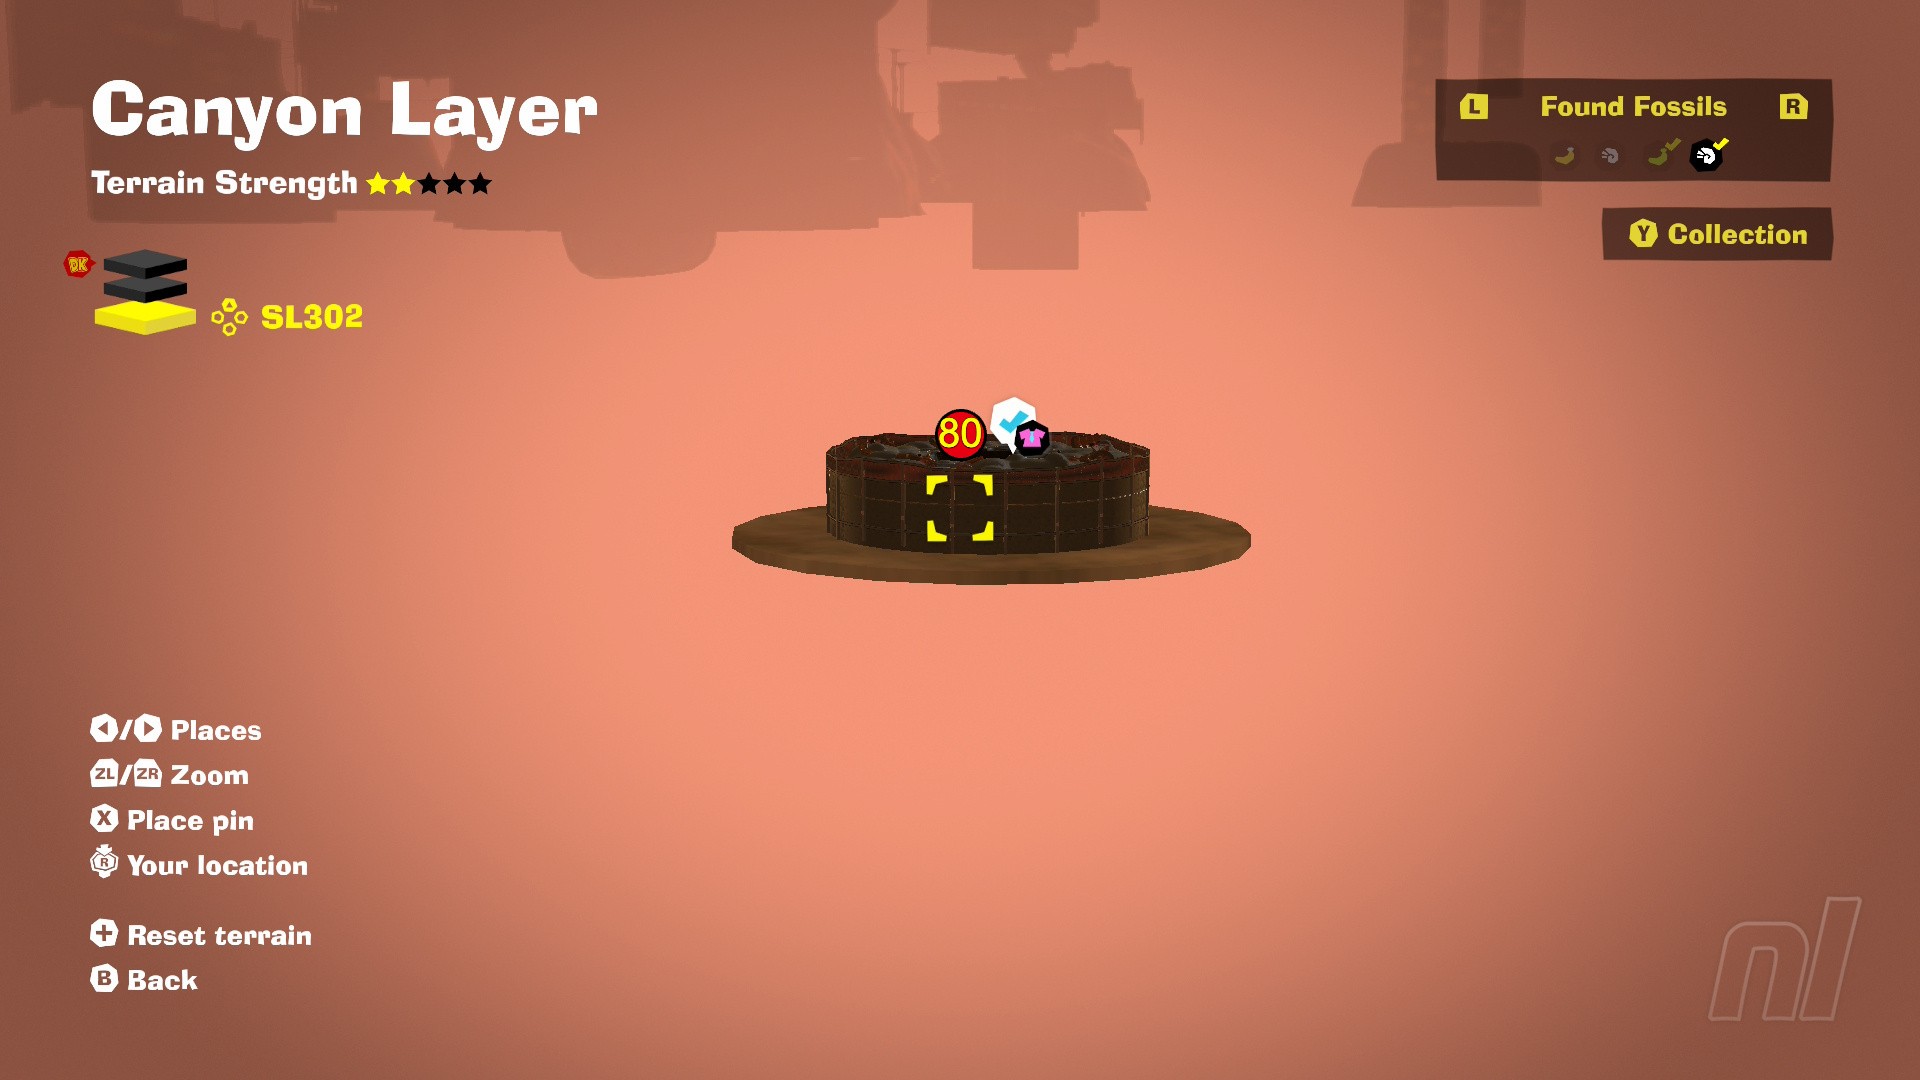
80. Decked Out in Helmets
After rolling credits, equip DK's Mining Helmet and Pauline's Gold Mining Gear, then speak to Glamtone next to the Sinkhole.
Check out our full Banandium Gem Locations guide hub to polish off the collectibles in DKB's other layers, and you can roll over to our complete Donkey Kong Bananza Walkthrough for even more hints and tips.


Comments 0
Wow, no comments yet... why not be the first?
Leave A Comment
Hold on there, you need to login to post a comment...