Continuing our in-depth look at everything Pokémon X & Y and following on from the Breeding Guide, we're now looking into the in-depth building blocks of Pokémon, with a focus on the most recent entry in the series.
Stats

Let's start off with a bit of basic Pokémon knowledge. Each species of Pokémon has specific base values for each of the stats. These are set for each species, and typically increase with evolution. Some Pokémon have focus on Attack, others on Speed and so forth. These stats cannot be manipulated in any way, but you can check the stats on various sites across the Internet. There is no way to actually see them in the game, only the effect.
However, in the Super Training feature of Pokémon X & Y, you can see the basic spread of these stats in the dark area in the middle of the graph.
Subscribe to Nintendo Life on YouTube844k
Individual Values

Individual Values are a fan term for a feature in the game. Commonly known as IVs, this feature of a Pokémon can easily be considered as genetics and these values are used to determine the true strengths of a Pokémon.
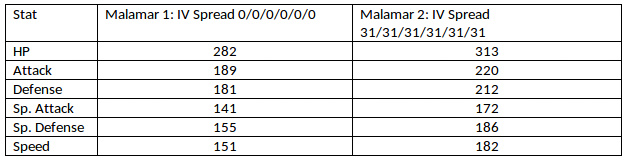
Originally, the idea of IVs was to make it so that every Pokémon of the same species is different, with there being 1,073,741,824 different combinations. Each stat of a Pokémon has a specific individual value of between 0 and 31. On first glance, these don't do much, but at Level 100, each IV point is equal to a stat point, while at lower levels, the calculations are a fraction. Let's assume that we have two Pokémon, out of example let's say Malamar. They both Level 100 are of a Serious nature so they get no boosts there, and assume they have no Effort Points.
Due to this, the goal of almost all competitive players has been to get a Pokémon that is flawless, or as near flawless as possible. Originally, this was all just due to luck, but over the years there have been numerous changes.
First, as we covered in the breeding article, you can now pass various IVs down to the baby when breeding. You can guarantee that up to 5 from the parents will pass, as well as guarantee a specific state will pass down to the baby Pokémon, but that still relies on random chance.
Pokémon X & Y brought several updates to the IV feature, to make it somewhat less random. First, in the Friend Safari, every Pokémon you will face will have at least 2 IVs set at 31. In addition to that, if the Pokémon is in the No Eggs Egg Group, such as Legendary Pokémon, then they are now guaranteed to have a minimum of 3 IVs set at 31 when captured or hatched. This is very useful for Legendary Pokémon, seeing as they cannot breed, and can work very well for breeding Pokémon that have baby forms, such as Lucario, Pikachu and Electabuzz.
To check IVs, you can either run a ridiculously complex calculation, or you can do a variety of things. First, in Kiloude City, there is a person who will check the IVs of your Pokémon. He will give you the overall potential of your Pokémon, and tell you if any of the stats are perfect, or if they are as low as possible. The potential runs as follows:
- Decent all round (0-90)
- Above Average (91-120)
- Relatively superior (121-150)
- Outstanding (151-186)
In addition to that, if you want to get the exact amounts, you can use one of the many IV Calculators on sites across the web, but do note that no IV calculator is 100% accurate at low levels, and they need you to fully keep track of everything, specifically Effort Values.
Effort Values
Effort Values, known in game as "base stats", are essentially training. As with most RPG games, you have the ability to manipulate the stats in order to make the characters even stronger than ever before, and Pokémon is no different.
Since Ruby & Sapphire, each Pokémon has the ability of having a total of 510 Effort Points with — as of X & Y — a maximum of 252 in each stat. These are all gained through various means, which we shall get to.
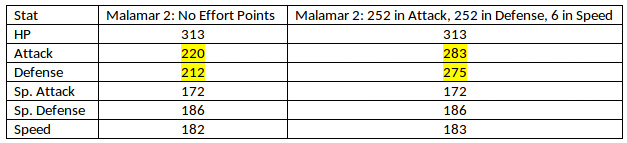
The difference between Effort Points and Individual Values other than training is that it's a combination. For every 4 Effort Points a Pokémon has, it is equal to 1 stat point at Level 100. Due to this, it can be very beneficial as it means that, if you max a stat, it can add a massive 63 points to the final stat total. This can change the tide of battle with your Pokémon considerably, but you have to think about the best places to use it. While you could spread it across all six stats, with 85 in each stat meaning a 21 point boost, this is not the best course of action. Instead, you'll want to monopolise on your Pokémon's stats. If it's fast and hits hard, you'll want to boost Attack and Speed. If you're using a Pokémon as a tank, you'll want to boost defences, but we'll come to this in-depth later. Using the Malamar example of before, the stat changes are as follows:
So, how do you get these Effort Points on your Pokémon? Simply put, you battle Pokémon. In the main game, when you face up against wild Pokémon or trainer owned Pokémon, you will gain Effort Points when you defeat them. All Pokémon used in the battle against the Pokémon will get the Effort Points, and they will also be given through EXP. Share.
Each Pokémon species will give between 1 and 3 Effort Points, sometimes in one stat, other times across up to three. This means, if you're training your Pokémon for competitive battle, you'll want to be very careful with what you face. The stats are recalculated with the Effort Points after each battle. You can find lists of what Pokémon gives what Effort Point online.
Now, this seems pretty grindy, but there are ways to increase it. First, there is the rare PokéRus virus. This virus has the effect of doubling every Effort Point the Pokémon obtains in battle, so if the opponent gives 2, it will instead get 4. PokéRus is obtained randomly, and you'll get notified of it when you heal your Pokémon. At this point, PokéRus can spread to other Pokémon in your party. There are multiple strains of PokéRus which last for one day, two days, three days or four days, meaning the Pokémon is no longer contagious once it hits midnight, but you can prolong this by placing the Pokémon in the box. After the Pokémon has recovered from PokéRus, it will get a small face icon in its summary screen, but it will still receive double Effort Points.
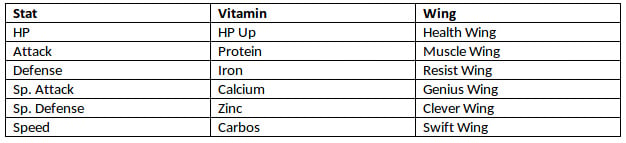
There are various items that give boosts as well. The Macho Brace, for example, will double all Effort Points gained and the Power items will always add 4 Points of the specific stat.
- Power Weight: Hit Points
- Power Bracer: Attack
- Power Belt: Defense
- Power Lens: Special Attack
- Power Band: Special Defense
- Power Anklet: Speed
Each of these items effect is stackable with PokéRus, so if you were facing a Pokémon which gives 1 Effort Point in the stat you're training as standard, you'd get 4 with the Macho Brace and a massive 10 with the Power items.
Still, that makes it look like a massive grind, regardless of the boost. Thankfully, they thought ahead and added the Horde Battle. Horde Battles are where you can face up against 5 Pokémon at once, so defeating them means you will get a massive boost. While they are originally random, if you have a Pokémon with Sweet Scent in your party, you can trigger a horde automatically.
If you're against a Pokémon that gives 2 Effort Points in a Horde, then that means you will get 40 using the Macho Brace, and 50 if you're using the Power Item. This cuts the amount of battles you require down considerably. Below are prime locations for Horde training:
- Hit Points: Whismur horde (Connecting Cave)
- Attack: Weepinbell & Arbok hordes (Route 19)
- Defense: Geodude & Graveler hordes (Victory Road)
- Sp. Attack: Mareep horde (Route 12)
- Sp. Defense: Mime Jr. horde (Reflection Cave)
- Speed: Floatzel horde (Victory Road)
Despite the ease of training through hordes, there are several other ways to increase Effort Values. First are the vitamins. These items will boost your Pokémon's Effort Points by 10 until that specific stat reaches 100. In addition, the Wing items will boost the Effort Points by 1, with no limit.
Next is Super Training. Game Freak took the criticism about the grind for Effort Points to heart and created something really awesome in order to aid in the training. Super Training gives you a variety of mini-games to play. These mini-games will then boost your Effort Points by small amounts to make EV training more fun.
- Level 1 training gives you boosts of +4
- Level 2 training gives you boosts of +8
- Level 3 training gives you boosts of +12
In addition to that increase, you will be given various punching bags, with different bags for each stat. When you equip these bags, you can tap them on the touch screen at any time, to make your Pokémon gain even more Effort Points. Each of the bags is categorised into:
- Small, Medium and Large.
- Small bags give you +1
- Medium bags give you +4
- Large bags give you +12
To top it off, the Super Training screen lets you track the Effort Points your Pokémon has in real time, and even lets you know if you have completely maxed out the Pokémon's Effort Points. This is incredibly handy, even if you're not using the Super Training part.
Now, the question is, what do you do if you trained the Pokémon in the wrong stat, or want to retrain it? Luckily, there's a way to do that, too. In Diamond & Pearl, various berries were given the added effect of being able to reduce Effort Values. This effect continues on to this day. If you give the Pokémon the berry, then the specific stat will be reduced by 10. You can do this until it's at 0, so be sure to grow as many of these berries as possible

In addition to that, you can randomly find a Reset Bag in Super Training. These bags are quite rare, but they will completely remove all Effort Points on your Pokémon. Finally, if you mix up a Kee Berry and a Maranga Berry in the Juice Shoppe in Lumiose City, you will get the very rare Perilous Soup which will also remove all Effort Points from your Pokémon.
Natures

Natures are the final building blocks of the Pokémon, and are not changeable on the Pokémon once it is captured or hatched. It's completely random, so you'll want to make sure you have the right nature before raising a Pokémon.
Natures are a cool feature. They raise a Pokémon's stat by 10% while decreasing another stat by 10%. Thankfully, the effects are noticeable in the Pokémon's status screen where the increased stat is coloured red while the decreased stat is coloured blue. There are also several natures which don't boost or reduce anything.
As such, you'll want to make sure your Pokémon has a nature that boosts its more favoured stat so if you're running a Pokémon with high Attack, you'll want to boost that even further, while lowering the stat you're not using, in this case Special Attack.
Again, using the Malamar example, the previous instances had it with a Serious nature, which is one of the neutral ones. Malamar, however, typically works better with the Adamant nature which increases Attack while decreasing Special Attack:

The changes are pretty drastic so you'll want to consider natures as you build your Pokémon.
There are ways you can manipulate the nature, however. If you are breeding a Pokémon, as we said in the breeding article, if you make one of the parents hold the Everstone, then the baby will definitely have that nature. However, if you're hunting Pokémon in the wild, there is another way. If the Pokémon at the head of your party has the ability Synchronize, then the wild Pokémon has a 50% chance of having the same nature as your Pokémon.


Comments 37
Superb write up!
It makes me appreciate the depth of Pokemon even more.
Hahahah good ol' ev training...
Really in-depth article; it made for a good read. I didn't realize there was a horde for each stat; that's going to make my life a little easier in the future.
Bookmarked. Any day now I'm starting with my first IV/EV training and this will be a big help!
Brilliant article even though I already know how to EV train I have bookmarked it as it has a load of great information.
Bookmarked. Great article and will be great for referencing while playing.
Breeding is easy--it's getting all the tools together that's hard. XY will be the third time I've had to start from scratch and I just can't be bothered to gather any more perfect IV Dittos. Why does Game Freak insist on making breeding so frustratingly lengthy and complex? It's nothing like real life...
Very nice article. Too bad illegal Pokemon are now present in X and Y so trying to get legit perfect Pokemon doesn't mean anything again.
Go to the X and Y thread. It's happening.
@WingedSnagret
I have my illegal lv 20 Regigigas xD never use my illegal pokemons though just to complete the pokedex
@BlackHearted1 You may not, but plenty of others will. Unless Nintendo does something (which I highly doubt they will), gen 6 is ruined.
I never realized how deep Pokémon is! This guide is really informative. I haven't played Pokémon hardcore since the original Gameboy versions and I'm just getting back into it with X, so I feel like a fish out of water. After reading this, I feel like I'm doing it all wrong and may just start all over . lol I'm not going to pretend I understand all of this, but I want to learn! Keep these guides coming! Really good stuff!
@WingedSnagret excuse the noob question, but how in the heck do people get illegal Pokémon? Do they mod the game to artificially boost stats or something, then trade them off?
@JQuest They hack them in. I personally don't know how the process works myself, but the bottom line is they can get Pokemon with above max EV/IVs, movesets that the Pokemon couldn't normally learn, abilities that don't belong to the Pokemon, and are typically shiny. A classic example is a Wonder Guard Spiritomb.
They do get traded around, and worse are used in battles against random people.
Yeah i agree its unfortunate how many people use hacked Pokemon for competitive play, its to bad they didn't put more security on the bank, even if it meant i couldn't have my Regigigas.
Depth like this is what people should consider thinking about before saying "Pokemon's for kids!"
@WingedSnagret wow. That's not cool. Whatever happened to the fun of grinding it out with the fun and joy received from winning by the hard work and sweat, and tears you put into training.
As a Technophile, I understand the joy of modding, but not at the cost of destroying the spirit of competition. I'm assuming there's no way of avoiding those who use illegals in battle? My speech aside, thanks for the info. Lol
I am so glad for X/Y Mechanics as a shiny hunter. Now we can breed legit competitive shiny pokemon. Gone are the days of almost all legit shinies being mere trophies!!
Gosh, I just love Pokemon. You'll never come across an RPG franchise quite like Pokemon.
IV training a group of Fairy Pokemon atm. Perfect chance to catch up on The Clone Wars tv series at the same time
@WingedSnagret Wonder Guard Spiritomb was the bane of my existence in diamond. It and roar of time magikarps made me stop playing online altogether in gen five
Flawless Iv for my event legends like Arceus with the correct nature took only 500+ resets =)
@Xtremetdifan @WingedSnagret @JQuest
Fortunately those "impossible" Pokemon created by cheat devices in the DS games are blocked by the Poke Transporter, and Nintendo is actively blocking battles and trades with hacked Pokemon in their X/Y server, so things are clean as of now.
@BlackHearted1
You may be able to Poketransfer some hacked Pokemon to X/Y, but Nintendo is keen on blocking them from online trades and battles. Just last month they blocked illegally hacked Sheer Cold Suicune during a scheduled maintenance.
I have a question:
If you completely max out your Pokemon's EVs at level 1, through Super Training, or whatever, does it make any difference how you level up after that?
Pardon my ignorance.
Most people hack using a computer software known as PokeGen. I've used it plenty of times to create technically legal Pokemon (though only one or two perfect IVs, meaning they're weaker than my legit IV bred Pokemon in X/Y) for convenience sake.
With the Gen 5 Pokemon games' wifi going offline on May 20th, I will most likely use PokeGen a few times for some Pokemon that have transfer-only moves like Hyper Voice Sylveon/Gardevoir. I'd never create unfair Pokemon though.
@ChoppedLiver I don't believe so. The extra stat points added are calculated after each battle in Black/White onward instead of when the Pokemon levels up. This means you can EV train a Level 100 Pokemon. Once your EVs are maxed, you are safe to use Rare Candies.
@WingedSnagret Funny thing is, Wondertomb wouldn't work in X/Y anyway because of Spiritomb's weakness to Fairy.
@IceClimbers
So, if I maxed out a level 1 Pokemon's EVs, it wouldn't matter how I leveled them up to 100?
@ChoppedLiver Exactly.
i have a few illegal pokemon like a lvl 1 shiny giratina (now its a 82 and its stats are pretty decent, not complaining and maybe i will use it online to see if i trained it well or not, if it doesnt do well then i will be happy that i did well for a decent pkmn) but im not making them illegally strong or have them with illegal moves, the shiny was just as if i was receiving the gamestop exclusives, other shiny i have are dialga, genesect and palkia, that is all for shinies but i do want a shiny rayquaza and yes while i got them illegally i do modify their stats so that they are what they would be if i had received them normally so i can ev train them (or balance their stats so that they are neither too weak or too strong). plus in my case the events are hard to come by in my area because they are located way too far to even go (they are about 5 miles from where i am and by taking the bus is a hassle and im not wasting my money on bus fare just to even go) and is a hassle but i have to and really have no choice and yes i know that buying the other versions is the way to go but i cant afford to spend my money left and right.
@Phantom_R Perfect IV dittos are better and easier to obtain than ever, and why can't you just send up your old one?
I still need the ditto safari myself, but until I have to breed genderless Pokemon I've been getting tons of good breeding material from wonder trade.
looks like pokemon has gotten a lot more complicated than in red and blue...
@bigtig Not really. IVs and EVs were in Red & Blue
sigh May I explain how to hack pokemon in x/y?
You can do it for just $20.. gamestop and walmart even sell a little device called the "Powersav" It's an action replay just released for the nintendo 3ds which hacks pokemon x/y and any other 3ds game. Basicly you enter codes into the device (kinda like scripting a computer) and it just automaticly does whatever you want.. it just simply goes in the back of your 3ds like a normal game cartirage.. want a mega latios? There you go.. pokemon has been exploited and now the game is ruined... for online play atleast. I'm guilty of using these devices in gen 4-5 but gen 6 just flat out doesn't deserve this terrible crime.. it's illegal to tamper with someone else's games while this company just lets players get away with it..
@HADAA Really i didn't know that, that's good though gets boring playing with people who hack there pokemon.
@Serebii ahh well then either my memory sucks or i wasnt very good at that game
@bigtig Well it wasn't commonly known until people such as myself ripped the games apart.
I am SO LUCKY with natures. I have a modest gardevoir, an adamant ballade and an adamant technician breloom
Show Comments
Leave A Comment
Hold on there, you need to login to post a comment...