
The layers keep coming, and so do the Banandium Gems! We're off to Donkey Kong Bananza's Forbidden Layer this time, home of some nasty Fractones, plenty of puzzles, and more than a handful of collectibles.
There are 25 Banandium Gems to get your hands on in this layer, and we'll show you how to do just that in the following map and list.
If you're still searching the previous levels, you can head over to our full Banandium Gem Locations guide hub to see the complete breakdown for other layers.
Subscribe to Nintendo Life on YouTube844k
Forbidden Layer Banandium Gem Locations
SL1500
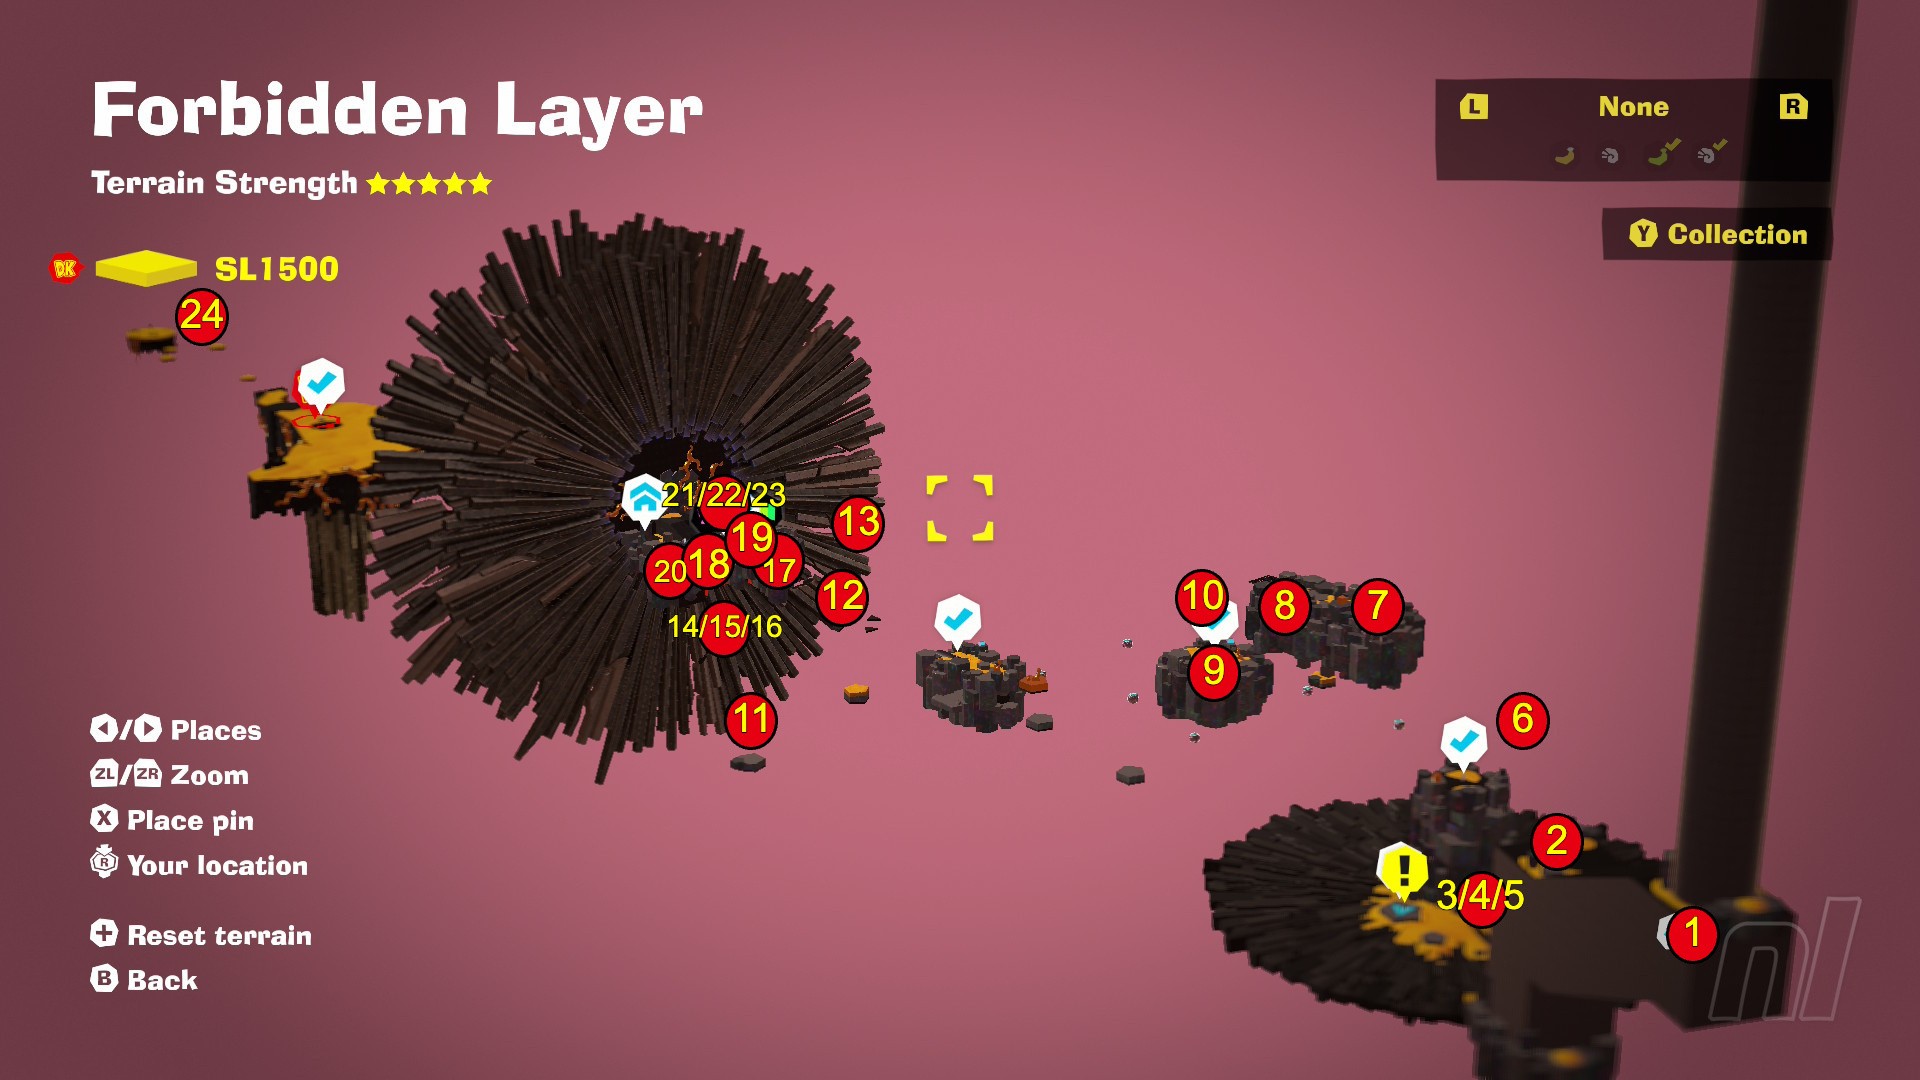
1. Scrubbed Muckety-Muck!
Defeat Muckety-Muck and dive down into SL1500.
2. Secret in the Shaft
In the early room with the switching electric floor, climb up the wall and punch through the roof when available. You'll find this banana at the top.
3. Soggy First Steps
Leave the starting tower and head into the Slippery, Soaking Shuffle Challenge Ruins straight ahead. Make it across the first path to get this banana.
4. Swift Sideways Shuffle
Use Ostrich or Zebra Bananza to quickly climb along the extra wall, right of the Barrel Cannon.
5. No Swimming, No Slipping
Head straight for the Barrel Cannon after the second changing wall and you'll find this banana in front.
6. Battle: Nighty Night, Nemesis
Head to the top of the first tower and make a bridge to the floating Illuminoid x4 Battle Ruins on the right.
7. Pitching for Passage
On top of the Second Concrete Tower, next to the Fractone.
8. Past the Shuffling Ceiling
Head to the top of the Second Concrete Tower and punch through the fluctuating chunk in the ground. Navigate the shuffling ceiling route below to the banana.
9. Under, Up, and Inside
Make a path underneath the Second Concrete Tower and use Snake Bananza to jump through a hatch in the bottom. Once inside, break through the wall of swapping material to find the banana hanging at the top.
10. Battle: Forged Path Upward
Throw a chunk from the Second Concrete Tower to the nearby floating Buzzoid x3 Battle Ruins.
11. Passage to the Lonely Island
Make a path from the Third Concrete Tower over to the floating island ahead.
12. Perilous Passage
Throw a chunk from the Third Concrete Tower to the spinning platforms with the banana on it.
13. Cranky's Forbidden Rant
On a high-up platform in the zone after the Third Concrete Tower checkpoint.
14. Halfway Shuffled
Head to the floating Lost in the Shuffle Challenge Ruins, next to the Third Tower's spinning platforms. The first banana is halfway through the course.
15. Balloons in the Shuffle
Pop all the balloons on the mine cart.
16. Survived the Shuffle
Finish the course.
17. Unwelcome at Go-No-Further Gate!
Arrive at Go-No-Further Gate.
18. Battle: Shuffling Walls
Speak to the Constructone and enter the Crockoid x3 Battle Ruins next to the Go-No-Further Gate checkpoint.
19. Forbidden Smashin' Stats
Smash 30,000m of Passage Stone in the layer and speak to Smashintone at Go-No-Further Gate.
20. Passage through Lava
Drop through the concrete pipe on the right side of Go-No-Further Gate and make a bridge through the lava.
21. Shuffling Ascent
Speak to the Constructone to open the Ostrich Bananza: Free Climbing Challenge Ruins, on the back wall of the Gate. The first banana is at the top of the first tower.
22. Behind the Shuffle
On the shuffling ascent, in the floral panel on the third level.
23. Atop the Shuffle
Finish the Challenge Course.
24. A Gift from Grumpy
After defeating Void, head to the highest, furthest platform in the layer, and Grumpy Kong will give you this banana.
25. Forbidden Chip Exchange
Spend your chips at the Go-No-Further Chip Exchange.
That's everything for the Forbidden Layer, but you can check out our full Banandium Gem Locations guide hub for all the other areas. And if you're after more help, swing by our Donkey Kong Bananza Walkthrough hub for bonus hints and tips.


Comments 0
Wow, no comments yet... why not be the first?
Leave A Comment
Hold on there, you need to login to post a comment...