The Wii U's eShop represents a big step forward in digital distribution for Nintendo, with eShop-only indie titles sharing shelf space with downloadable versions of major retail releases from day one. These larger titles can easily occupy over 10GB of space, with Tekken Tag Tournament 2: Wii U Edition confirmed to be over 16GB.
Whether you picked up the 8GB Basic console or the 32GB Deluxe version, chances are if you dabble much in downloading you're going to want to expand your available storage sooner or later. Luckily, Nintendo's made it easy to augment the Wii U's onboard storage with USB hard-disc drives (HDD), and we're here to walk you through the process and help you get the most out of your new Wii U.
Which USB hard drives will work with my Wii U?

First things first: you'll need to figure out what kind of USB storage to buy, or if a drive you already own will do the trick. For a USB drive to work with the Wii U, it needs to:
- Be powered by an external power adaptor (i.e., requires its own power outlet)
-or- - Draw power from USB by using a Y-cable, taking up two USB ports on the Wii U
-and- - Have a total capacity of two terabytes (2TB) or less
The current 2TB size limit is a restriction that Nintendo plans to remove in the future. However, while this proposed update will allow larger HDDs to be recognized by the system, the maximum available storage will still be capped at 2TB, and any additional space on the drive past that limit will be unavailable to the Wii U.
Note that USB thumb drives and flash storage are not recommended as external storage on the Wii U; Nintendo has explained that because flash storage has a maximum number of reads/writes, it's unsuitable for the type of continuous data access needed to run games.
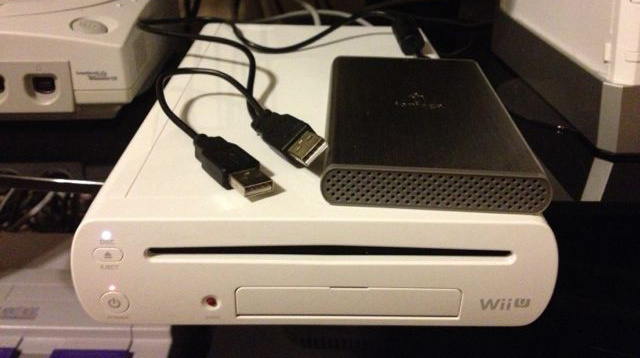
Nintendo maintains a (currently very short) list of specific USB hard-disc drives known to be compatible with the Wii U at this link, though it's far from exhaustive - any drive that fits the basic specifications (external adaptor or Y-cable power supply, 2TB or less) should work. Our tests were performed on a 500GB Iomega HDD powered by Y-cable not listed on Nintendo's site, and we encountered no problems.
How do I hook up my USB drive to my Wii U?
Once you've got hold of your USB drive, it's a simple process connecting it to your Wii U. First though, if you're going to be using a USB drive you already owned, make sure you back-up everything you need off of it before you begin. You'll need to format it to use it with the Wii U, and that process erases any and all data on the drive. It also makes it inaccessible to computers and other devices, so you'll need to dedicate a HDD entirely to the Wii U.
Step 1: Make sure your Wii U is turned off.
Step : Plug the HDD into the USB port(s) on the back of the Wii U.
Step 3: If you're using a drive with external power, make sure it's plugged into its own power outlet. If you're using a USB-powered drive, make sure you're using a Y-cable and both USB ports on the back of the Wii U.
Step 4: Turn on your console. After a short wait, you should be prompted that you'll need to format your USB device to use it with the Wii U.
Step 5: Select "Format" - remember, this will erase any data currently on the hard drive, and once you format a drive for the Wii U, you won't be able to use it on a PC or Mac without re-formatting it.
Step 6: Once the formatting process is complete, you'll be returned to the Wii U Menu, and a blue icon in the lower left-hand corner will indicate that your HDD is set-up and ready for use!
How do I manage my data on the USB drive?
Now that your hard drive is successfully paired with your console, you should have a lot more room to work with. The Wii U is quite happy to organize your data behind the scenes, and you'll never need to worry about choosing where to direct your downloads or save files. However, if you'd like to manually manage any of your downloaded games or saved data, it's an easy process.
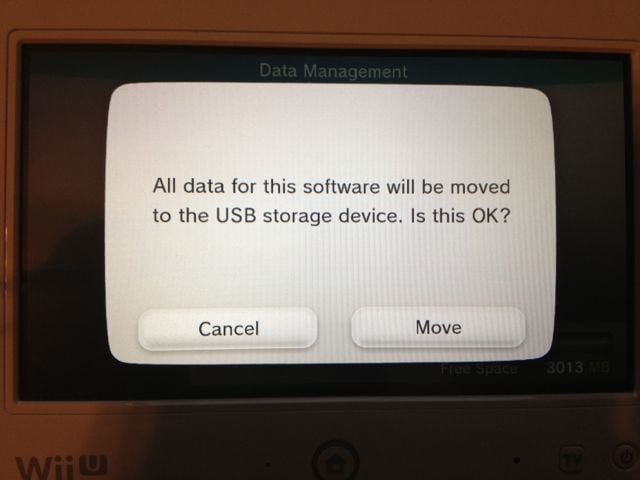
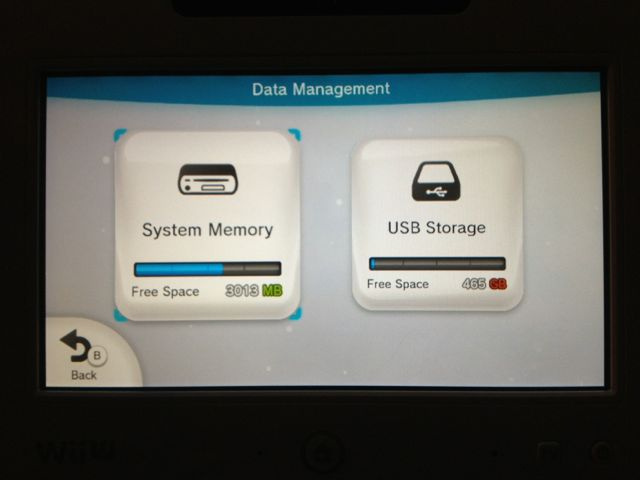
To view and move your data, open the System Settings app on your Wii U Menu, and select the second tab, "Data Management". Here you'll see buttons for both System Memory and USB Storage, as well as a quick measure of available space on each. Clicking on either option will show you all the data stored on that device. Files are organized by software title, so that - for example - a downloaded copy of Nintendo Land, associated saved data, and the day-one update installed when first running the game are all grouped together.
To move files from the onboard memory to USB storage or vice-versa, simply select a game or app grouping, and press the X button or tap "Transfer All" on your GamePad screen. All files for a specific game or app will stick together, so you're not able to move Nintendo Land's saved data to USB storage while keeping the game itself in system memory, for instance - though you can delete individual files within a game group.

On the user interface side, games are treated no differently whether they're on an external hard drive or on the console itself; you'll still launch them from the Wii U Menu and games run off of the HDD just the same as if they were on the system.
What's next?
With an external drive hooked up to your Wii U, you should be set to enjoy all that Nintendo's leap into the digital era has to offer: download a retail game or three and check out some demos, or get busy making a million Miis - the possibilities are endless.
If you have any questions, be sure to let us know in the comments, and we'll do our best to help you out!


Comments 121
I am still trying to decide what size HDD I want for my Wii U! I also want one that is glossy and will look right at home next to my soon to be mine Black Wii U! I really doubt if I will need more than 1TB yet I'm still contemplating a 2TB one just to future proof myself completely!
If an average Wii U game is only 3GB, a 2TB external USB HDD can store about 682 games. It could even hold 81 25GB games.
I have no idea why anyone would need upwards of 2TBs of space available for their Wii-U. Do you intend on downloading 80+ retail games?
Got myself a 2TB Seagate super speed USB desktop AC powered HDD for $99
SHOW ME THE DOWNLOADS!!!
I know someone who has the same iomega hard-drive pictured (that is, if it's the 1tb model).
Do games launching off of the HDD have noticeably longer loading times compared to launching off of onboard memory?
I have a 250GB drive I can use in the mean time, and it has two leads that come out of it - A "DATA" lead and a "DATA+POWER" lead. Just out of interest, would I need to plug in both leads or would I be able to use just one USB port so I can charge any wii remotes with the remaining one(s).
How many USB ports does a WiiU have?
Also, can a hdd formatted for the WiiU utilise more of a HDD's advertised disk space than one for a computer - or is that something you just have to accept when buying a HDD? (For example, a 1TB only having up to 980GB of usable space).
@Jonisme
I launched Nano Assault Neo (only around 50mb) off an sd card in an sd reader and i notcied it took a slightly longer time to start up but after that it ran well. I don't think it will take too long even for bigger games.
Also, as I understand it, hard drives tend to slow down quite a bit once they become more than 50% full.
I'll add a 2tb one in the future. I think it would've been great to have it on usb3 though. Oh well, I'll be mostly retailing the games anyways - they'll soon be cheaper in store than on nintendo's full retail price shop
Im definitely getting a Y one when I need to, I dont like the idea of having to turn my HDD on and off.
why Y-cable ? with computers, Y cable is requiered for some very old disks using obscene amount of power, or with very old laptops which didnt provide enough power through usb.
The original wii always delivered enough power for any modern 2.5" disk through a a single usb plug.
So, the Wii-U is delivering less power (than original wii) on usb plugs like a very old laptop ?
external power adaptors sucks : you need one more power plug and you need to to not forget to switch the disk on/off by hand if you dont want to shorten his life
When I actually take a second to consider what's really required for a fully functioning Wii U, that does all the stuff any core gamer would reasonably want it to do, it turns out this is actually a pretty bulky and clumsy console setup that takes up a lot more space and indeed plug sockets than I personally would like...
There's the consoles itself which comes with the huge power brick that takes up one socket, the Wii U GamePad and it's charger that has it's own mini power brick and also requires it's own socket, and the external hard drive which adds more bulk and for most people will require another power supply too. Then there's all the different cables coming from each of these things as well. There's even the sensor bar that you have to stick on top of your tv too.
This really isn't a very neat or slick console at all when all is said and done. In fact, it's a frikin mess of a system that's just gonna clutter up my living room with lots of needless crap.
You know, in terms of design neatness I would much rather go with the likes of PS3 which has a built-in power brick and 500 gb hard drive, isn't that much different in size to the Wii U, certainly the new PS3 for sure, and only requires a single power socket. I don't really want a PS3 but I'm just making a point.
You can fool some people by making the basic console size smaller, Nintendo, but I'm not that easily tricked.
@Jonisme I tried playing the same game right before and right after copying to the USB drive to test it, and I didn't notice any difference.
@edhe Nintendo says you'll definitely want to use the Y-cable (data+power) but the Wii U has 4 USB ports all up - 2 in the front and 2 in the back - so you should have plenty of room for a few extra devices!
@edhe As far as everything I've read elsewhere would indicate, you absolutely do have to plug in both of those in for it to work properly.
The WiiU has four USB ports - 2 on the back, 2 in the front under the cover where the SD slot is.
Edit: And then Zipmon beat me to it
Luckily, HDDs are dirt cheap, but
http://localhost/instances/400x/30679995.jpg
I'll only use the hard-drive for eshop/VC games... and save files of course.
I wounder how long it will take for third party companies to make an external HDD that match the look of the Wii U? A 250 GB or 500 GB external HDD that actually matches the look of the system would be perfect for me...that is once I decide to get a Wii U. Actually this might be a deciding factor. To me looks matter
These instructions will certainly be useful in the future. Thanks, @zipmon.
Thanks for doing this guide NL! So is it completely out of the question to use a HDD with just the single USB cable and no AC supply? I've never seen Y-cable HDDs advertised in stores.
@Kirk
Well this is your second post about bulky brick power adaptors. You don't like them, that's fine.
But repeated commentary like this is trolling, albeit a lot more polite.
It's an opinion which has some sense to it but nobody's holding a gun to your head to buy one.
I'm well aware of the cables but I think you're assuming that everything has to be fed from a point near the TV. What would you rather do - have your Gamepad on a cradle-charger next to your chair or to have to go over to the TV cabinet and disconnect the untidy usb cables from the console then have to hide them somewhere.
You don't need a power brick for all external hard drives either - whatever works with the Sony - since that's your benchmark - will work exactly the same way with the Wii U -from a power supply perspective with LESS untidiness because the usb ports are.... well... you go find out
Instead of acting like an old fart (and I should know because I am one) and sticking with what you think you know, open your mind to the possibilities. Where else can you tidily charge the PS3 controllers for example?
Yes, I own a PS3 so I know where you're coming from - I had the Phat which had linux taken out because of that hacking tosser GeoHot (he's like the idiot who didn't stop talking in class so we all got punished), and now a 'Mk I' Slim with backward compatibility removed, no card readers built-in and less usb ports at the FRONT.
But this is a site for Nintendo-related exchanges, so I only drag up my Sony experience since it seems that it is all you can relate to and not be trolled into accusations of fan-boy gainsaying.
Oh and couldn't you just create another partition on your HDD to be able to use it with the Wii U and a PC?
Y U no allow partitioned HDDs?
@Schprocket
I'm simply saying the Wii U is actually very bulky and clumsy in the end, which I just noticed even more so after this article. It is. More so than the other consoles and I used the PS3 as a direct comparison example.
The PS3 doesn't require an external HDD because it has 500gb built in so I don't know why you're saying the Wii U HDD situation is similar to the PS3 when clearly it's totally different since the Wii U only has a tiny amount of memory built in and therefor will require an external drive for anyone that expects to actually download any games or any other media on it.
I don't like bulky messy stuff and I think Nintendo is being a little bit sneaky here by making the main console look much smaller than the competition when in reality, once you add on all the extra crap (which is pretty much garanteed for most of us in here), it's actually a lot more bulky and indeed messy. It makes my living room look a lot more messy, means a lot more big chunks of plastic and cables lying around and requires many more sockets.
There's not a debate going on here. That's how it is.
PS. I can post about the power brick and how bulky the system is as many times as I want, as long as it's related to the topic which it is. Maybe you would like it to be trolling or something but in reality it's just speaking the truth. Not saying it in a Nintendo friendly way does not make it trolling either. It's still just speaking the truth.
Probably not. My understanding is that the Wii U's use of the HDD is exactly like the PS3's in terms of completely taking over the whole drive.
You might be able to partition the drive after letting the Wii U do it's thing first but there's no guarantee that won't upset things when the Wii U goes to write to a section it thinks it has access to and it can't see it. Depending on any protection strategy being employed, this could potentially lock the drive down as 'failed' at some future point.
Of course, if partitioning was going to be possible, you won't find a Windows or OSX tool for it....
@Schprocket What are you talking about? EaseUS Partition software will work fine on Windows. Why the Wii U doesn't allow partitioning I'll never know.
@Kirk
You and I are looking at the same thing and I'm not saying your visualisation of bulky mess is wrong. What I'm saying is how you're relating a completely different controller to 'bulk' is based on existing console paradigms. The game pad does not have to sit next to the Wii U. The power brick sits on the floor.
I'll concede the hard drive, when viewed as a supplementary system drive is a little more desktop space, but you could hide that too if you wanted to.
In terms of having an extra drive connected, though, it's no different than hooking up a drive to the PS3 or a Smart TV.
I can't believe that Nintendo - a company in a country where space is a premium - would intend the design to be centralised and therefore as ungracefully bulky as you perceive it will be.
I suppose rather than try to have you break the rigid mental image you seem to have, I should have asked you that given what these devices do - tablet-style controller and external drive to keep release-costs down - how else would you design it?
The only rule is that you can't say "like the PS3" because this isn't a PS3.
@adrenochrome - I disagree, it's better to have a drive with its own power adapter. Supplying a 2TB drive with power from the Wii U USB ports can shorten the life of the Wii U. The Wii U is USB 2.0 not 3.0, 3.0 can handle a much larger load than 2.0. That is why Nintendo recommends a drive with its own power.
@edhe - the Wii U will have the same size drive that a PC has. A 1 TB drive does not appear to have 1 TB of space because the drive manufactures calculate space differently than PCs do. On a PC, 1K is 1024 bytes. The drive manufactures calculate 1K as being 1000 bytes. They started doing this years ago to mislead people into thinking they are getting more storage.
@Kirk
as it was said the gamepad power plug is the same as the nds one, maybe you could build a usb cable yourself or wait for a third party product
http://www.youtube.com/watch?v=fYZoF8kX1eI
@Schprocket
If you are on about the controller specifically then I would keep it pretty much exactly as it is. I don't have any major issues with the controller on it's own. In fact, I think it's brilliant for the most part. The only think I'd add is to make one of the sets of triggers analog and make the finish matte instead of glossy (I'd make the console matte also). Oh, and I'd try to increase the battery life by quite a bit too.
In terms of charging it I'd offer the consumer the OPTION of either charging via USB cable OR using the current charge cradle solution. I'd probably put the simple USB cable in the box by default because it's cheaper and less bulky, and offer the charge cradle as an extra peripheral that consumers can choose to buy separately should they want it.
In terms of memory I'd have it built in, at least a lot more than is available in either pack currently, and still offer the option to increase it externally using SD and USB too. Even if adding more into the machine by default was not something Nintendo would entertain then I would most certainly at least have given the consumer the option to store their games on SD and USB as well as run them from SD and USB too. Rather than not letting them use SD for anything other than old Wii content, which means most people are going to be forced into getting an external drive by default even when they might have preferred to just use SD cards, and having to load from USB onto the main machine before you can even play any Wii U downloaded games.
The power brick would be built in, and if Apple can do it with the absolutely diminutive iMac Mini I'm not gonna hear anyone saying it couldn't be done properly with Wii U.
I would have let the player use both the GamePad and Pro Controllers to play any Wii, WiiWare and VC games as well as any Wii U content. I would also have put all the Wii, WiiWare, VC and Wii U digital content onto one unified store rather than splitting them up and forcing players to boot into the outdated and inferior Wii only mode just to download and play the older content.
I'd not make everyone have to do a day one update that takes an hour or so and uses up a chunk of your built in memory right off the bat just so you can use some basic features that should have been activated by default.
I'd also have sorted the issue with all the load times when just opening up stuff or moving between Channels etc. I'm 100% sure that could have been working much better out the box. That kind of silly issue just seems like it was all a bit rushed and unpolished too me.
I could go on with quite a few other things I'd personally do a bit differently but I can't be bothered.
What I would say is this; if you think about the stuff I'm saying properly, and try to imagine the console as it would be if those things were done the way I've suggested, you will find that nothing I'm suggesting would actually worsen the current Wii U experience for the vast majority of people. In fact it would actually improve it dramatically for pretty much everyone involved. All I want is the best experience possible rather than something that feels a little bit gimped in so many unnecessary ways imo.
I just expect more from a Nintendo console and I'm a little bit disappointed as it stands.
SteveW : does it really exist 2TB disk in 2.5" size ? only the 2.5" disks are external-power-less
@Kirk The storage that comes with the Wii U is not a regular storage type, it's an SSD. Anything loading from it will be considerably faster than a regular internal hard drive. Unfortunately, SSD storage is expensive which means it may have been better to have opted for more storage vs more speed (though it's less likely to overheat).
It could be that Nintendo wants to avoid overheat issues with the Wii U especially considering how compact the device actually is (especially witnessing the issues the 360 had).
@dragonrider most decent partitioning and imaging tools create a boot disk that's... wait for it... linux-based. It's the only OS that is capable of reading and creating a wide variety of drive formatting options. You may get a Windows version but a linux version will be first.
Actually as I answer this, wiping the drive first, performing a logical partition of the drive, then letting th Wii U do it's thing to the first partition, then formatting the second partition might work but my experience with upgrading the PS3 hard drive suggests otherwise.
People shouldn't be surprised if the Wii U performs a low-level format on the whole drive, thus wiping out any partitioning created beforehand.
@Everyone whom asked about partitioning
You can partition the hard drive BUT it must be done before connecting it to the console, the console will not do that itself. I would assume everyone whom asked about partitioning has the tools for doing that.
@True_Hero @Mario_Party_Fan_999 You're very welcome, I'm glad it's useful!
Re: Single-cable USB drives - it's possible that a drive hooked up via a regular USB cable could work, but Nintendo won't guarantee it and recommends against it. From my understanding, it's because the Wii U runs at a pretty low power footprint, and if a drive needs more power than it's getting from the USB bus, it'll shut off to prevent blowing anything - potentially problematic if you're running a game off of it at the time. Your mileage may vary, but I wouldn't recommend it.
If you've got a USB drive with a single cable you'd like to use, check and see if it also has a port for an optional wall adaptor - my little Iomega does and I never noticed it until now! And of course you could always just grab a Y-cable, which would do the trick!
@zipmon
Ah, I see. Guess I will buy a desktop HDD then. I didn't realise that just using any old Y-cable would work though, so thanks for that!
@Kirk Yes, but you must remember that no other "core" system has as ambitious a digital service as Nintendo is proposing. The PS3, nor the 360 aim to make every retail release also available for download. If that was the case, you would also need to go out and purchase additional memory/HDD stuff, which would take up space and look ugly. A 32 gig Deluxe WiiU should be fine as long as you're buying retail copies. You don't have to worry, in that case, about external "anything". The extra plug to have your Game Pad constantly charging shouldn't be any more of an inconvenience than your 3DS charging cradle, or Ipad, or your phone dock, or your laptop, or your router, or your curling iron...
@GN0LAUM
Well it's great that Nintendo is offering a much more complete download service, it absolutely is, but that doesn't mean they should get away with doing it badly or half-a**ed. They don't get a free pass for promising more. Having to boot the console in the crappy Wii SD only mode and play using only Wiimotes or Classic Controllers, having browsed for and downloaded the games through the terrible Wii Shop Channel, isn't exactly an elegant solution for the whole WiiWare and VC part of the digital service for example.
Also, yes those other devices use cables and they also need to be charged too but I can get a days use out of my iPhone, or 10 hours out of an iPad before I have to charge it, so it's not quite as inconvenient as the GamePad which only gets a few hours play before it needs to be charged and can't be played more than a few feet away from the wall while it's charging because the cable isn't very long. I certainly couldn't play on it while it's charging while sitting on my couch in front of the TV. So, it really is more inconvenient that it should be imo.
Look, I'm not trying to make up issues here.
They actually exist.
I'm just expressing my frustration with some of them.
@Hyperstar96
Which is basically my point; it was easier for them but it's resulted in a more clumsy and convoluted experience and service for the end user.
As the end user I'd rather they put in the extra time and effort and just did it right.
I actually want to move on from the Wii now that we're supposedly into the next generation of consoles. Not be stuck using all that old Wii interface, Shop Channel and controller stuff, that was mostly never very good in the first place and in some cases pretty terrible.
Well i bought a PS3 and xbox on luanch days, i have had 6 XBOXs since then im not going to go to why you should no,[also got a NINTENDO Wii icant remember what size SD card ive got in that i have many downloaded games on it] and i have had 2 PS3s,why XBOX has 250HDD and my PS3 has 320HDD i can tell you im not even halfway,but it depends on YOU i have paid for somthing im not going to really use,so NINTENDO is saying you buy what you feel is wright for you,and not what they say you need and then charge you for it,i can get a 3TG harddrive fot under £100 if you but it inside unless they bring down the price of the concole you pay the same for it if you no what i mean,some people may never download games ect just buy the games it in the shops.ALL have a great time playing and i do mean all
@zipmon I got this:
http://www.amazon.com/Seagate-External-Hard-Drive-ST310005EXA101-RK/dp/B001UI49XA/ref=pd_rhf_dp_p_t_3
By any change, do you know if this could work without the Y cable? Looking at the second pic, rear view, seems to support what you are saying...
@zipmon oh well, sorry, i just read this from amazon:
Power Consideration: This desktop class hard drive requires the use of a power adapter (included) to operate. It cannot be powered by a USB cable alone.
So I think I will be fine....
I love how there's a very inconspicuous Dreamcast and SNES in the background of the main picture above. Console Completist much?
Can somebody explain why Nintendo do not recommend flash drives? They are quite smaller.
@Sun if you read the artical he tells you, usb flashdrive have a limited read and wright data,the Wii U needs to access this all the time its dats always going back and forth,what i need to no is can you use a 7200rpm harddrive
So to clarify. I cannot have all of the data on the hard drive, yet keep the save data on the console?
Can some one tell me if im reading this right? Can you actually run games off of the hard drive or do u have to move them to the Wii U when you want to play them?
@JAPBOO Excellent, that should do just fine with the AC adaptor!
@Steviis_Father Absolutely! There's a 32X, Saturn, and N64 under there too!
@blinder2 I haven't seen anything from Nintendo that would suggest you wouldn't be able to use a 7200rpm, should be fine!
@booker_steve Right - you'll have to keep all the files for each game together. I'm assuming this is so you can't split your data in a way that lets you open up a downloaded game without having the saved data available, or vice-versa. And as @Hyperstar96 pointed out, everything seems to default to the USB drive once it's hooked up, so it's really sort of a 'set it and forget it' operation.
@PinkSpider Yup! No need to move games to play them - anything on the hard drive can be played right from there.
@ZIPMON thank you that has made me very happy
@PinkSpider You got it, made me very happy too!
@Kirk I agree I been figuring out this puzzle/ maze of wires and stuff where it's all gonna go and look neat at the same time. Very cool system though I would not pass it up because of this, but it is a pain.
@Kirk
There are a lot of power adapters required for this thing, but to be honest, I much prefer being able to use an external HDD for eShop titles. Way easier to upgrade storage than it is on the 360 (which is a crazy expensive process) and PS3 (limited to 2.5" drives). I may just test out a single-cable USB drive and see how that runs--once the bloody Wii U comes out here, that is...
I agree that the way Nintendo has tackled the online infrastructure is pretty fractured and infuriating. My hope is they'll listen to the many complaints people have about not linking purchases to user IDs (Apple have a great setup that allows just that) and locking everything to hardware, and actually do some catching up to make the Nintendo Network a bit more user-friendly. This week's Giant Bomb podcast features an exhaustive talk about the pitfalls of the approach Nintendo have taken.
This is a giant leap for the company, though. They just need to take some time to listen to their user base, then go back and patch up the baby steps they missed in their rush to embrace the interwebs.
@grayadamson
"This is a giant leap for the company, though. They just need to take some time to listen to their user base, then go back and patch up the baby steps they missed in their rush to embrace the interwebs."
Well exactly. I just hope they don't stop where they are though, which after the Wii is a very real fear I have. It's a great step forward from where they were for absolute sure but it wouldn't be enough for me if it just stayed as it is now. With a few fixes here and there is could be truly great and I just hope Nintendo can see clearly enough to actually make those fixes happen. I really do.
@Kirk
This I finally can agree on. I do have a slight fear Nintendo won't continue to improve upon the system, though I'm quite impressed on how quickly features like Netflix and YouTube were added (unlike the Wii and 3DS which took forever to add functions present right on the menus). I truly hope Nintendo continues improving because the system is already great but has potential to be even more amazing.
Remember folks, this is the first week of the console's life: hell, it hasn't even launched here in Australia yet, let alone Europe and Japan! It'll take them time to build up the featureset and iron out the bugs. Nintendo have been haemorraging cash this year, and no doubt they're keenly aware of the fact that things have to change in order for them to remain relevant.
The N64 was their last stand at competing in the console market with pure hardware horsepower. The 'Cube was somewhere between the PS2 and Xbox in terms of power, but they started to edge away from direct competition by not including a DVD player, and through the DS's various incarnations to the Wii and now Wii U, they're making it clear they want to explore other areas of game design.
Now, that doesn't excuse the silliness of some of their actions thus far, but we do have to step back a bit and take a look at what they're trying to accomplish. Message boards, Twitter and comments on blogs like this are (if Nintendo are even looking, which I hope to God they are) a good way to voice our concerns and offer up some feedback.
One thing that's really puzzling me, however--especially in light of the recent comments from the Metro: Last Light devs--is why Nintendo felt the need to limit the power consumption of the CPU to the extent that ports are difficult to optimise. I for one am not in the least bit fussed about how much electricity the Wii U sucks up, because I'm the guy who turns on his phat model 360 in the winter to heat up my bedroom...
What constitutes a dirt cheap HDD? I can't seem to find good prices.
And one question to NintendoLife: Has Nintendo elaborated why it's not allowed/possible to use SD cards as Wii U storage?
Am I not nerdy enough, or am I just blatlantly ignorant? I just wanna play my Wii U and get the best of it experience wise, I don't even know what the hell most of you are talking about. I mean I know my tecnology, but this is just too many thangs poppin' at the same time, what's a good half a Tb external drive to use on the wii u, could anybody explain it to me like if I was a second grade schooler or a , please?
@ThePillowGolem That's not what Nintendo told me in an email. My guess is that didn't know what I was talking about. Has anyone tested this yet?
I bought a Toshiba external portable hard drive 1TB from best buy, and now after reading this article I don't know if the wii u would have enough power to supply the device...Any answers to my question is greatly appreciated
so jus thinking, if you get a drive with an external power source, does that mean that the wii u takes up three power outlets(console, gamepad, hard drive)?
@castlezelda All you'll need is a Y-cable like the one in the picture; two standard USB ports (1 for power, 1 for data) going to a micro-USB or whatever the back of your hard drive requires. Or, if your drive has a port for an external power adaptor on the back, that would do the trick too!
@zipmon No it doesn't have thing like displayed in the picture, do they sell USB Y-cables do you know separately?
I also seem to have the same hard drive as castlezelda... but mine seems to be working fine with one port.
Well...I think I'll be ok with just a nice cheap 500gb external HD, Not sure why people are going crazy thinking that they'll need either 1TB or 2TB, unless you're not going to buy any physical retail games at all? I mean, not so bad for smaller sized games but why would anyone even consider downloading stuff like Tekken that takes up 16.5gb when you have the option of buying it on disk anyway? Because it'll only needlessly fill up your hard drive in the long run and cost you more money. I doubt I'll fill up the 250gb drives on my Xbox 360 or PS3 (I've had them 4 and 3 years respectively, and I do download a lot of XBLA/PSN games) so I doubt I or many other people would come close to filling up 1tb with Wii U downloads within the next few years if most people continue buying physical copies of games, plus you can always delete games you don't play at all anymore anyway, just like with Wii downloads, and redownload them at a later date if needs be. Just something worth considering when you choose which HDD to go for.
@castlezelda Didn't you get a power adaptor with your hard drive? You should be able to just power it with that, and then connect it via USB to your Wii U, though you'll need a spare plug socket to do so.
@castlezelda Absolutely! You should be able to pick one up at a computer or electronics store, and certainly online if you can't find one locally.
wow this is great but i do have to agree with @AbeVigoda i sure wouldnt need a 1tb's of space i would probably need like 50GB at the most -.- so i guess i have a hard time finding one that would work for me? e.O still confused on the hdd especially since idk if i will need it yet
@Zipmon : could you tell the source of the informations about power supply in this article (why no picture of this info ?) ?
because it seems you frightened a lot of non-tech people
i really doubt Nintendo said the external power supply or the y-cable is mandatory for any 2.5" usb drive.
The Wii-U is advertised as supporting external usb drives -not a specific subset of them- and most of [250-750]gb current drives dont need that(i've the same drive as on your picture and it was sold with a single "I" usb cable).
Advising a good power source is a thing but it's only an advice
ToxieDogg No I didn't, get a power adapter w/mine.
I don't download retail games, so this is absolutely no problem for me.
@adrenochrome Certainly! It comes from Nintendo's official FAQ: http://www.nintendo.com/consumer/systems/wiiu/en_na/external_usb_storage.jsp (See question #8)
Does ne1 know if laptop 500 to 2TB HHD even work?
@zipmon, thanks
according to #12, Nintendo tell us to try our drives as is, and if it dont work with 'i'-cable, only then, try a 'y'-one
so Wii-U really support all usb drives, that's really a good news !
maybe this article should be a bit less "directive" ( "for a USB drive to work" is too strong and not really accurate : i cant even work without the enumerated conditions )
@adrenochrome Well, I take their saying "we can't guarantee that such devices [single-cable connections] will run properly" without a Y-cable as meaning that they're unsupported. The minimum they recommend is a Y-cable, so that's what I'm going with here. As I said in an earlier comment, I understand that a single-cable connection may work, I just don't feel comfortable recommending it. I appreciate your feedback on the wording, too - thanks as always!
I never heard of a y-cable to tell the truth, they sell em at walmart or ne computing store right?
@castlezelda Yup, should be easy enough to find at a big box store, computer store, or Radio Shack. And if you can't find it there, Amazon or Newegg or lots of places online stock them.
@zipmon thank you, gonna try to hunt down a y-cable tomarro, this might bhe a stupid question but what usb drive is displayed in the picture?
@castlezelda No problem! The drive in the picture is an Iomega Prestige 500GB. It's an older model from a few years back but it works just fine!
@zipmon thanks for informing me about that model.
Good to know but I don't intend to download any retail games at all so I should be good.
Would this type of adapter work with Y-cables for those of us that only want to plug in 1 USB connector into the Wii U?
http://www.tmart.com/USB-Power-Adapter-Charger-for-iPod-iPhone_p116379.html?gclid=CLL3qrSc57MCFUxxQgodDCgA2w&utm_campaign=product&utm_medium=organic&utm_source=base
this page is more natural to access while browsing Nintendo website
http://www.nintendo.com/consumer/systems/wiiu/en_na/system_external_storage.jsp?menu=how_to&submenu=wup-usb-ht-connect
and illustrate a single plug
for me Q&A is what i read only if i run into troubles
be sure my insistence is nothing against you but i only want to reassure the numerous worried Nintendo fans from the current comments
(the above page has another important warning, imho, about not to power off WiiU or external drive while writing data)
@MakeMyBiscuit The seagate 1.5 TB drive looks like it was made by Nintendo for the black Wii U except for the different logo.
SHINNY BLACK. Pretty good at picking up fingerprints too.
@zipmon Will a 3.0 USB work or should I use a 2.0 ?
@SetupDisk,
Nice. Can you post some pics of the two together? Do you have the Seagate on top of the Wii U or next to it?
BTW are there USB ports in the back of the Wii U or only in the front? I can not believe Nintendo would only put USB ports in the front of the system.
@Discostew Like, plugging one half of the Y-end into the Wii U and one half into the power adaptor? Logically that should work, though I think some Y-cables split data and power and some channel both through both cords, so you'd have to try with your particular cable. In any case, there's 4 USB ports all up on the Wii U.
@adrenochrome Definitely! I appreciate it! And that's a good point about not powering down the HDD too, very important!
@Sosa Yup! USB 3.0 is backwards compatible and will work fine, it'll just be capped at USB 2.0 speeds. If you're buying a HDD especially for your Wii U, I'd go with a 2.0 just 'cos they're cheaper, but either will work!
@MakeMyBiscuit Two ports in the back, and two in the front under the little flap. Plenty of room for a HDD and a few extras!
You definitely need a HD with it's own power supply or it will not work.
Glad I always read manuals anyway
@zipmon
Thanks. 4 USB ports. Not bad for such a compact system. It is looking more promising.
@zipmon I had to return the USB Extermal 1GB dard drive (at my bestbuy and walmart they were sold out of USB cables and Y-Cables) I had to pick up a Toshiba external USB 2 GB desktop drive. I didn't wanna go that rout but I felt like i had too. At least it works
@castlezelda Perfect, I'm glad you got it sorted! You'll have room for as many games as you need! =D
pfft, I just went to my local Radio Shack, asking about a USB 2.0 Y-cable. They had none, because they said, and I quote, "They are being phased out due to USB 3.0 external HDDs". The Y-cables they did have were USB 3.0, that had one large end split to 2 mini-USB connectors, which was the exact opposite of what I needed.
@sun, @blinder2, the comment about flash is incorrect. Perhaps if the author can cite his sources where Nintendo claims not to recommend using flash. Their internal memory is flash memory itself, so if the author was right, which he is not, then Nintendo is recommending you not use the internal memory to play games from. The fact is flash wears out after many thousands of writes to the same cylinder. It has nothing to do with reads. You can, in theory, read millions of times without causing any damage. You can use flash, and unless someone can cite with written words from Nintendo indicating otherwise, please go ahead and use your SD cards (over USB) or flash USB cards. If anything, reduce your writes to the internal system flash storage!
Thanks for the instructions. I made sure to bookmark this page for when I finally get a Wii U.
"Note that USB thumb drives and flash storage are not recommended as external storage on the Wii U; Nintendo has explained that because flash storage has a maximum number of reads/writes, it's unsuitable for the type of continuous data access needed to run games"
Does that mean that if you insert a SD card into a card-reader and then plug it into the Wii u is a bad thing? In that case I better buy a USB harddrive someday!
@dmdsoftware The information comes directly from Nintendo's External Storage FAQ: http://www.nintendo.com/consumer/systems/wiiu/en_na/external_usb_storage.jsp
(See question 10.)
@zipmon I might try next week to buy a small more compact laptop hard drive still w/1, 2 or 3 TB. just hating the fact that i had to settle for a computer drive. Kinda disgusted by the colors Black (HDD) and White (basic wii u), I know Punky Brewster might dig the color mix, i dunno, am I going a little extreme here?
@castlezelda Haha no worries, I can appreciate that! If it makes you feel better about your computer drive (i.e. wall plug-in) choice, that's definitely Nintendo's preferred method. And remember if you grab the 3TB drive, you won't be able to use it until (at least) December when the firmware update to support drives > 2TB comes in.
@zipmon If I get a 2TB laptop drive, ne1 u recommend, that has a wall plugin?
@castlezelda I haven't bought a HDD in a few years, so I wouldn't be able to tell you any specific models - but anything with a wall plugin will be just fine! I've had good experience personally in the past with Iomega and LaCie drives, and I've also heard good things about Toshibas. But if I were buying a new drive, I'd probably just go with any drive with a wall plug that I could get a good deal on. And if you can find one in white, even better!
Question:
What happens if i fill my HDD and i need to use a new one? (the limited storage size in the Wii U doesn´t allow to copy all my data and then exchange the HDD to copy in it again).
I ask this because the easier answer was to do a backup in a computer and copy all data in the new HDD and then use it in the Wii U (the same as we do in the 3DS when we change the SD card) but you already say it isn´t compatible with a computer and you need to format if you put it in a computer.
@DarkEdi Nintendo's said they're working on an update that will eventually allow you to connect two HDD's to the console, for that exact purpose of moving and copying data. (They haven't specified exactly when this will happen, but it's in the cards! )
Got my external HDD repurposed as a Wii U storage drive. I was impressed that the format took about 1.5 seconds. I'm assuming this is because it was empty, though.
I did some tests running New Super Mario Bros. U through it and the only differences I notice is that the initial load screen (before the game starts) takes slightly longer and the save time is much quicker. Everything else seems to have remained the same, which means I have about 15 times the storage space now. Ready for some eShop lovin'.
@zipmon Can the Wii U handle 3.0 USB or just 2.0 USB, do you know?
@castlezelda The ports are 2.0, but by all accounts it will work just fine with USB 3.0 HDD's! (The speeds just obviously being throttled down to USB 2 standard.)
Useful to know thanks.
@zipmon I'm thinking on buying this Seagate - FreeAgent GoFlex Home 3TB External Network Storage System, can wii u handle 3 TB?
I thought Reggie said, can't handle 3 and above,.
Can anyone tell me whether or not it is okay if I set the external drive on top of the wii if they're both lying flat, or am I potentially threatening their well being?
I have a external hdd that i wanted to use wit h my Wii U but the system can't power it. I was wondering if I could use my usb splitter that has it's own power supply that gets plugged into the wall, if that would work. Any ideas?
might have been asked - tried to trawl through - so apologies if already answered.
If I start out with a small HDD like 250GB, and fill it up... how would I go about moving the files to another HDD, can the Wii U handle two HDD at a time?
If the HDD is formatted only for Wii U use then I couldn't just copy via a PC/Laptop...?
I have this drive and formatted it using the Wii U. I just sold the Wii U and would like to use this drive on my PC but no drive letter appears when hooking it up. How can i REFORMAT the drive if no drive letter is allocated to it?
@Amrulez search Google for HDD Low Level format tool. It will help you reformat your drive for use on a computer.
If your Wii U is taking long time without detecting your hard disk you have whether use Y USB cable or USB hub and it will work fine. Make sure that you use the front ports and not the back once.
.From the hard disk 1 cable in and 2 out to the Wii U
3abdallahم - 26 أبريل 2013 في 4:41 م - إقتباس
بكتبه بالانجليزي عشان الناس تستفيد
.How to format a usb hard disk for Wii U
If your Wii U is taking long time without detecting your hard disk you have whether use Y USB cable or USB hub and it will work fine. Make sure that you use the front ports and not the back once.
.From the hard disk 1 cable in and 2 out to the Wii U
I am debating getting one of these now.
A regular USB flash drive works too, right?
I backed up all my save files to a usb drive so I could format my WiiU. Once the WiiU was back to factory reset I tried plugging the usb drive but the WiiU won't show up (I made sure the Wiiu was turned off before plugging) I don't understand . Thanks
Wow this is awesome! I originally imagined this is how it would work and so I went for the basic white 8GB model.. I thought that the only way to use saves or games / downloads was from internal memory. So at first I was always transferring stuff around.. thanks so much for letting me know that I can run off the HDD!! I was recently planning on buying a 'replacement' black console to 'upgrade' to 32GB to overcome this issue (which annoyed me the moment I got the white and presumed the limitation of only running stuff internal).
Now I don't need to, I'll just bother to turn my external HDD on a bit more from now on xD
@firowind read this and feel sad your saved games are gone
http://mmgn.com/wiiu/news--how-to-transfer-data-from-one-wii-u-to-anothe
^ I wouldn't ever want to do that process.. but also I think they are wrong about the needing two gamepads, surely you could sync the one gamepad to each console as required for each step.
@zipmon i was wondering if you could help me out? I am extremely stupid when it comes to technology and i moved my splatoon data to a USB that wasn't compatible. Is there any way for me to get that back? i got it from eShop but downloading it again wont allow me to receive my old data.
Now that the Wii U and 3DS eShops are about to close, it could be a good time to bump this to the front page.
Show Comments
Leave A Comment
Hold on there, you need to login to post a comment...