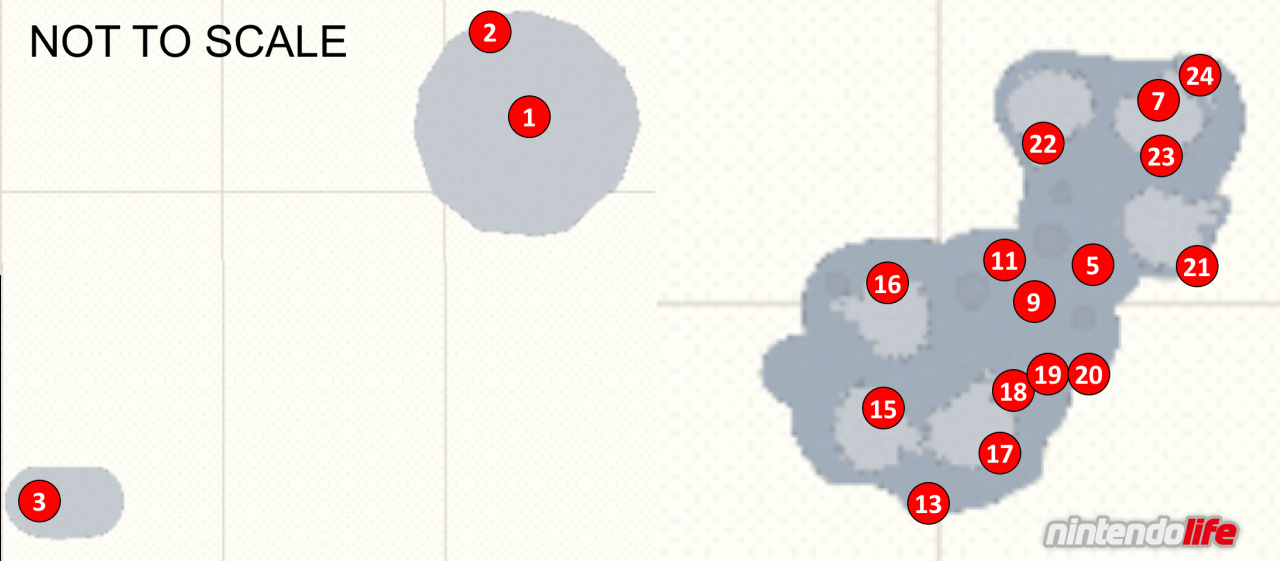
Welcome to our ultimate guide for collecting every Power Moon from Dark Side in Super Mario Odyssey! Below, you'll find maps detailing the exact location for all 24 of the Power Moons located in this Kingdom, as well as descriptions on how to get each and every one of them. We've also added a small mention for the single Power Moon available from Darker Side.
The numbers on the maps correspond to the relevant Power Moon listed below and, whilst most of them appear in that spot from the beginning (or after you've completed the story at least), it is worth nothing that sometimes you are required to perform a specific action to make it appear. Use a combination of our maps and walkthrough information to grab each of the Power Moons with ease. Enjoy!
Subscribe to Nintendo Life on YouTube848k
Dark Side Power Moons (1-24)
1. Arrival at Rabbit Ridge!: You'll receive this Power Moon when you make it to the top of the giant carrot of doom™. The first four floors feature fights with the Broodals that you will have already encountered - the tricky part is keeping enough lives to see the whole thing through. On the fifth floor you'll need to use the Hammer Bro to take down the mecha-robot and smash open each Broodal's dome.
2. Captain Toad on the Dark Side!: As you're making your way up the tower for Power Moon 1, walk past the green pipe that would normally take you up to the roof - after you have fought Rango on the fourth floor. You'll find a hidden area with Captain Toad - talk to him to receive a Power Moon.
3. Breakdown Road: Hurry!: Just behind the Odyssey you'll find a scarecrow standing next to a blue door. Throw Cappy at the scarecrow to enter and get ready for the Dark Side's evil terror to begin. You may have seen this room before, except last time you still had Cappy to help you out. For this Power Moon, you'll need to head to the back of the room to collect the key, and then make it back to the entrance without falling to your doom. If you're after Power Moon 4 (which is in the same location), it would make sense to grab that one at the same time. (See below).
4. Breakdown Road: Final Challenge! (see location 3): In the same location as Power Moon 3, make your way to the end of the room with the key. You'll have to let a Bonzai Bill come towards you to smash the floor you are currently standing on, using a backflip to jump over its head as it closes in. You'll drop down to a lower level with another Bonzai Bill - you'll need this Bonzai Bill to chase you all the way to the entrance of the room at this level. To make this happen, you'll need to perform a series of very fast long jumps across tiny platforms that are lying in a straight line to a wall of bricks. The Bonzai Bill will smash open the bricks to reveal the Power Moon.
5. Invisible Road: Rush!: You'll find a scarecrow standing in front of a blue door in an area off the side of the cliff in the main part of the Kingdom. Drop down to it and throw Cappy at the scarecrow to enter. You'll find yourself in an area with invisible paths and Piranha Plants. To get this Power Moon you'll need to make it to the end of the room (avoiding the poison as you try to land on invisible parts of the path) and defeat the three large Piranha Plants by jumping on their heads as they lower their bodies. If you touch them at the wrong time it will damage you instead so make sure to be careful.
6. Invisible Road: Secret! (see location 5): In the same area as Power Moon 5, make your way to the room until you reach the spinning section in the middle that appears to be shaped like a cross. Jump onto this platform and let it spin around until you are on the opposite side to where you initially jumped on. If you look in the direction that your current cross point is facing, you'll notice a small hole in the wall - you'll be able to walk directly into this hole using an invisible path. Head inside and ground pound the treasure chest to find a hidden Power Moon.
7. Vanishing Road Rush: At location 7 on our map you'll find a scarecrow standing next to a blue door in a small alcove in the edge of the platform there - throw Cappy at the scarecrow to enter. You'll find several sections that only appear when you've pressed the corresponding P-Switch and you'll need to make it all the way across before their timers run out. The first section is easy if you keep pressing 'Y' to roll your way through; the second section is perhaps the hardest - you'll need to use a combination of a triple jump at the start, dive jumps to get up the steps, and then long jumps in the longer stretches at the end; and the third section is easiest if you jump, and triple jump, up the crumbling steps on the right. If you make it to the end you'll find a Power Moon waiting for you.
8. Vanishing Road Challenge (see location 7): In the same area as Power Moon 7, you'll find this Power Moon sitting on the crumbling platforms in the third section. Hit the third P-Switch and make sure to stick to the right - you'll need to jump up the steps perfectly with the occasional triple jump and long jump to make it to the end.
9. Yoshi Under Siege: You'll find a grey warp pipe on a ledge just above the blue door that takes you to Power Moons 5 and 6. Enter the warp pipe to find a Yoshi egg waiting for you. For this Power Moon you'll need to search the area as Yoshi and eat ten pieces of fruit. Don't worry if the Sherm tanks make you lose all of your health - the fruit will still count as being found. Take your time and search the area thoroughly.
10. Fruit Feast Under Siege (see location 9): In the same area as Power Moon 9, you'll need to use Yoshi to eat another ten pieces of fruit - meaning that you will have eaten all twenty in total. As before, you'll keep the fruits you've already found even if you die, so take your time and make sure to search every area, climbing up to all of the platforms above you.
11. Yoshi on the Sinking Island: You'll find a grey warp pipe just off the edge of a cliff near Uncle amiibo - enter it to find Yoshi in an area made up of small cliffs. You'll need to eat ten of the twenty available pieces of fruit to get this Power Moon. As you climb the cliffs, use your flutter jump, and then extend Yoshi's tongue at the area you're aiming for so that he performs a front flip to land on it - his jump can't make it otherwise and you'll be swallowed up by the lava.
12. Fruit Feast on the Sinking Island (see location 11): In the same area as Power Moon 11, you'll need to have Yoshi eat another ten pieces of fruit, meaning you'll have eaten twenty in total. The same advice from before applies here.
13. Yoshi’s Magma Swamp: Enter the grey warp pipe at location 13 on our map to find Yoshi in an area with sinking platforms. For this Power Moon, you'll need to have Yoshi eat ten of the fruit pieces that you can see dotted around the room. It is safest to cross between islands when they are raised and you'll always want to return to the centre of each island when you can.
14. Fruit Feast in the Magma Swamp! (see location 13): In the same area as Power Moon 13, Yoshi will need to eat another ten pieces of fruit - meaning you'll have eaten all twenty in total.
- The following Power Moons are all found using 'hint art'. Our recommendation here is to find all ten pieces of art in Dark Side (the locations on map above show you where to find them) and use the Switch's capture button to save them for reference before heading out to find them in the other Kingdoms. The descriptions below will help you to find the right areas in the corresponding Kingdoms after you have collected the hint art.
15. Found with Dark Side Art 1: This hint art depicts the Cascade Kingdom. Fly there and warp to the Fossil Falls Heights checkpoint, making sure to then walk over the bridge in the northwest. You'll need to walk to the northeastern point of this area and perform a ground pound when you are standing at the spot indicated in the hint art - looking out to the waterfalls below.
16. Found with Dark Side Art 2: Fly to the Metro Kingdom and warp to the Heliport checkpoint flag. There is some yellow paint on the floor that looks just like the art in the picture - ground pound the spot that is indicated to receive the Power Moon.
17. Found with Dark Side Art 3: Fly to the Mushroom Kingdom and head over to Toad's garden in the east. Use the hint art to locate the correct area - you'll need to be standing in between the two bushes when performing the ground pound for the Power Moon. You can use the purple coin indicators as reference points.
18. Found with Dark Side Art 4: This picture is a representation of the Cloud Kingdom's centre island map. Fly there and head to the mainland - you'll notice that the raised platforms in this area all look like variations of the moon. Find the picture that matches the moon shape from the hint art (it's the one in the northwest) and perform a ground pound in the centre for a Power Moon - you have to be quite precise with this one.
19. Found with Dark Side Art 5: Fly to the Snow Kingdom and jump down the well to find Shiveria Town. You'll need to go down to the race area, stopping by the archway that serves as the entrance to the bottom floor. You'll notice that the image from the hint art is in the middle of this archway - head to the side of it, perform a back flip and a Cappy dive to get onto it, and run up to the point above the picture. Perform a ground pound here for the Power Moon.
20. Found with Dark Side Art 6: Head to the Seaside Kingdom and locate the Talkatoo. From there, you'll need to travel directly north until you reach the green binoculars (it has to be the correct set of binoculars). Then head directly east until you reach a bunch of parasols up on an island, and then south again to find two pillars that are close to the section with the rolling spiky shells. Ground pound on the spot indicated in the hint art to reveal the Power Moon.
21. Found with Dark Side Art 7: Fly to the Lost Kingdom and make walk north from the Odyssey. You'll need to make sure that you are in the block labelled 'C4' on your map. The exact spot you need for the Power Moon is near the edge of the cliff on the eastern side - you should recognise the shadow from the hint art that is being created by a nearby tree.
22. Found with Dark Side Art 8: The two images in the hint art act as a game of 'spot-the-difference'. The difference is the blue fork in the top-right of the image, standing next to one of the tall pillars. You'll need to fly to the Luncheon Kingdom, head to Peronza Plaza, and ground pound this exact point for the Power Moon.
23. Found with Dark Side Art 9: The pillars in this hint art can be found inside the Water Plaza in the Lake Kingdom. Head there, making your way to the bottom floor, and walk over to the right-hand side to spot the broken pillars from the image. Ground pound in the spot indicated to reveal the Power Moon.
24. Found with Dark Side Art 10: This hint art shows the Ruined Kingdom. Fly there, and ground pound the spot indicated in the image for the Power Moon (it's very close to the Odyssey).
Darker Side Power Moon
You'll unlock Darker Side when you have collected 500 Power Moons. There is only one Multi Moon available here but it's locked behind a pretty hefty challenge!
1. Long Journey's End: The journey to this Power Moon is a very tough one indeed. As you make your way through Darker Side, you'll have to travel through what feels like an underground, pure evil in video game-form to eventually re-surface and claim your Moon at the top of the tower at the other end of the Kingdom.
The main reason that the challenge is so difficult is the lack of checkpoints - you'll need to make it all the way to the end without losing all of your health. The best advice here is to start the challenge knowing that you'll fail numerous times - use each of these times to learn from your mistakes and you'll start to get better at each section every time that you complete it.
It's also worth noting that you can grab yourself two Life-Up Hearts during your travels, increasing your maximum health to 6. The first one will be given to you if you defeat the optional Yoofoe right at the beginning (the thing that spits out Goombas). The easiest way to beat it is to climb the steps behind it until you reach the top, and then perform a long jump when it is at its closest point. This way, you don't need to bother creating Goomba towers and you'll find yourself with 6 health rather quickly.
The second is much later through the adventure - when you are running across the flower paths, make sure to visit the Sphynx and answer its question for a second Life-Up Heart. Once you've answered the Sphynx once, you'll never have to do so again - the heart will just be waiting for you each time. The answer to the question is 'Mushroom Kingdom'.
So, grab the hearts, memorise the sections, and - importantly - good luck!
We hope that you have found this guide on collecting all Power Moons in Super Mario Odyssey's Dark Side useful. Let us know if you've managed to grab them all with a comment below.


Comments 10
I was so disappointed w/ both of these areas. The first moon area was fun w/ the low level gravity jumping, but I was really hoping for more SMG esque platforming in these 2 areas. There was 1 2D level that was fun but they never really did that in 3D like I was hoping. I'm happy for people who want a challenge in the last area but I'm never trying to beat that last level again. The party atmosphere in the last level was really fun though, reminded me of the after credits party in FF8.
Mushroom Kingdom is my favorite area in the game so the after credits wasn't all bad, but the 2 extra moon areas I found to be underwhelming.
Obligatory "stop spoiling the names of the kingdoms for those who haven't played it yet" comment
No in all seriousness I have found these guides to be very useful and informative. I'll always try my very best to find as many moons as possible without the use of a guide (or a quick check on youtube) but some moons can be very very tricky to find without some guidance.
@Marios-love-child
Played together with my 5yr old. We needed a lot more time obv. and beat Bowser yesterday. So this here is a Spoiler for me. Kinda annoying tbh because I have no chance of avoiding....
@rjejr Yeah, these Kingdom's were very underwhelming... and easy. The final Moon challenge had so many hearts in it that it was almost impossible to fail of you were good enough to get there in the first place.
Even so, this game was amazing, I just wanted a tougher final challenge I think.
@SteveF
To be fair I'm not much further ahead of you, only beat Bowser myself last Sunday and I haven't yet visited this particular kingdom.
I just meant the guides in general are quite useful when needed.
I've only 100% completed 2 kingdoms so far, Cap kingdom and Cascade kingdom and some moons would be almost impossible to find without guidance
Edit: incase you hadn't realised my original comment was meant as a joke
@Marios-love-child
Nono I got it I just wrote it in yesterdays thread as well. Wish they used more clickbaiting here and less spoilering.
But yes guides are obv superuseful.
I love the Sphinx! He's my favorite character! I was over joyed to see him one last time in this level. I tear'd up when he gave his goodbye's. LOVE YOU SPHINX!!
I cheesed myself through the final level with the help of the wedding peach amiibo, infinite lives
@Mijzelffan Until you fall in the lava
@Mijzelffan Me too, I don't like levels where you get sent back to the beginning after a mistake. And even with the healing the platforming bits were still a challenge.
Show Comments
Leave A Comment
Hold on there, you need to login to post a comment...