Next week is the 2016 European International Championships at the ExCel in London, and many people are still getting to grips with the new system for training and even the new Pokémon in Sun and Moon. While Individual Values haven't changed much - beyond Hyper Training, anyway - how you get Effort Values has altered from Pokémon X & Y, and this article should give you the knowhow on how to best, and most quickly, train your Pokémon for battle!
What Are Effort Values?
Simply put, Effort Values, known in game as "base stats", are training. As with most RPG games, you have the ability to manipulate the stats in order to make the characters even stronger than ever before, and Pokémon is no different.
Since Ruby & Sapphire, each Pokémon has the ability of having a total of 510 Effort Points with, as of X & Y, a maximum of 252 in each stat. These are all gained through various means, which we shall get to.
The difference between Effort Points and Individual Values other than training is that it's a combination. For every 4 Effort Points a Pokémon has, it is equal to 1 stat point at Level 100. Due to this, it can be very beneficial as it means that, if you max a stat, it can add a massive 63 points to the final stat total. This can change the tide of battle with your Pokémon considerably, but you have to think about the best places to use it.
While you could spread it across all six stats, with 85 in each stat meaning a 21 point boost, this is not the best course of action. Instead, you'll want to focus on your Pokémon's stats. If it's fast and hits hard, you'll want to boost Attack and Speed. If you're using a Pokémon as a tank, you'll want to boost defences, but we'll come to this in depth later.
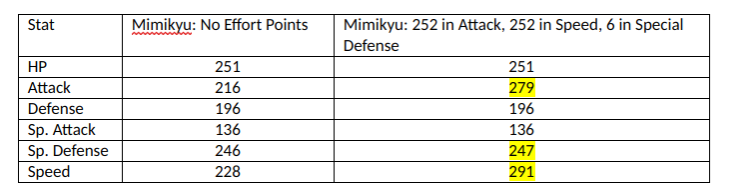
Using a Level 100 Mimikyu with max Individual and a neutral nature the stat changes are as follows:
So, how do you get these Effort Points on your Pokémon? Simply put, you battle Pokémon. In the main game, when you face up against wild Pokémon or trainer-owned Pokémon, you will gain Effort Points when you defeat them. All Pokémon used in the battle against the Pokémon will get the Effort Points, and they will also be given through EXP. Share.
Each Pokémon species will give between 1 and 3 Effort Points, sometimes in one stat, other times across up to three. This means if you're training your Pokémon for competitive battle, you'll want to be very careful with what you face. The stats are recalculated with the Effort Points after each battle. You can find lists of what Pokémon gives what Effort Point online such as on Serebii.net.
Previously, keeping track of the Effort Values gained was a bit laborious and required you to have a notepad and sit and count everything you did, but Sun and Moon has provided a simpler way. When you check the Pokémon's status screen, you will see a graph of its stats. If you press the Y button, you will see a different graph. This one shows your EVs. In the middle, the yellow graph is the actual set base stats of the Pokémon, but the orange or light blue graph around it shows how much you have trained in the stat. If the graph is light blue, you can no longer train that Pokémon and if a stat sparkles, it has been 100% trained in that stat.
The whole set up for Effort Values, at first glance, can seem like an absolute grind and if you did it simply by defeating Pokémon individually, it would be. However, there are numerous ways to expedite the process.
First, there is the rare PokéRus virus. This virus has got the effect of doubling every Effort Point the Pokémon obtains in battle, so if the opponent gives 2, it will instead get 4. PokéRus is obtained randomly through battle, and you'll get notified of it when you heal your Pokémon. At this point, PokéRus can spread to other Pokémon in your party. There are multiple strains of PokéRus which last for one day, two days, three days or four days, meaning the Pokémon is no longer contagious once it hits midnight, but you can prolong this by placing the Pokémon in the box. After the Pokémon has recovered from PokéRus, it will get a small face icon in its summary screen, but it will still receive double Effort Points.
There are various items that give boosts as well and Pokémon Sun & Moon has altered them significantly. First, the Macho Brace that doubled effort values gained has, unfortunately, disappeared and is unavailable in the game. However, the special Power items have received marked improvements. While in previous games they would boost their respective stat by 4 with each defeated Pokémon, in Sun & Moon they have double the effect and give a massive 8 points per Pokémon defeated.
- Power Weight: Hit Points
- Power Bracer: Attack
- Power Belt: Defense
- Power Lens: Special Attack
- Power Band: Special Defense
- Power Anklet: Speed
Each of these items effect is stackable with PokéRus, so if you were facing a Pokémon which gives 1 Effort Point in the stat you're training as standard, you'd get a massive 18 with the Power items.
In Generation VI, there were two ways to expedite this even further, with Super Training and Horde battles, but these are now a thing of the past. Sun and Moon however have actually gone above and beyond and actually provided an even better way.
S.O.S. Battles
First up is S.O.S. Battles. These are a new feature where a Pokémon will call for help as its Hit Points get lower causing a second Pokémon to enter the battle. This can be made more likely by using Adrenaline Orbs or having a Pokémon with Pressure, Intimidate or Unnerve out and can be continued by keeping one Pokémon around using False Swipe.
While this may seem like a situation where it just means it is easier to get Pokémon to appear, there's an added benefit. When a Pokémon successfully calls for help the first time, all Effort Value yields in battle are instantly doubled. So, if you combine this with the PokéRus and a Power Item, you can get a massive 36 points per defeated Pokémon (if that Pokémon just gives 1 point) meaning you can max out a stat completely in just 7 battles. Alternatively, you can forgo the Power item and just get 4 per defeated Pokémon in order to get more specialised EV spreads or just go with standard Pokémon to get 2 points, but maxing them out has never been easier.
There are some recommended areas for training your Pokémon in S.O.S. Battles:
- HP: Malie City Outer Cape - Grimer (SOS Battle) - 30% Chance
- Attack: Route 1 - Yungoose (SOS Battle) - 30% Chance (Day) | Route 1 - Spinarak (SOS Battle) - 20% Chance (Night)
- Defense: Route 12 - Geodude (SOS Battle) - 40% Chance
- Sp. Atk: Route 1 Trainer School - Magnemite (SOS Battle) - 50% Chance
- Sp. Def: Route 2 - Drowzee (SOS Battle) - 20% Chance
- Speed: Seaward Cave - Zubat (SOS Battle) - 80% Chance
Festival Plaza
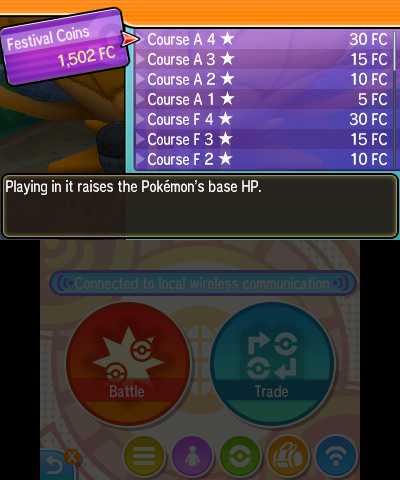
Festival Plaza is the massive area where all multiplayer connectivity takes place and, taking a page from the book of Join Avenue from Black and White 2, it includes a variety of facilities which will boost your Pokémon in some manner. One of these is by increasing Effort Values. In the Bouncy Houses (Clink-Clunk Land, Stomp-Stomp House, Thump-Bump Park), you can purchase special courses using your Festival Coins which boost your Effort Values. Each store type carries two stats and the higher the level of them, the more you can use. You can obtain more stores by levelling up your Festival Plaza or scouting them from other players you meet online.
Each stat has got 7 courses which boost the stat by 2, 4, 8, 16, 32, 64, 128 and even 252 at once. This means you can immediately max a stat just by purchasing one of the courses. You can only purchase each course once a day, so it's not an ideal situation, but it can definitely aid in boosting your stat.
Poké Pelago

There's also one island in the Poké Pelago which will help you raise your Pokémon's EVs. This is on Isle Evelup. On this island, you can put groups of 6 Pokémon to train. When you do so, you can select a specific drink that will allow for you to raise a stat and select the amount of training sessions you wish for your Pokémon to partake in. Each session takes 30 minutes of real-world time and the Effort Values gained in each session depend upon the level of the island. Level 1 gives 1, Level 2 gives 2 and Level 3 gives 4. This means in 63 sessions, or 31.5 hours, on a Level 3 island you will be able to max a stat. This can be expedited by using Poké Beans to halve the time it takes for each session to be completed. This allows for you to passively train Pokémon while you're sleeping.
Removing EVs
Finally, there is also a way to remove unwanted training from a Pokémon, if you did the wrong thing or forgot to turn EXP Share off while you had it in your party. If you give the Pokémon the berry, then the specific stat will be reduced by 10. You can do this until it's at 0, so be sure to grow as many of these berries as possible.
In addition to that, you can also go to the Friendship Café and Friendship Parlor in Festival Plaza, which have special items to purchase that will instantly reduce your Effort Values down considerably, or even completely!
That's pretty much all there is to know about Effort Values, and the changes brought by Pokémon Sun and Moon. IVs and Natures remain unchanged, as does breeding. Good luck training!


Comments 52
Something wrong with the first paragraph in 'Removing EVs'... You say "give the Pokemon the berry", but don't mention what berry.
Sigh, a step in the backward direction after Super Training.
@FriedSquid I think there's a berry for each stat. Regardless, this was a good guide, but if you want to take it deeper, everything you need to know is here: http://www.serebii.net/games/evs.shtml
Are the vitamin items still available in Sun and Moon? I feel they have become somewhat antiquated with each generation.
@Kit I disagree. Super training took a lot longer than horde battles to EV train, and SOS battles are even faster. The only real barrier to getting competitive pokemon is level grinding to 100. I miss the infinite loop from ORAS. Used to be able to drop a few pokemon in daycare and clip the circle pad overnight to level grind them with the bicycle.
EV Training:
Ruining Pokémon since Ruby/Sapphire
(Maybe even longer, but EV Training became really popular since Ruby/Sapphire arrived)
@Nagi_Nagisa Came here to say this.
@Kit not in the slightest, you can kill 7 pokemon and max out a single stat, it's perfect
Wtf, EV Training still exists?
thats why i don´t play Pokemon against other player.
I want to enjoy the game and not go after a a damn list that says me what to do. EV Trainig ruined the competitive Gameplay for me.
@Joe Merrick
Please be reminded that your Mimikyu example shows 510 total Ev's when Gen 6 changed it to 508 and 255 to 252.
And also, you don't need to be level 100. At level 50, you can even notice stat changes. 100 doesn't matter since rules set you to 50 anyways. Leveling to higher levels, you start noticing the Ev's upon level-up. At higher levels, putting Ev's on Pokemon give the stats instantly when the Ev's are given (After battle, or consuming vitamins).
@Lloyd @Menchi187 That's exactly my opinion.
Back when Pokémon Red/Blue and Gold/Silver arrived the thing i most enjoyed in these Games was the freedom it offered to train your Pokémon however you like. EV Training took that freedom away for me and many other players.
@NoxAeturnus Poke Pelago has sort of filled the exp role of the day care... it's probably slower per Pokemon, but allows you to train multiple Pokemon at once, and doesn't require your game to be left on... you've just got to make sure you have enough beans to afford it.
@Nagi_Nagisa Good to know I'm not the only one that has a problem with this. Looks like too much and unnecessary trouble to train competitive pokemon now. At least I don't have the time for it. It would be cool if there were an amateur mode for online battles. I want to enjoy battles against other players but with this rules I have no chance of winning one. Unless I quit work and dedicate my life to breeding imaginary monsters on a virtual world.
@Serebii Um, what berry reduces EVs? It is never specifically mentioned in the article.
@DragonEleven That feature is pretty useless in my experience. I put six Pokémon in there for the max amount of time I could (around 40 hours) and only one of my Pokémon levelled up.
Huh, I do apologise. I thought I listed the Berries that deleted
HP Pomeg Berry
Attack Kelpsy Berry
Defense Qualot Berry
Sp. Attack Hondew Berry
Sp. Defense Grepa Berry
Speed Tamato Berry
@KO-Cub No I know. I'm not saying that you can't see the changes until Level 100. I'm saying that Level 100 is where the changes are most evident and so I used a Level 100 example to show it
People are grossly exaggerating the amount of time it takes to EV train a Pokémon. Out of all the things you "need" to do to play competitively (IV trickery, getting the correct nature, chain-breeding moves and leveling up) it's easily the fastest, and it seems it's only faster now.
@Nagi_Nagisa EV training has been a thing since gen 1: http://www.serebii.net/rb/evtraining.shtml
Nobody is taking your ability to do whatever you want with your creatures away, and there's enough casual players online to have a good time without playing competitively.
It was best in gen 6 with the horde battles - you could fully EV a poke in 10 min
I miss horde battles. =(
What berry?
@Serebii
Pardon me then.
:v
@Nagi_Nagisa
And you still have this freedom. If I can play through normally and enjoy S/M without ev training, so can you. No one is forcing you, so you can't say it ruined Pokemon when it adds so much depth and gives people another 200 to 400 hours of extra play time.
It's ignorant to say it ruined a game about "Being the very best."
Why did they even take Super Training out? It made things super easy....
@Lloyd ev training, along with ivs has existed since the very first games
@Chrayfish Yes, the vitamin items are available. I believe they're both in one of the pokecenters and also available for BP.
I still prefer hordes. 5 battles and all EVs maxed to 250 on one stat. Waiting for a poke to call for help is quite boring and not always works.
@MarcelRguez I wouldn't call it EV training back then and the formula was different but you are right. Pokemon training exists from the very beginning of the series. I find it weird that people get angry at some extra depth in poke-care. I mean, no one is forcing people to EV train their pokes.
@NoxAeturnus There is a fast way (probably fastest so far) to hatch an egg, but your thumb will get sore: call Tauros in that small area in front of the Nursery and dash in circles there. Hatched several Cyndaquils in suprisingly low time :U
@Megas Not sure if you are ironic or serious but... You do realise that with each new generation, people often have to breed and train the same pokemon again? As for me, I will just bring my max IV & EV & shiny teams and be happy with them in local battles. But if I wanted to participate in championships, I would find doing the same work again greatly redundant - especially with O-powers removed.
This is one of the reasons why competetive people prefer to use online battle simluators to test their future teams.
Regardless of what I said above, main story line of the pokemon is always incredible easy - and as of S&M it's a pinackle of hand holding. The game shine as a collectathon and it is great in competetive battling aspects tho.
@KTT I figured Tauros would replace the bicycle for egg hatching, and that's good to know. I wonder if it just increases the speed of steps or if it counts as extra steps? Anyway, that's not my problem. I used to be able to just set it and forget it to level my pokemon up after EV training. Then I'd use heart scales to remind them of important moves, or TMs as needed.
@DragonEleven Really? That's good news. I haven't played around with Pelago at all yet, but the Pokebeans seem cheap enough even if I have to go around to all the different centers to stock up.
@MarcelRguez Absolutely. EV training is by far the fastest part and breeding is definitely the trickiest. My least favorite part is level grinding. I could breed and EV train all day. The level grind afterwards is the worst.
@Calllack You spelled "spelt" wrong
@ProfessorToad daaaaaarrrrrrnnnnnnn
*spelled
@MarcelRguez @KO-Cub Thank you both for breathing some sense into this discussion. It's refreshing to see comments on here that AREN'T rushed-to, emotional conclusions with little basis in fact.
I like that Pokemon is enjoyable both as a fun, 40 hour monster-collecting JRPG and as a super-competitive, complex monster raising sim that yields hundreds of hours of content.
The latter isn't really my style. I usually quit after playing through the campaign. I'm sure this added depth keeps a lot of people coming back, though.
Since I only play with friends, I'll probably try these features but not give them any serious time aside from maybe maxing a few faves for battles. I mean, no matter how Game Freak dresses it up, preparing a team for competitive play takes a serious time commitment. Time a lot of us don't have. I don't expect them to shortcut, say, breeding moves or getting IVs, but that's just the way it is.
I've EV trained since the original RSE and really enjoyed the opportunities it's opened up for me. I've been able to play at a good level when going to events, stayed even playing online against some top-notch players and REALLY invested me into the lore of the game.
I've always played legit since Gen 1, I played a Summer Tour back in 96/97 which saw me getting an official Mew download for Blue using my effort and hardwork... since then I've always put the work in.
@SPG That may be true, but it became popular with Ruby/sapphire.
A better place for Attack EVs is Lush Jungle - everything except Morelull and Comfey give Attack EVs, and you can easily run into Trumbeak, Pinsir, or (in Sun) Passimian, which all give 2 EVs each - couple that with SOS battles and you're showered in Attack.
I'm always so saddened when people say EV training ruined Pokémon, and you need to give up your life if you want to get into it. And that it limits you. I just don't get it.
IV breeding and EV training are not hard in any way. You just need to know a few little tricks, that's all. It also gives you much more freedom to create any Pokémon you like, because in the first 2 gens, where it all worked much differently, you could just max out all of your Pokémon's stats, and they were pretty much all the same - so you were stuck with roughly the same stats every time, which limited you greatly.
EV training and IV breeding became easier and easier with each game, now it takes about one or two hours to breed and train a perfect Pokémon. That's absolutely not much in my opinion. Sure, I've played almost 500 hours of Pokémon X, but that includes beating the game, completing the entire national dex, doing every side-quest, including the Battle Maison, fooling around, playing random battles against friends, collecting everything, shiny hunting for a bit, and (here comes the important part) breeding and training around 70 competitive Pokémon. Which is more than 10 times the amount you need for a working team.
It's interesting that always the people who don't play competitively and don't intend to are the ones complaining about it all the time. That's because the ones who are playing competitively know that it's not at all a difficult or particularly time consuming thing to prepare for it, and the battling itself is extremely interesting and multi-layered, which makes it all worth it.
I think these people should try and play around in online battle simulators, maybe just to get a feel of competetive battling, and maybe it will make them interested in the whole thing. It pretty much takes no time to create a team there.
EV training in ORAS was so much easier. Sweet Scent, Horde Battle, Power item. Rinse repeat. Get a Secret Base full of level 100 Blissey trainers that only know Healing Wish and hold the Toxic Orb. Hold the Lucky Egg and train to level 100 in no time flat.
"If you give the Pokémon the berry, then the specific stat will be reduced by 10. You can do this until it's at 0, so be sure to grow as many of these berries as possible."
What berry? There are many.
I'd say you're better off going to Brooklet Hill and defeating Psyducks for special attack, Magnemite can have the ability Sturdy and use Supersonic, so it's bound to take a long time doing it with Magnemite.
@Lloyd and? that doesn't really mean anything
@SPG It means, that more and more people used it. And that means, it was harder for normal player to play competitive .
Reading this (still waiting for Nintendo/pkmn to solve my syncID problem before playing), the biggest regression is the lack of the Super-training's "magic bottle" who was able to erase all EVs in a single click. Is there no alternative? (berries are fine, when you are nitpicking points)
@Lloyd @Nagi_Nagisa I remember using an action replay to select my wild encounters against my favourite lv100 in Pokémon Red as soon as I noticed that after each time I was "force leveling" a new Pkmn in the League, the lv100s I was using were getting points based on what they fighted as soon as I stored them in the PC. (same things with IVs: always catched several specimen and later in Silver hatched several eggs before choosing one)
Back then, I had no name for it but I'm sure people were already doing it as soon as they figured out there was some "hidden thing" behind the stats differences among the same species.
On the other hand, it was nice that it didn't look like one of the main focus points (like nowadays).
Ruby/Sapphire went on my nerves because of the so many stat malus occasioned by natures. I hated this (still hate it, despite its benefices). So I shouldn't probably writing about this. ^^"
About the competitive or not argument:
Over 3-4 months of playing Alpha (my first Internet-based Pkmn), I never got to fight something else than those two configurations:
I never encountered any in-between. After a while, I gave up any hope I had (like finally playing with more people than my brothers) the Internet could bring to my experience of a Pokémon game. (it's not even an efficient way to complete the Pokédex)
@MarcelRguez Thank you. theres other professions in the pokemon world you dont have to battle to be the strongest.
@Rei Isn't action replay cheating though?
@abbyhitter Share your techniques with a video?
@DanteSolablood It is very rewarding, I love the challenge.
@Aurumonado @Ralizah "EV a Poke" lol
@Kamiyouni It's fairly simple. I just googled QR codes for Blissey trainers. There were tons of them. Just scan those codes and invite those trainers into your base. Healing Wish kills themselves. The last one helps kill itself with holding a Toxic Orb. Let your Pokemon hold a Lucky Egg.
@Kamiyouni I didn't find a better way to choose what kind of opponent EV trainer I wanted.
Yes, it is cheating because it changes values in the game.
@NoxAeturnus The bicycle thing is kinda cheating if you ask me. It's like setting up a bot while playing an online MMO to auto-grind overnight. They had a reason to change that...
Tap here to load 52 comments
Leave A Comment
Hold on there, you need to login to post a comment...