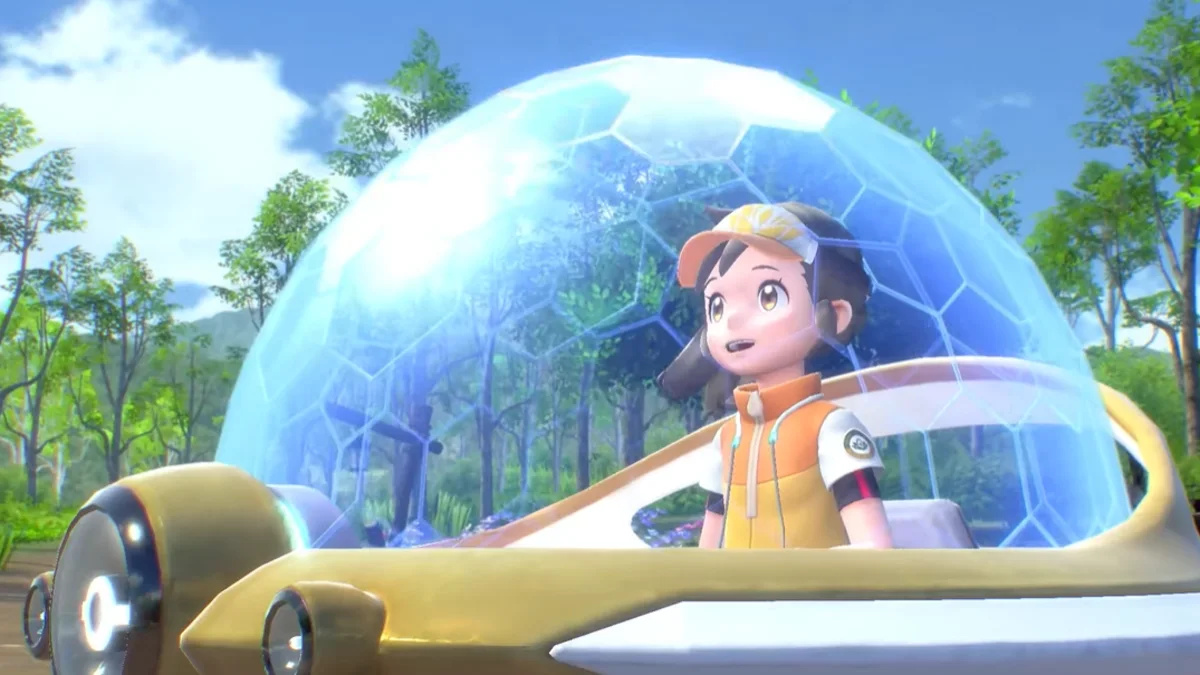
This snow-covered environment is populated by Pokémon like Mamoswine, Abomasnow, Vulpix and Snom.
Be sure to check out our Photodex hub page: New Pokémon Snap Photodex / Pokédex - Pokémon List For All Monsters
- Florio Pokémon List / Pokédex - 001 – 040
- Belusylva Pokémon List / Pokédex - 041 - 079
- Maricopia Pokémon List / Pokédex - 080 - 122
- Voluca Pokémon List / Pokédex - 123 - 154
- Durice Pokémon List / Pokédex - 155 - 200 < YOU ARE HERE
- Aurus Pokémon List / Pokédex - 201 - 214
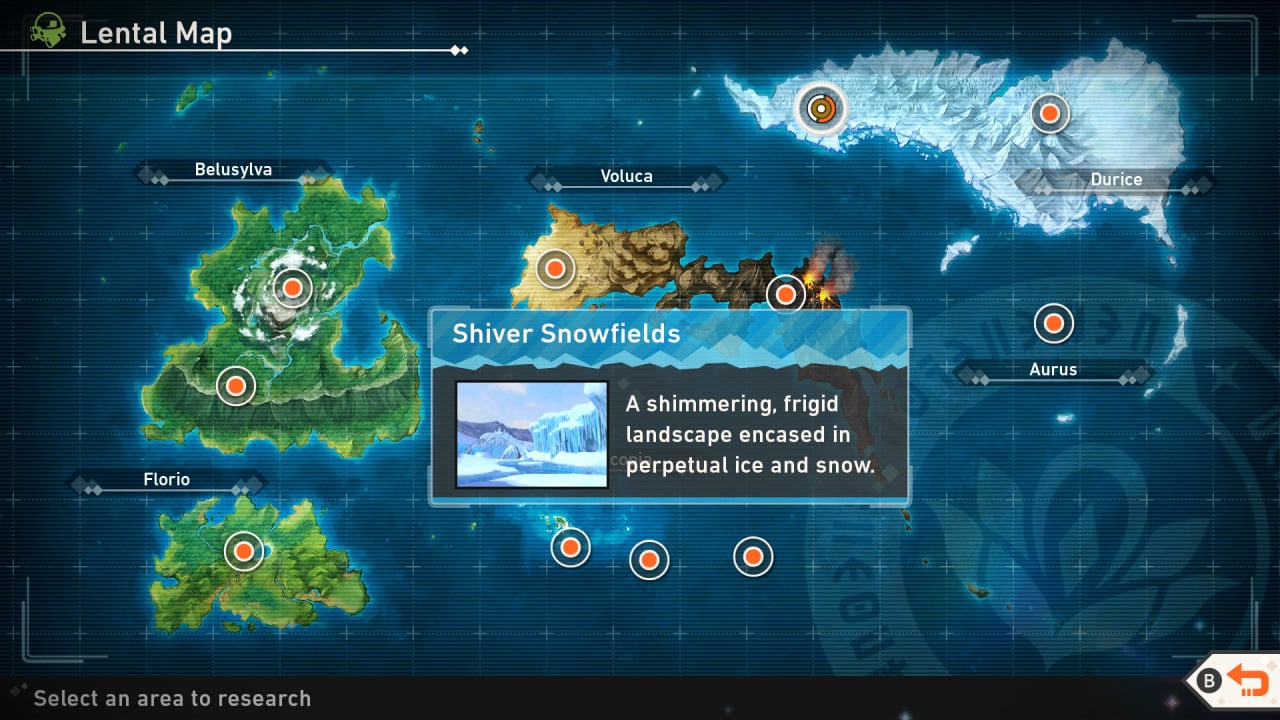
New Pokémon Snap Durice Pokémon Location Map
New Pokémon Snap Shiver Snowfields Day Map

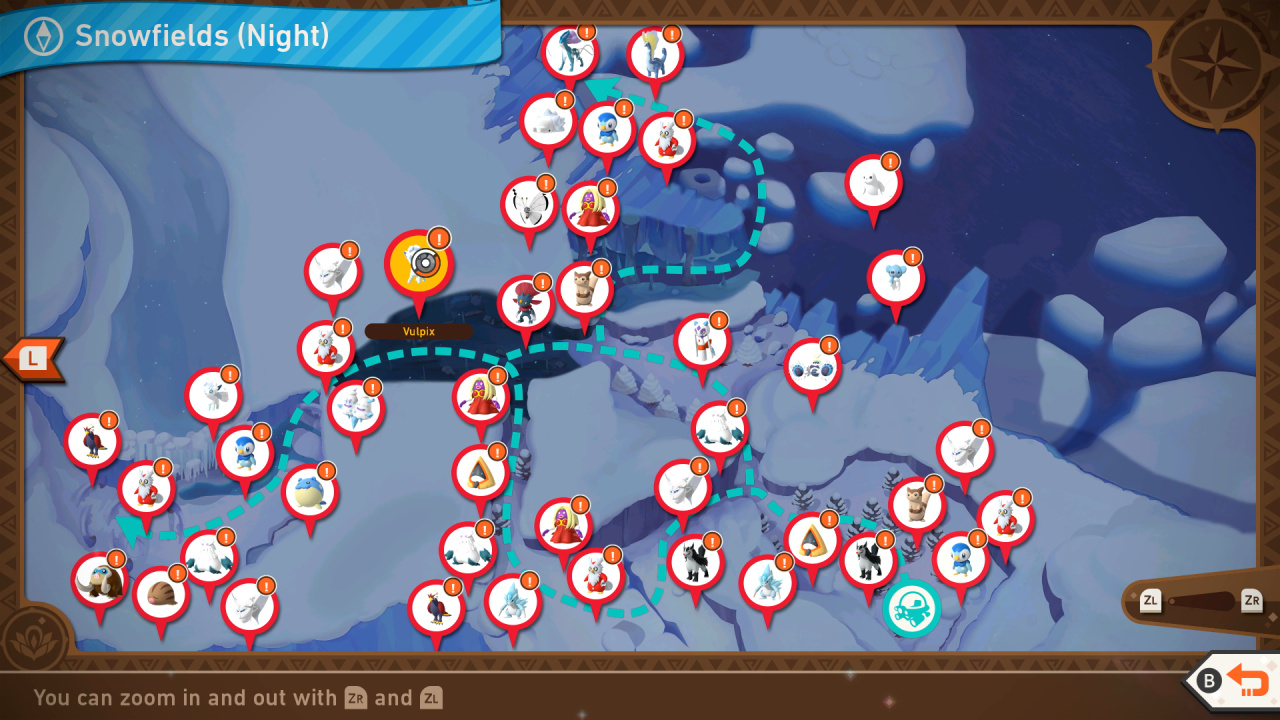
New Pokémon Snap Shiver Snowfields Night Map
New Pokémon Snap Outway Cave Map

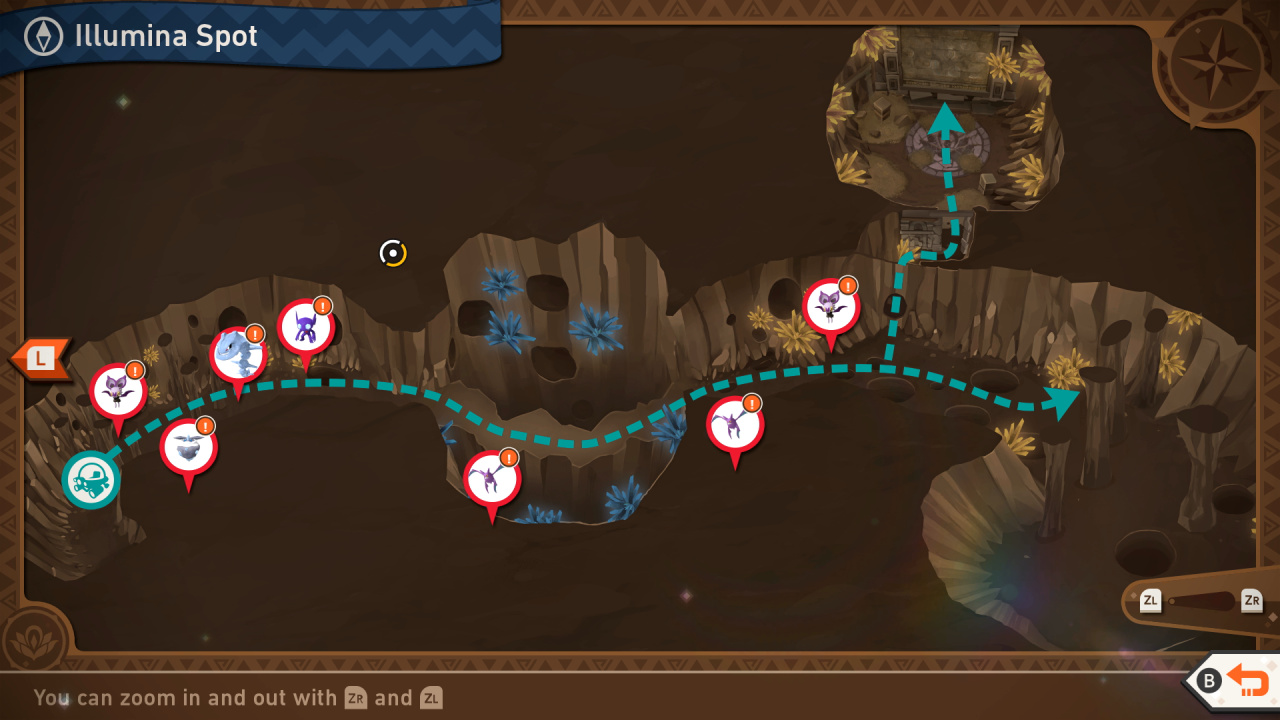
New Pokémon Snap Outway Cave Illuimina Spot Map
New Pokémon Snap Durice Photodex
001: Vivillon (Meadow Pattern)
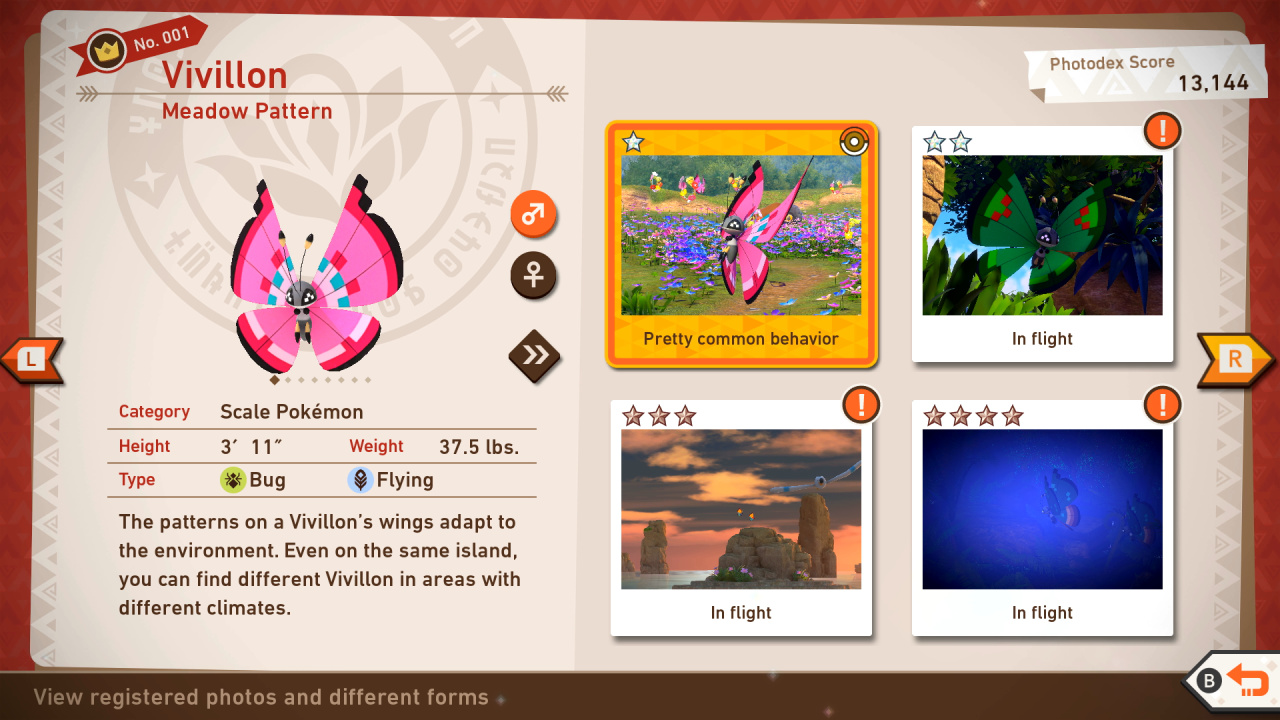
Vivillon Star Guide / Conditions:
1 Star: Most basic photo of this Pokémon possible
2 Star: In general, throwing a Fluffruit at or scanning a Pokémon will cause it to behave in a way that will get you a 2-star photo.
3 Star: In the second alternate path of the Snow (Night) course, you'll find some Icy Snow Pattern Vivillon flying inside the snow cave; take a close-up shot of Vivillon facing you
4 Star: In Jungle (Day), you'll find Arbok blocking your path. As you get closer, scan the area to discover a new path; take the new path and wait for Aipoms to show up in front of you; throw an Illumina Orb to the Aipom on the right for it to cut the tall grass on your left; this will free the Monsoon Pattern Vivillons that are trapped inside the cave; throw an Illumina Orb at Vivillon and take a close-up shot of it
155: Furret

Furret Star Guide / Conditions:
1 Star: Most basic photo of this Pokémon possible
2 Star: In general, throwing a Fluffruit at or scanning a Pokémon will cause it to behave in a way that will get you a 2-star photo.
3 Star: Take a 3 Star photo of Furret near the start of Snowfields (Day). To the right of the path before passing a snow wall, you can spot a Crystabloom next to a few holes in the ground. Toss an Illumina Orb at the Crystabloom to make a Furret jump out of the hole to the left. Take a photo of the Furret as it is jumping out of the hole.
4 Star: Start the Snowfields (Day) course at Research Level 3 and take a photo of the two Furret intimidating each other.
156: Cubchoo
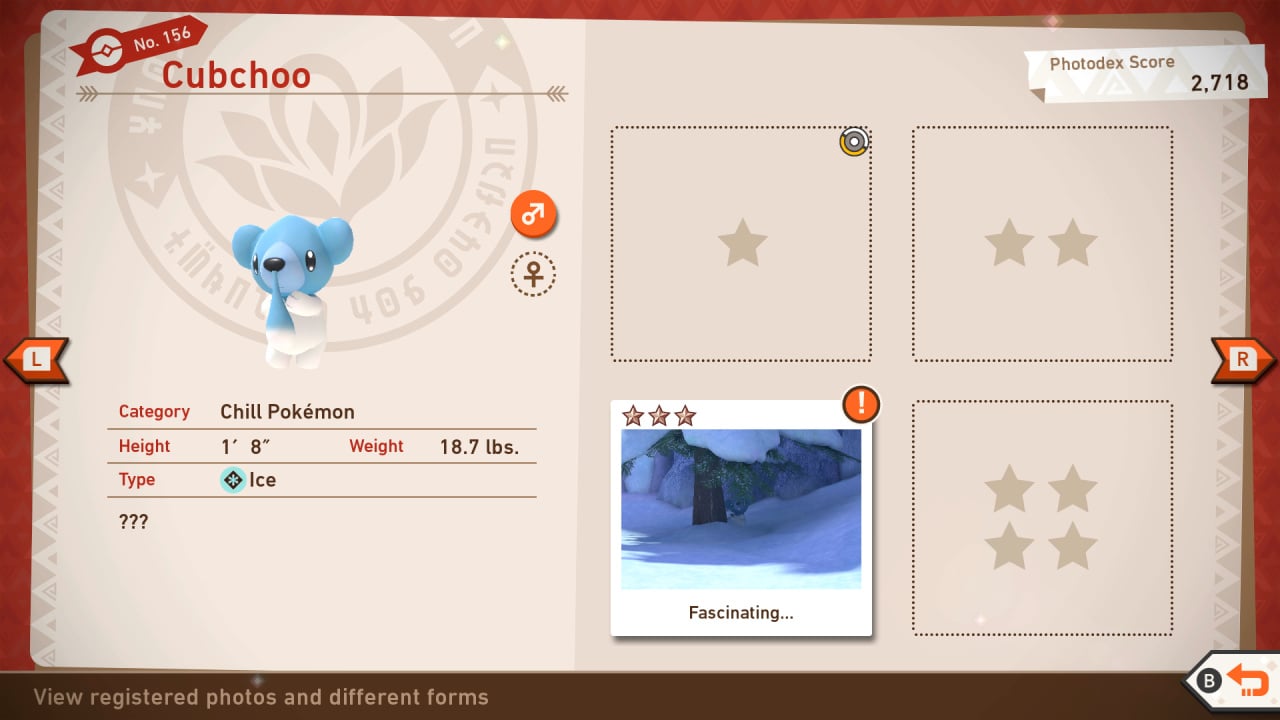
Cubchoo Star Guide / Conditions:
1 Star: Most basic photo of this Pokémon possible
2 Star: In general, throwing a Fluffruit at or scanning a Pokémon will cause it to behave in a way that will get you a 2-star photo.
3 Star: Reveal the Cubchoo hidden on top of the mound of snow in Research Level 3 of Snowfields (Day). You can make Cubchoo come out by tossing Fluffruit on top of the mound. Take the photo immediately as Cubchoo pops out of the snow.
4 Star: Follow the same steps as its 3 Star photo, but make sure to reveal Cubchoo before Beartic passes the snow mound so that it could see the Cubchoo and pick it up. As Beartic passes, it will stop and pick up Cubchoo off the mound. Take the photo as Beartic is lifting Cubchoo.
157: Beartic
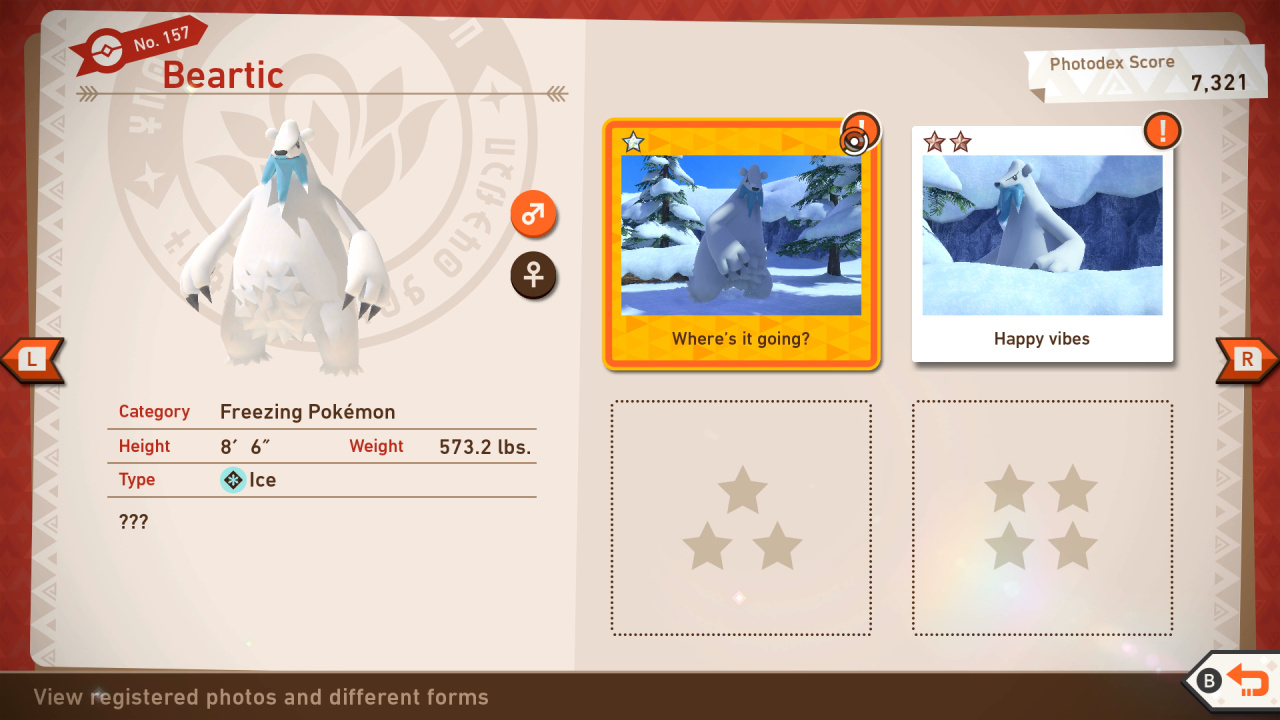
Beartic Star Guide / Conditions:
1 Star: Most basic photo of this Pokémon possible
2 Star: In general, throwing a Fluffruit at or scanning a Pokémon will cause it to behave in a way that will get you a 2-star photo.
3 Star: Get Beartic into an enraged state. You can find two Beartic sitting on an iceberg near the end of the two alternate routes of Snowfields (Night). Toss Fluffruit at the Beartic on the right until it stands up and growls at you.
4 Star: After taking the two alternate routes in Snowfields (Night), you can find a Beartic to your left as you are exiting the ice cave. It is sleeping next to the water hole beside two Snorunt. Toss a Fluffruit into the water hole to make Magikarp jump out, then hit Beartic with another Fluffruit to wake it up. It will stand up and jump into the water to chase the Magikarp. To take a 4 Star photo, make sure to capture the moment that Beartic jumps.
158: Mightyena
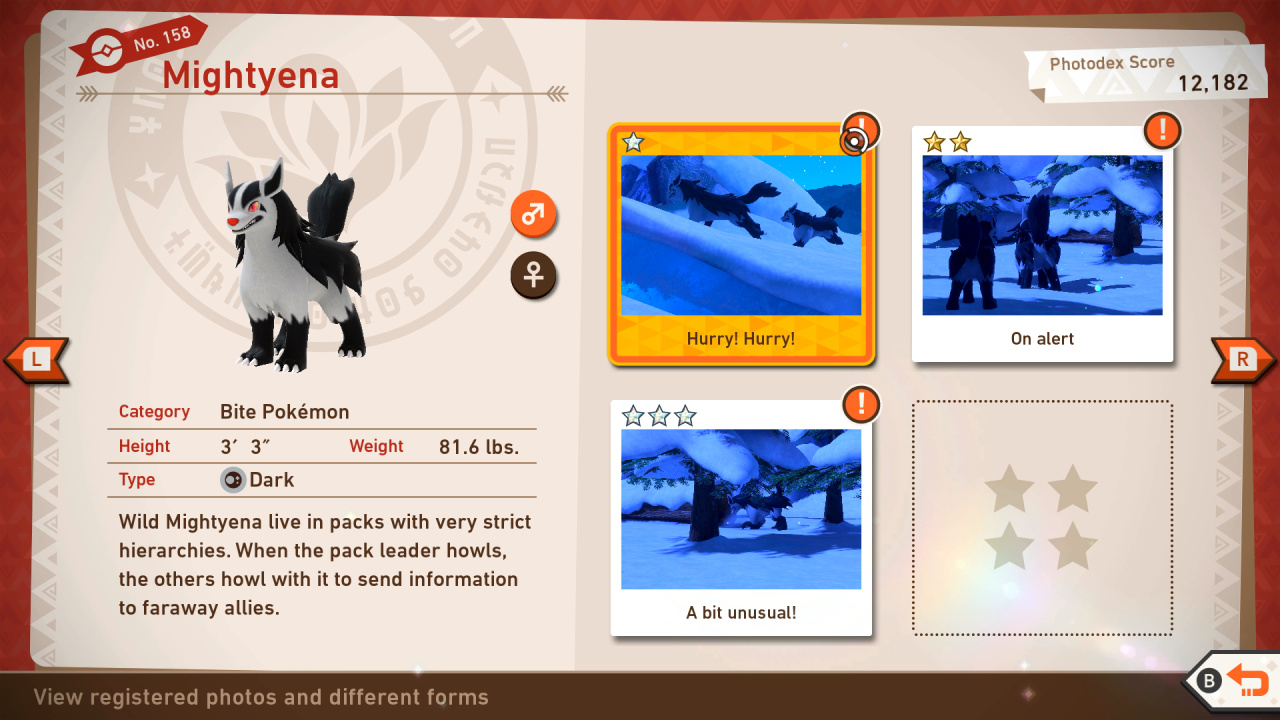
Mightyena Star Guide / Conditions:
1 Star: Most basic photo of this Pokémon possible
2 Star: In general, throwing a Fluffruit at or scanning a Pokémon will cause it to behave in a way that will get you a 2-star photo.
3 Star: Capture Mightyena as it is barking at you. Though this behavior is common all around the Snowfields (Night) course, the best location to take this photo is near the start of the course with the Mightyena to the left of the path. Keep your camera focused on the Mightyena until it notices the player and begins to bark.
4 Star: Clear the Howling at the Heavens request. But before Mightyena runs to the cliff, throw an Illumina Orb at the Crystabloom below the ground. Make sure to get a close-up shot of a howling Mightyena on a cliff to achieve 4 Star Diamond.
159: Weavile
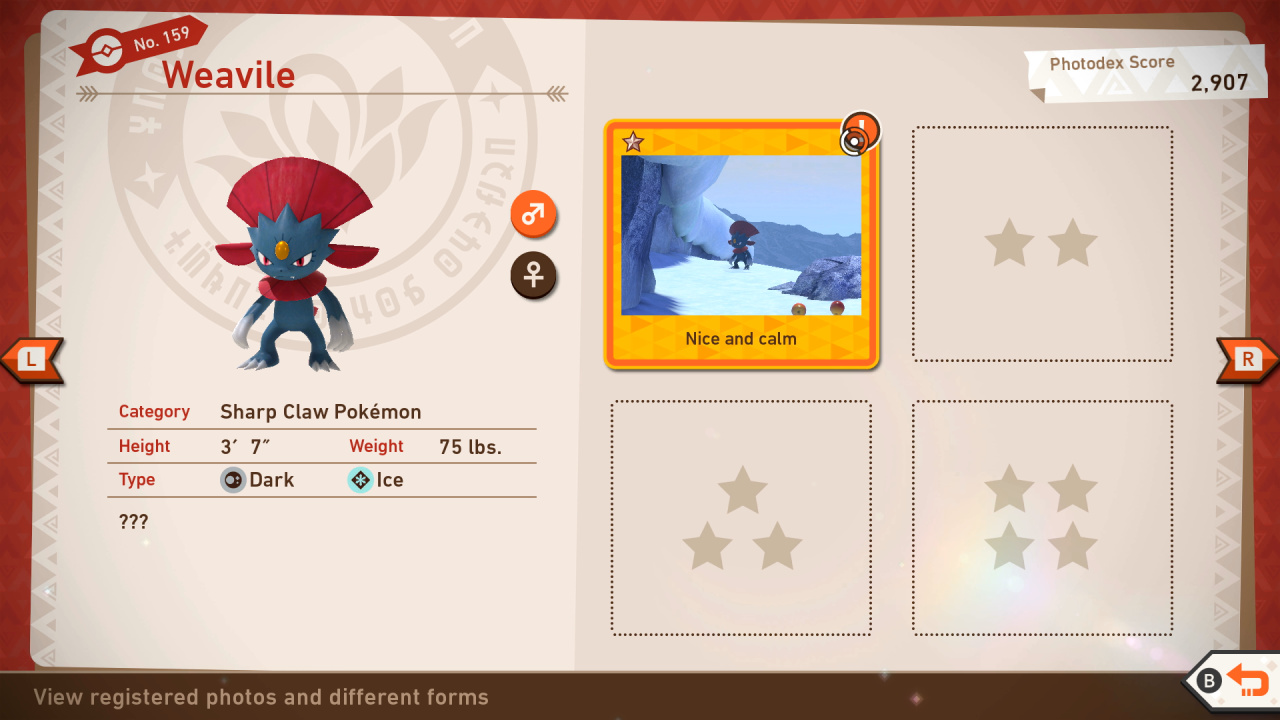
Weavile Star Guide / Conditions:
1 Star: Most basic photo of this Pokémon possible
2 Star: In general, throwing a Fluffruit at or scanning a Pokémon will cause it to behave in a way that will get you a 2-star photo.
3 Star: Complete the Message from a Friend request and take a photo of Weavile while it is reading the markings on the tree.
4 Star: Complete the Wrath of Mamoswine request. However, instead of taking a photo of Mamoswine while it counterattacking, you need to take a photo of Weavile as it delivers the initial attack that sets off the Mamoswine.
160: Braviary

Braviary Star Guide / Conditions:
1 Star: Most basic photo of this Pokémon possible
2 Star: In general, throwing a Fluffruit at or scanning a Pokémon will cause it to behave in a way that will get you a 2-star photo.
3 Star: Take a photo of the Pokemon while it is doing a loop-the-loop. As you go through the second area of the main route of Snowfields (Night), focus your camera on the spot in the above image. A few moments after you pass the ice fissure, Braviary will come flying out from behind the cliffs. Follow Braviary as it flies to the sky and take a photo immediately once it does a loop-the-loop.
4 Star: Near the start of Snowfields (Night), you can find two Sandslash partially hidden on top of some boulders close to the cliffs to the left of the path. Toss an Illumina Orb at the Sandslash that is further away. You have to do this before Braviary starts flying above the area. Once Braviary swoops in, Sandslash will pop out of the ground, surprising Braviary. Quickly take a photo of Braviary's reaction to Sandslash.
161: Swinub
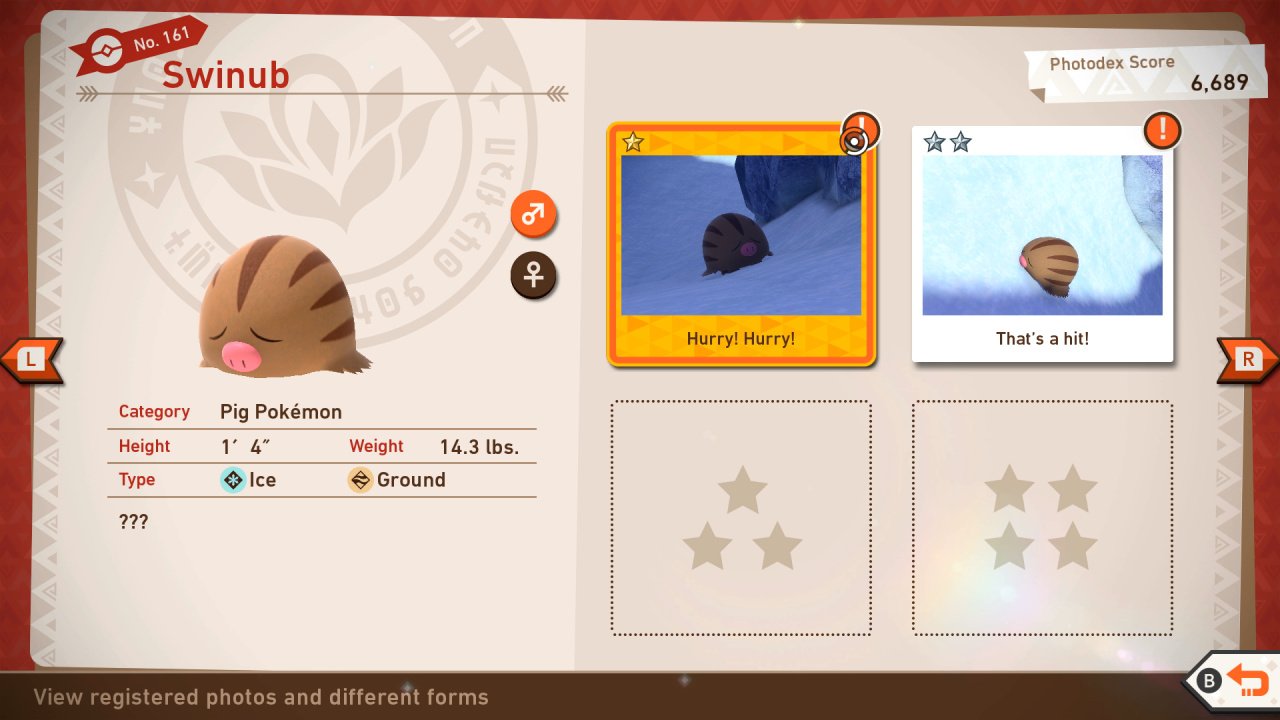
Swinub Star Guide / Conditions:
1 Star: Most basic photo of this Pokémon possible
2 Star: In general, throwing a Fluffruit at or scanning a Pokémon will cause it to behave in a way that will get you a 2-star photo.
3 Star: Go to the Snowfields course research-level 3. At the last part of the course, look at the cliff near the Crystabloom and you'll find Swinub walking towards the edge. Throw an Illumina Orb at Swinub for it to jump and land to the hot spring near it.
4 Star: Once you get closer to the hot spring, hit Swinub with a Fluffruit until it spins over. Take a close-up shot of Swinub in an upside-down position to achieve 4 Star Diamond.
162: Mamoswine
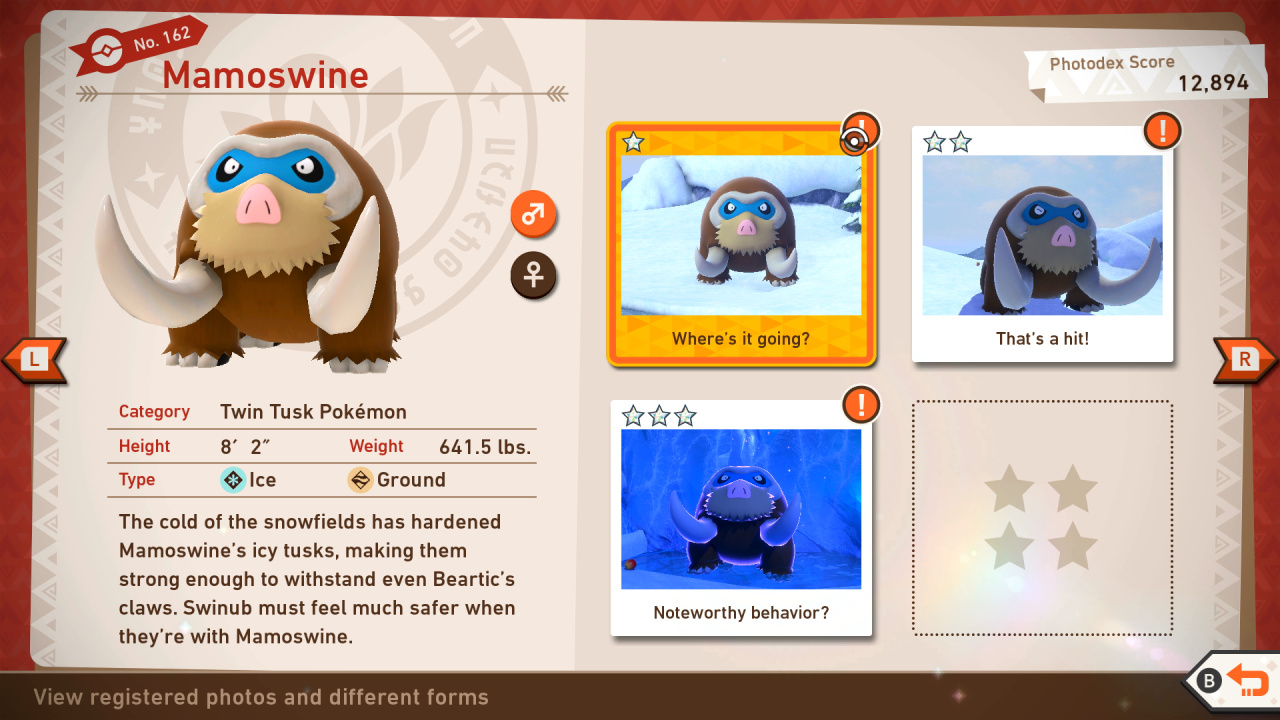
Mamoswine Star Guide / Conditions:
1 Star: Most basic photo of this Pokémon possible
2 Star: In general, throwing a Fluffruit at or scanning a Pokémon will cause it to behave in a way that will get you a 2-star photo.
3 Star: Near the end of the Snowfields (Night) course, you can spot a Mamoswine entering the hot springs. Once you are close enough, take a photo of the Mamoswine as it relaxes in the warm water.
4 Star: Complete The Wrath of Mamoswine request, and capture the moment that Mamoswine tosses snow at Weavile.
163: Skarmory
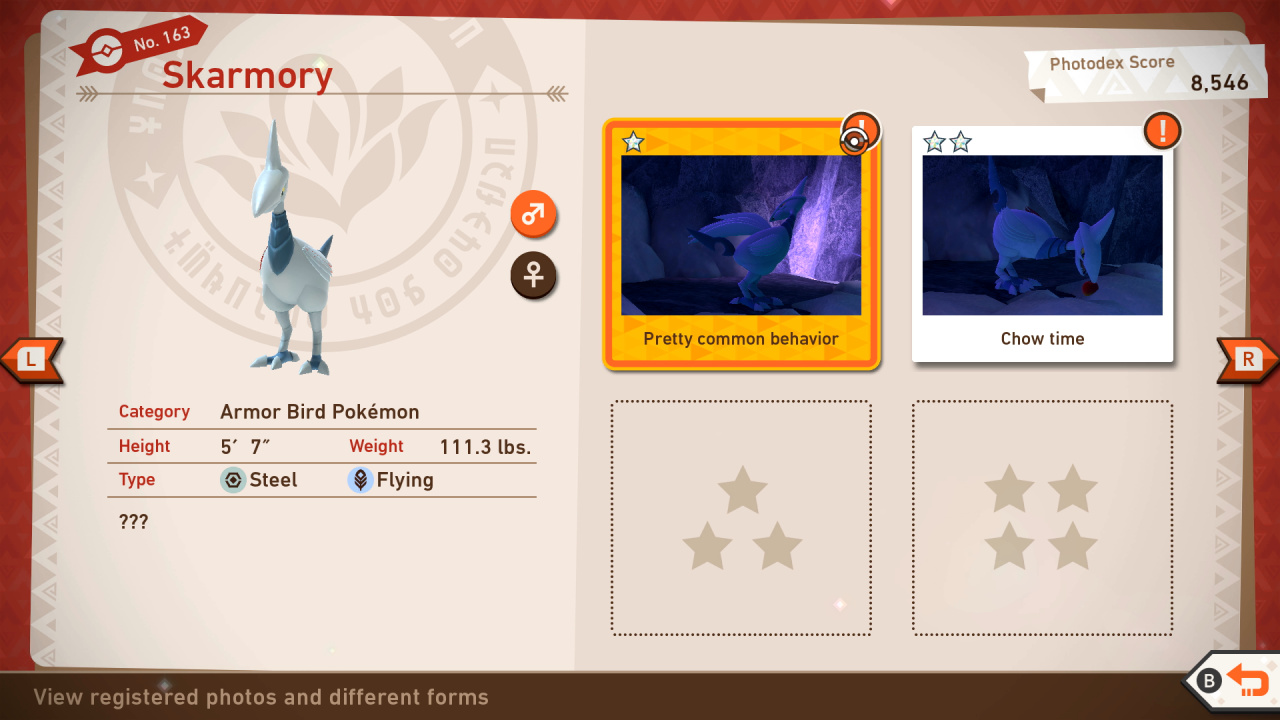
Skarmory Star Guide / Conditions:
1 Star: Most basic photo of this Pokémon possible
2 Star: In general, throwing a Fluffruit at or scanning a Pokémon will cause it to behave in a way that will get you a 2-star photo.
3 Star: To take a 3 Star photo of Skarmory, you need to take Skarmory's photo right as it lands on the ground. Since this requires very precise timings, it is recommended to use Burst Mode when taking this photo.
4 Star: Follow the steps to completing the Skarmory's Flying Show request and capture the moment it twirls in midair.
164: Sandslash
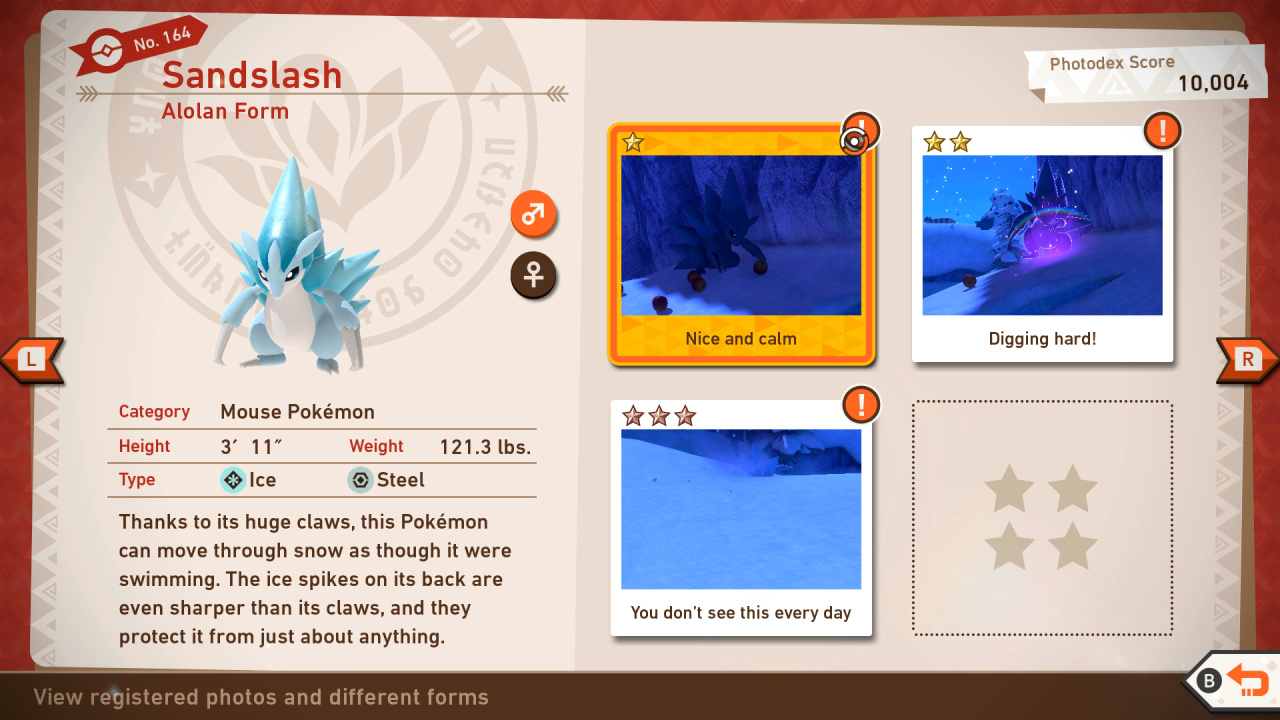
Sandslash Star Guide / Conditions:
1 Star: Most basic photo of this Pokémon possible
2 Star: In general, throwing a Fluffruit at or scanning a Pokémon will cause it to behave in a way that will get you a 2-star photo.
3 Star: To take a 3 Star photo of Sandslash you need to take a photo as it jumps in the air and digs underground. The best area to take this photo is in the first alternate route through the blizzard in Snowfields (Day) since you can get close to one Sandslash that will repeatedly dig underground each time you scan.
4 Star: After taking the first alternate route in Snowfields (Day) at Research Level 3, you can find a Sandslash to the right of the path that will repeatedly reveal itself each time you scan before digging itself back underground. Toss an Illumina Orb at the spot the Sandslash is under to make it jump out of the snow and smile at you. Quickly take a photo as the Sandslash is smiling.
165: Abomasnow

Abomasnow Star Guide / Conditions:
1 Star: Towards the end of the Snowfields (Night) course, take a photo of Abomasnow running through the snow
2 Star: In general, throwing a Fluffruit at or scanning a Pokémon will cause it to behave in a way that will get you a 2-star photo.
3 Star: First, knock the Frosmoth off the wall in the cave to make it appear in the final area of the course; when exiting the cave, look for an Abomasnow following Frosmoth; wait for it to fly away; Abomasnow will walk over to the other Frosmoth and watch it flying around; toss an Illumina Orb at that Frosmoth to excite Abomasnow and take a photo of Abomasnow as it does this.
4 Star: Follow the steps to complete the Whiteout request and take your photo when Abomasnow triggers a blizzard
166: Vulpix
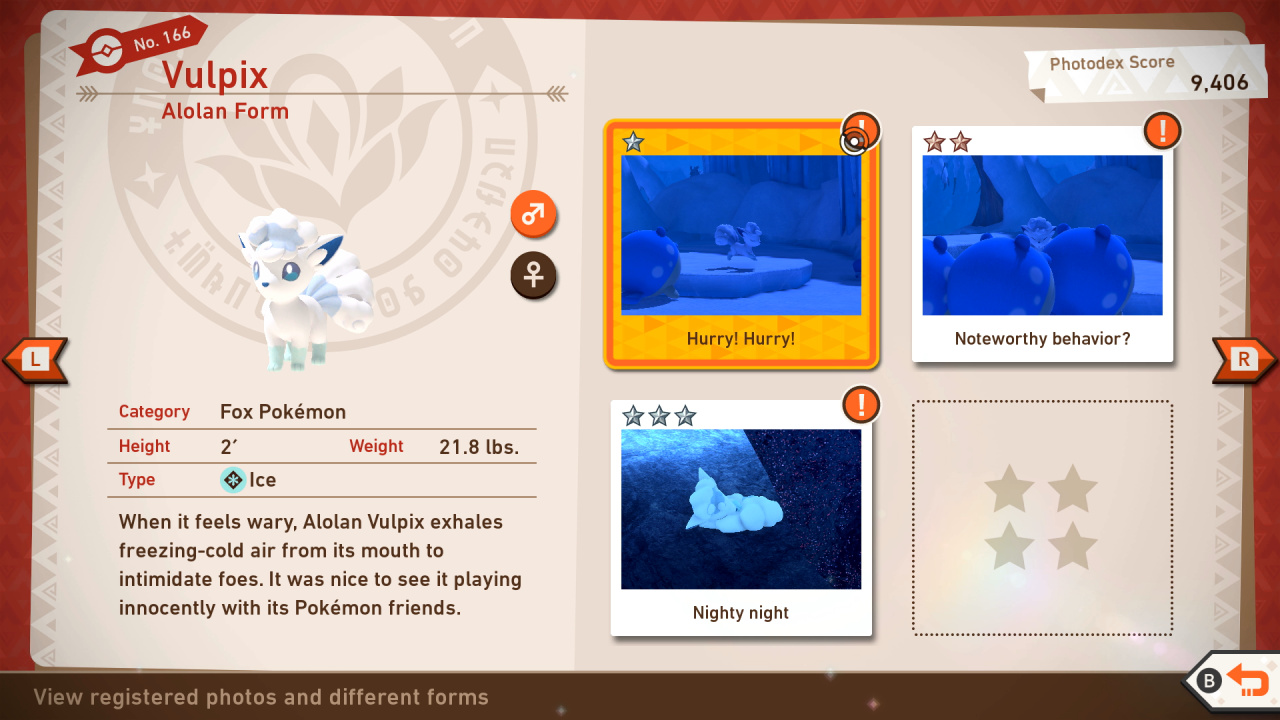
Vulpix Star Guide / Conditions:
1 Star: Most basic photo of this Pokémon possible
2 Star: In general, throwing a Fluffruit at or scanning a Pokémon will cause it to behave in a way that will get you a 2-star photo.
3 Star: Take a photo of Alolan Vulpix happy after eating a Fluffruit; Get a picture of Vulpix sleeping in a righthand cave alcove
4 Star: Get a picture of Alolan Vulpix using Icy Wind on the Spheal in Snowfields (Night); In the final area of Snowfields (Night), hit Spheal with a Fluffruit before Abomasnow hits them so Piplup can finish the race. Take a photo of Vulpix as it's crowning the victor, an even better picture if it is with Glaceon; Take a picture of Vulpix sleeping through the holes in the side of the cave
167: Delibird

Delibird Star Guide / Conditions:
1 Star: Most basic photo of this Pokémon possible
2 Star: In general, throwing a Fluffruit at or scanning a Pokémon will cause it to behave in a way that will get you a 2-star photo.
3 Star: Take a picture of Delibird putting a Fluffruit into its sack; If you awaken the sleeping Crabominable with two Fluffruit and an Illumina Orb, it will knock the tree with the Snom sleeping. The Snom will dig under ground but one will be slower. Hit it with an Illumina Orb and Delibird will come with a Fluffruit. Take a picture of Delibird offering the Fluffruit
4 Star: After Delibird puts a Fluffruit in its pack, throw another and throw an Illumina Orb or playing Melody to get it to offer you one; After Delibird puts a Fluffruit in its pack, throw another and use Scan to get it to yell at you
168: Snom
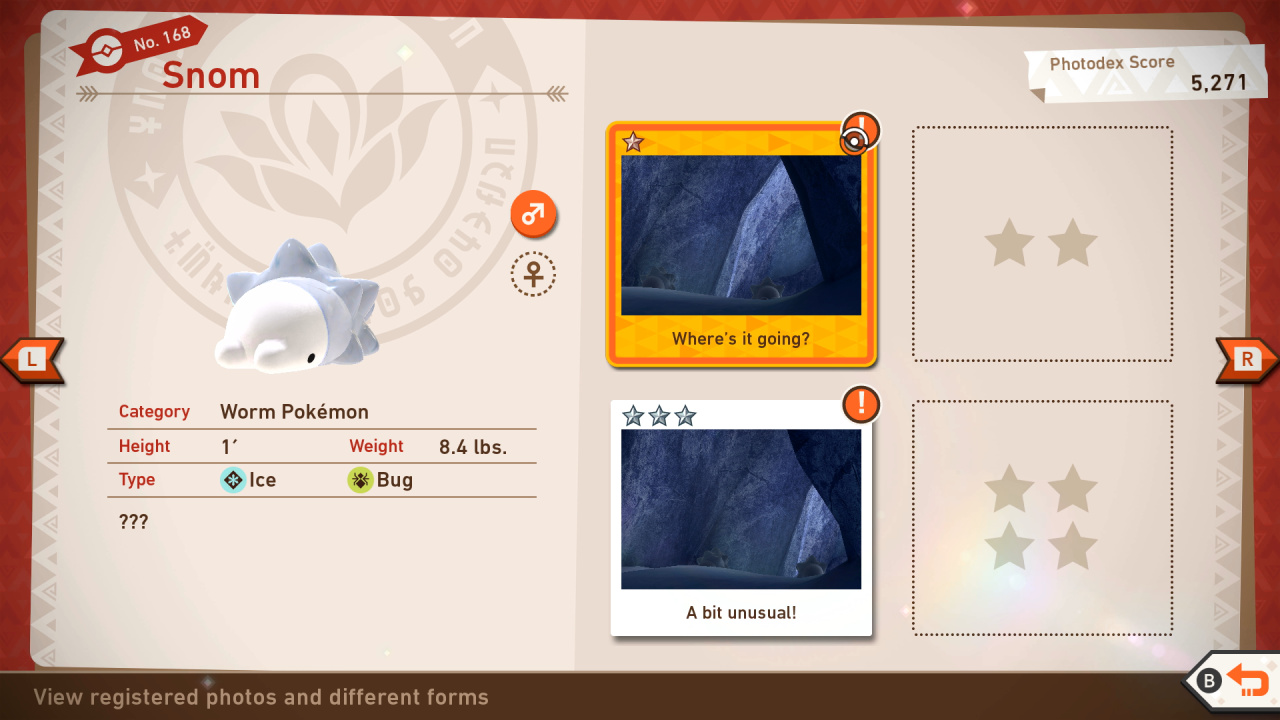
Snom Star Guide / Conditions:
1 Star: Most basic photo of this Pokémon possible
2 Star: In general, throwing a Fluffruit at or scanning a Pokémon will cause it to behave in a way that will get you a 2-star photo.
3 Star: Take a picture of Snom hanging down from the cave after going through the Snow Wall path in Snowfields (Night); Take a picture of Snom going into the trees in Snowfields (Night); Take a picture of the Snom on the righthand tree when going into the cave in Snowfields (Day)
4 Star: In the Snow Wall area of Snowfields (Night), if you awaken the sleeping Crabominable with two Fluffruit and an Illumina Orb, it will knock the tree with the Snom sleeping. The Snom will dig under ground but one will be slower. Hit it with an Illumina Orb and Delibird will come with a Fluffruit. Other Snom will then come up and celebrate. Take a photo for a 4 star photo
169: Frosmoth

Frosmoth Star Guide / Conditions:
1 Star: Most basic photo of this Pokémon possible
2 Star: In general, throwing a Fluffruit at or scanning a Pokémon will cause it to behave in a way that will get you a 2-star photo.
3 Star: Knock off the two Frosmoth on the way into the Snowfields and take a picture of them eating Fluffruit; Knock the Frosmoth off from the tree in the Blizzard area and take a picture of it dancing by throwing an Illumina Orb
4 Star: In Snowfields (Night), hit the Frosmoth hanging off the cliffside in the Tundra. It will then come to the final part of the stage. Hit it with an Illumina Orb and take a picture of its move
170: Crabominable
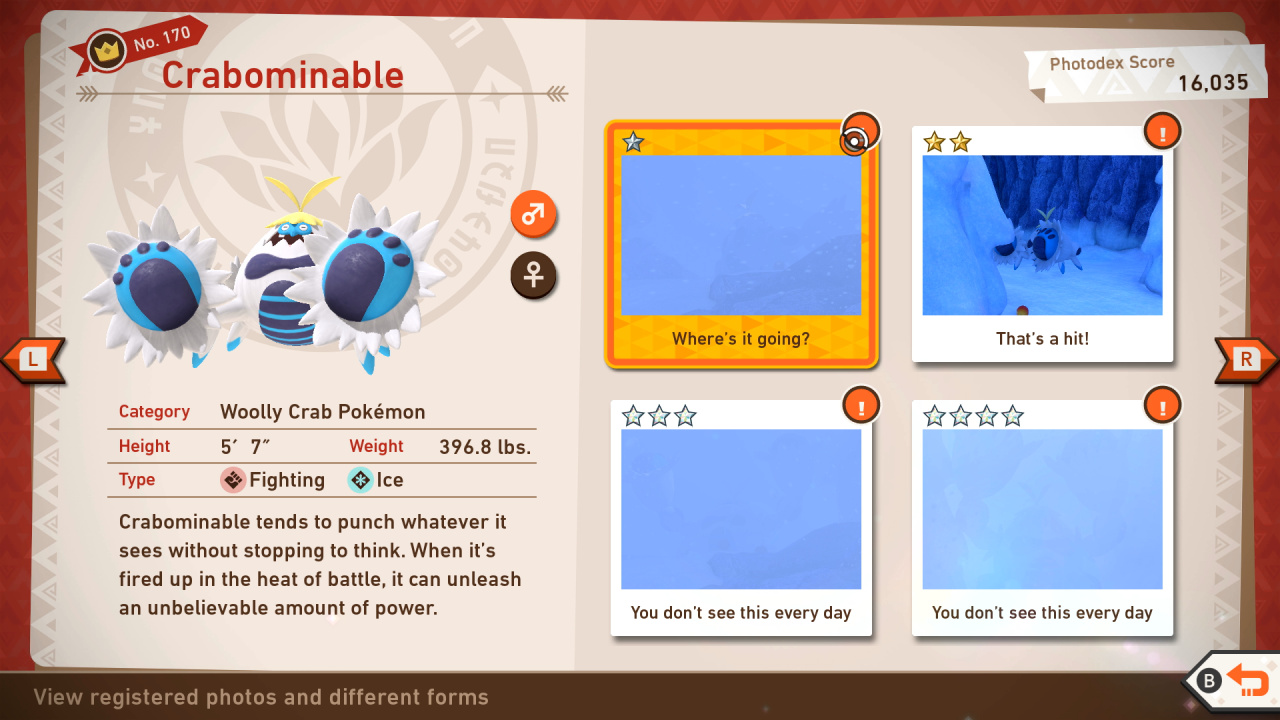
Crabominable Star Guide / Conditions:
1 Star: Most basic photo of this Pokémon possible
2 Star: In general, throwing a Fluffruit at or scanning a Pokémon will cause it to behave in a way that will get you a 2-star photo.
3 Star: Take a photo of Crabominable punching the tree beyond the Snow Wall in Snowfields (Night)
4 Star: Throw a Fluffruit/Illumina Orb at Crabominable beyond the Snow Wall in Snowfields (Day). Then, it will jump to you towards the end of the area. Take a photo when it lands
171: Snorunt
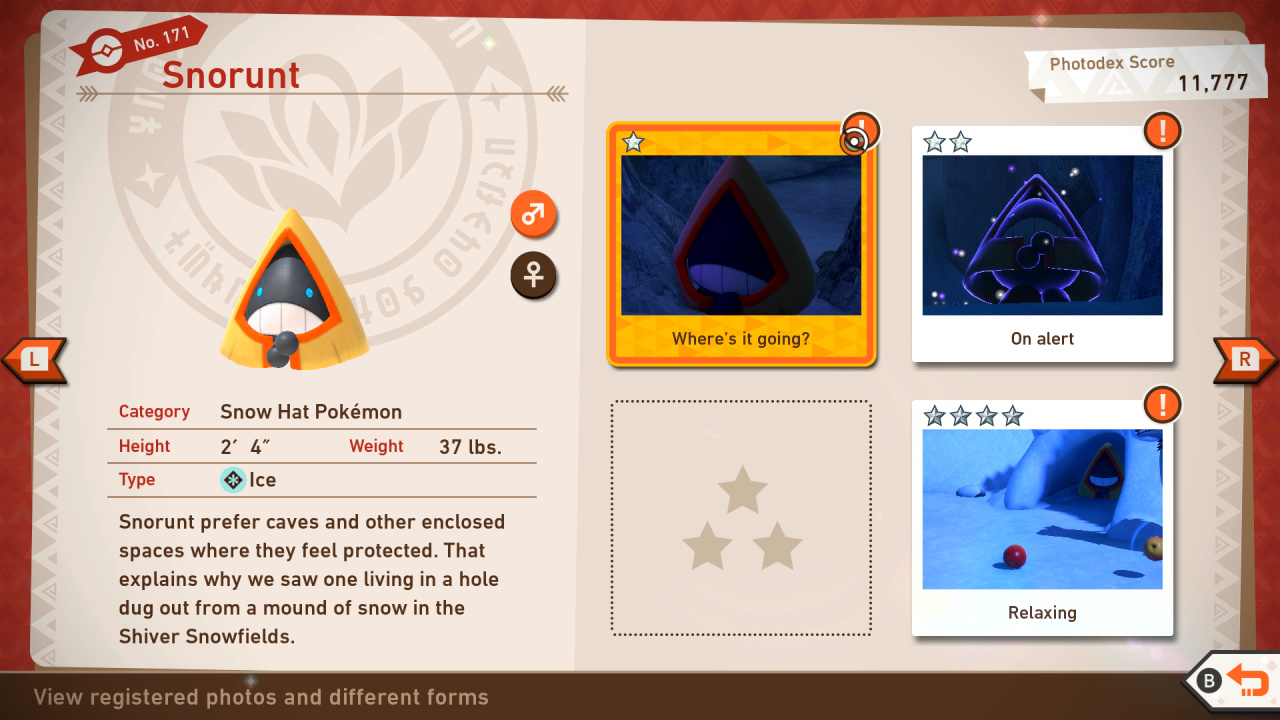
Snorunt Star Guide / Conditions:
1 Star: Most basic photo of this Pokémon possible
2 Star: In general, throwing a Fluffruit at or scanning a Pokémon will cause it to behave in a way that will get you a 2-star photo.
3 Star: Take a picture of Snorunt happy inside the cave; Take a picture of SNorunt excited at the fallen icicle in the cave in Snowfields (Day)
4 Star: Throw a Fluffruit at the front of the igloo in Snowfields (Night) and take a picture of Snorunt within it; Knock the icicle down above the Snorunt and take a picture of them as it lands
172: Glalie
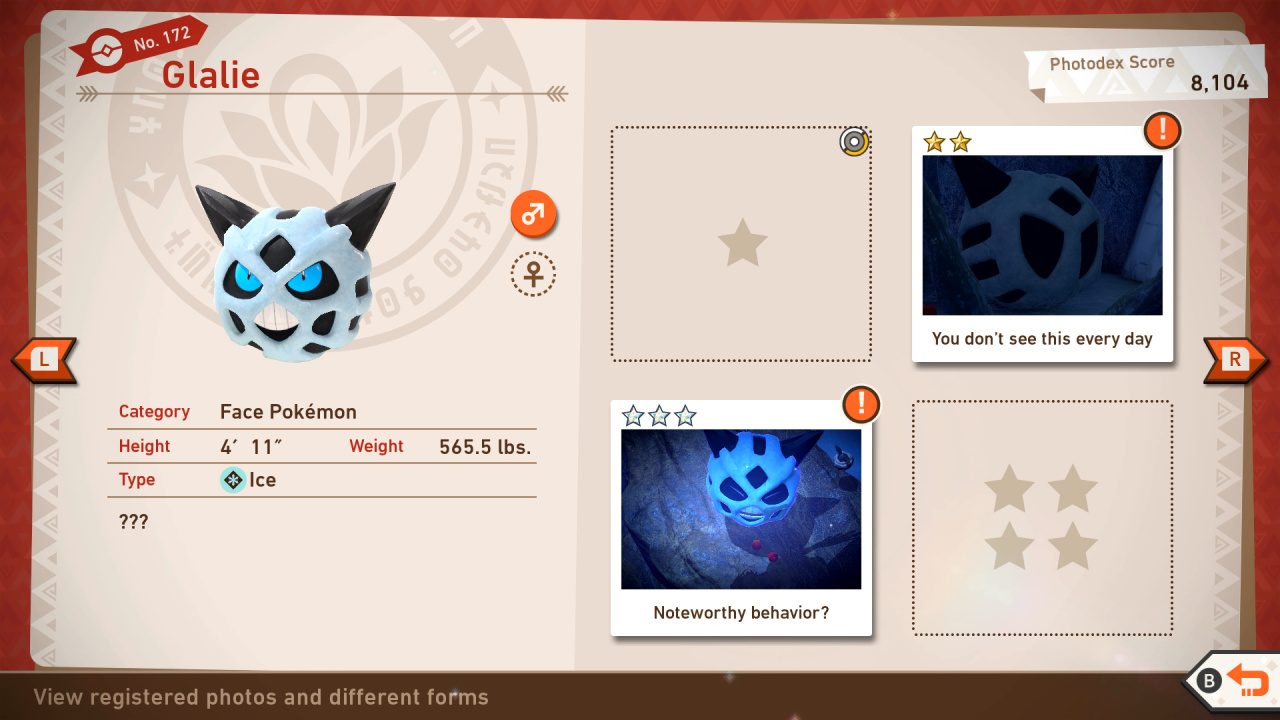
Glalie Star Guide / Conditions:
1 Star: Most basic photo of this Pokémon possible
2 Star: In general, throwing a Fluffruit at or scanning a Pokémon will cause it to behave in a way that will get you a 2-star photo.
3 Star: Throw a Fluffruit and Orbs at the Glalie in the Cave Level 2
4 Star: Inside the cave after it has been woken up in Snowfields (Night), throw a Fluffruit at Glalie to activate its Ice Armor; Lure Glalie to Avalugg's tail in the Icy Cave in Snowfields (Day) and hit it with an Illumina Orb to get it to bite down
173: Froslass

1 Star: Most basic photo of this Pokémon possible
2 Star: In general, throwing a Fluffruit at or scanning a Pokémon will cause it to behave in a way that will get you a 2-star photo.
3 Star: Take a picture of Froslass as it is using the snow to teleport
4 Star: After Froslass wakes up inside the cave in Snowfields (Day) Level 1, throw Illumina Orbs at the Crystabloom by it, then throw a Fluffruit to get it to use an attack; In the Ice Cave, throw Illumina Orbs at the Froslass so she keeps disappearing. She will appear by the Froslass and release a spray of ice dust; Wake the Froslass up in the Snow Wall area of the Snowfields Night. Then, when going into the standard path, hit the Snom she's speaking to with a Fluffruit and she will move to the final area. Wake her outside and play Melody for a photo
174: Jynx
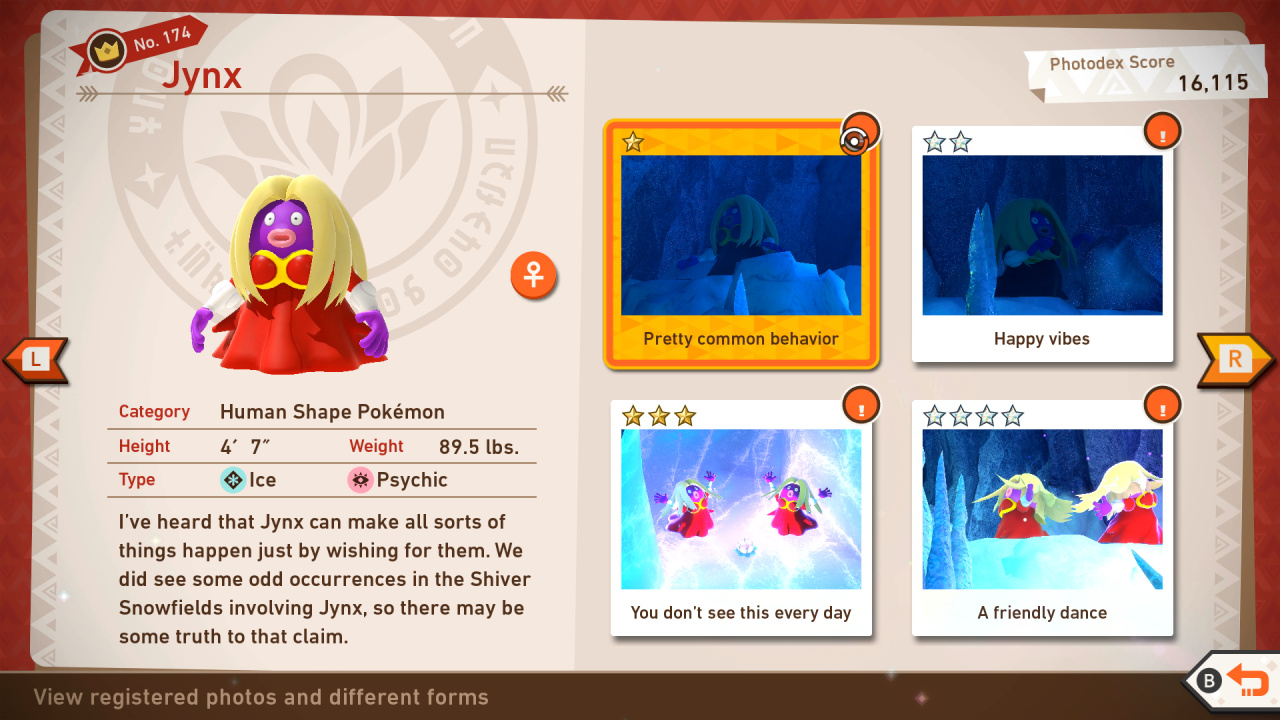
Jynx Star Guide / Conditions:
1 Star: Most basic photo of this Pokémon possible
2 Star: In general, throwing a Fluffruit at or scanning a Pokémon will cause it to behave in a way that will get you a 2-star photo.
3 Star: Take a picture of Jynx as it tries to use its powers on a crystabloom
4 Star: Throw an Illumina Orb at the Jynx praying by the river inside the Icy Cave and take a photo of it when it blows a kiss; Take a picture of Jynx dancing with Vanilluxe by throwing an Illumina Orb at the Crystabloom
175: Spheal
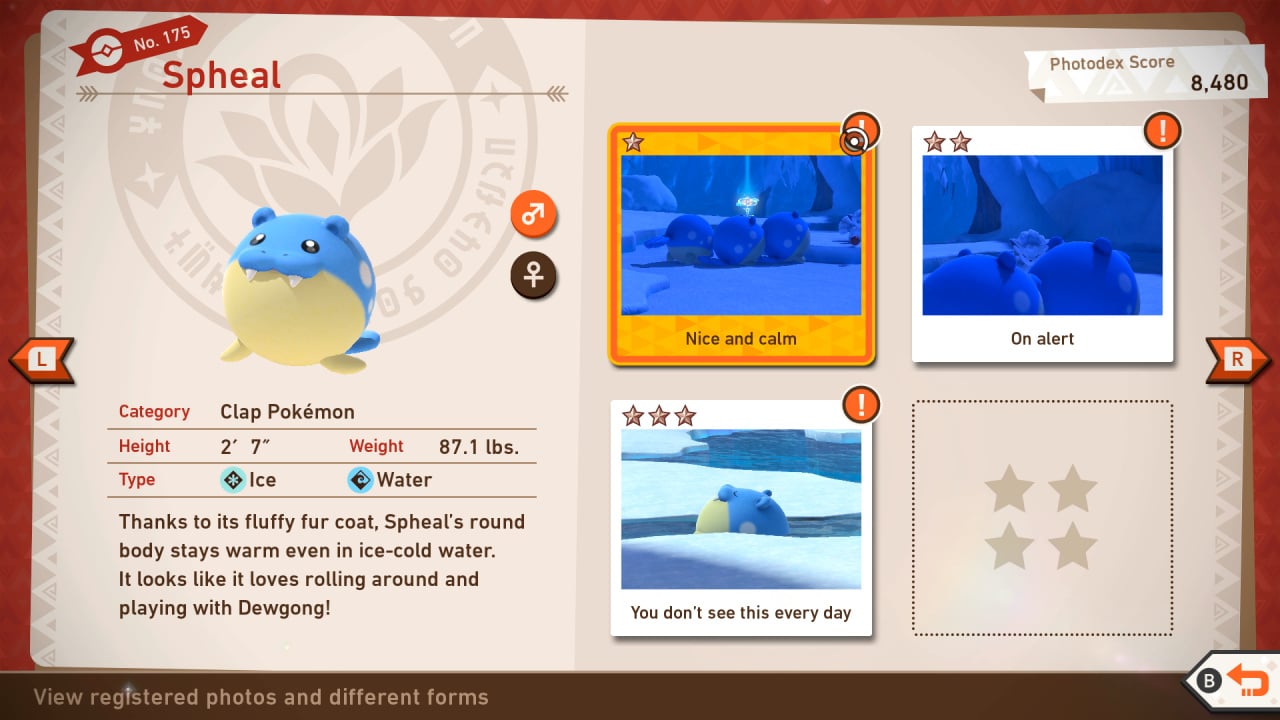
Spheal Star Guide / Conditions:
1 Star: Most basic photo of this Pokémon possible
2 Star: In general, throwing a Fluffruit at or scanning a Pokémon will cause it to behave in a way that will get you a 2-star photo.
3 Star: Take a photo of Spheal relaxing in the water in Snowfields (Day)
4 Star: Knock Spheal into the water hole in Snowfields (Day) and play Melody to get a picture of Dewgong bouncing Spheal on its head; Take a picture of Spheal happily bouncing and posing after being bounced by the aforementioned Dewgong
176: Piplup

Piplup Star Guide / Conditions:
1 Star: Most basic photo of this Pokémon possible
2 Star: In general, throwing a Fluffruit at or scanning a Pokémon will cause it to behave in a way that will get you a 2-star photo.
3 Star: As you exit the cave in the main route of Snowfields (Night) you can see two Piplup running towards the frozen lake to meet up with a third Piplup. The three of them will start to slide around the ice and stop beside the Spheal. Take a photo of the Piplup as they are sliding on the ice. You can use Turbo Boost to get a better angle of the sliding Piplup.
4 Star: As you enter the final area of the main route in Snowfields (Night), you can see a group of three Piplup to your right about to start a race. Toss Fluffruit at the sleeping Spheal to wake them up and clear the way for the race. After the race has finished, the winning Piplup will walk towards the Vulpix, which will blow an Icy Wind to celebrate. Take a photo of Piplup as it stares at Vulpix's Icy Wind.
177: Vanilluxe
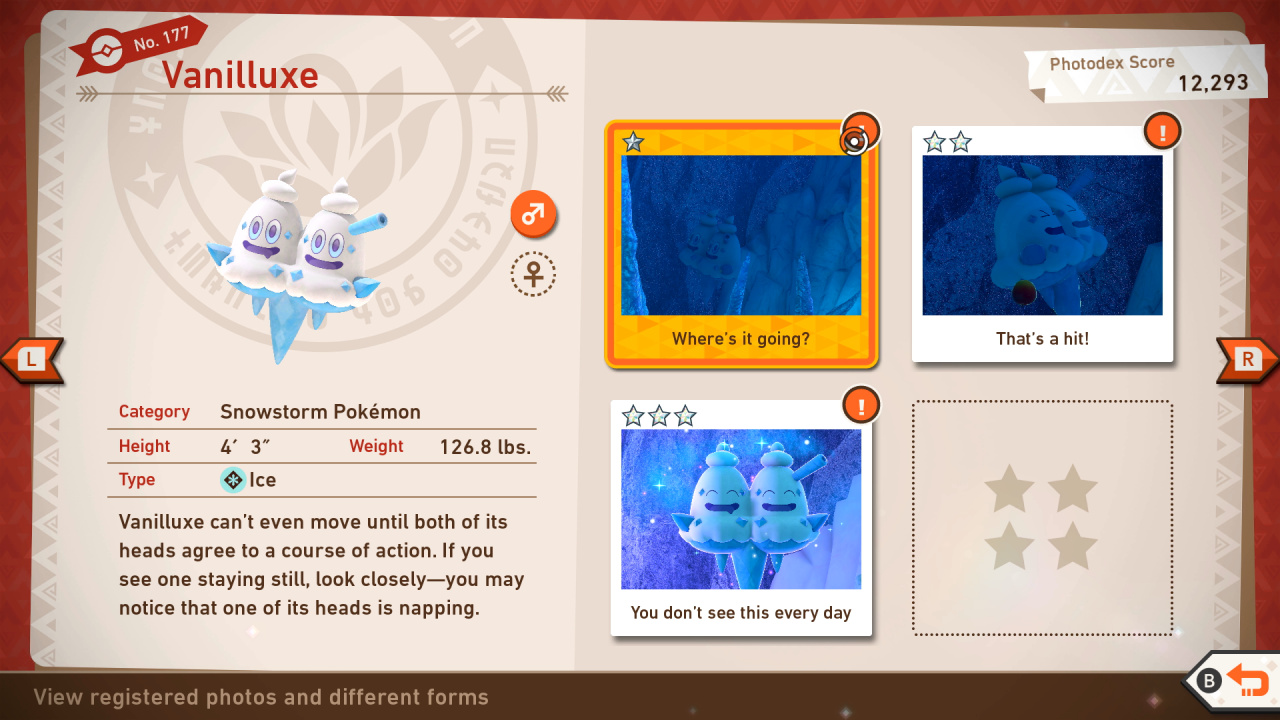
Vanilluxe Star Guide / Conditions:
1 Star: Most basic photo of this Pokémon possible
2 Star: In general, throwing a Fluffruit at or scanning a Pokémon will cause it to behave in a way that will get you a 2-star photo.
3 Star: You can take a 3 Star photo of Vanilluxe in the same location as its 1 Star Photo. However, before you take a photo of it, toss an Illumina Orb at the Crystabloom while Vanilluxe is beside it. Take a photo as Vanilluxe delightfully twirls around.
4 Star: To take a 4 Star Photo of Vanilluxe, proceed through the main route of Snowfields (Night) until you reach the cave. Toss an Illumina Orb at the Crystabloom to make the Pokemon around it dance. Once the Crystabloom has stopped glowing, toss another Illumina Orb at the Jynx closest to the exit. The Jynx will jump down beside Vanilluxe, and Vanilluxe will release a ring of smoke. Take a photo as Vanilluxe releases the smoke.
178: Avalugg
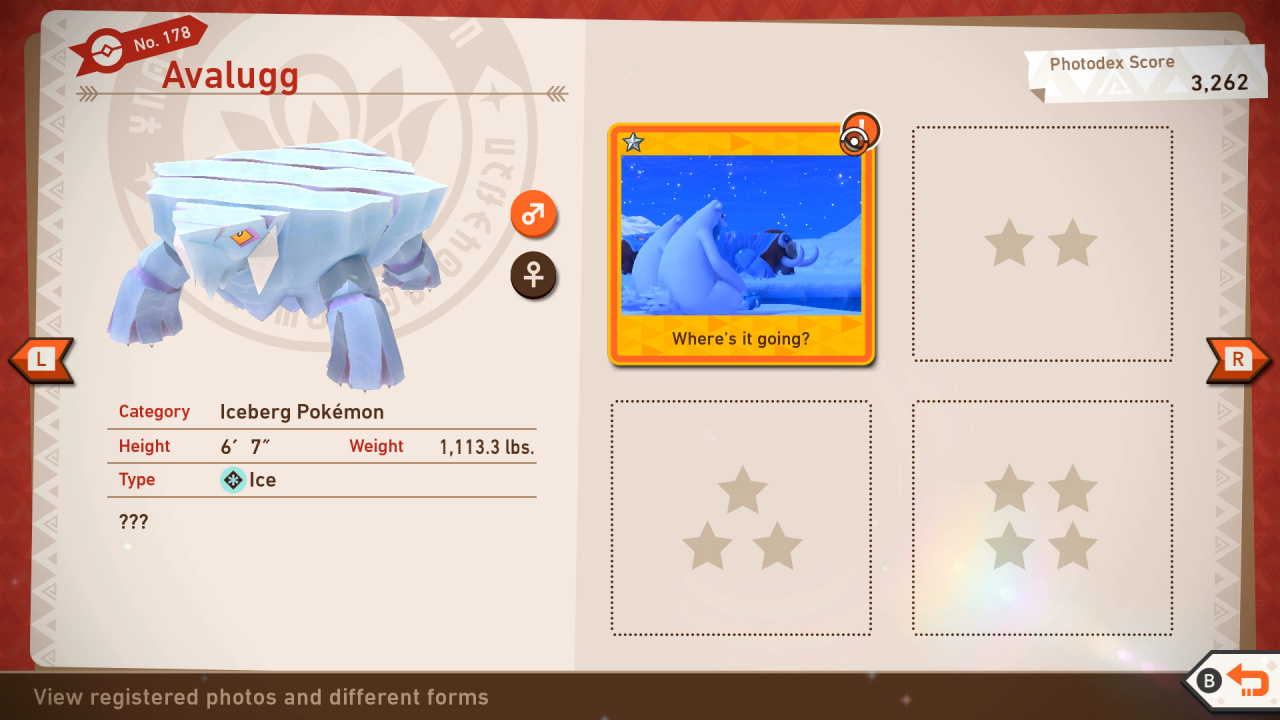
Avalugg Star Guide / Conditions:
1 Star: Most basic photo of this Pokémon possible
2 Star: In general, throwing a Fluffruit at or scanning a Pokémon will cause it to behave in a way that will get you a 2-star photo.
3 Star: After taking the two alternate routes in Snowfields (Night), you can find a Jynx riding an Avalugg on the water right as you exit the cave. Take a photo of the two Pokemon with Avalugg as the main subject to capture its 3 Star photo.
4 Star: In Snowfields (Day) at Research Level 3, take the two alternate routes until you reach the ice cave. Play the Melody to make Glalie dance and approach Avalugg's tail. Toss an Illumina Orb at the Glalie to make it bite Avalugg. Quickly get in front of Avalugg with Turbo Boost and take a photo as it roars in pain.
179: Dewgong

Dewgong Star Guide / Conditions:
1 Star: Most basic photo of this Pokémon possible
2 Star: In general, throwing a Fluffruit at or scanning a Pokémon will cause it to behave in a way that will get you a 2-star photo.
3 Star: In Research Level 2 of Snowfields (Day), take the two alternate routes that lead to the large lake near the end of the course. After emerging from the ice cave, toss Fluffruit at the iceberg shown in the image until a Dewgong comes out of the water to eat the fruit. After Dewgong has finished eating, it will happily wag its tail while smiling at the player. Take a photo of the happy Dewgong to get a 3 Star photo.
4 Star: To take a 4 Star photo of Dewgong, you need to capture the Pokemon as it is jumping out of the water to toss Spheal into the air. You can get Dewgong to do this by following the same steps to completing the Icy Playground request. However, instead of taking a photo of Spheal, make sure to focus the camera on Dewgong. It is recommended to use Burst Mode for this photo since Dewgong jumps quickly out of the water.
180: Aurorus
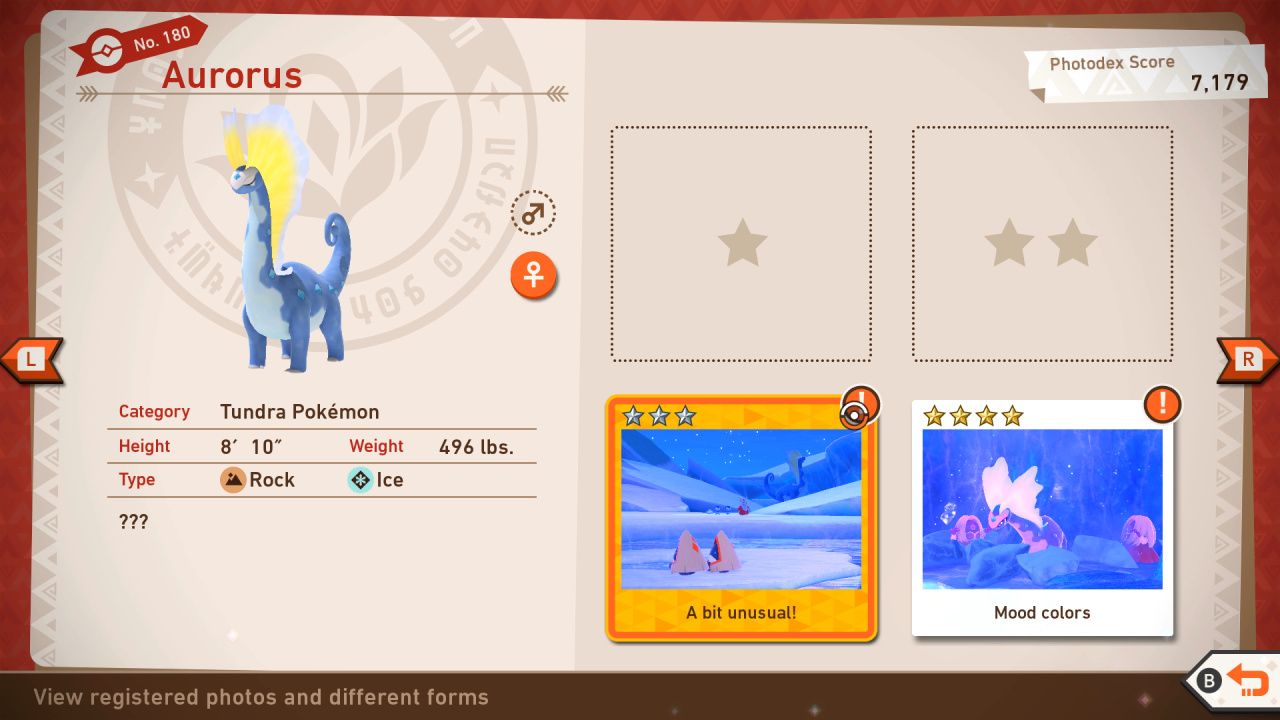
Aurorus Star Guide / Conditions:
1 Star: Most basic photo of this Pokémon possible
2 Star: In general, throwing a Fluffruit at or scanning a Pokémon will cause it to behave in a way that will get you a 2-star photo.
3 Star: Go to the same spot as its 1 and 2 Star photos and toss some Fluffruit near one of the Aurorus, but don't hit it; after it eats the fruit, take a photo as its fins turn yellowish-green.
4 Star: Lead the sleeping Jynx over to the crystabloom in the ice cave, where they will summon an Aurorus; snap a picture of it as soon as it appears
181: Glaceon
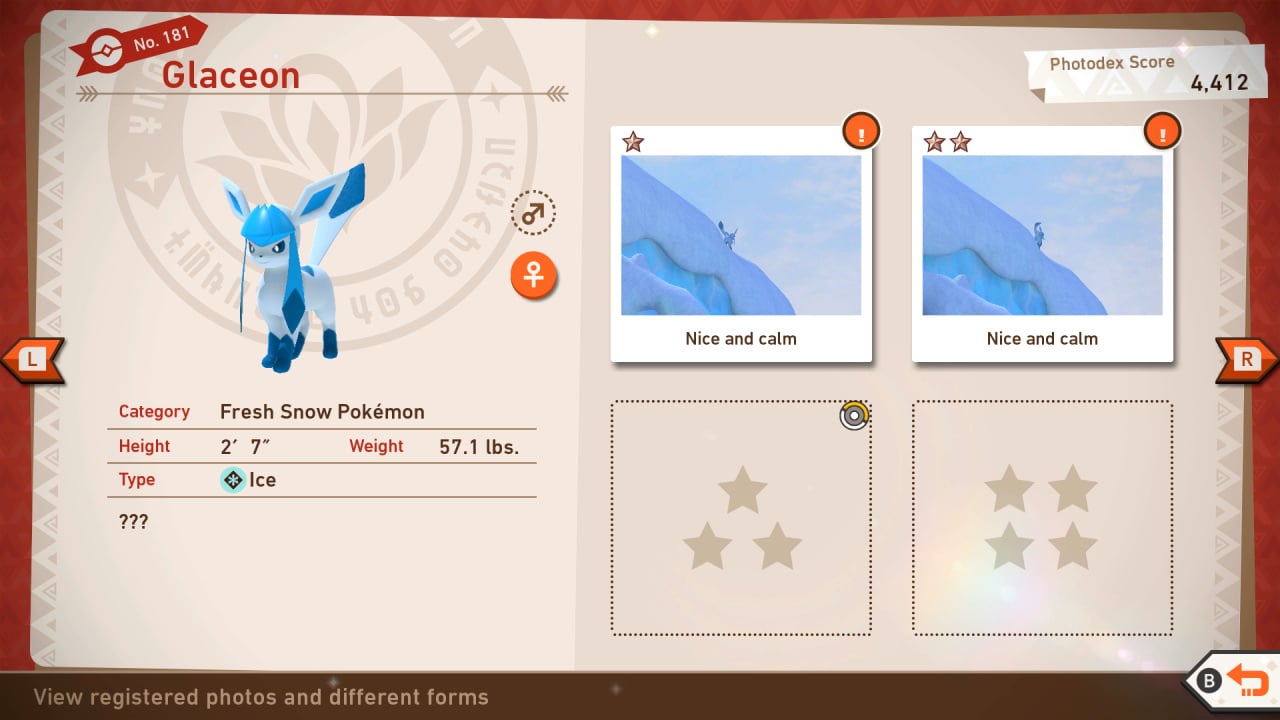
Glaceon Star Guide / Conditions:
1 Star: Most basic photo of this Pokémon possible
2 Star: In general, throwing a Fluffruit at or scanning a Pokémon will cause it to behave in a way that will get you a 2-star photo.
3 Star: Snap a photo of "Happy Vibes" Glaceon after it eats a Fluffruit for its three-star photo.
4 Star: Get Glaceon closer to you in the final area. Then, throw Illumina orbs at it so it will perform Diamond Dust - this is the four-star photo you need
182: Suicune
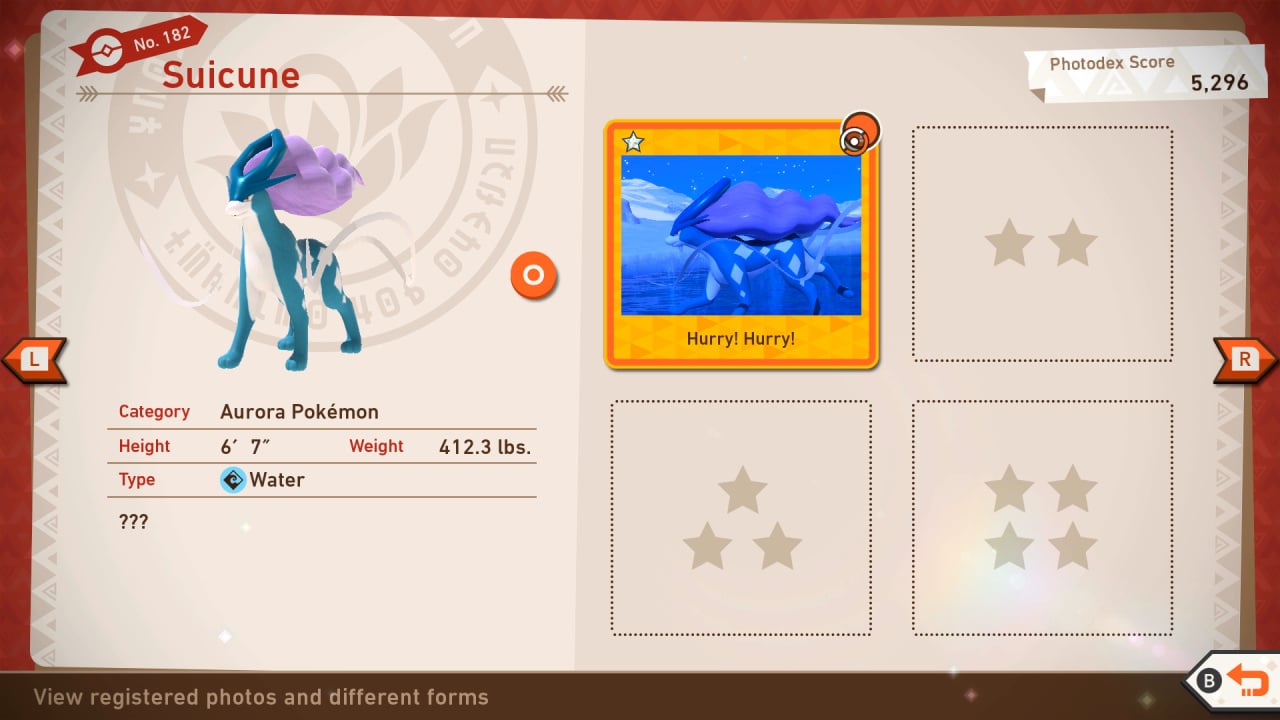
Suicune Star Guide / Conditions:
1 Star: Most basic photo of this Pokémon possible
2 Star: In general, throwing a Fluffruit at or scanning a Pokémon will cause it to behave in a way that will get you a 2-star photo.
3 Star: Throw an Illumina Orb at the Jynx found above the Avalugg; look to your right and wait for Suicune to appear, then throw an Illumina Orb at it; wait for Suicune to stop near a Delibird, then take a photo of it growling
4 Star: After exiting ice cave in Snowfield (day), you'll see a Jynx riding on an Avalugg in the water; hit it with an Illumina Orb until it performs a Summoning ritual; wait a bit, and you'll see Suicune run across the water; once close enough, use an Illumina Orb to get Suicune up onto the land; then, hit it with another Illumina Orb to get it to use Blizzard and take your photo
183: Crobat
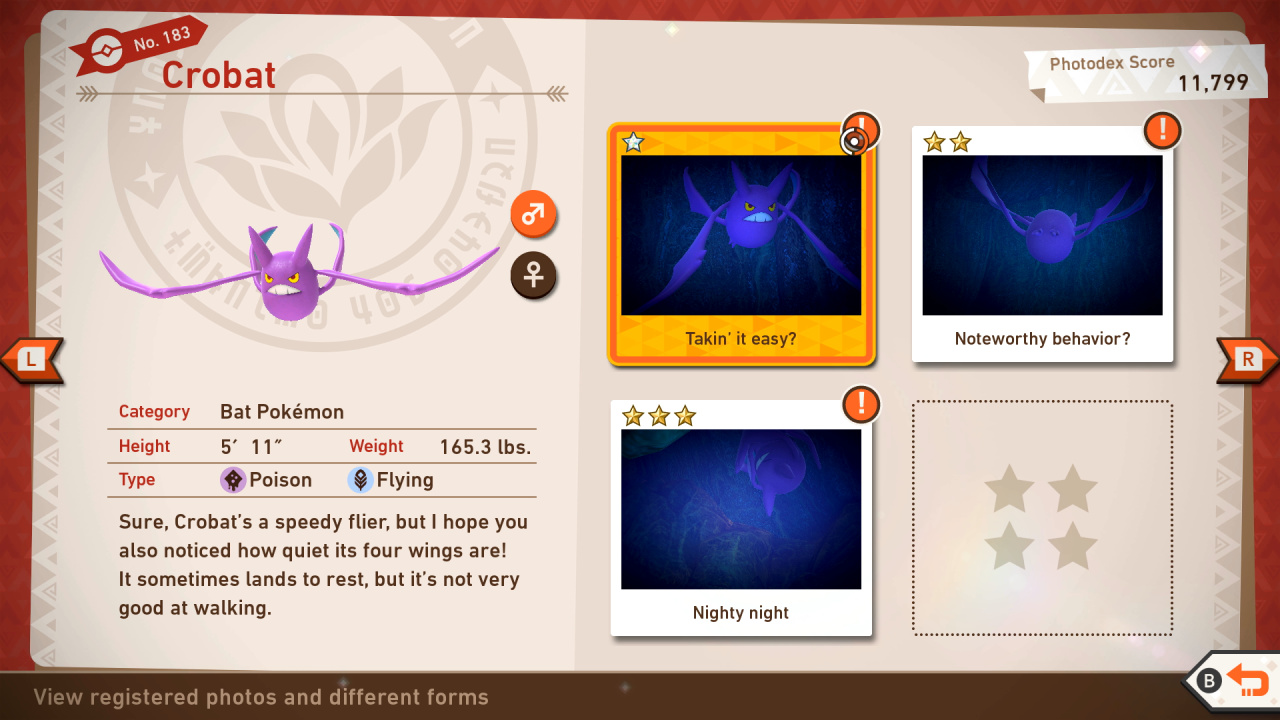
Crobat Star Guide / Conditions:
1 Star: Most basic photo of this Pokémon possible
2 Star: In general, throwing a Fluffruit at or scanning a Pokémon will cause it to behave in a way that will get you a 2-star photo.
3 Star: To take a 3 Star photo of Crobat, you need to capture the Pokemon as it is sleeping. Though any sleeping Crobat will result in a 3 Star photo, the best location to take this photo is in the tunnel of the Cave at Research Level 3. As you enter the tunnel, a Crobat should be sleeping to your left.
4 Star: To take a 4 Star photo of Crobat, you need to follow the steps to complete the Crobat Touches Down request and take a photo of the Pokemon while it is eating Fluffruit on the ground.
184: Joltik

Joltik Star Guide / Conditions:
1 Star: Most basic photo of this Pokémon possible
2 Star: In general, throwing a Fluffruit at or scanning a Pokémon will cause it to behave in a way that will get you a 2-star photo.
3 Star: In Cave, once you enter the cavern after the open area with the waterfall, look to the right and scan to find 2 Joltik crawling about rock near the spiky wall. Every time you scan, the Joltik will change position on the rock. Keep scanning until the Joltik end up on the ledge. There, they will scratch their heads. Snap a photo of Joltik scratching its head to get the 3 star photo
4 Star: For a 4 Star photo of Joltik, go to the Cave course research-level 3 and take the second alternate path, which is inside the Giant Crystals area. Upon entering the last part of the course, look to the far left and you'll find yellow spikes on the ground. Lure Joltik to go near the spikes by throwing a Fluffruit. Once Joltik is on the spikes, it will start to spark. Take a close-up shot of Joltik in the electrical spikes to achieve 4 Star Diamond.
185: Geodude
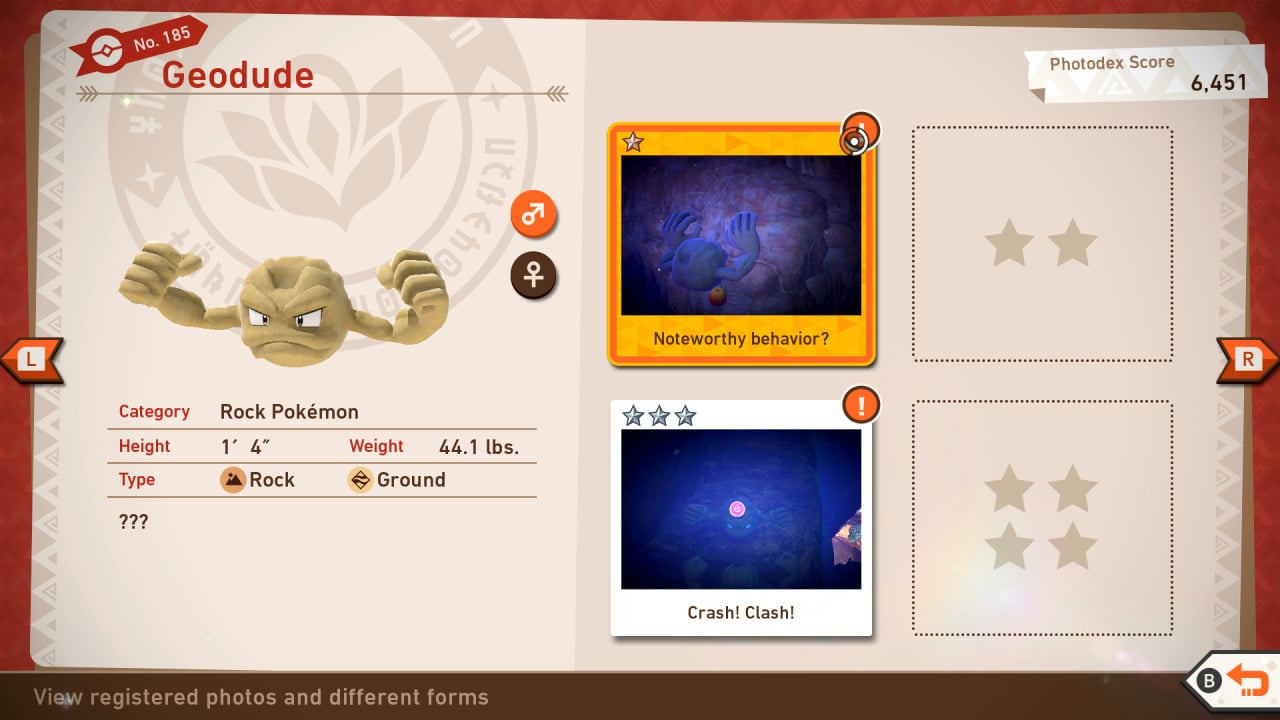
Geodude Star Guide / Conditions:
1 Star: Most basic photo of this Pokémon possible
2 Star: In general, throwing a Fluffruit at or scanning a Pokémon will cause it to behave in a way that will get you a 2-star photo.
3 Star: As you descend down the alternate route into the gem cave of the Cave course, you can find two Geodude headbutting each other on a ledge. To take a 3 Star photo of Geodude, capture the exact moment that their two heads collide.
4 Star: You can take a 4 Star photo of Geodude in the same spot as its 3 Star photo. However, you need to toss an Illumina Orb at the Geodude that is further back. This will cause it to launch the other Geodude off the ledge. Wait for a few seconds and take a photo of the moment Geodude does a one-armed handstand.
186: Carbink
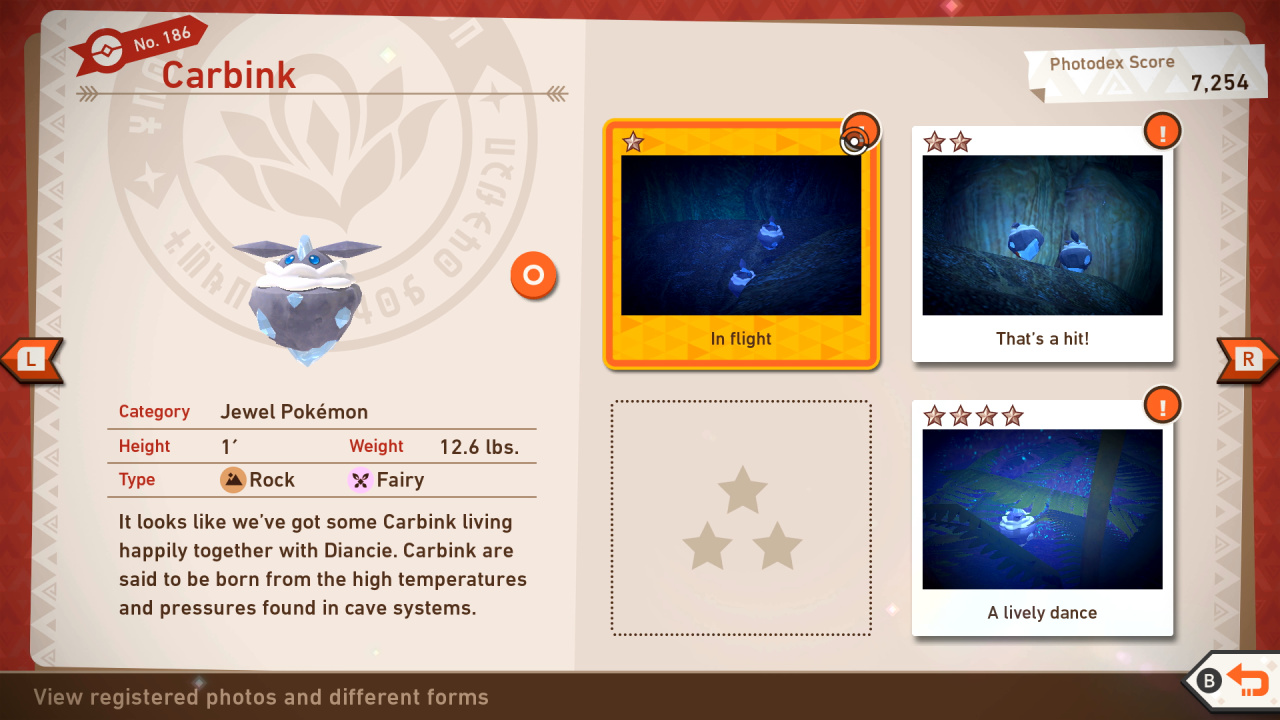
Carbink Star Guide / Conditions:
1 Star: Most basic photo of this Pokémon possible
2 Star: In general, throwing a Fluffruit at or scanning a Pokémon will cause it to behave in a way that will get you a 2-star photo.
3 Star: For a 3 Star photo of Carbink, go to the Cave course research-level 2. Upon entering the Giant Crystals area, you'll find Carbink being chased by three Sableye. Throw an Illumina Orb at Carbink twice and it will start to glow. Take a close-up shot of a shining Carbink to achieve 3 Star Diamond.
4 Star: You can take a photo of a dancing Carbink near the end of the course after taking the first alternate route through the gem cave. As you enter the lush cave, toss an Illumina Orb at the hidden Cystabloom shown in the image to make two Carbink come out. Toss Illumina Orbs at the two Carbink and play the Melody to make them dance. Take a photo of the dancing Carbink to get a 4 Star photo.
187: Gengar
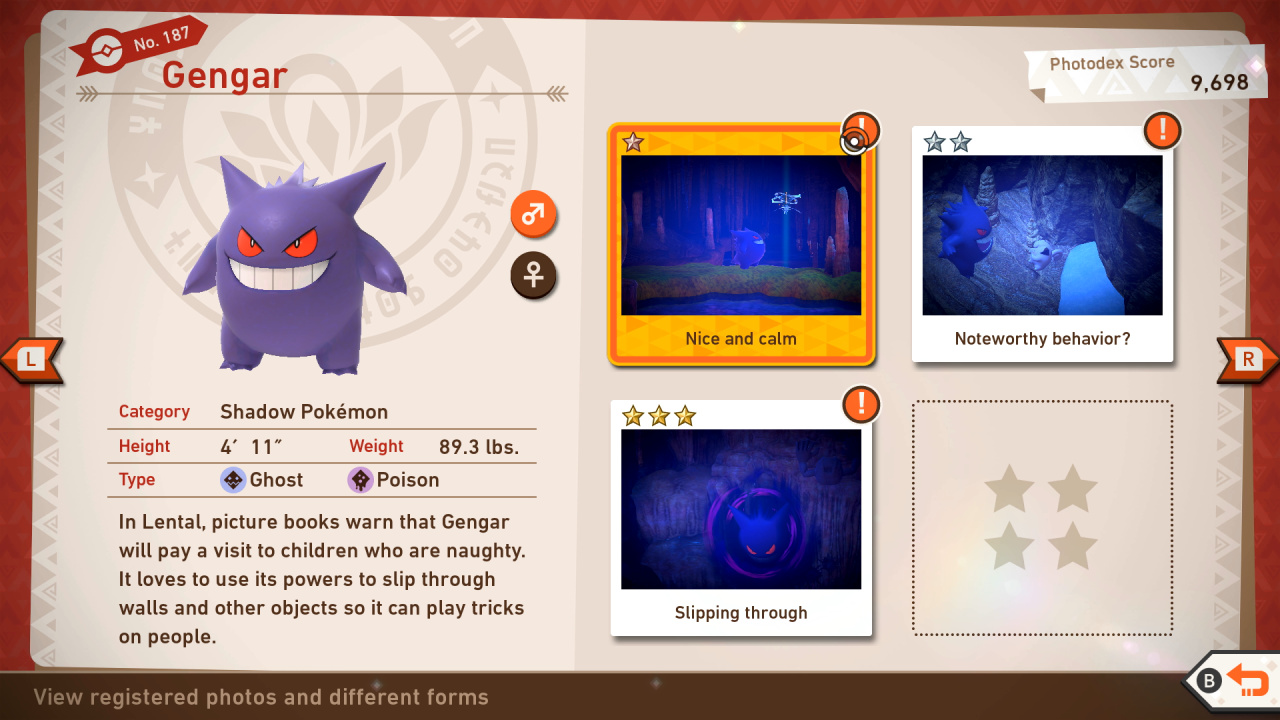
Gengar Star Guide / Conditions:
1 Star: Most basic photo of this Pokémon possible
2 Star: In general, throwing a Fluffruit at or scanning a Pokémon will cause it to behave in a way that will get you a 2-star photo.
3 Star: Before you enter the second area of the Cave at Research Level 2 or higher, you can see a Gengar portal next to two Carbink. Toss an Illumina Orb a the portal to get Gengar to reveal itself. Take a photo of Gengar as it peeks through to get a 3 Star photo.
4 Star: You can take a 4 Star photo of Gengar at the same spot as its 3 Star photo. After you reveal Gengar by tossing an Illumina Orb at it. Toss another one at Gengar to get it to scare two Carbink beside the portal and take a photo.
188: Noibat
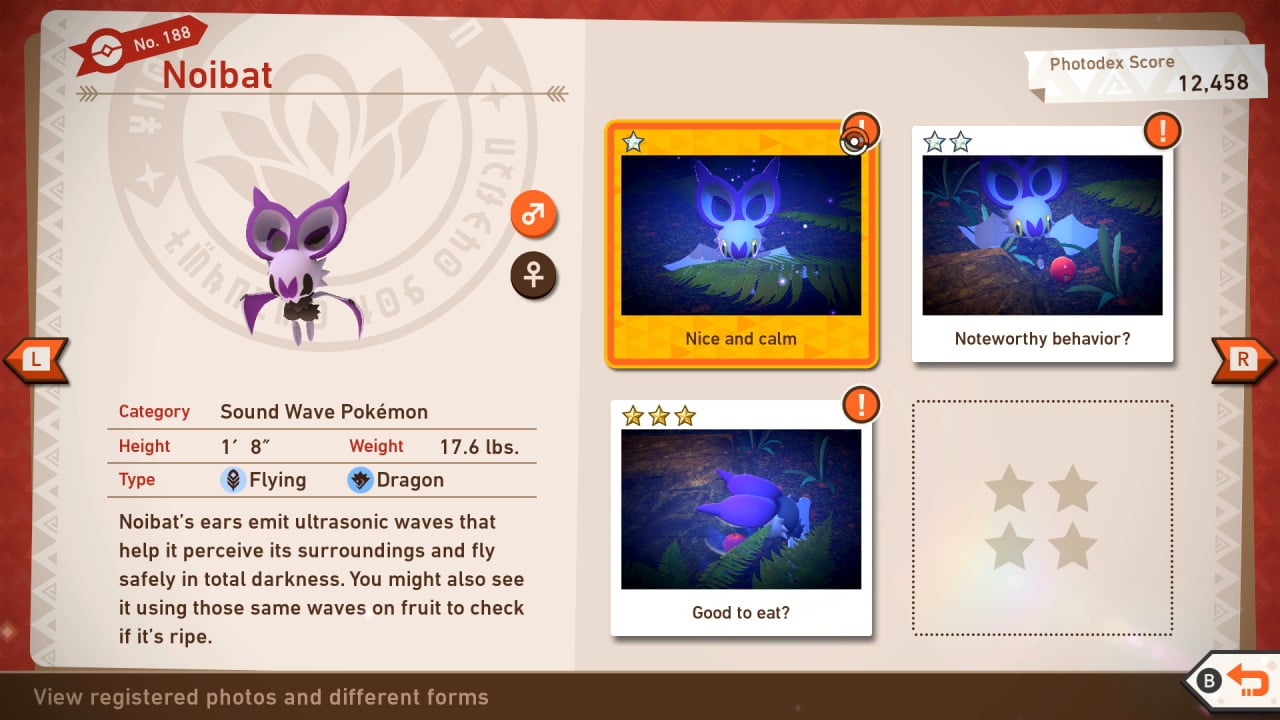
Noibat Star Guide / Conditions:
1 Star: Most basic photo of this Pokémon possible
2 Star: In general, throwing a Fluffruit at or scanning a Pokémon will cause it to behave in a way that will get you a 2-star photo.
3 Star: Complete the Noibat's Refined Palate request and take a photo as it is inspecting a Fluffruit.
4 Star: For a 4 Star photo of Noibat, go to the Cave course research-level 3 and take the first alternate path. At the last part of the course, you'll find three Noibat that is walking on the ground. Hit the two Noibat with a Fluffruit and feed the Noibat that is left. Take a close-up photo of a Noibat eating a Fluffruit to achieve 4 Star Diamond.
189: Pumpkaboo (Average Size)

Pumpkaboo (Average Size) Star Guide / Conditions:
1 Star: Most basic photo of this Pokémon possible
2 Star: In general, throwing a Fluffruit at or scanning a Pokémon will cause it to behave in a way that will get you a 2-star photo.
3 Star: Near the end of the Cave course after taking the first alternate route, you can find a Pumpkaboo floating over the grassy cave floor. Toss an Illumina Orb at the Pumpkaboo to make it shake and take a photo of it.
4 Star: To take a 4 Star photo of Pumpkaboo, you need to follow the steps to completing The Biggest Pumpkaboo of All request and capture a photo of super-sized Pumpkaboo in the lush cave section of the course.
190: Croagunk
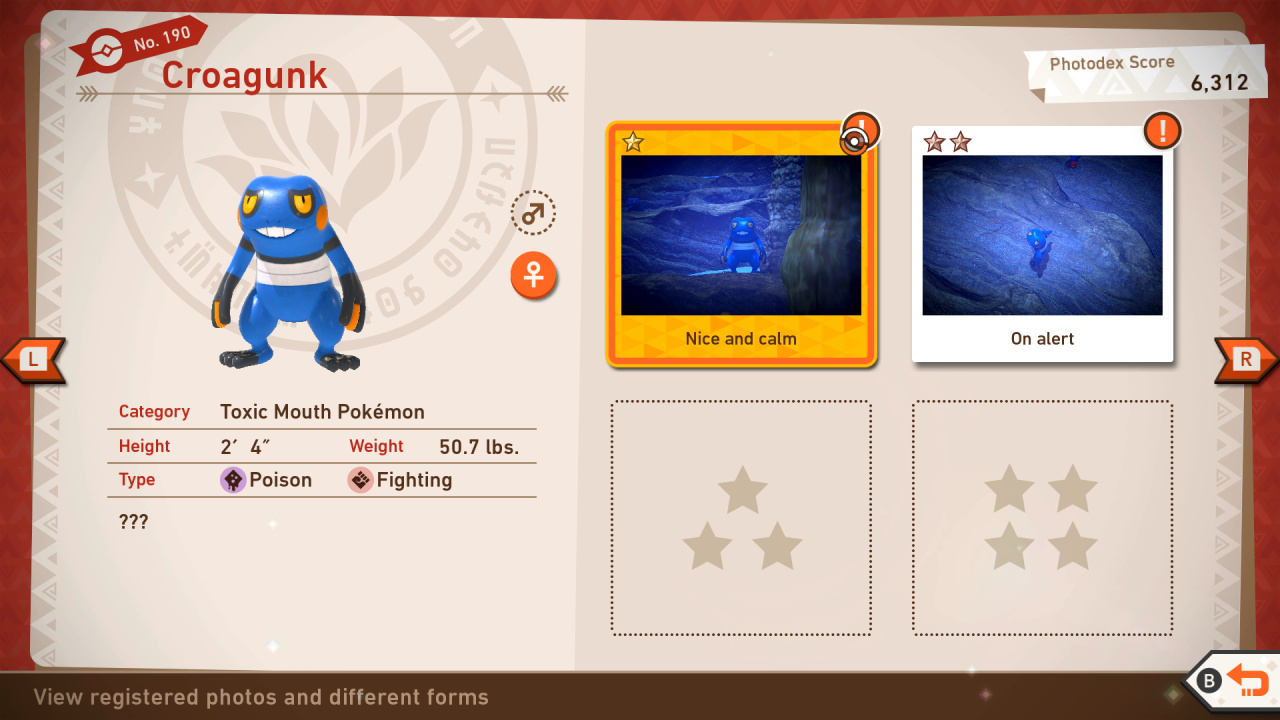
Croagunk Star Guide / Conditions:
1 Star: Most basic photo of this Pokémon possible
2 Star: In general, throwing a Fluffruit at or scanning a Pokémon will cause it to behave in a way that will get you a 2-star photo.
3 Star: As you descend the alternate route into the gem cave of Research Level 3 of the Cave course, you can see a sleeping Croagunk to your right. As Croagunk is sleeping, it will periodically blow bubbles out of its nose. Take a photo of Croagunk as or before the bubble pops to get a 3 Star photo.
4 Star: Complete the Croagunk Chorus request and take a photo of one of the floating Croagunk.
191: Drifloon
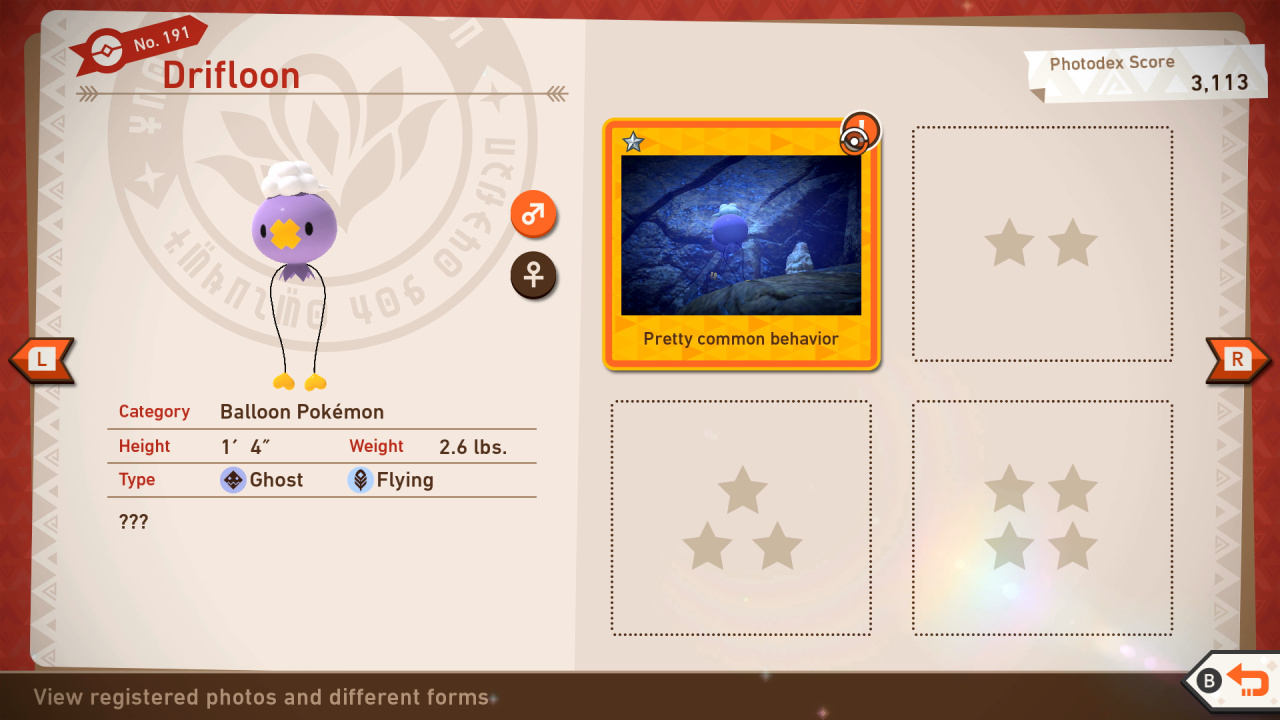
Drifloon Star Guide / Conditions:
1 Star: Most basic photo of this Pokémon possible
2 Star: In general, throwing a Fluffruit at or scanning a Pokémon will cause it to behave in a way that will get you a 2-star photo.
3 Star: You can take a 3 Star photo of Drifloon as you descend the large chasm of the Cave at Research Level 2. Toss two Fluffruit at the Glalie sleeping on a ledge. Make sure to toss the second Fluffruit after Glalie had shut its eyes again. Once Glalie is awake, it will float towards three Drifloon and scare them. Take a photo of the scared Drifloon to get a 3 Star photo.
4 Star: To get a 4 Star photo of Drifloon, you need to follow the steps to complete the Drifloon Puffed Up request and take a photo of the inflated Drifloon in the pools of water.
192: Clefairy
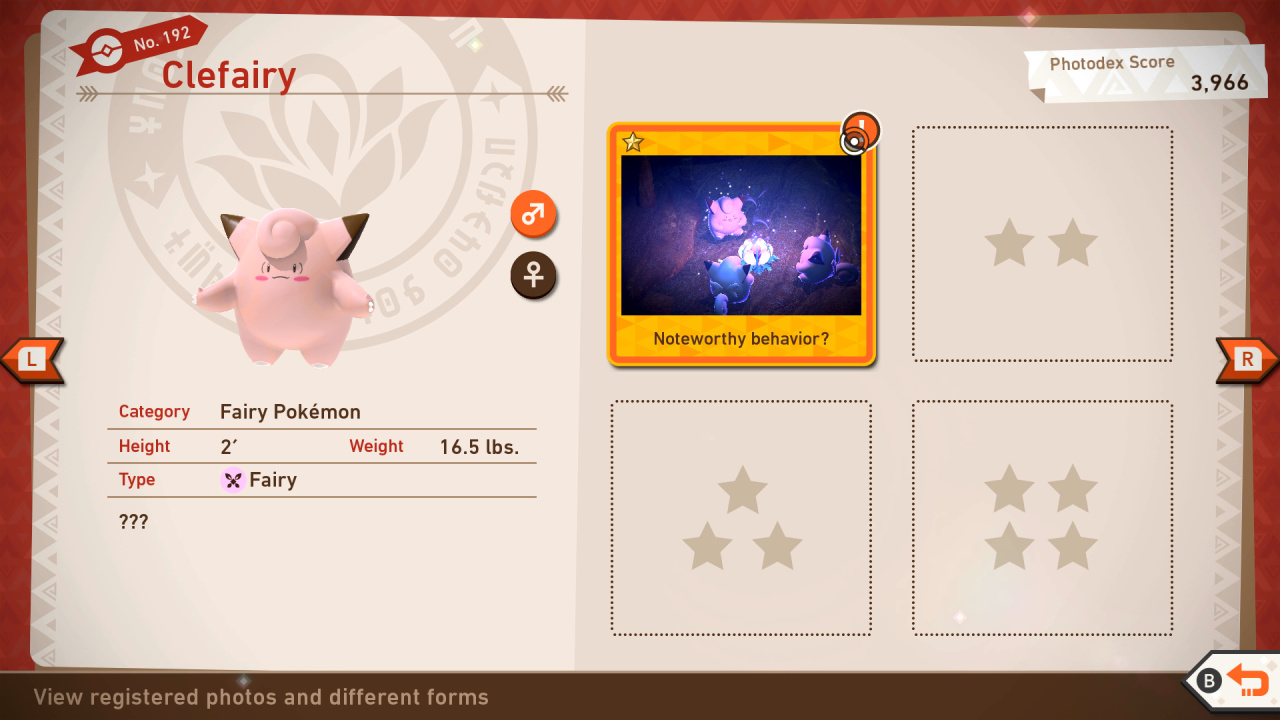
Clefairy Star Guide / Conditions:
1 Star: Most basic photo of this Pokémon possible
2 Star: In general, throwing a Fluffruit at or scanning a Pokémon will cause it to behave in a way that will get you a 2-star photo.
3 Star: On your first descent downward you will see a group of clefairy on the left huddled around an Crystablossom. Throw an illumina orb at them and snap a picture of them dancing.
4 Star: On your descent in the cave you will see a bunch of Clefairy huddled around a Crystabloom. Throw an illumina orb at the flower to wake the Clefairy, then play a Melody. Once the Clefairy start dancing throw an illumina orb at the flower again to make them levitate. This is the 4 star pose.
193: Sableye

Sableye Star Guide / Conditions:
1 Star: Most basic photo of this Pokémon possible
2 Star: In general, throwing a Fluffruit at or scanning a Pokémon will cause it to behave in a way that will get you a 2-star photo.
3 Star: On the main path towards the end of the level after passing the Croagunk you will see a Sableye scurry off. It will go behind a few spikes sticking out of the ground and it will start digging at the floor. This is its 3 star pose.
4 Star: On the main path once you decend into the Crystal portion of the cave you will see a bunch of Sableye chasing a Carbink and a Mawile on a ledge in front of you. Just past this Mawile look to the right and you will see a Sableye lounging on its side. This is its 4 star pose. If you want to make it nicer throw a fluffruit at it and it will grin.
194: Rampardos

Rampardos Star Guide / Conditions:
1 Star: Most basic photo of this Pokémon possible
2 Star: In general, throwing a Fluffruit at or scanning a Pokémon will cause it to behave in a way that will get you a 2-star photo.
3 Star: Obtained by taking a picture of Rampardos roaring at you. It will do this by default on the main path but you can also entice this by throwing a fluffruit at it to agitate it.
4 Star: At the end of the main path you will see two Rampardos being harassed by a few Crobat. Look to the right and you will see a Rampardos by itself. Use fluffruit to lure it towards the shadow spot on the wall to the right. Once it gets close enough to the shadow it will headbutt the wall, this is its 4 star pose.
195: Hydreigon
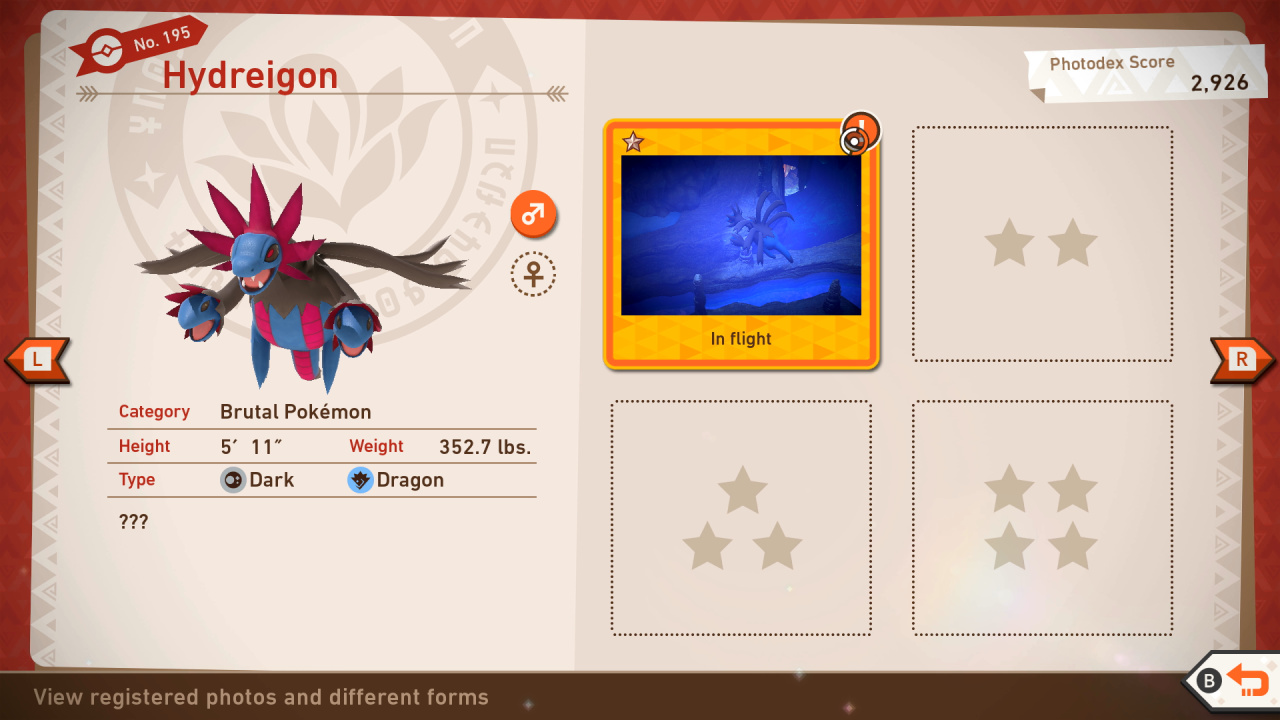
Hydreigon Star Guide / Conditions:
1 Star: Most basic photo of this Pokémon possible
2 Star: In general, throwing a Fluffruit at or scanning a Pokémon will cause it to behave in a way that will get you a 2-star photo.
3 Star: While descending in the large area there will be a Hydreigon flying down toward the main paths ending area. Throw 2 fluffruit at the Hydreigon and after the second hit it will scream at you, this is its 4 star pose.
4 Star: In the final area of the main path you will see a Hydreigon flying in the back corner toward the teleport zone. When it starts flying wait for it to get over the Rampardos and play it a melody, it will stop and head into the pool of water just ahead on the right. Throw a fluffruit into the water and it will eat the fluffruit and be happy after. Take a picture of it eating or being excited after for this pose.
196: Goodra
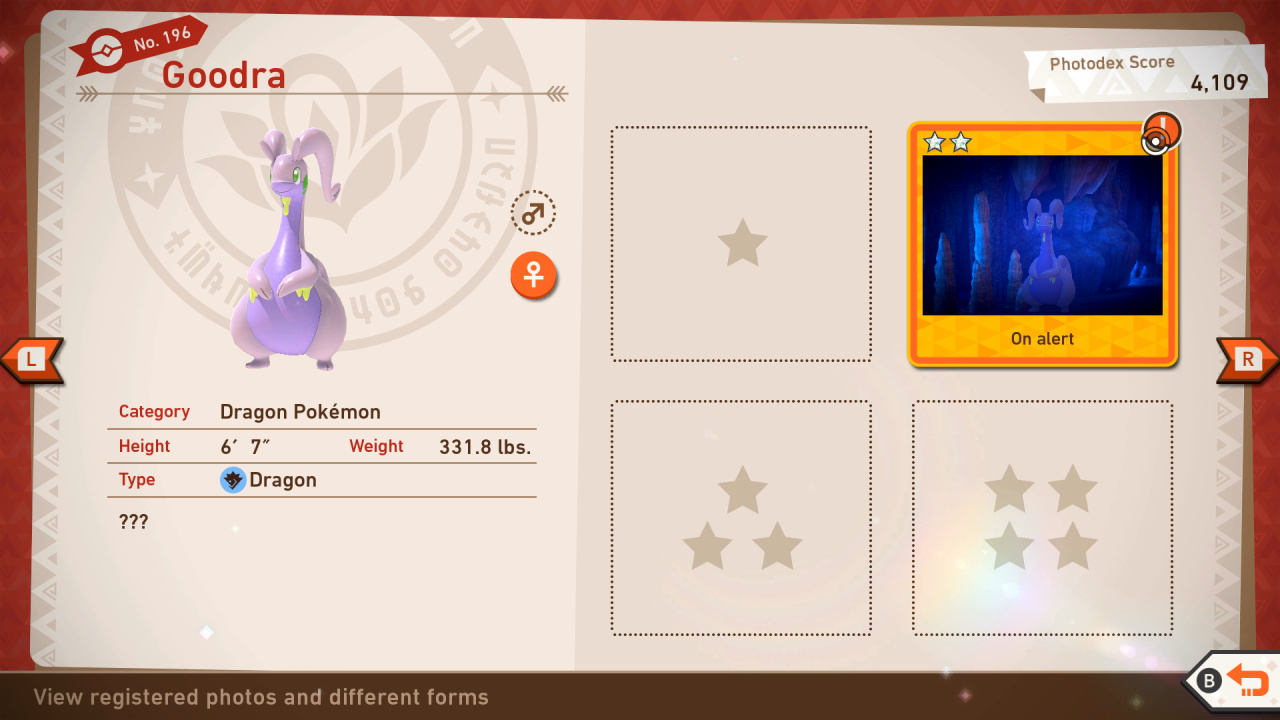
Goodra Star Guide / Conditions:
1 Star: Most basic photo of this Pokémon possible
2 Star: In general, throwing a Fluffruit at or scanning a Pokémon will cause it to behave in a way that will get you a 2-star photo.
3 Star: Once you head out of the big open area on the main path you will see a Goodra just up ahead on the left. To the left is a big cave opening with a Crystabloom in it. Illuminate the flower and Goodra will get excited, this is its 3 star pose.
4 Star: Near the end of the main path you will want to take the alternate end path, when you start heading into the pools run a scan and to the left will be a scannable area, throw fluffruit toward the spikes and a Magikarp will pop out. Once it is out it will flail a bit and stop, throw an illumina orb at it to make it jump down and flail some more. Throw another illumina orb at it when it stops again to make it hop towards the Goodra. Throw an illumina orb at the Goodra before the Magikarp flails too far away and the Goodra will use its tail to attack away the Magikarp, this is its 4 star pose.
197: Mawile

Mawile Star Guide / Conditions:
1 Star: Most basic photo of this Pokémon possible
2 Star: In general, throwing a Fluffruit at or scanning a Pokémon will cause it to behave in a way that will get you a 2-star photo.
3 Star: Obtained by taking a picture of Mawile while it is yelling at you with its large mouth. It will do this by default but you can also make it do this by throwing a fluffruit at it.
4 Star: Once you take the alternate route in the middle of the level look directly below you when you get into the open area and you will see two Carbink and a Mawile. Throw an illumina orb at the Mawile and it will start to dance, this is its 4 star pose.
198: Jolteon

Jolteon Star Guide / Conditions:
1 Star: Most basic photo of this Pokémon possible
2 Star: In general, throwing a Fluffruit at or scanning a Pokémon will cause it to behave in a way that will get you a 2-star photo.
3 Star: Obtained by taking a picture of Jolteon while Joltik is on its back. To get Joltik on its back lure the Joltik over with fluffruit and when it gets close enough the Joltik will jump on the Jolteon.
4 Star: Lure the Joltik near the end over to the Jolteon and let it hop on the Jolteon’s back. Jolteon will get upset and use an electric attack to shock the Joltik off, this is its 4 star pose.
199: Diancie

Diancie Star Guide / Conditions:
1 Star: To find Diancie, head to Cave Level 3 and take the right-hand path past a sleeping Crobat; in the open chamber, look for the giant crystals to find some Carbink and a Mawile - hit all three of them with Illumina Orbs to get Diancie to make an appearance
2 Star: In this same place, hit Diancie with an Illumina Orb to make it do a ritual, and take any photo here.
3 Star: In this same place, hit Diancie with an Illumina Orb to make it do a ritual, and take a high point photo for 3 stars instead of 2
4 Star: At the very end of its ritual dance, when the Energy Orb bursts, use Burst Mode to capture a 4-star photo
200: Steelix

Steelix Star Guide / Conditions:
1 Star: Most basic photo of this Pokémon possible
2 Star: In general, throwing a Fluffruit at or scanning a Pokémon will cause it to behave in a way that will get you a 2-star photo.
3 Star: From the start of the level when you make your way into the first tunnel throw a fluffruit in the second hole on the right and hit Steelix with an illumina orb as it pops out. Throw a fluffruit into the hole it just dug into and it will appear from the hole above it and drop straight down, throw another illumina orb at it. In the open area right after throw an illumina orb at the hanging Crobat in the bottom right hole on the right side and it will fly forward. In the next area you will see a big hole to the left with Crystals lining the bottom. Throw a fluffruit in and start throwing illumina orbs right away to hit the Steelix. The Steelix will roar at you before heading out of the hole, this roar is the 3 star pose.
4 Star: From the start of the level when you make your way into the first tunnel throw a fluffruit in the second hole on the right and hit Steelix with an illumina orb as it pops out. Throw a fluffruit into the hole it just dug into and it will appear from the hole above it and drop straight down, throw another illumina orb at it. In the open area right after throw an illumina orb at the hanging Crobat in the bottom right hole on the right side and it will fly forward. In the next area you will see a big hole to the left with Crystals lining the bottom. Throw a fluffruit in and start throwing illumina orbs right away to hit the Steelix. If hit enough it will pop out of the hole and fight the Crobat. Fighting the Crobat will be the 4 star pose.


Comments 0
Wow, no comments yet... why not be the first?
Leave A Comment
Hold on there, you need to login to post a comment...