
This is it, the end of the end. The Legend of Zelda: Tears of the Kingdom's final boss is a gauntlet of a challenge and a tough test of your combat mastery and survivability.
After surviving the Depths of the Hyrule Castle Chasm and making your way to the end of the final dungeon, the Demon King awaits. You'll need to throw everything you've got at this encounter.
It should go without saying here — there are huge spoilers for the end of the game in this walkthrough, including images of all three final boss forms. If you don't want anything about this final encounter, it's time to hit the back button.
Subscribe to Nintendo Life on YouTube848k
Okay, ready? Brandish your Master Sword, get your best weapons ready — it's time to finally beat The Legend of Zelda: Tears of the Kingdom and defeat The Demon King.
Zelda: Tears Of The Kingdom: How To Defeat The Final Boss, Best Strategy
General final boss tips
Your preparation for the final boss is basically the same as it was for the dungeon — just multiplied. Gloom-healing, gloom-resistance, the Master Sword, Fusing, and Great Fairy Fountains to upgrade armour. There are a few additional details that you'll want to master for this fight.
First up, Flurry Rush. Just like against the Hyrule Castle boss against Phantom Ganon, this will be the best way of dealing damage to the first two phases of the final boss. Its attacks are very well-telegraphed, but what makes it tricky is the speed they come out at. So be on your toes, guard, and be ready to time your backflip perfectly.
Next, your bow is your best friend. If you're not confident about dodging, you can shoot the boss in the face to temporarily stun them. This won't always work, but it works most of the time.
Shield parry is also an amazing tool for this fight. Almost all of the boss' attacks can be parried and this will create a big opening for you to get some hits in.
Make sure you have lots of hearts for this fight — and eating heart-increasing food is not a bad idea. That means a lot of Shrine hunting, although you do get given Heart Containers for completing all of the Temples.
Lastly, take your time. You can't rush any of these fights. Guarding and dodging is always more important than getting in an attack, and this strategy is often the difference between victory and defeat.

The final boss fight
This walkthrough covers the strategy for the final boss and the final boss only. For the fights preceding this — check out our Final Dungeon walkthrough. Plus, this guide will only consider the final boss under normal circumstances, i.e., you've beaten all four Regional Phenomena quests (Tulin of Rito Village, Yunobo of Goron City, Sidon of the Zora, and Riju of Gerudo Town) and completed Find the Fifth Sage and visited the Spirit Temple.
There are three separate phases to this final boss fight. The first two escalate in difficulty fairly rapidly. The third phase is a rather spectacular fight, but much easier than the first two sections.
Regardless, we'll be looking at each phase separately. It wouldn't be a final boss if it didn't have multiple phases, would it?
Phase 1
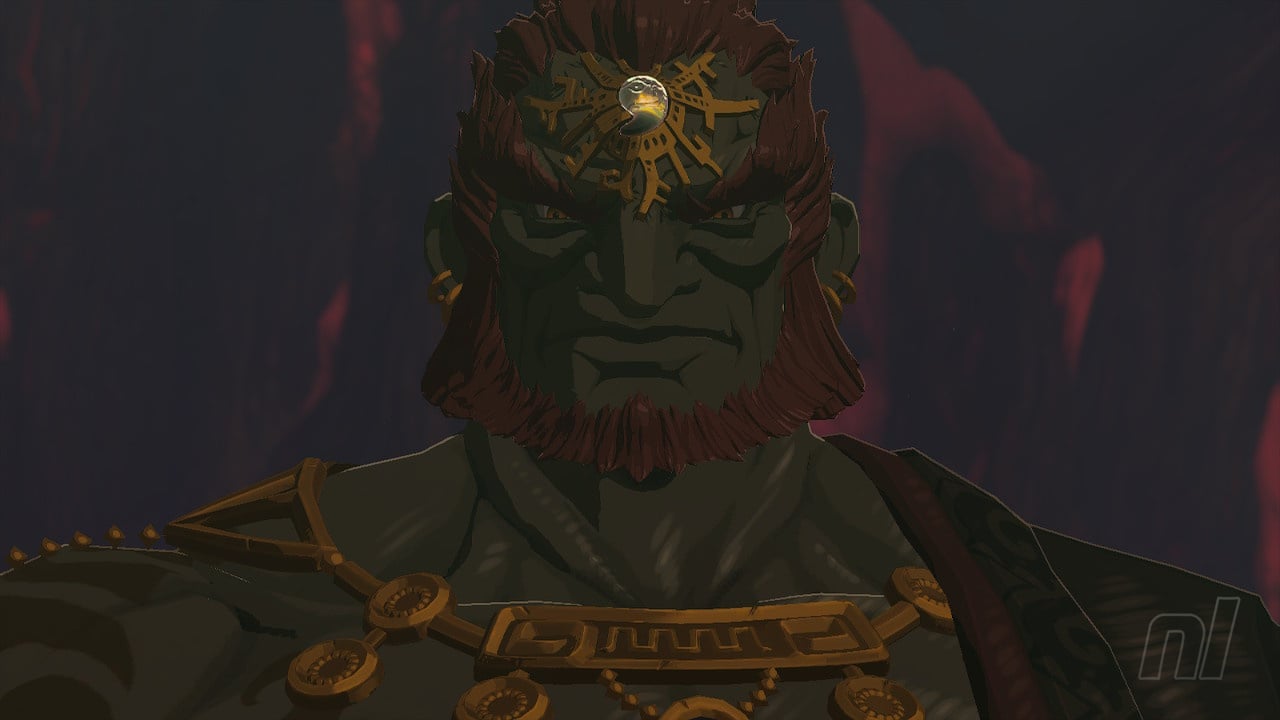
The first phase sees you take on the human form of Demon King Ganondorf. This fight is very similar to the Phantom Ganon fight, except it's just you and Ganondorf.
All of Ganondorf's attacks do gloom damage, meaning if you get hit you'll be at a huge disadvantage. This doesn't cure between phases, either, so you'll need to remove it yourself with Sunny-based food.
Ganondorf has multiple attacks. When you're close, he'll either try to swipe at you with his sword (which you can parry) or spin around (which you can dodge). If Ganondorf is far away, he will bend down and charge at you. Again, dodge or parry this to give yourself an opening.
When Ganondorf is below half-health, he might change weapons mid-fight. If he has a spear, he'll charge at you. And if he has a claymore, he will jump up and attempt to slam down and cleave you in two. he can swap between all of these weapons at any point. Bide your time, watch him, and attack when you get a chance.
Phase 2
Ganondorf will ascend from simply being The Menace Unleashed and is now Master of the Secret Stone. His transformation means that he's bigger, more powerful, and has a lot more health — as indicated by the massive health bar.
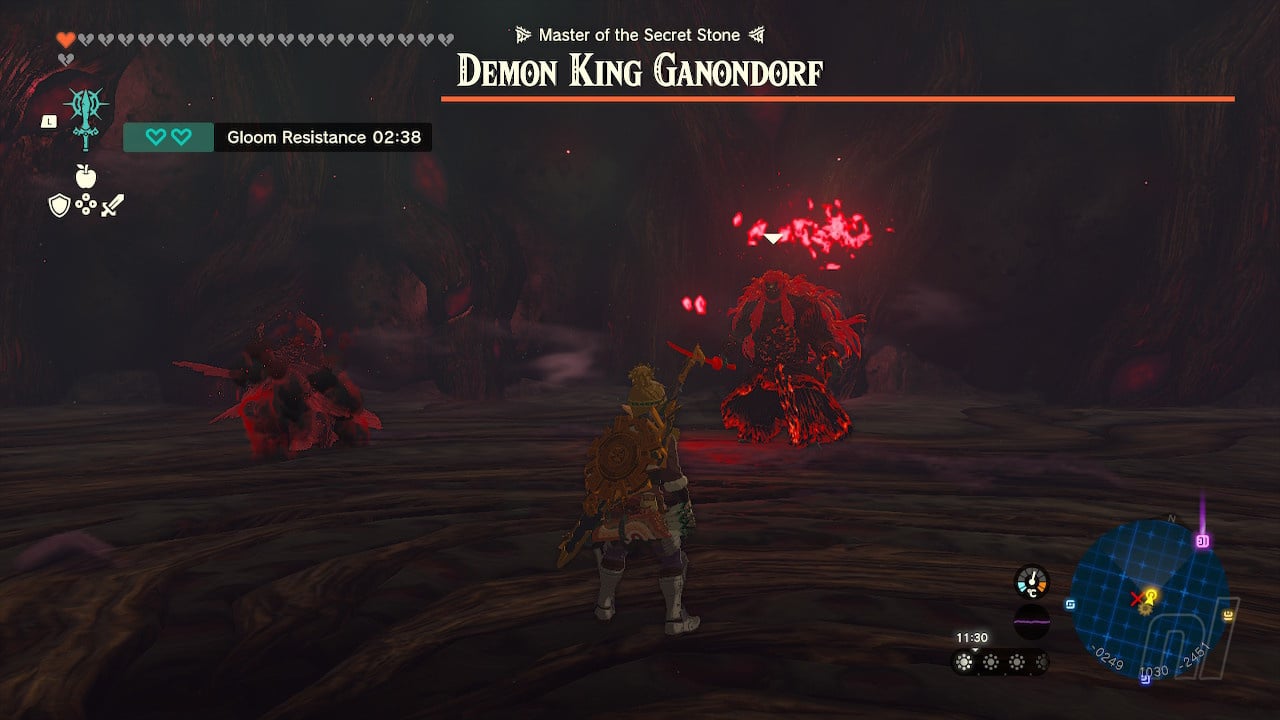
The strategy here is largely the same, but you've now got phantom copies of the boss to deal with. Fortunately if you finished all four temples and recruited the fifth sage, then your allies will gradually join you throughout the fight, and they'll pick away at the clones. Be aware of them while you take on the main boss, but don't worry too much about them.
One of Ganondorf's new attacks will happen when he takes his huge two-handed sword out and an updraft will blow out from the ground. Use this, because Ganondorf is going to slam down and cause gloom to erupt from the floor, dealing a lot of damage. Get your paraglider out to avoid this.
At the halfway stage, Ganondorf will absorb the copies and banish your allies, leaving you to fend for yourself. He gets even more new attacks here. Multiple gloom bullets will shoot towards you from the ground — avoid these by running away or by running through the gaps. Ganondorf will also summon magic orbs to home in on you. These attacks will permanently remove hearts if you get hit by them — and you cannot restore them.
Your tactics will remain the same, however. Dodge and parry, don't rush, and watch Ganondorf's movements, because every single attack is very well telegraphed. He's just pretty darn quick.
Once you've wiped out that massive health bar, well, it's still not over.
Phase 3
After a cutscene, you'll be out in the open, and you'll be up against the Draconified Demon King, the Demon Dragon. You won't be fighting this monstrous creature alone, however.
Before the fight starts, the Light Dragon will rescue you and you'll start the battle by riding on her back. If you didn't have the Master Sword before the fight, you'll have it now.

This is the easiest phase of the three fights and you cannot die by falling to the ground as the Light Dragon will save you each time you descend too far. You need to dive onto the Demon Dragon's back and attack the glowing sections on its back.
There are two ways you can do this — shoot arrows from the sky as you're diving (although you need to get fairly close to hitting), or just land in the red pool and attack it with the Master Sword. While in these pools, you will take gloom damage, but once you're back in the sky, this will heal.
The Demon Dragon will attack by launching magical orbs at you as you descend — these are fairly easy to dodge so just manoeuvre your way around them.
Once you've destroyed all three sections of the dragon, you'll need to land on its head and deal the final blows by attacking the Secret Stone on its head. A simple but stunning fight.
Watch the cutscenes, press the button prompts when they appear, and let the credits roll. Congratulations on saving Hyrule. You'll get a nice little star on your save file the next time you load up the game.
That's the end of the main quest of The Legend of Zelda: Tears of the Kingdom. But as you're aware, there is so, so much more to this game. There are Shrines to find, Koroks to rescue, and plenty more Side Adventures to seek out. So for all the hints and tips you need, head on over to our Zelda: Tears of the Kingdom walkthrough.


Comments 5
I screwed myself by getting to Ganondorf with no gloom food and only 3 hearts left... No way to fast travel. Thanks Nintendo.
@MetalMan
I did the same thing. Easiest way to fix this is by loading an earlier auto-save. The game auto-saved for me just before multi-wave enemy fight.
@MetalMan
>I screwed myself
>No way to fast travel. Thanks Nintendo.
Nintendo can't fix stupid, bud.
TotK's three- phased final boss fight is easily the best and most challenging final boss in the history of the series.
We've gone a long way since the days of Wind Waker where you could destroy the Ganondorf with a couple of quick time events.
Actually, how did they mess that one up so bad? OOT and MM were older games and yet easily more challenging. I guess we should thank Dark Souls' effect on the industry for bringing challenge back to games.
Just realised you can also hit the gloom ring and gloom wall projectiles back at him.
Show Comments
Leave A Comment
Hold on there, you need to login to post a comment...