Welcome to our ultimate guide for collecting every Power Moon from the Wooded Kingdom in Super Mario Odyssey! Below, you'll find maps detailing the exact location for all 76 of the Power Moons located in this Kingdom, as well as descriptions on how to get each and every one of them.
The numbers on the maps correspond to the relevant Power Moon listed below and, whilst most of them appear in that spot from the beginning (or after you've completed the story at least), it is worth nothing that sometimes you are required to perform a specific action to make it appear. Use a combination of our maps and walkthrough information to grab each of the Power Moons with ease. Enjoy!
Subscribe to Nintendo Life on YouTube841k
Wooded Kingdom Power Moons (1-27)
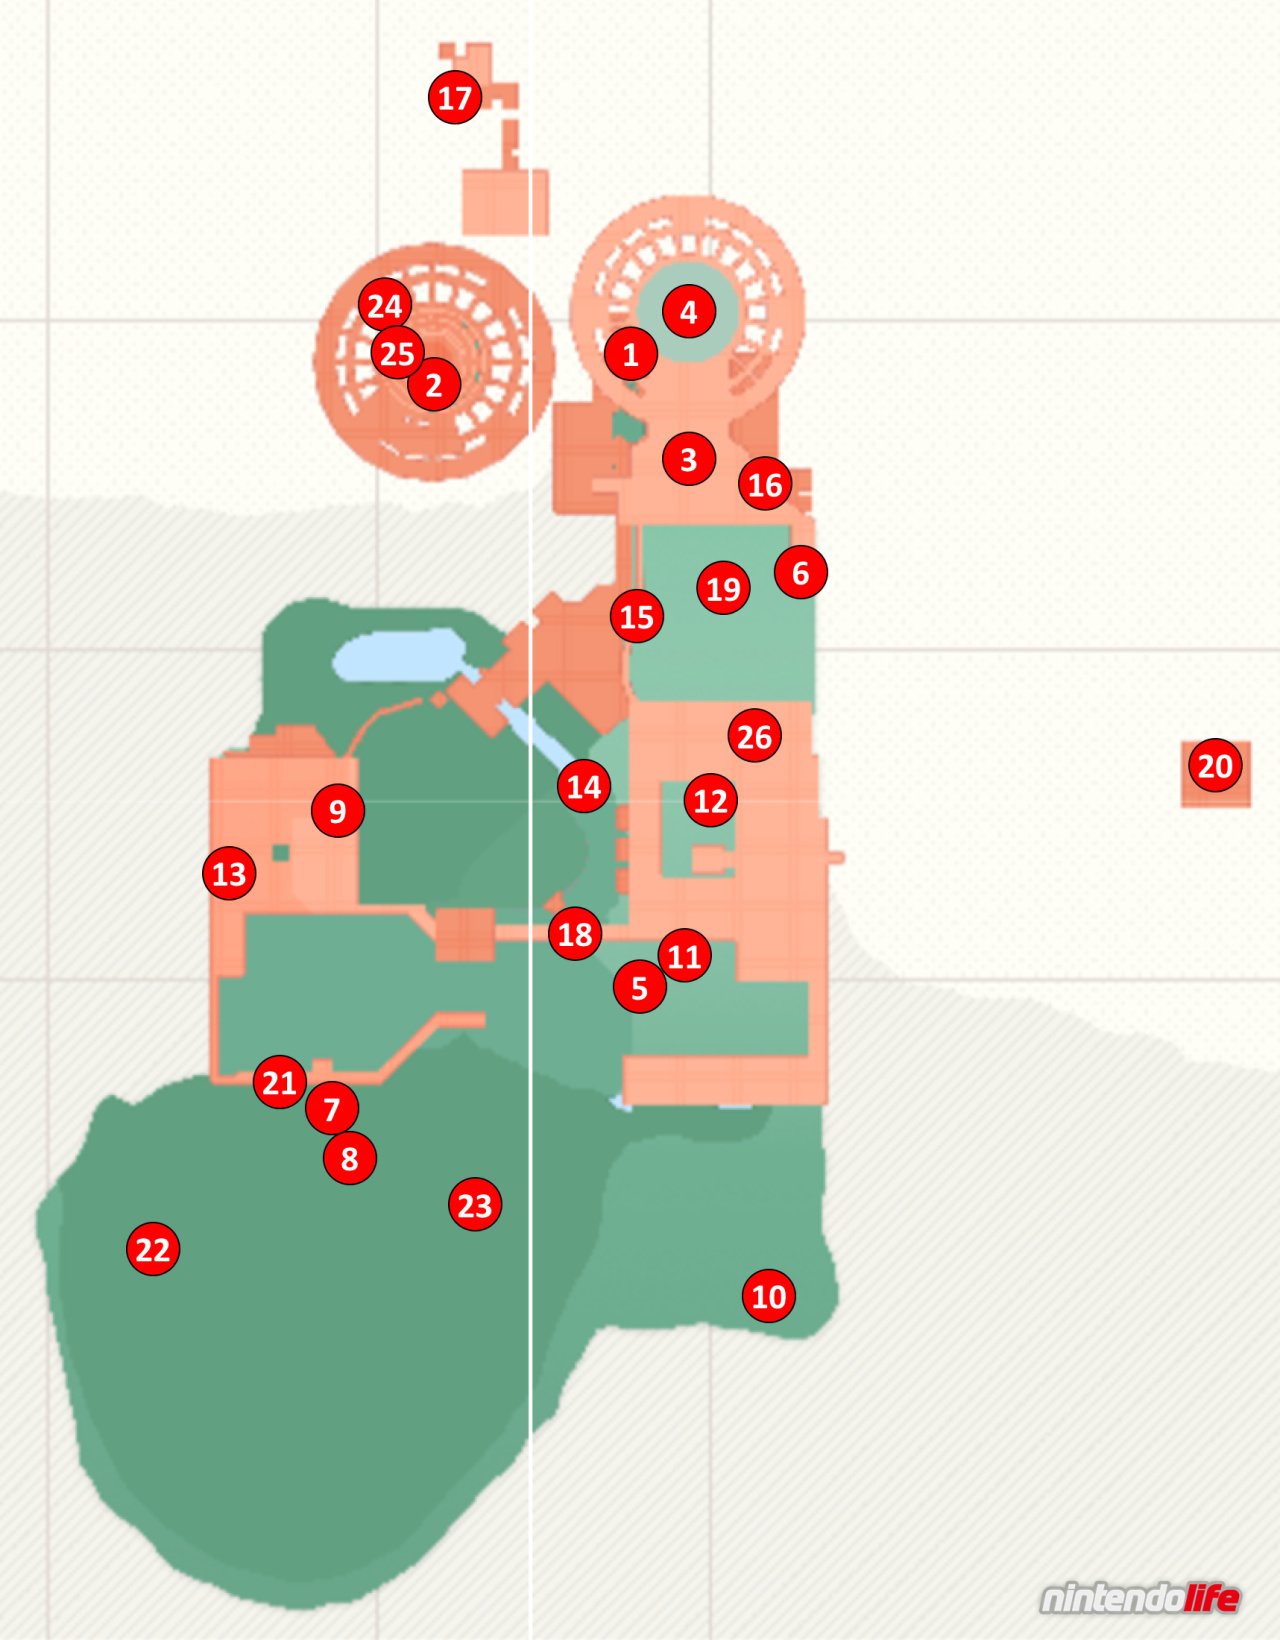
1. Road to Sky Garden: You'll receive this Power Moon when you first defeat the giant Piranha Plant which is essential to the story.
2. Flower Thieves of Sky Garden: You'll receive this Multi Moon when you defeat the Broodals boss for this Kingdom.
3. Path to the Secret Flower Field: This Power Moon is found whilst on your way to the Secret Flower Field, heading towards the Kingdom's second boss.
4. Defend the Secret Flower Field!: You'll receive yet another Multi Moon by defeating the Kingdom's second boss.
5. Behind the Rock Wall: Find the rock wall that is covering the 2D Mario section (located at number 5 on our map). In front of the wall is a Sherm (those awesome tank fellas) - capture a Sherm and use it to blast the rocks on the wall. The top-left area of the wall contains a Power Moon.
6. Back Way Up the Mountain: Travel to the Iron Mountain Path Station 8 checkpoint and jump down to the area containing an Uproot and several grey blocks. Capture the Uproot and use it to smash all of the blocks - revealing a path in the process. Enter the green pipe in this pathway and make your way through the 2D section - your Power Moon will be waiting for you at the other end.
7. Rolling Rock in the Woods: One of the tiny rocks in the forest area where the Odyssey landed contains a Power Moon and, if you kick it around for long enough, you'll receive your prize. The rock in question is located near the hopping rabbit.
8. Caught Hopping in the Forest!: In the forest area where the Odyssey is sitting, you should be able to find a rabbit hopping around. Chase the rabbit (using Cappy to stun it if necessary) and make contact with it to receive a Power Moon.
9. Thanks for the Charge!: In the Forest Charging Station area, you should see three stations all lined up in a row. The one on the right has a glowing spot where the robots should be standing. Ground pound this spot to reveal a Power Moon.
10. Atop the Tall Tree: Head to location number 10 on our map to find a section of the forest containing large trees and Uproots. Capture an Uproot and use its stretching ability to climb up the platforms on the tree in the southeastern corner. Upon reaching the top you'll discover a nut - hit the nut with the Uproot to burst it open and receive your Power Moon.
11. Tucked Away Inside the Tunnel: At location number 11 on our map you should be able to find a tunnel that is tucked away almost underground. Make your way through the tunnel, capturing or defeating the Hammer Bro if necessary, and exit on the other side to find an Uproot nearby. Take this Uproot back into the tunnel until you reach the point where the Hammer Bro was originally standing (near the end of the flow of the water). If you extend your Uproot fully by shaking your controller, you should just be able to reach a metal platform above this area by jumping out of the Uproot capture. Smash the nut on this platform for a Power Moon.
12. Over the Cliff’s Edge: From the Summit Path checkpoint, drop down to the area containing a Sherm tank and run around the corner to the southeast. You'll find a number of ledges leading to a hidden pathway containing falling blocks and bars to swing from. Make your way to the end of this area to find a nut containing a Power Moon.
13. The Nut ‘Round The Corner: Go to the Iron Path: Entrance checkpoint and head southwest to discover two Uproots walking along a ledge. Capture one of these Uproots and follow the ledge around the right hand side to find an area with falling blocks. If you use the Uproot to reach the area on the other side of these blocks you'll find a nut containing a Power Moon.
14. Climb the Cliff to Get the Nut: The game intends for you to climb a series of platforms to reach this but there is a quicker way. Start by warping to the Iron Mountain Path, Station 8 checkpoint and then jump off the western wall, falling just past the crumbling, yellow blocks. Just below these blocks is a small cliff with a fireball-throwing Hammer Bro (you may have to bend your fall with the control stick or use a dive to jump back towards this area). Run along this cliff area to find a nut at the end - smash it open and you'll get the Power Moon.
15. The Nut in the Red Maze: At location 15 on our map you'll find a red maze that can only be travelled through by using an Uproot to move the platforms inside. Inside this maze, in the top-right-hand corner is a nut. Use your Uproot to smash this nut open and be rewarded with a Power Moon.
16. The Nut at the Dead End: Head to the Iron Road Halfway checkpoint and jump up onto the next little bit of land with the watering can robot. You'll notice a small gap between the back wall and a fence on its left - jump through this gap to find an Uproot sitting below. Use the Uproot to climb onto the ledge leading away from the area you started in and travel around the corner to eventually stumble across a nut. Smash the nut to reveal a Power Moon.
17. Cracked Nut on a Crumbling Tower: Head to the platforms at the far northern point of the map (you get here by running along a flower bridge which is created by stepping on a P Switch near the Iron Road Halfway Point checkpoint). When you reach the northern area, jump across the platforms and make your way to the top of the tower to find a nut containing a Power Moon.
18. The Nut that Grew on the Tall Fence: Head to the Iron Mountain Path, Station 8 checkpoint and look over to the west. You'll notice a platform not too far away - reach this platform by jumping over the railing, throwing Cappy forward, diving onto Cappy, and then throwing and diving again. Run to the end of the platform you reached and drop down. If you turn around you'll notice a nut which can be smashed to get a Power Moon.
19. Fire in the Cave: Warp to the Iron Road: Entrance checkpoint and head to the left of the moving platforms in front of you. You'll notice a small path with a scarecrow on it - throw Cappy at the scarecrow to open the door just behind it. When you go inside, you'll need to defeat a Hammer Bro without Cappy - a simple jump on its head will do the trick - to receive a Power Moon.
20. Hey Out There, Captain Toad!: Head to the Observation Deck checkpoint and capture the Glydon sitting nearby. Far out to the east you'll see a distant platform - use Glydon's glide to fly over there and talk to Captain Toad when you arrive. He'll give you a Power Moon for your troubles.
21. Love in the Forest Ruins: Right next to the Forest Charging Station area is a place full of Goombas and a Goombette standing on a high platform. Capture one Goomba and jump up on to the centre platform. From here, you can keep jumping off onto other Goombas' heads to build a tower. When your Goomba tower is tall enough, waddle over to the Goombette to receive your Power Moon.
22. Inside a Rock in the Forest: Near the Odyssey, in the opening forest section, is a pile of rock not breakable by Mario alone. To break this rock, and grab the Power Moon inside, you'll need to smash it open with the help of a Sherm tank. Head to the Forest Charging Station checkpoint and go to the area with all of the Goombas nearby. From there, you can capture a Sherm and start travelling towards that rock by dropping down over ledges. When you arrive at the rock, blast it open to reveal the Power Moon.
23. Shopping in Steam Gardens: In the main forest area near the Odyssey you'll notice the Crazy Cap store - buy this Power Moon for 100 Gold Coins.
24. Nut Planted in the Tower: Head inside the tower that houses Power Moons 24, 25, and 2 on our map above. Whilst you are on the flower path that extends from the second P Switch, you should notice an alcove within the tower's central column. Jump inside and break open the nut inside to receive this Power Moon.
25. Stretching Your Legs: Inside the same tower as Power Moon number 24, you should notice a shadow in the centre of the circular platform right at the very top. Stretch directly upwards as an Uproot here to reach a Power Moon floating in the air.
26. Spinning-Platforms Treasure: Head to the Observation Deck and capture Glydon who is sitting nearby. Glide off the eastern side of the deck and turn yourself back around 180 degrees to see a whole bunch of platforms and bars that Mario can swing from below. Amongst all of this is a green pipe - use Glydon to land near the pipe and enter it. Inside will be a nut containing the Power Moon.
27. Make the Secret Flower Field Bloom (see location 4): Head back to the Secret Flower Field after you've defeated the boss inside and throw Cappy at the circular flower patches. When all of the flowers have bloomed, you'll receive a Power Moon.
Wooded Kingdom 'Deep Woods' Power Moons (28-36)
These Power Moons are located in the 'Deep Woods' section (accessed by jumping off the wall behind the Odyssey into the fog below). The eight Power Moons available in this area are made slightly harder to obtain thanks to the fact that the game's map and compass do not work here. As such, we can only rely on descriptions to help you for these ones.
28. Rolling Rock in the Deep Woods: One edge of the Deep Woods is lined by a low level of rock that you can walk along. Walk along beside this rock border until you find a small grey rock and give it a kick. If it starts glowing, you have found the right one - now just keep kicking it until a Power Moon eventually bursts out.
29. Glowing in the Deep Woods: Near the river you should be able to find a scarecrow. Throw Cappy at the scarecrow and look around to find a Power Moon that has appeared in the distance. You'll need to use a series of long jumps to reach it before the scarecrow's timer runs out.
30. Past The Peculiar Pipes: There is a green warp pipe on top of a small hill that is right on one of the Deep Woods' edges. Enter this pipe to activate a pipe puzzle. You'll notice that more pipes appear but only one of them is the correct path - if you select the wrong one you'll be sent back to the beginning. You'll need to guess your way through several of these puzzles before finding the Power Moon.
31. By the Babbling Brook in Deep Woods: For this Moon you'll need to capture the T-rex. This can be done by making him chase you and running behind a tree - he'll crash straight into the tree and be knocked out. Capture him and take him up to the mouth of the river. If you head left from the river mouth and smash the rocks nearby, you should uncover a glowing patch of ground. Ground pound this spot to find the Power Moon.
32. The Hard Rock in Deep Woods: Capture the T-rex (see Power Moon number 31 if you need help with this) and take him down to the bottom of the Deep Woods where you are able to jump off the edge. Near one of the beanstalks in this area is some hard rock that can be smashed with your dino buddy - take them out and ground pound the glowing spot that is revealed to claim this Power Moon.
33. A Treasure Made from Coins: For this Power Moon you'll first need to find a Coin Coffer. These are almost invisible - their outline shimmers slightly as you approach - and you can find them between the river and the green pipe in the wall at the far edge of the woods. Capture one and take it to the river - somewhere in the water you should come across a small plant that is surrounded by coins lying flat underwater. You'll need to keep flinging coins from the Coin Coffer at the plant until it is fully sprouted to get the Power Moon. Word of warning, though - this uses up an awful lot of your coins (we're talking several hundred) so make sure you're suitably prepared.
34. Beneath the Roots of the Moving Tree: On one edge of the Deep Woods you'll notice some steps leading up to a lone tree that looks a little like a Christmas tree. You can actually capture this tree, so move it away from the wall to reveal the Power Moon.
35. Deep Woods Treasure Trap: One of the largest trees in the Deep Woods has a green pipe in its base - look for this pipe and head inside. You'll find three chests that need to be hit in a specific order - middle, left, then right - in order to get the Power Moon.
36. Exploring for Treasure: At the mouth of the river you'll notice a locked door - talk to the robot standing nearby whilst wearing the Explorer's outfit (available from this Kingdom's Crazy Cap store) to have him open the door. There is a Power Moon waiting inside.
Wooded Kingdom Power Moons (37-54)
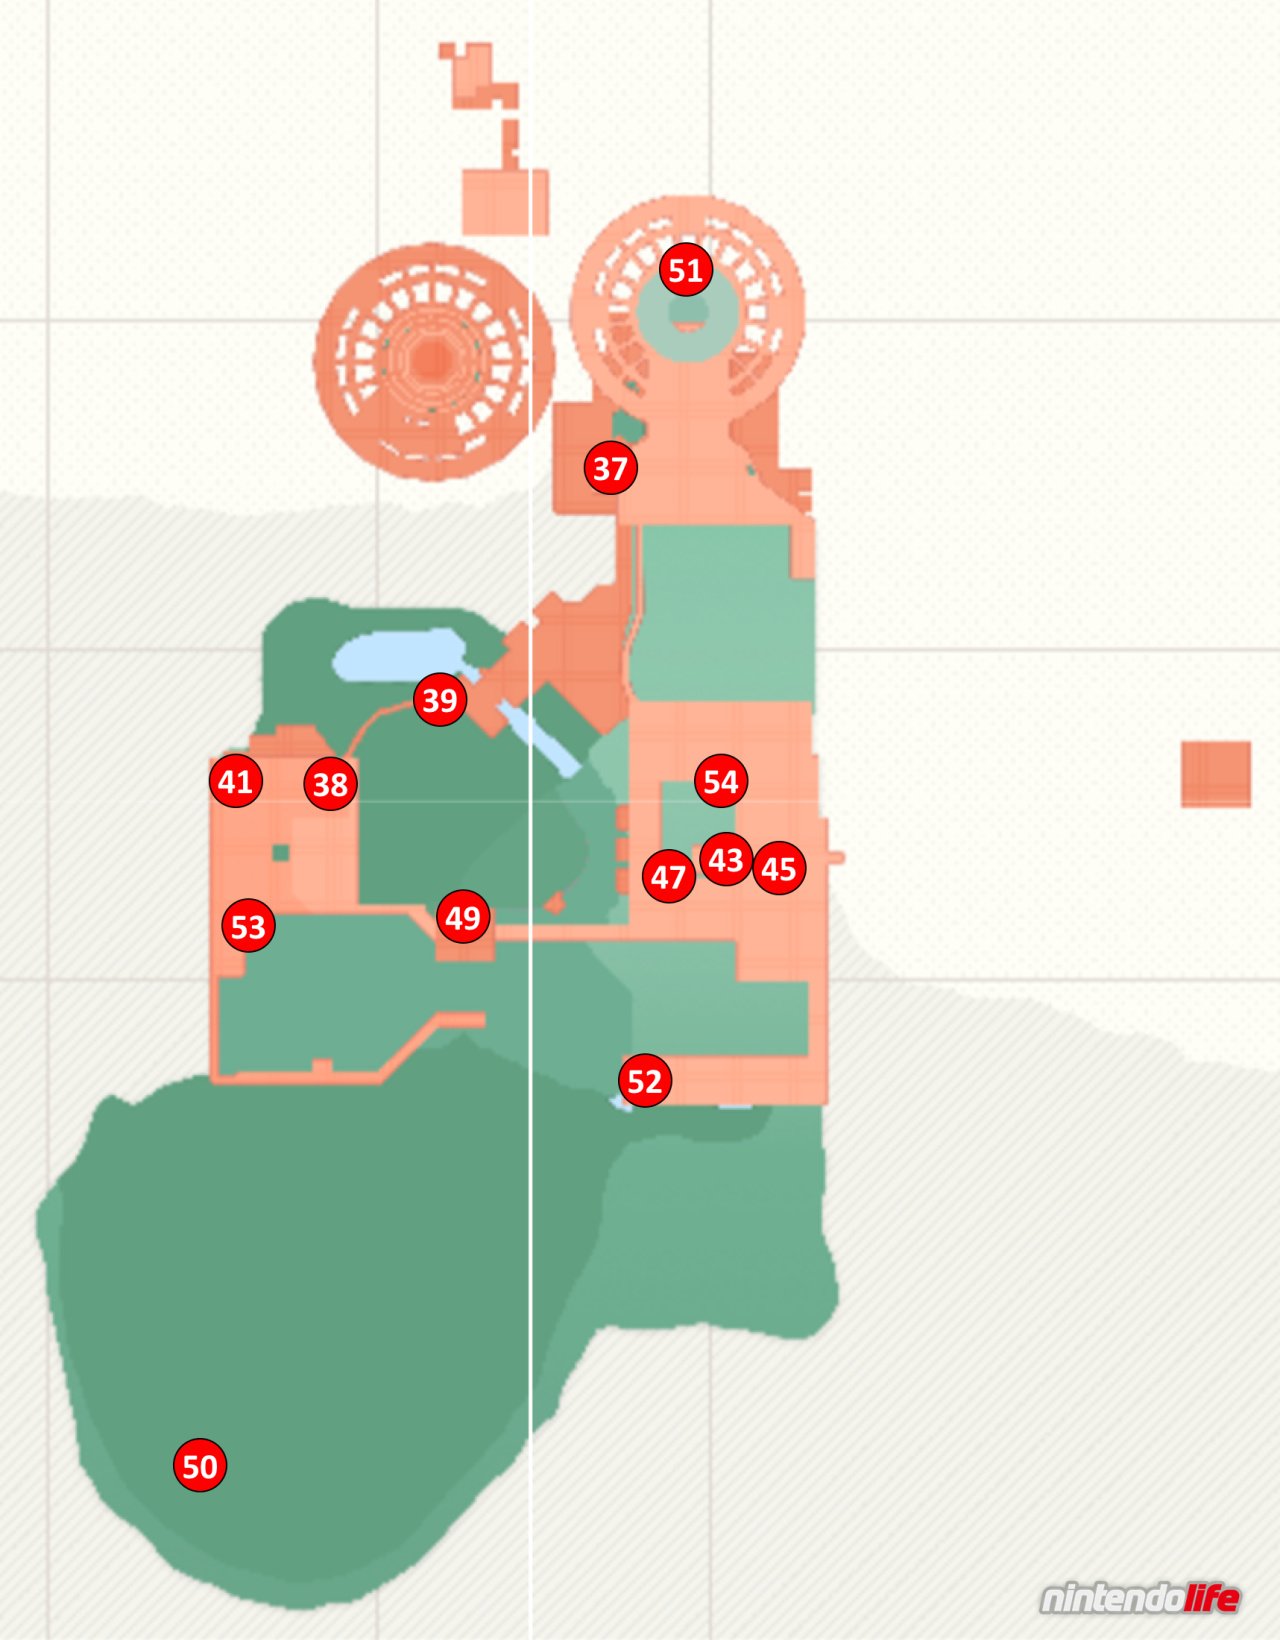
37. Wooded Kingdom Timer Challenge 1: Standing close to the Iron Path: Halfway Point is a scarecrow. Throw Cappy at the scarecrow and fling yourself across each of the bars to reach the Power Moon at the top.
38. Wooded Kingdom Timer Challenge 2: You'll find a scarecrow in one of the Forest Charging Station stations (yep, we just said "station stations"). Throw Cappy at it and jump from platform to platform to get the Power Moon.
39. Flooding Pipeway: Dive into the lake near where Talkatoo is sitting to find a green warp pipe. Head inside and make your way to the end to receive the Power Moon.
40. Flood Pipeway Ceiling Secret (see location 39): In the same area as Power Moon number 39, keep heading through the hidden room until you come across three gold coins hovering in the air just below what looks like a gap in the ceiling. Perform a backflip into the gap, and then do a wall jump, to find yourself in a hidden area with a Power Moon.
41. Wandering in the Fog: Capture the rocket at the Forest Charging Station to enter a bonus area containing five Moon Shards to collect. You'll see the first one as you move forward and the second is on the platform below you to your right. From that platform, move left up the path to find the third between the flying Goombas. Capture one of these Goombas and fly to the platform hovering by itself in the fog to find the fourth, fly underneath the platform you started on to the find the fifth.
42. Nut Hidden in the Fog (see location 41): In the same location as Power Moon number 41, capture a flying Goomba and allow it to fall slightly into the fog so that you can see the bottom of the platforms. One of the platforms has a small alcove with a nut inside - fly over to it and break it open to get the Power Moon.
43. Flower Road Run: Warp to the Summit Path checkpoint and run past the really steep hill on the right hand side. You'll come across a gap in the walls with coins inside that allow you to wall jump to the top - head up here and enter the secret door. Inside, hit the P Switch and follow the flower road to reach the Power Moon at the end.
44. Flower Road Reach (see location 43): Inside the same area as Power Moon number 43, make sure to capture one of the Goombas when you come across them. Start jumping onto other Goombas to create a tower, and then waddle over to the pillar nearby. Jump off the top of the Goomba pile onto this pillar to grab the Power Moon.
45. Elevator Escalation: Head to the Summit Path checkpoint and grab one of the flowers to sprint up the steep hill. Instead of heading to the next area on the left, however, stay to the right to find a hidden area. Enter the puzzle room and use the Sherm tanks inside to make your way through the room. A Power Moon is waiting for you at the end.
46. Elevator Blind Spot (see location 45): In the same area as Power Moon number 45, capture the first Sherm tank and then turn around. On a tiny platform you'll notice a small rock - shoot this rock to reveal a secret Power Moon.
47. Walking on Clouds: Start by collecting a seed from the robot standing next to the Secret Flower Field entrance. Walk over to the Observation Deck with your seed and use the P Switch to head up to the top. On top of the Observation Deck, throw the seed into the large pot to create a beanstalk - jump onto this beanstalk and climb to the top to reach a hidden area. Use the Uproot in this area to navigate the room and collect the Power Moon at the end.
48. Above the Clouds (see location 47): In the same area as Power Moon number 47, look out for a small shadow on the red and green platform near the end of the room. If you extend into the sky as an Uproot underneath this shadow, you'll be able to reach a hovering Power Moon.
49. Secret Path to the Steam Gardens!: The 'Secret Path' Power Moons can be rather complicated. To get this Power Moon, you'll need to travel to the Wooded Kingdom through a warp painting from one of two Kingdoms. The Kingdom the corresponding warp painting will appear in depends on the choices you made in the main story.
If you decided to travel to the Lake Kingdom before you went to the Wooded Kingdom, the warp painting you need will be in the Metro Kingdom. Find the warp painting there, just behind the Odyssey, to travel to a cage within the Wooded Kingdom containing this Power Moon.
If you went to the Wooded Kingdom before travelling to the Lake Kingdom, the portrait will be in the Snow Kingdom. Capture the Ty-Foo (the big cloud-like dudes) located on a thin path not far from the Odyssey and fly in a north-easterly direction until you find some wooden blocks that can be blown to the side. Blow them as far as they can go and use Mario to jump up onto them - and then the snow platform - to find the warp painting.
50. Found with Wooded Kingdom Art: Head to location 50 on our map to find a tree with some hint art on its side. It depicts a Koopa in the Sand Kingdom. Head to the Sand Kingdom and locate the Koopa who tasks you with a walking challenge (location 45 on the maps in our Sand Kingdom Power Moon guide). From here, you'll need to walk strictly north until you reach the very top of the Kingdom - you'll notice two small bushes sitting next to each just like in the hint art. Ground pound in front of them to receive the Power Moon.
51. Swing Around Secret Flower Field: Warp to the Secret Flower Field checkpoint and head towards the open area just before it. On your left you'll see a pole that you can climb - climb this and follow the wall up and above the entrance to the Secret Flower Field below. When you've reached the other side, climb down this second gold pole, jump over the falling platforms, swing across the bars, grab the key, hit the P-Switch, and follow the flower road that appears to reach the Power Moon.
52. Jammin’ in the Wooded Kingdom: Warp to the Summit Path checkpoint and jump down to the stream below. You'll notice a Toad wearing headphones on a nearby platform. Talk to the Toad and play him track 76 'Above the Clouds' to receive the Power Moon.
53. Wooded Kingdom Regular Cup: Find the Koopa at the Forest Charging Station to start a race challenge. The best trick here is to immediately head left and jump over the railing, using Cappy throws and dives to reach the area below and cut out the beanstalk route that the Koopas all take. Make your way to the goal first to get the Power Moon.
54. Peach in the Wooded Kingdom: In this Kingdom, Peach is located on the Observation Deck. Use the P Switch at the top of the ramp near the Summit Path to get to the top if you haven't already. Talking to Peach will reward you with a Power Moon.
Wooded Kingdom 'Moon Rock' Power Moons (55-76)
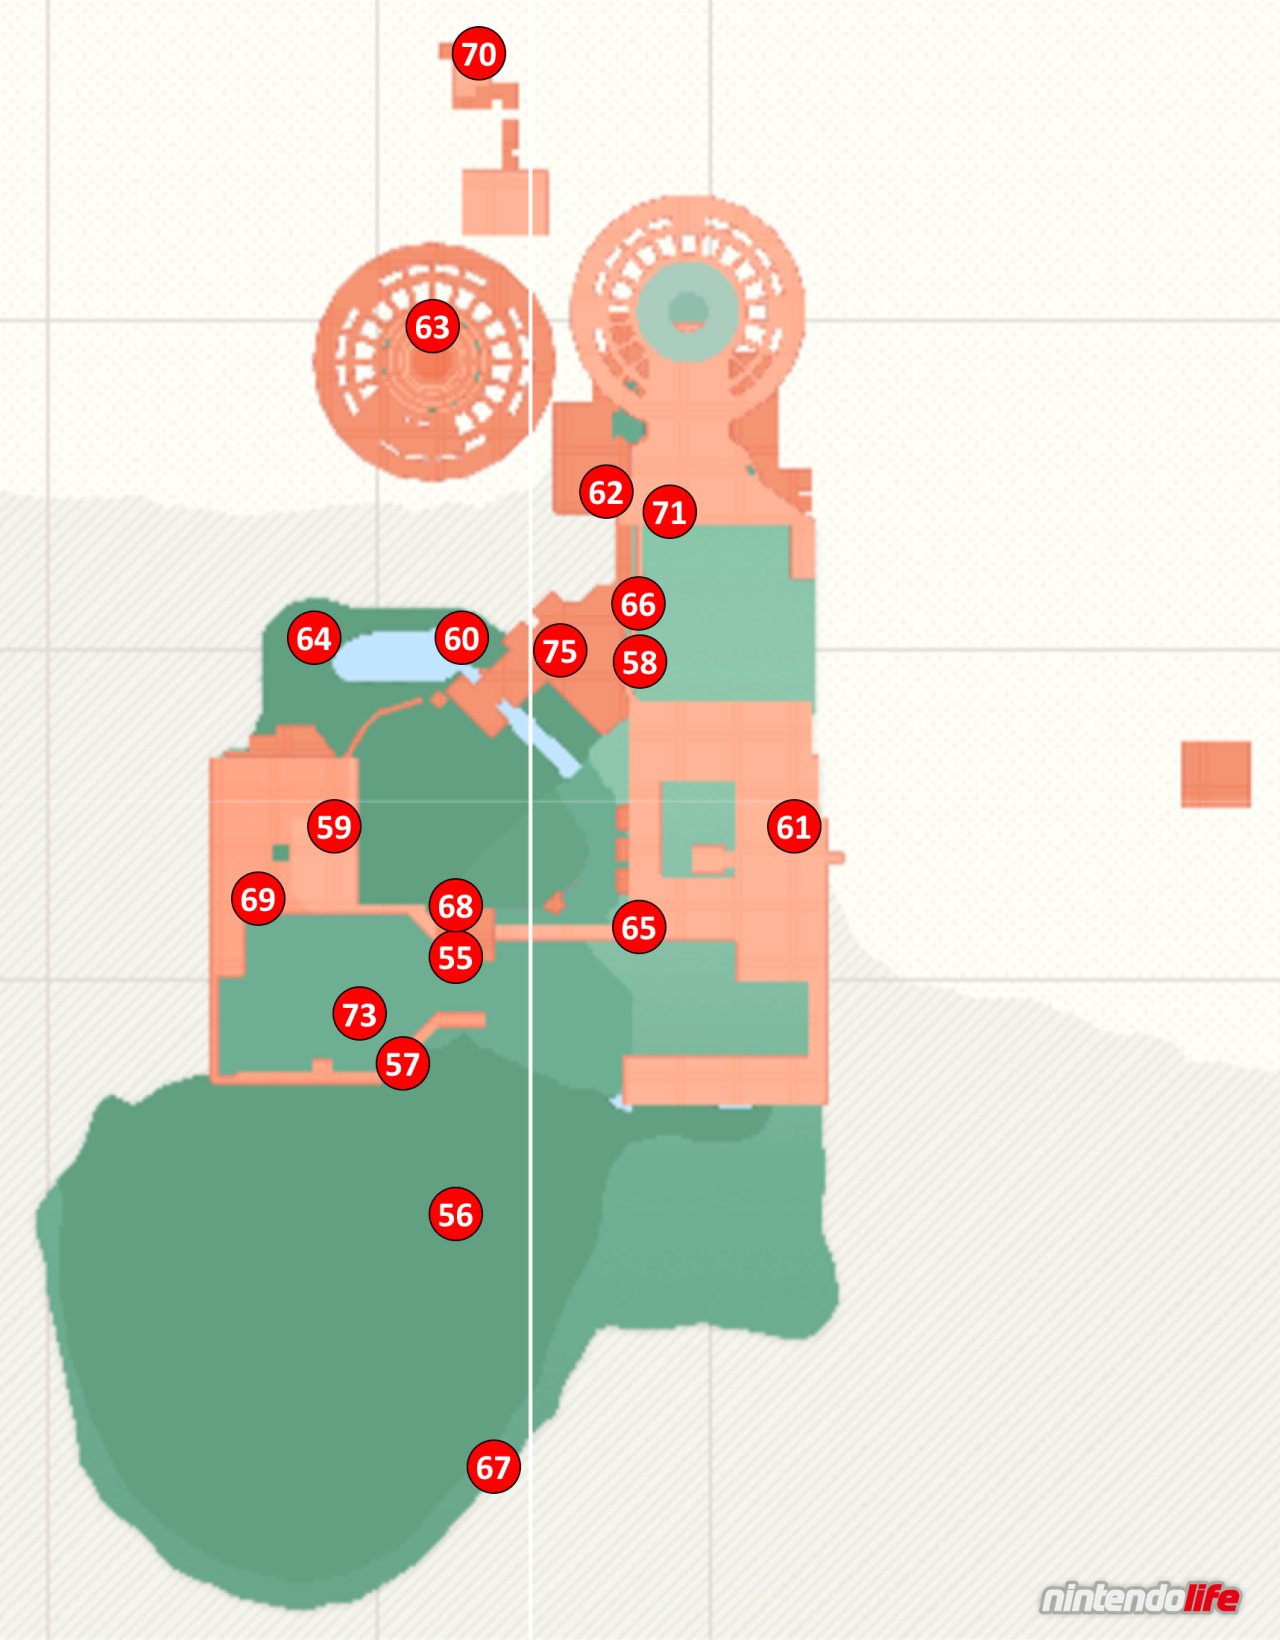
These Power Moons will become available to you when you have smashed the Moon Rock located in this Kingdom.
55. High Up in the Cave: Inside the cave that was originally guarded by a Sphynx (location 55 on our map) a Power Moon is hovering high up in the air. Take an Uproot inside to stretch up and reach it.
56. Lost in the Tall Trees: Warp up to the Observation Deck checkpoint and capture Glydon who is sitting nearby. If you look very closely to the southwest you'll find a wooden box in the trees. Glide over to this box and smash it open to receive a Power Moon.
57. Looking Down on the Goombas: Warp up to the Observation Deck checkpoint and capture Glydon who is sitting nearby. To the west, you should notice a nut sitting on a high, thin pillar (to the left of the giant cage). Glide over to this spot and break open the nut to get the Power Moon.
58. High Up on a Rock Wall: Located just before the maze where you need an Uproot to move the platforms inside, you should notice three grey blocks attached to the wall. Use an Uproot to climb up onto these three blocks, and then extend again to hit the nut above - a Power Moon will be yours when you smash through.
59. The Nut in the Robot Storeroom: Warp to the Iron Road: Entrance checkpoint and take an Uproot into the robot storeroom which is located nearby (where you initially planted a giant beanstalk to reach the top). Use the Uproot to break open the nut that is attached to the wall above the door inside to receive your Power Moon.
60. Above the Iron Mountain Path: An easy way to get this Power Moon is to warp to the Observation Deck and capture Glydon. Looking to the northwest you should just be able to see the Power Moon hovering beyond the railings below. Glide down to it and make sure to make contact with it.
61. The Nut Under the Observation Deck: Warp to the Iron Mountain Path, Station 8 checkpoint and capture an Uproot below. Take the Uproot up the ramp, turning right and passing the P Switch to find a robot in front of a railing. Walk towards the railing and around the corner - if you fully extend the Uproot in the corner formed by the red metal structure you should discover some hidden blocks. Jump up onto the hidden blocks and extend again to break open the nut attached to the wall and receive your Power Moon.
62. Bird Traveling the Forest: A glowing bird can be found flying around the Wooded Kingdom and, if you can hit it with Cappy, a Power Moon will pop out. The trick is to follow the bird's flight path and stand in an area where it gets relatively close to a platform, waiting for it to circle around to your chosen spot. We managed to grab it at location 62 on our map.
63. Invader in the Sky Garden: Warp to the Sky Garden Tower and climb up the stairs to find a new enemy at the top. Capture a Goomba and jump onto other Goombas to form a tower. When you're tall enough, jump out of the Goomba tower and ground pound the enemy from above to defeat it. You'll receive a Power Moon for winning the battle.
64. Hot, Hot, Hot from the Campfire: Next to Talkatoo you'll find a Volbonan (the adorable forks from the Luncheon Kingdom) who needs fire to cook. You can find a Fire Bro right next to Power Moon number 14 in our guide and, after capturing it from that location, you can easily jump back down to where the fork is located. Light the little pile of wood with a fireball to receive your Power Moon.
65. Wooded Kingdom Timer Challenge 3: Warp to the Iron Mountain Path, Station 8 checkpoint and jump over the railing to the west. You should find a scarecrow near some falling platforms. Throw Cappy at the scarecrow and make your way over the platforms and bars to reach the Power Moon.
66. Moon Shards in the Forest: Make your way to the maze after the Iron Road: Entrance checkpoint and capture an Uproot. Inside the maze you'll find five Moon Shards that need to be collected. Grab all five to receive a Power Moon.
67. Taking Notes: On Top of the Wall: Near the Odyssey is a small bump that allows you to jump up to the wall that surrounds this area's edge. Jump up onto the edge and follow it around until you reach location 67 on our map. Touching the glowing treble clef here will make an awful lot of notes appear back down the path you just climbed. To get them all, you'll need to roll all the way down as you'll run out of time otherwise - just keep trying it over and over if necessary, learning how much pressure to apply to the control stick with each turn.
68. Taking Notes: Stretching: Warp to the Iron Mountain Path, Station 8 checkpoint and jump over the railing to the northwest. Below the section with the scarecrow is a glowing treble clef (this is near the area with a Fire Bro and Power Moon number 14). Capture an Uproot below this area and use its stretch to climb back up. Touch the treble clef and use the Uproot's stretch ability to touch all of the music notes that appear.
69. Wooded Kingdom Master Cup: At the Forest Charging Station, you'll need to challenge the Koopa to a second race. To win you'll need to make use of a couple of shortcuts - the major one being to jump over the railing to the left at the beginning of the race, using dives to reach the area below. You can also skip the entire maze section by using a long jump and a dive to jump from the platform just in front of it to the other side. If you win, you'll receive a Power Moon.
70. I Met an Uproot!: For this Power Moon you'll need to take an Uproot all the way to location 70 on our map. You can find an Uproot near the Iron Road: Entrance checkpoint - go through the maze, trigger the P-Switch, walk along the flower path that appears, and jump across the falling platforms to get there. You'll find a Bonneter here who wants to see an Uproot up close - approach him and you'll receive your Power Moon.
71. Invisible Road: Danger!: Head inside the grey warp pipe near the Secret Flower Field Entrance. Inside you'll come across lots of invisible walk ways that can only be seen when covered in the goop from the Piranha Plants. Make your way to the end of the room and defeat the giant Piranha Plants to get the Power Moon.
72. Invisible Road: Hidden Room (see location 71): In the same room as Power Moon number 71, make your way to the central platform that spins around. Directly opposite from where you first get onto this platform you'll notice a hole in the wall - walk over to this hole to find a hidden Power Moon inside.
73. Herding Sheep Above the Forest Fog: You'll find a grey warp pipe in the area full of Goombas near the Forest Charging Station which will take you to one of the most simultaneously hilarious and aggravating secret rooms in the entire game. Inside, you'll need to guide the sheep to the goal to receive a Power Moon. If you walk next to the sheep on its left hand side, it'll walk to the right, and vice versa. You can also throw Cappy at the sheep to launch it forward around the course but be very careful with this. The trick is to line up every shot with Cappy in perfect, straight lines to ensure that the sheep doesn't go flying through the air at a strangely satisfying, yet completely useless, diagonal arch.
74. Herding Sheep on the Iron Bridge (see location 73): In the same room as Power Moon number 73, jump down from the sheep goal onto a small grey platform and enter the green warp pipe nearby. You'll find a second sheep that needs to be thrown into the goal - use the P-Switch to reveal a new platform and line up two perfect Cappy shots with the sheep to see it launch into the goal for a second Power Moon.
75. Down and Back Breakdown Road: Warp to the Iron Road: Entrance checkpoint and enter the grey warp pipe below the moving platforms in the distance (on the left). Inside this room, run past all the Bullet Bills that are flying in your direction to reach the key at the end. A Power Moon will appear back where you started.
76. Below Breakdown Road (see location 75): In the same area as Power Moon number 75, make it all the way to the end of the room and allow the giant Bonzai Bill to smash the rocks where the key is located. Below this area you'll find a second giant Bonzai Bill - capture this lower one, and fly it in the direction it initially starts to head towards. Eventually you'll reach the platform you started on and should find some brown bricks that can be smashed - fly into the bricks to uncover a secret Power Moon.
We hope that you have found this guide on collecting all Power Moons in Super Mario Odyssey's Wooded Kingdom useful. Let us know if you've managed to grab them all with a comment below.


Comments 7
Please can you not have the name of the kingdoms in the headline. It's not fair to have unavoidable spoilers when the game only just came out.Thank you!
@OorWullie
Um....
It's okay if we got a little spoilers rather than being Clueless.
Sometimes, i need some hints if i was stuck in the game.
@OorWullie this was the same kingdom Nintendo showed at the treehouse
The guides have finally caught up to me! I need to get moving!
So far, this is my favorite world though. I love the enemies, the atmosphere, and the music. The song played throughout the level has this 60's surfer feel to IMO and it's great.
@OorWullie Maybe use the contact page, they say that it's more likely that they'll read your requests there.
@1UP_MARIO Yep, I know this one and a couple more after this but I'm trying to get them to stop before they get to the unknown.
@crackafreeze Haha, I did say that I'd understand if they didn't want to change it but nah, I don't really
Show Comments
Leave A Comment
Hold on there, you need to login to post a comment...