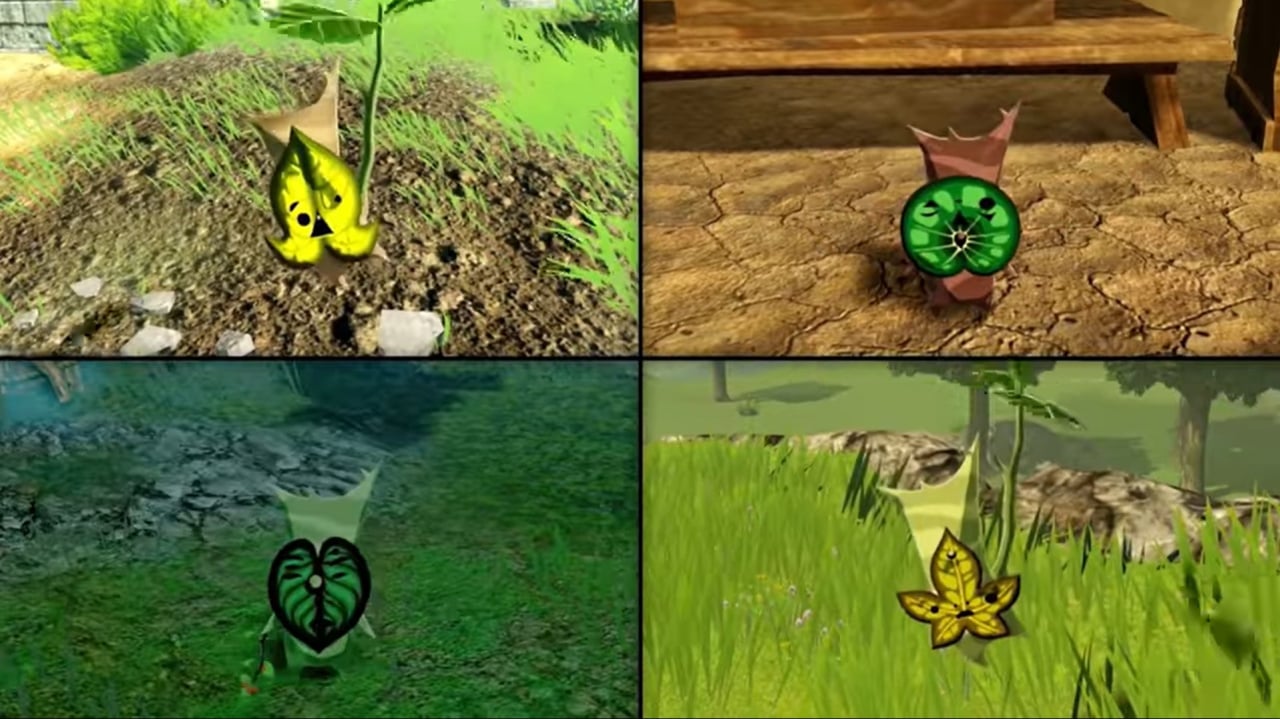
As a prequel story to The Legend of Zelda: Breath of the Wild, Hyrule Warriors: Age of Calamity features many returning characters, including the diminutive Koroks. These little plant people love nothing better than a spot of Hide and Seek, and once again you'll find them hidden around Hyrule, waiting to be found. Fortunately, there aren't quite as many of them this time (we're still looking for the last hundred or so of the 900 Koroks hidden away in Breath of the Wild), although they're still tricky to spot, especially amongst all the action when you're giving the monster hordes a thrashing.
In Age of Calamity, Koroks are mainly found in the main story subchapters, although you'll also find single Koroks hidden in a handful of the unlockable Challenge stages, too. In total, there are 134 Koroks to find in Hyrule Warriors: Age of Calamity (122 in the subchapters, and 12 more across 11 Challenges). At a certain point in the game (once you complete the Challenge 'A Most Peculiar Korok') you can unlock the ability to see how many Koroks there are in any subchapter or Challenge. This information is found on the Battle Info screen which pops up before entering a chapter or trial — invaluable for keeping track of the Koroks still hidden.
This Korok Location guide is now complete. We've listed all the Koroks in the Age of Calamity and included a Korok map of each area with their approximate locations marked.
SPOILERS! Although there are no story details below, we have included the subchapter titles for easy reference. There's probably nothing too surprising but if you want to avoid even the mildest of spoilers, we'd bookmark this page and come back once you've finished the main story.
Right, let's find the blighters!
Hyrule Warriors: Age Of Calamity Korok Locations Guide — Chapters
The following is a list of the 122 Korok locations in the main story chapters in Hyrule Warriors: Age of Calamity. We've numbered them, although the number doesn't necessarily denote the fastest or most economic order to collect them, rather the order we found them. You may well spot them in a different order to us, so use the maps for reference!
Chapter 1: The Battle of Hyrule Field
Koroks to find: 7
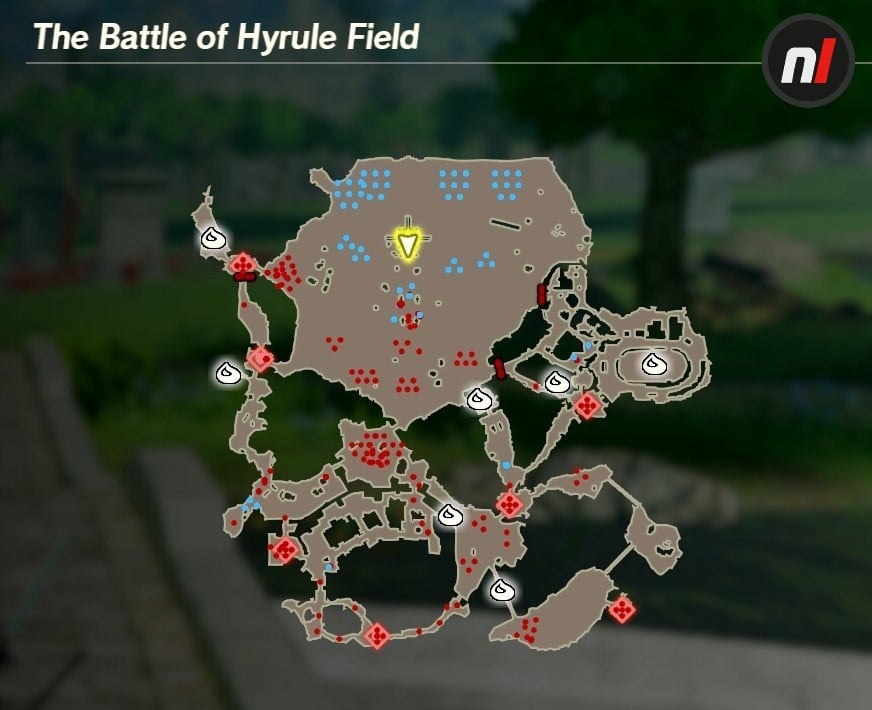
Korok locations:
- Korok #1 — In the north west area just past the Outpost in a crate.
- Korok #2 — In the middle of a bridge in the east.
- Korok #3 — A tree stump through a gate in the centre of the map.
- Korok #4 — In the centre of the horse grounds in the east (use your arrows to hit the floating target).
- Korok #5 — A flower in the west just outside the south exit of the first Outpost you have to take over (turn right).
- Korok #6 — A flower on the left of the path between the main field and the Outpost just south of the stables and grounds in the East.
- Korok #7 — A flower next to a protruding tree trunk along the stone wall around the town (to the north west of the wooden bridge in the south).
Chapter 1: Road to the Ancient Lab (formerly 'Guardian Amok')
Koroks to find: 6
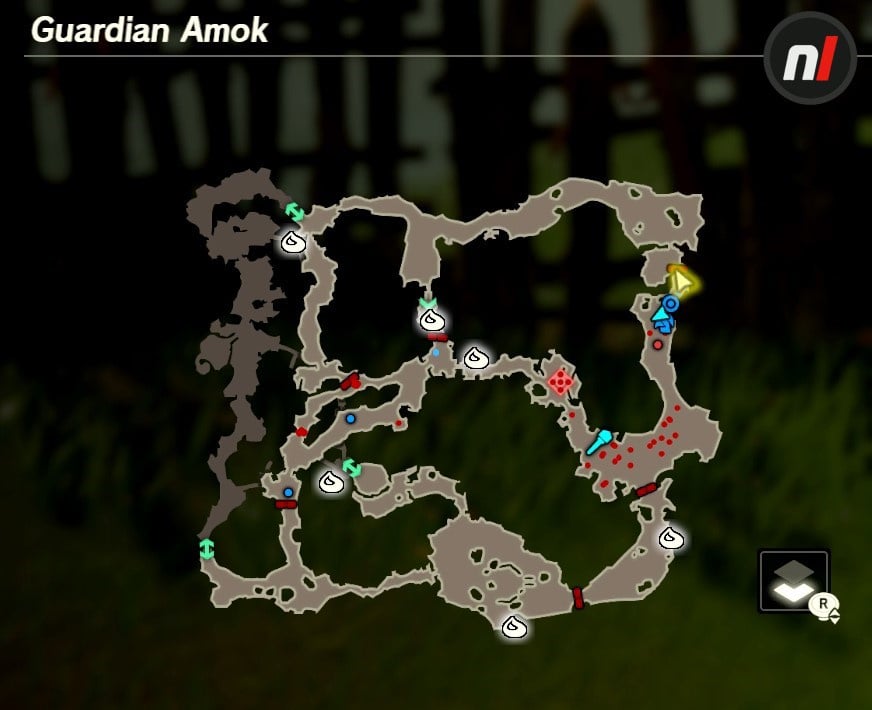
Korok locations:
- Korok #1 — A flower on the right just before when the Guardian appears.
- Korok #2 — A stump in the area the Guardian bursts out from.
- Korok #3 — In the north west on the platform to the right of the Unearthed Guardian (just before you jump to the lower level).
- Korok #4 — In the west, to the left before the other Unearthed Guardian.
- Korok #5 — A flower in the south, behind the Outpost structure on a grassy ledge.
- Korok #6 — A floating target in the south east (shoot it with arrows).
Chapter 2: Mipha, the Zora Princess
Koroks to find: 4
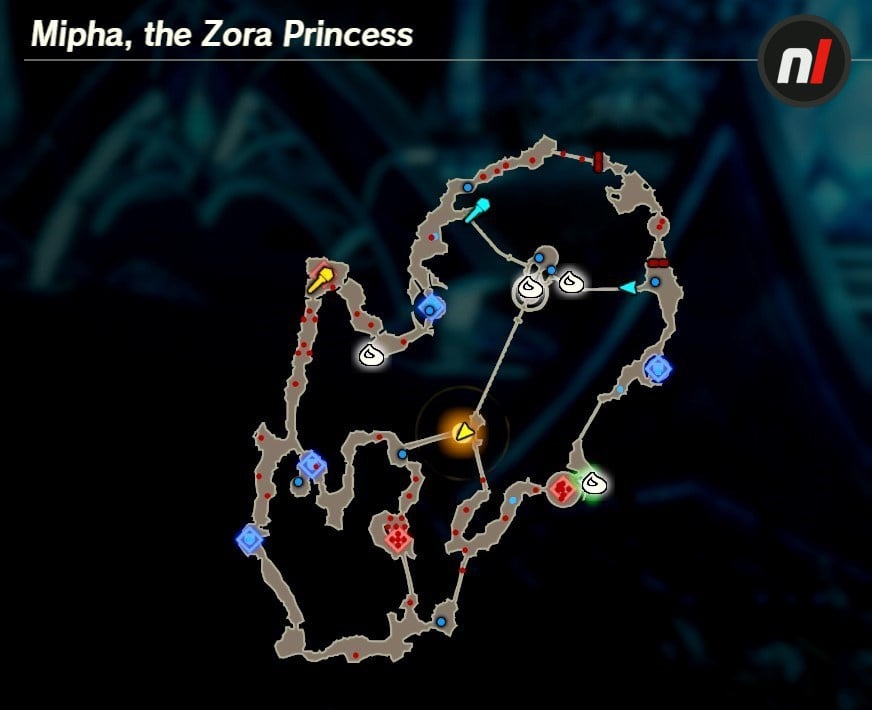
Korok locations:
- Korok #1 — Directly above the area where you start — take one of the staircases to find it.
- Korok #2 — In the east, in the grass just past the Outpost in the centre of the map.
- Korok #3 — A flower to the south east of the north westernmost Outpost on the map.
- Korok #4 — A flower on the thin eastern bridge out of the main palace (gated initially).
Chapter 2: Daruk, the Goron Hero
Koroks to find: 8

Korok locations:
- Korok #1 — Turn round at the very beginning and head behind the structure where Impa and Zelda are waiting to find a windmill.
- Korok #2 — In the stone house inside the Outpost at the south western point.
- Korok #3 — To the right of the Outpost in the centre of the map.
- Korok #4 — Beside the red arrow sign near the hot springs.
- Korok #5 — A sparkling spot on the path to Death Mountain, just after the bridge that Daruk lowers.
- Korok #6 — A tree stump to the right after you cross the lava bridge in the south west (near the beginning).
- Korok #7 — A glowing spot on the left just before the bridge into Goron City.
- Korok #8 — A windmill on the right after defeating the Igneo Talus and crossing the long wooden bridge (next to a lonely crate).
Chapter 2: Revali, the Rito Warrior
Koroks to find: 8

Korok locations:
- Korok #1 — Turn around at the very beginning and head into the Outpost to find a stump.
- Korok #2 — Take the first right turn from the beginning and you'll see a flower in the area.
- Korok #3 — In the enclosure/Outpost in the south western corner of the map.
- Korok #4 — A stump surrounded by stones up a short path in the north western corner (after you ride the wind to the upper section).
- Korok #5 — A windmill next to the water in the centre of the map, just before you fly up to fight the two Rito Captains.
- Korok #6 — On the raised area in the east accessed by riding an updraft (just before you float down to battle the ice moblin and bomb the rock).
- Korok #7 — A floating target up a path opposite the boss arena in the north eastern corner of the map. Arrows won't work on this target — use Stasis to 'freeze' and hit it.
- Korok #8 — Bomb the rocks in at the end of the path at the northenmost part of the map (past the boss area).
Chapter 2: Urbosa, the Gerudo Chief
Koroks to find: 9
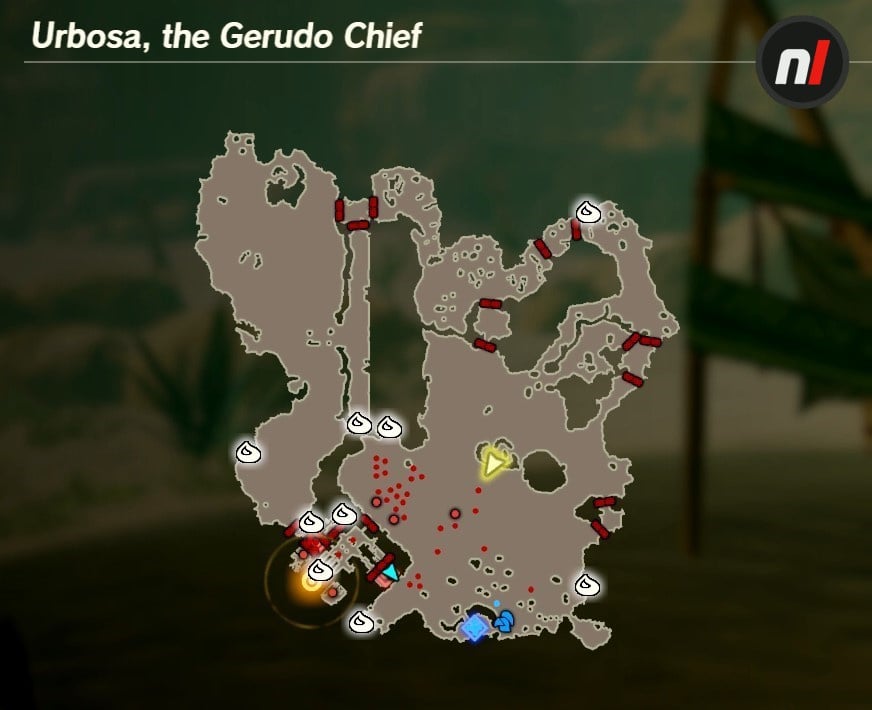
Korok locations:
- Korok #1 — In a crate in the south western area, outside the city.
- Korok #2 — A flower in the north western part of the opening area (outside the city, next to the pillars). You can also see a floating target nearby, although you won't be able to hit it from this area of the map.
- Korok #3 — A windmill between the cannons outside the Outpost in the north east.
- Korok #4 — Up the stairs on the palace balcony, outside Urbosa's boudoir.
- Korok #5 — In the courtyard by the western gate to the city.
- Korok #6 — A windmill in the enclosure at the city's northernmost point.
- Korok #7 — The floating target you could see earlier in the south eastern tip of the second desert area (next to the pillars).
- Korok #8 — A sparkling point on in the sand in the west, next to some pillars and a statue (outside the city in the second area).
- Korok #9 — Bomb a pile of rocks along edge of the map in the south east.
Chapter 2: The Yiga Clan Attacks!
Koroks to find: 8

Korok locations:
- Korok #1 — A glowing point on the ground in the front garden of the house at the southernmost point on the map.
- Korok #2 — A flower at the south easternmost point.
- Korok #3 — A stump beside some hay bales and outhouses in the space to the east of the south easternmost Outpost (the one with the well in the middle).
- Korok #4 — A flower among the buildings in the south west.
- Korok #5 — A windmill behind the houses in the south west.
- Korok #6 — A flower beside an overturned wagon up a dead-end path in the north east.
- Korok #7 — A tree stump beside the graveyard south of the central northern Outpost.
- Korok #8 — Go west (life isn't much more peaceful there) from the area you start in and head north when you're able. At the northernmost point of this dead-end, you'll see a floating target — use Stasis to 'freeze' and hit it.
Chapter 3: Freeing Korok Forest
Koroks to find: 10
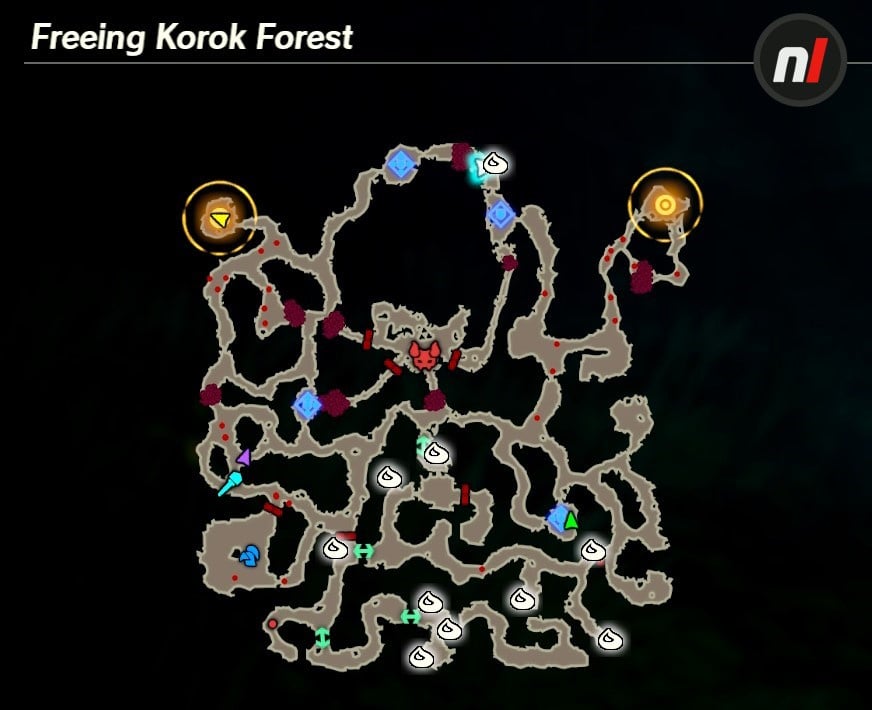
Korok locations:
- Korok #1 — Break the crates to your left in the start area.
- Korok #2 — Run forward from the start and turn right to find a flower.
- Korok #3 — Run forward from the start area and you'll see a windmill in the grass on the left next to the well.
- Korok #4 — A windmill next to the Outpost gate in the west.
- Korok #5 — A windmill outside a gate in the east.
- Korok #6 — A floating target in the end of a path in the south east.
- Korok #7 — A flower next to a tree trunk gate in the south east.
- Korok #8 — A flower just outside the central area with the Stalnox.
- Korok #9 — A flower just north of the central area with the Stalnox.
- Korok #10 — Along the path at the very top of the map, to the east of the northernmost Outpost.
Chapter 3: The Road Home, Besieged
Koroks to find: 3
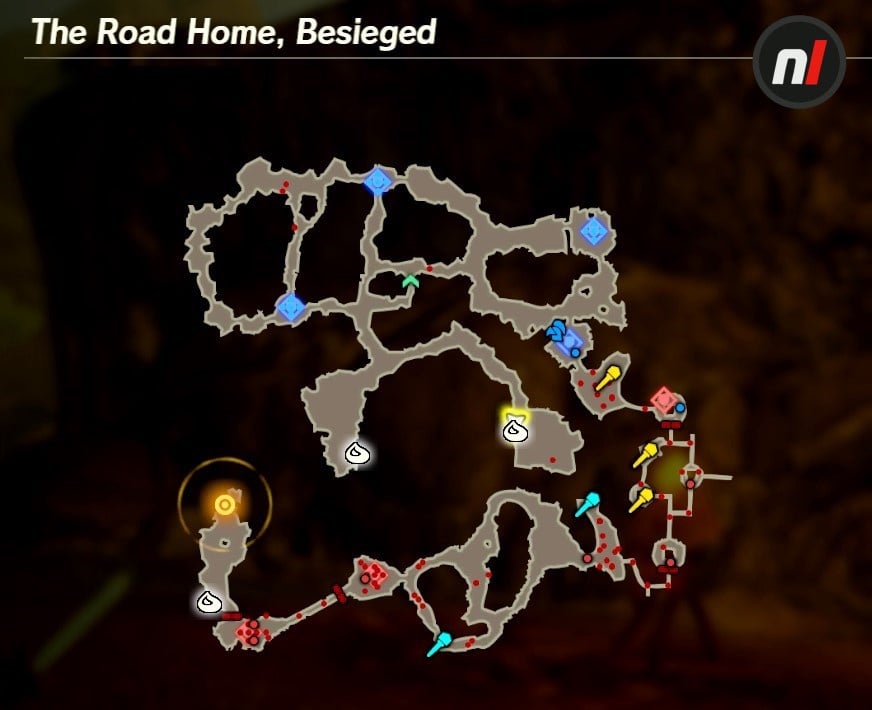
Korok locations:
- Korok #1 — Next to the skull fort down the eastern fork of in the centre of the map.
- Korok #2 — Hidden in a bomb-able bunch of rocks down the western fork (the opposite route from the previous Korok).
- Korok #3 — Just on the left as you enter the final area with the Stone Taluses.
Chapter 4: Akkala Tower
Koroks to find: 5
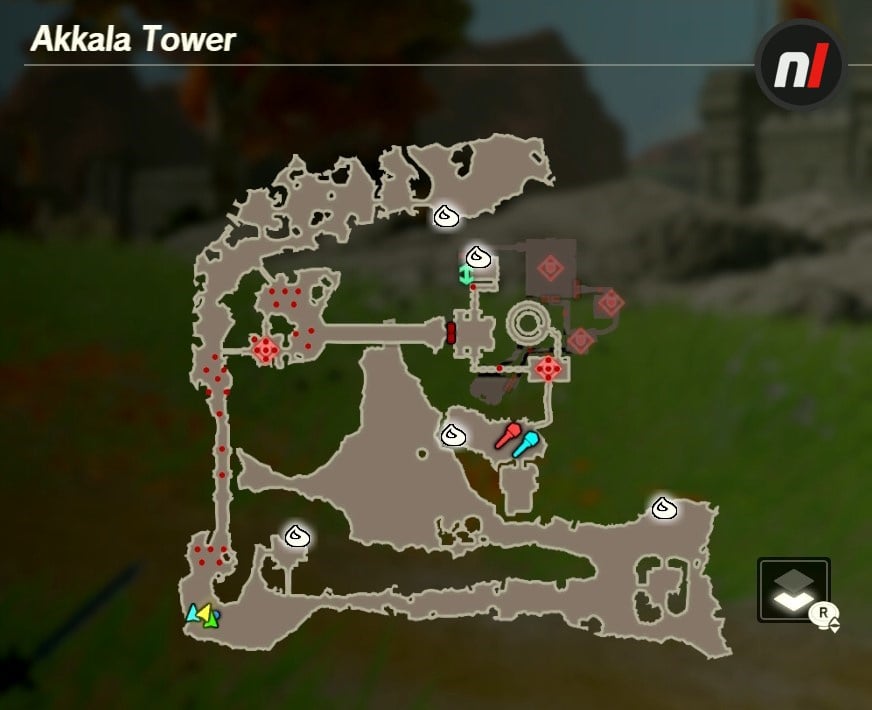
Korok locations:
- Korok #1 — A windmill in the small fort near the starting point in the south west.
- Korok #2 — A flower in the northernmost area.
- Korok #3 — A tree stump in the south east area.
- Korok #4 — A windmill in the courtyard to the south once you enter the Citadel.
- Korok #5 — Head north once inside the Citadel and climb the stairs where you'll find a korok on the landing halfway up to the room with the Blue-Maned Lynel.
Chapter 4: Destroy the Yiga Clan!
Koroks to find: 8
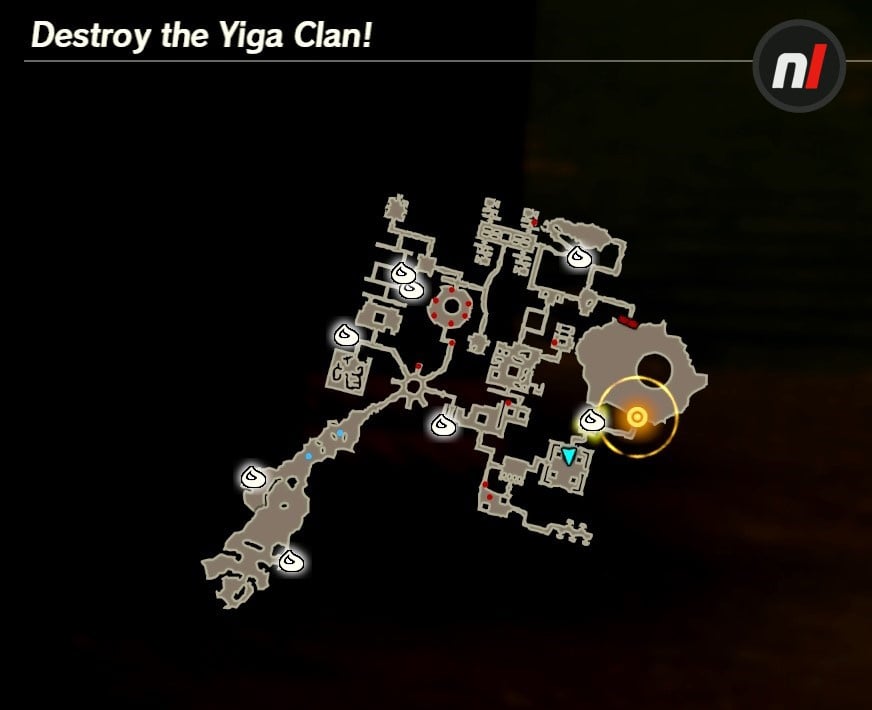
Korok locations:
- Korok #1 — A flower to the right of the start area.
- Korok #2 — A floating target down the ramp to the left of the start area (use Stasis to 'freeze' and hit it).
- Korok #3 — A glowing spot on the ground outside the south western Outpost room in the hideout (of the three you must capture at the beginning).
- Korok #4 — A windmill at the end of a corridor the south western and northern Outposts.
- Korok #5 — Along the same corridor route as the previous Korok.
- Korok #6 — A windmill halfway down the stairway leading to the cave in the north eastern area of the hideout.
- Korok #7 — A glowing spot at the top of a staircase you find after taking the eastern 'branch' from the hideout entrance area.
- Korok #8 — In the corridor leading to the boss battle (after Sooga).
Chapter 4: When Courage Fails
Koroks to find: 5
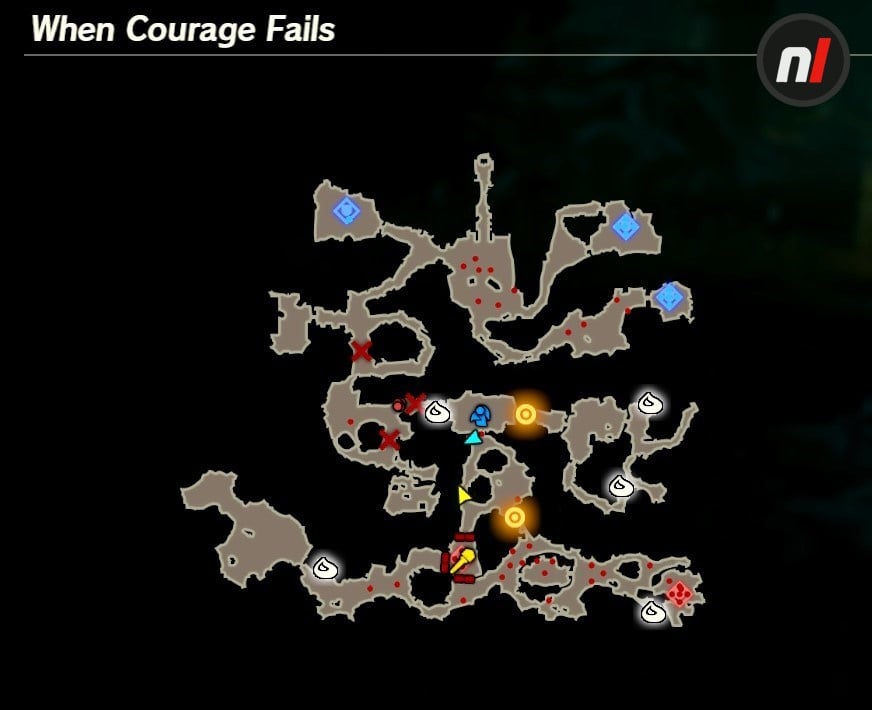
Korok locations:
- Korok #1 — A flower just after you bomb the third tree.
- Korok #2 — A floating target in the west (use Stasis to 'freeze' and hit it).
- Korok #3 — A glowing spot in the water in the west.
- Korok #4 — In a box in the south west.
- Korok #5 — A windmill to the south of the Outpost in the south east, along a steam that runs to a dead end.
Chapter 5: Calamity Strikes
Koroks to find: 7

Korok locations:
- Korok #1 — A tree stump in the grassy area on the left after leaving the first Outpost room.
- Korok #2 — A windmill (and one of two Koroks hanging around at the docks) after you battle the Guardians in the throne room battle — it's to the right of the staircase...
- Korok #3 — And the second is in a crate a little further on in the same area.
- Korok #4 — In a wooden crate in the top level of the library (on the left before the final staircase you climb to the south exit).
- Korok #5 — A windmill in the dead-end room to the north of the dining room.
- Korok #6 — A windmill behind a bomb-able wall (look for a crack) in the dark stone corridor before the dining room. There are two other cracked walls in this area, one with a treasure chest.
- Korok #7 — A glowing spot on the left just to the south of the big hall with the White-Maned Lynel.
Chapter 5: Water and Fire
Koroks to find: 3
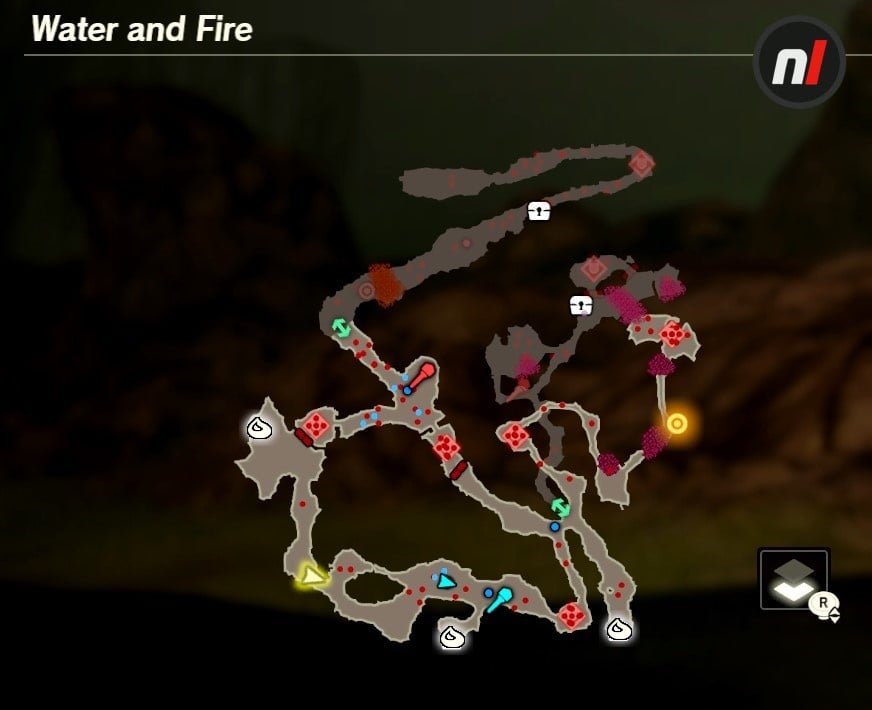
Korok locations:
- Korok #1 — Pull a 180° turn at the very beginning and run up to the western area of the map — you'll find a floating target across the hot springs (use Stasis to 'freeze' and hit it). There's also a treasure chest in the corner closeby.
- Korok #2 — In a wooden crate down a path in the south (next to a treasure chest).
- Korok #3 — A flower in the south east, past the enemy tower (beside a treasure chest).
Chapter 5: Air and Lightning
Koroks to find: 5
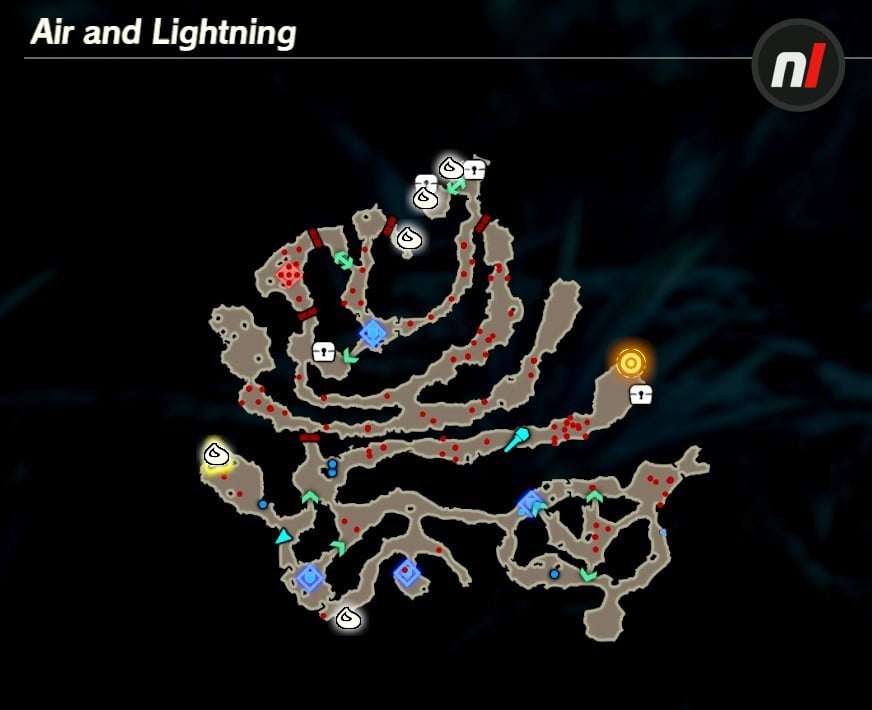
Korok locations:
- Korok #1 — A bomb-able rock along the south wall of the map in the south west.
- Korok #2 — A flower behind a log in the west (accessed via the route in the south west, after killing the Fire Moblin).
- Korok #3 — A tree stump near the updraft at the northernmost point of the map (there's also a buried chest nearby — use Magnesis).
- Korok #4 — Use the updraft near the previous Korok to access a small area with a floating target (use Stasis to 'freeze' and hit it). There's also a treasure chest here (and, if you're quick, a glowing rupee bunny to shoot).
- Korok #5 — A flower on the left just before the final updraft.
Chapter 6: Relentless as a Waterfall
Koroks to find: 6
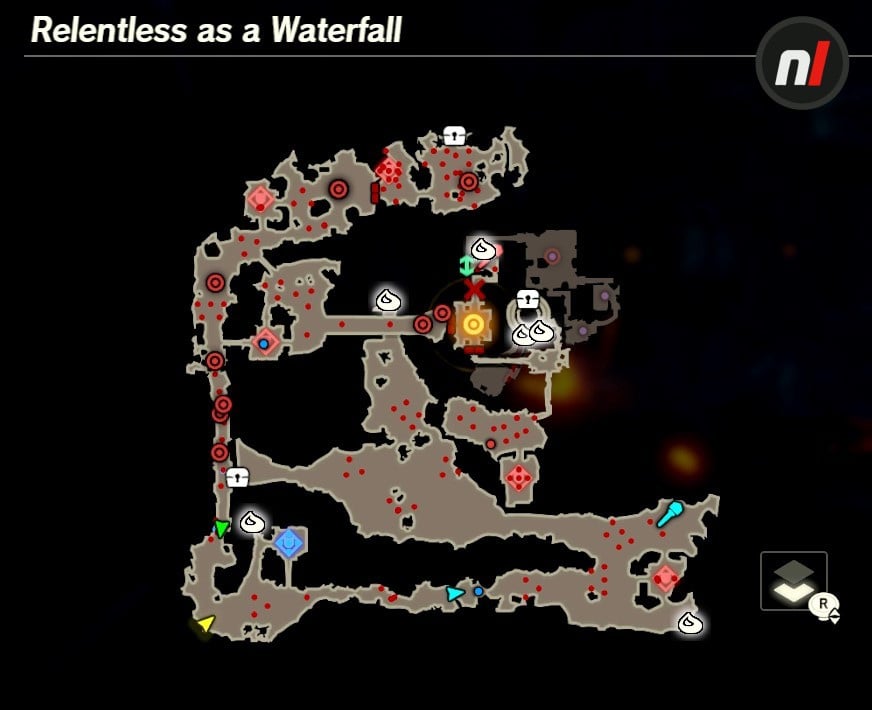
Korok locations:
- Korok #1 — A flower by the western entrance to the Outpost in the building in the south west (near where you start).
- Korok #2 — A windmill in the south east corner of the map.
- Korok #3 — A windmill in the Citadel, on a wooden landing up the stairs.
- Korok #4 — In a crate in the south east of the circular landing in the Citadel (the room with the tower i the middle, just after where you rescue Robbie). There's also a treasure chest nearby.
- Korok #5 — A glowing spot in the south of the circular tower room in the Citadel (the lower floor this time).
- Korok #6 — Turn right after jumping down from the bridge (after the cannons have blasted the Guardians off it) and you'll see a tree stump. Get it BEFORE defeating the Guardians!
Chapter 6: Each Step Like Thunder
Koroks to find: 4
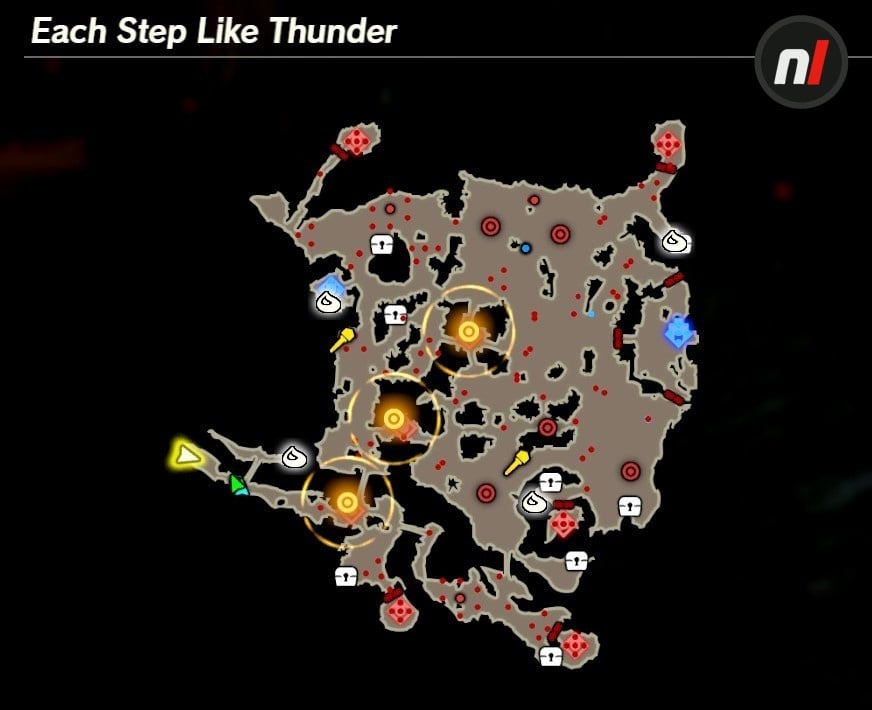
Korok locations:
- Korok #1 — Cross the bridge to the left at the very start and you'll find a windmill if you turn right on the other side next to a treasure chest (and a glowing rupee bunny you can shoot for 100 rupees in the opposite direction.
- Korok #2 — A flower to the in the grass just outside an Outpost in the south east.
- Korok #3 — A flower next to a treasure chest down a path in the north east of the map.
- Korok #4 — A tree stump in an the Outpost in the north west (the one off the main field, NOT the northernmost over the bridge).
Chapter 7: The Great Plateau
Koroks to find: 7
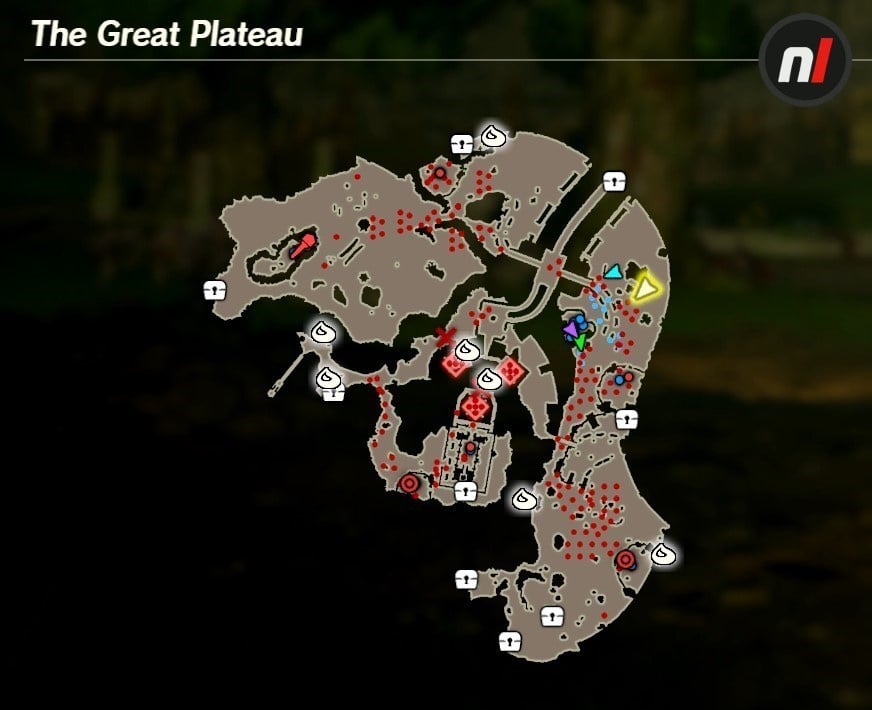
Korok locations:
- Korok #1 — At the end of a path in the very centre of the map, just north of the Temple of Time (although not accessible from the Temple area).
- Korok #2 — A windmill to the right of the Outpost entrance if you take the opposite fork just north of the Temple of Time.
- Korok #3 — A windmill by the Outpost in the south east.
- Korok #4 — A flower by a tree in the north.
- Korok #5 — A flower on the cliff overlooking Hyrule, directly in front of you after you exit the Shrine of Resurrection.
- Korok #6 — A tree stump in the west, south after you exit the Shrine of Resurrection.
- Korok #7 — A bomb-able bunch of rocks on the western wall in the south east.
Chapter 7: All Hyrule, United
Koroks to find: 6
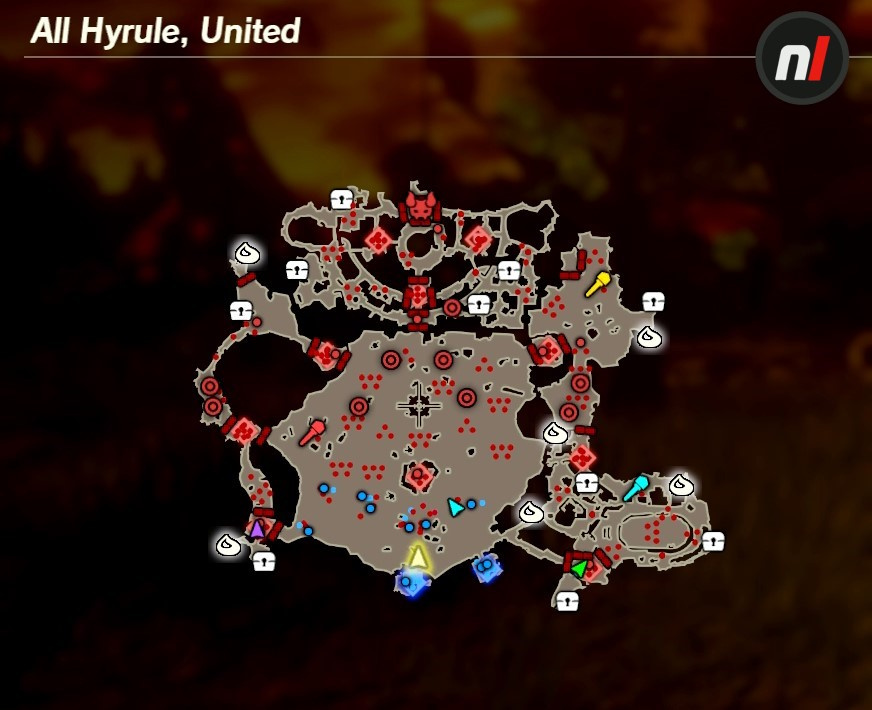
Korok locations:
- Korok #1 — A tree stump in the south east (at the end of the left fork on your way to the Outpost in the south east of the map).
- Korok #2 — A windmill north of a building in the ranch (in the south east).
- Korok #3 — A flower by the water in the north east.
- Korok #4 — A windmill in a fenced yard to the west of the Outpost where Teba is fighting (in the east).
- Korok #5 — A floating target in the south west corner of the map (use Stasis to 'freeze' and hit it).
- Korok #6 — In a box in the Outpost that opens up in the north west corner of the map.
Chapter 7: The Future of Hyrule
Koroks to find: 3
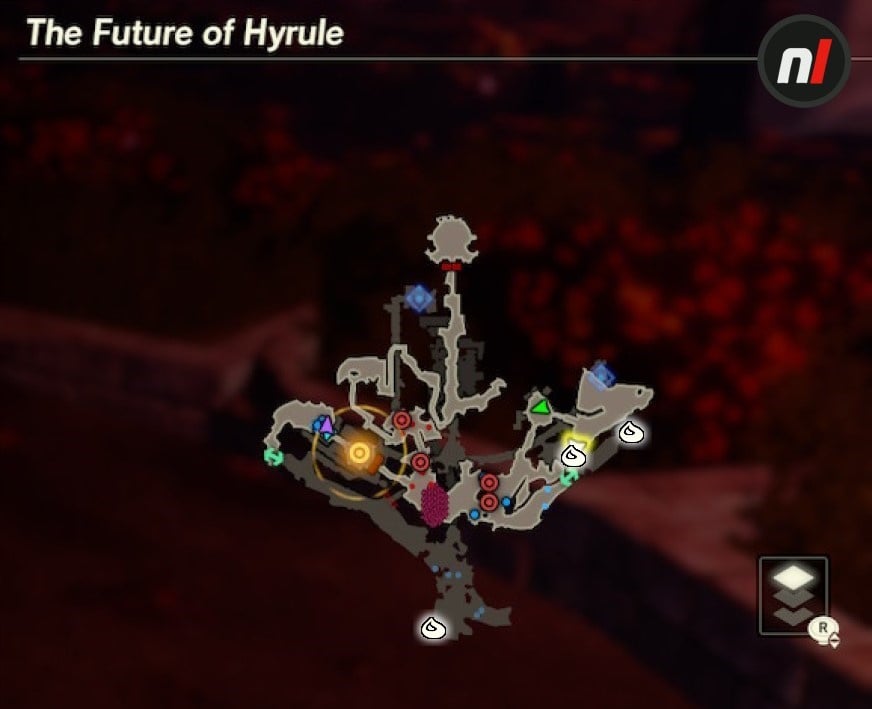
Korok locations:
- Korok #1 — Turn around to your left at the very beginning and you'll see a flower.
- Korok #2 — A tree stump in the east.
- Korok #3 — A windmill next to a wrecked Guardian in the east.
Hyrule Warriors: Age Of Calamity Korok Locations Guide — Challenges
The following is a list of the 12 Korok locations in the unlockable Challenges in Hyrule Warriors: Age of Calamity. No maps this time — the Challenge maps and areans are generally much smaller and easier to navigate.
Mipha's Training
Koroks to find: 1
Korok locations:
- Korok #1 — A flower on the right, halfway up the map (to the left of the long bridge to the palace).
Cross the Hebra Mountains
Koroks to find: 1
Korok locations:
- Korok #1 — In a wooden crate in an enclosure at the south westernmost point of the map.
Anti-Ice Training: II
Koroks to find: 1
Korok locations:
- Korok #1 — A windmill on the left halfway up the mountain path in the south (get it before beating the Frost Talus).
Innkeeper's Request
Koroks to find: 1
Korok locations:
- Korok #1 — A windmill to the south of the middle 'leg' on the map.
Winged Escort
Koroks to find: 1
Korok locations:
- Korok #1 — A tree stump in the north, just above the northern Outpost.
Defend Zora's Domain
Koroks to find: 1
Korok locations:
- Korok #1 — Turn around at the very start and follow the trail to the northernmost point on the map to find a windmill outside a gate.
Elemental Uproar
Koroks to find: 2
Korok locations:
- Korok #1 — A flower on the trail in the centre of the map (down the short dead-end path leading south on the eastern stretch of the trail).
- Korok #2 — A tree stump at the junction on the central trail, to the west of the previous Korok.
Polishing His Technique
Koroks to find: 1
Korok locations:
- Korok #1 — Head down the hill and take the winding path to the south in the centre of the map. To the south on the second bend you’ll find a windmill.
Hair-Width Trial: Expert+
Koroks to find: 1
Korok locations:
- Korok #1 — Head down the hill and take the turn on the left to find this Korok among crates.
Hunting Partners
Koroks to find: 1
Korok locations:
- Korok #1 — A flower in the south east of the map.
Defend Hyrule Castle
Koroks to find: 1
Korok locations:
- Korok #1 — A windmill behind bomb-able wall in the south west of the map.
What are Korok Seeds used for? What do you get for finding all the Koroks?
Korok seeds are used as materials to complete Hestu-related Quests which unlock certain buffs and benefits such as increased weapon capacity, which comes in very handy. By the end of the game our Link had a whopping 41 weapon slots in his inventory.
That's all you get, though, so don't go expecting any other special 'gift' from Hetsu. For the best, probably.
What about treasure chests?
You'll also find treasure chests hidden (or not-so-hidden) around the maps. Sometimes they'll be half-buried and you'll need to use Magnesis to free the chest, other times you'll spot them waiting to be plundered in plain sight.
While you'll obviously want to grab these when you see them, the treasure they contain arguably isn't all that exciting (you'll obtain weapons, rupees and materials through the normal game). One of the many unlocks you'll win through play is to have any unfound treasure chests highlighted on the map, too, so if you love collecting treasure you'll want to complete 'The Treasure Detector' and 'Upgrading the Detector' to have the Chest details on the Battle Info screen, and the Chests themselves displayed on the map respectively.
Let us know below which of these little guys gave you the most trouble. If you're new to the game, you might want to check out our Age Of Calamity Tips and Beginner's Guide. You can also find out about the playable character roster in our Age of Calamity unlockable character guide and discover how amiibo work in Age of Calamity.


Comments 18
I never found a single one in the demo 🙈
Kudos to nintendolife for managing to make this type of content
I would be upset if I dropped $60 on a game, only to be given this busy-work. Are these things required for progress, or they just unlock buffs?
Found another seed: THE BATTLE OF HYRULE FIELD (Map1) - Along the path directly west from the Outpost south of Korok Seed 3. Interact with the yellow Korok Flower beside the fortress wall. Sorry if instructions are hard to follow.
Hyrule Warriors, you were the Chosen One! It was said that you would destroy the Koroks, not join them.
Yahaha! You found me!
I did found a couple on the demo When I first saw them Im like NO PLEASE!!
@TexanSansei Thanks : )
It's been almost 4 years and people dedicated to finding them still haven't...it's insane how many there are.
I found several in the demo, and they carried over as already being found when I started the full game. I'll happily search everywhere for all of them. I don't know how many there are in this game, but I imagine its considerably less than the literal 900 from Breath of the Wild.
On Chapter 3: The Road Home, Besieged the 3rd seed is hidden in bombarded rocks near the trees when you go down in that split dead end area. The opposite side of seed 1 on your list
In Chapter 7: The Future of Hyrule, the korok you don't have is directly behind where you start the battle by the entrance gate. This helped me find lots of the koroks so thanks!
@TG16_IS_BAE just buffs, nothing required
So, I completed the quest, The Road Home, Besieged, which they say opens quest:
A Most Peculiar Korok
My log shows The Road Home, Besieged is completed though A Most Peculiar Korok is not showing up. Any help, appreciated. thx
EDIT: Ok, it needs to be made clear that its not THE ROAD HOME, BESIEGED that triggers A MOST PECULIAR KOROK, it's the completion of all quests that remain in the forest too. I just finished a HETSU quest and this trigger A MOST PECULIAR
Urbosa the Gerudo Thief‽
It would be helpful if you labelled the seeds on the map with their number.
Thank you so much for this guide, is as solid as Daruk's protection
Super helpful but I would love the pictures to be numbered with the corresponding seed to make locations even easier
Tap here to load 18 comments
Leave A Comment
Hold on there, you need to login to post a comment...