Storage can be a bit of an issue on the Switch; the console's internal capacity is only 32GB, with a portion already reserved for the operating system, and bigger micro SD cards can be very expensive. Thankfully, you can rely several of the smaller, more affordable cards with relative ease. For those of you getting to the point where your initial storage is filling up, and as an alternative to the 'Archive' option on the system, below is the step-by-step guide for keeping multiple cards on the go.
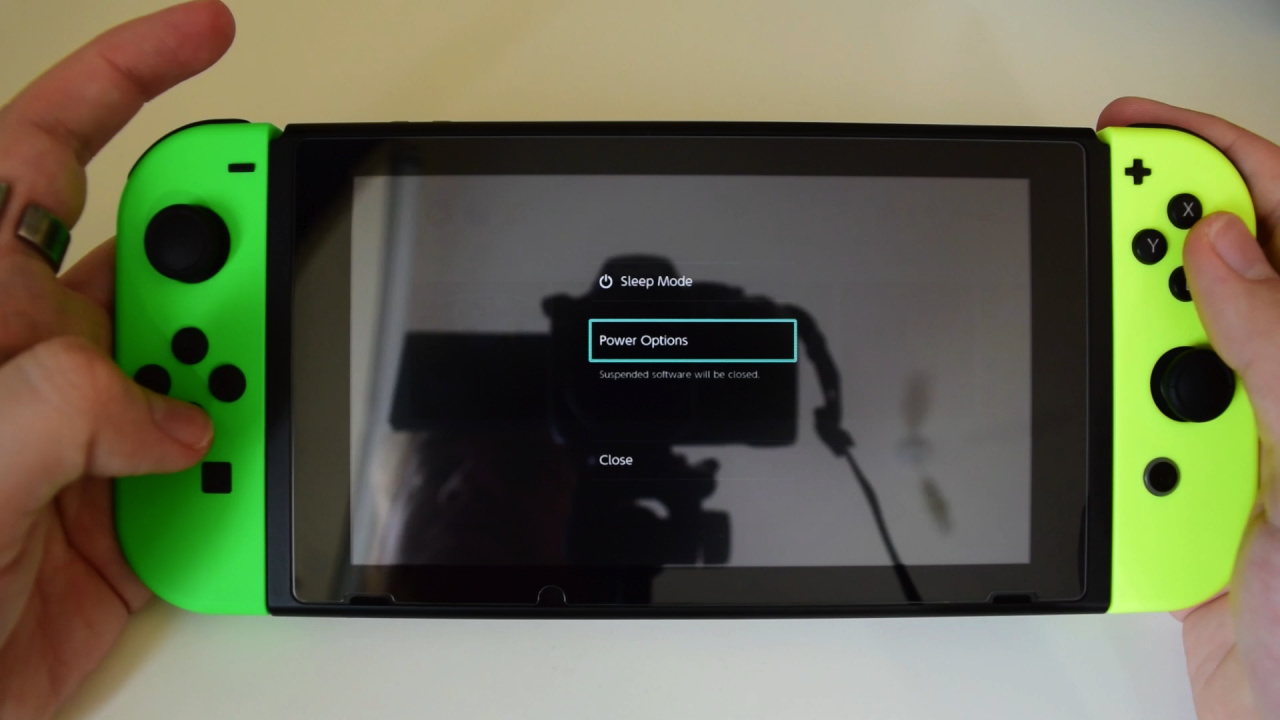
First of all, power off your console by holding the power button until the Power Options menu appears, and select 'Power Off'. Do not just put your console into sleep mode, or you run the risk of causing irreversible data corruption.
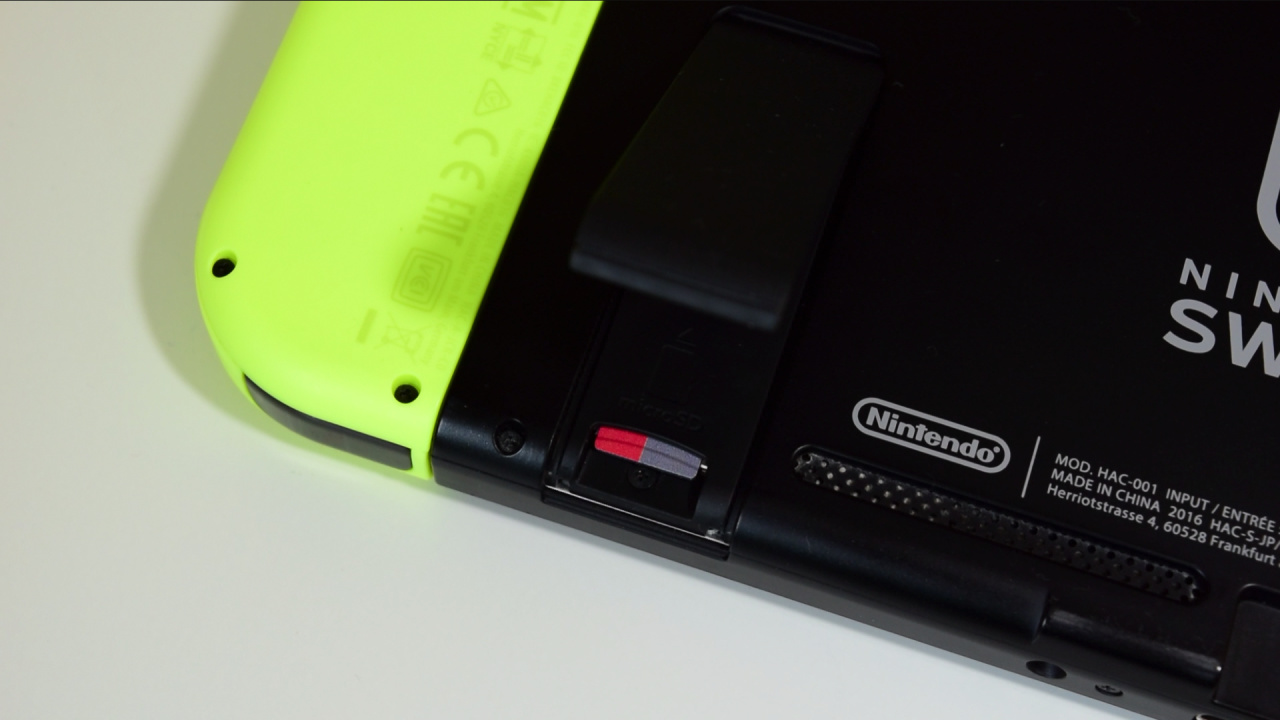
Once your console is off, simply flip it over and lift the kickstand up to reveal the micro SD card within. Take it out and replace it with your new card and re-close the kickstand.
As far as the process goes, you're basically done. The only thing to bear in mind is that of course none of the games from your other micro SD card will be present, but their icons will be accompanied by a little cloud icon.
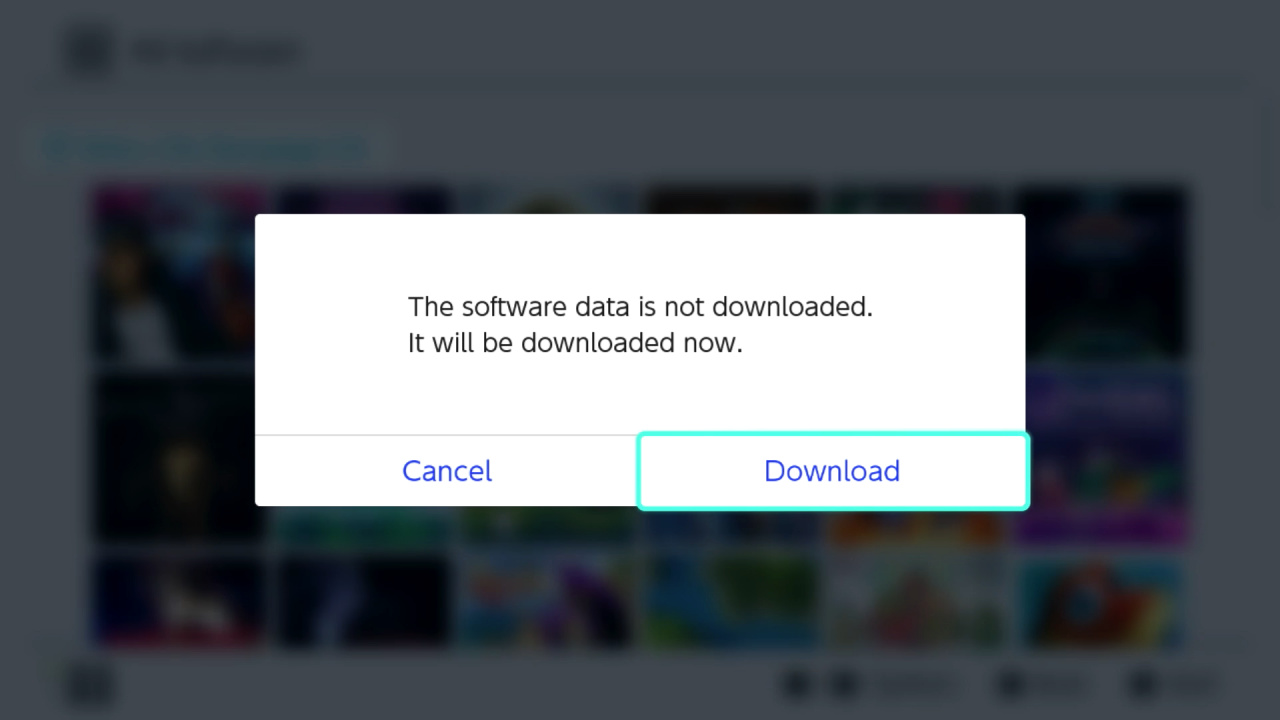
To play any of the games you've purchased simply press the A button to download them onto this new card and start gaming to your heart's content. Because all your save data is stored on the console's internal storage it'll still be there ready for you to use so you can dive right back into your games.
Of course, this can also be applied to new games you purchase from the eShop, allowing you to flip between SD cards depending on what games you want to play and when. This process becomes especially helpful when downloading larger games such as The Legend of Zelda: Breath of the Wild.
Just make sure you keep the little sods in a safe place.


Comments 107
Not bad....if my 128 gb card ever runs out then I'm glad to know I can just pick up another and keep on playing!
Cool, now all we need is a save data archive feature.
Wow this is an incredibly useful tip, nice catch
... uhhhhhh. Was this uncommon knowledge? I was half expecting an article revealing a hidden memory card slot. Why not create an article showing people how to swap the game card aswell, for the people that did not realise that the game they put in can, low and behold, be taken out again!
I'm hoping to keep everything within the internal memory and a 128 GB SD card. I imagine that if I continue to buy physical retail games whenever possible, I should be able to do it. If not, it's nice to know this is an option.
My plan was to go all digital, partly for convenience but also because it's the cheapest option for me where I live. I can buy all retail games on their release day but there is an import tax on top and with the awful exchange rate of the pound to Thai baht, I'd be paying around 20% more than the US Eshop price never mind the UK Eshop price. But with games like Doom and LA Noire on the way it's not going to be possible unless I take this approach here, multiple SD cards. I don't like that one bit though, it's far from ideal. Instead I'll just buy all my 3rd party games physically and download the rest. Nintendo games are generally smaller so I should be able to get to the end of the Switch's life with a 128gb card.
I don't have the money right now for an SD card. I was worried about having to get something like a 64 minimum. Thank you. This is a great help.
I think almost everyone knows this already...
I’ll stick to just using one large microSD, as I’m liable to lose one when not using it 😂
Nice.
So, with that tricks, can I store my Digital Download games onto my Micro SD cards ?
Pretend it feels like I own the "Physical" version of Digital Download Only games.
@OorWullie
Psst... use this trick.
Set your Region as USA, Georgia.
Whichever games you download from e-shop, it will got NO Tax.
It worked.
Btw, imagine if we can Store our Digital Download Only games onto Micro SD Card, and put inside the Custom Physical box. The result maybe like this.

@Yasaal I also thought so.
Question relating kinda.... So I have Mario Kart physical but I’m enjoying digital much more for pick up and play games. I’ll reserve physical for large epic games from now on (Skyrim). Anyways if I trade in Mario Kart and download the digital instead will all my data still work... example my gold trophies on 200cc will stay or will I have to restart? I’m thinking everything will stay but I’m wondering if anyone has done this yet?
I'll just keep my system pruned regularly (delete completed demos, games I have no interest in revisiting any time soon, etc.).
Old and known...
This was pretty self-explanatory for me from day one, so I don't get the need for a guide...
But while we're on it, it's really disappointing that you have to redownload all you games when you swap your microSD with a bigger card.
At least on the Wii U you could just copy over from one storage medium to another, now with the Switch you can't do anything...
Well count me in as somebody who considers them-self to be well informed but was really happy to read. We'll be getting our Switch in 2 weeks and I was wondering what to do about the SD card situation. I usually buy everything on disc/cart but it's good to know that I can just buy whatever cheap card I come across at launch and then get a bigger card in a few years when I need one.
For those who think this is well known and simplistic knowledge, go get yourselves a Wii U and try balancing your games and saves between the system, an external HDD and a USB thumbdrive.
So the next question will be - what about our save files? I'm guessing right now there's not much we can do, but I'm guessing each of my sons will want their own system in a few years and we'll need to get their game saves from the family Switch to their own. Hopefully the cloud comes into play, or at least less us move them to the SD cards 1 time like the Wii to Wii U migration which went smoothly. Only per account, not the whole system. Nintnedo does'nt need that yet I suppose, but when Pokemon releases they will.
Of course you need to write down, on which card which games are!
Were there people that actually needed this explained to them?
nintendo - please hurry with Cloud saves! I'm so worried about losing or damaging my Switch!
the memory cards should've been hot-swappable, really.
@Anti-Matter Cheers, I actually do that already but instead of Georgia I have Oregon as my state. Works a treat.
I'm curious, do you buy your physical games in Indonesia or do you need to import them? If you do get them in Indonesia are they the Japanese versions and how much more do you have to pay on top?
Is there a different way to insert an SD card? I feel like this shouldn't be a revelation.
@shani You don't need to re-download all your games. Just use a computer to copy everything from the old microSD to the new one, just like with previous systems. Only need to re-download games if you're moving from internal to external storage (or vice versa) as there's no way to transfer games between the two.
Wow you lose quite a bit when you install a card.
I just bought a 200gb for £40 and put it in to discover that after formating I had just 183gb left. With nothing on it yet?
Is this right?
@Banksie I haven't used as SD card on my switch and didn't know this. I am not sure if you could do this with Wii U hard drives could you?
I always just get a bigger SD card once my previous one is full. By the time one is full, I can get a bigger one for the same price. Upgraded my SD card size 5 or 6 times for my 3DS (and might upgrade once more before I'm done with my 3DS).
It's messy, constantly swapping, I'd rather one big memory card. No danger of losing it or having to keep track of what games are on what card. I'm not sure what if anything new this is teaching people, I agree with comment #4. All it reminds me of is having to do the same with the Gamecube memory cards, yes it's a bit different. A lot of which sadly ended up getting corrupted over time. Though the save files are on the Switch here but we already knew that. I like the colour scheme of the Joy-Con's in the photos.
@OorWullie
Luckily, in Surabaya , East Java, there are some Game Shop that sell Original games in Physical form. I got around 70% of my games from my local Game Shop (I usually buy from Game Inn, at Super Mall Surabaya. Check Game Inn from Instagram). They provide the games from Jakarta or Singapore or Hong Kong. Mostly, USA or PAL or Chinese Asia region. The other games like Wii / NDS / PS2 / etc , I have to order from my friend from playasia com or Ebay. I have to pay more from my friend since he help me to get the games that NEVER been Sold in Indonesia.
About the price that I have to pay from my local game shop, I can say in Indonesia , some of games sold UNDER MSRP . Let's say Mario Kart 8 Deluxe with MSRP US$ 60 or equal with IDR 840,000 if assumed US$1.00 = IDR 14,000. But, I got Mario Kart 8 Deluxe with price IDR 720,000 Brand New Condition or US$ 53.34. Sometimes, I got Second handed games in Very Great / Like New conditions with very Cheap price.
Also, I can buy E-Shop voucher from my local game shop easily. I just say what nominal that I want to buy ( $20 = IDR 350,000 / $35 = IDR 520,000 / $50 = IDR 730,000 ), then the shop keeper will sent messages to E-Shop card supplier from Jakarta, wait for 10 - 15 minutes then I got the code. And there are also a Game Shop with name Game Republic and Next Game that sold a Real E-Shop card. I can straightly pick up the card I want, pay the price in Indonesia Rupiah, scratch the aluminium foil cover, Redeem the code and got the Voucher.
I go Physical for every single games that I buy, except if the games are Digital Download Only. But, I heard from this thread if I can get another legal copies of E-shop games, stored into Micro SD card for Back Up purpose and Redownload again, put inside another Micro SD Card. So that means, I can have Multiple of Same E-shop games inside of multiple Micro SD Card. That also means, I can make my Digital Download Only games become "Physical" retail since I got the E-shop games stored inside of separated Micro SD Card.
Well, correct me if I wrong.
I bought my 128GB micro sd card before the prices went through the roof. I don't expect them coming down any time soon.
@BenAV
Wait !
If I check the inside of my Micro SD Card on PC, Can I Copy my E-Shop games files onto FlashDisk or empty DVD/ Blu-Ray Disk to be Burned / Backed Up ?
@Banksie Not really a bad article. I've yet to buy a Switch & was wondering where the save state is stored. I wish someone could comment on if the Memory cards only "allow for display of a certain # of games." Both the Wii U (expanded memory) & cards in the 3DS are limited. Not sure how many on the 3DS, but the Wii U is slightly over 200. Yes, I've filled my Wii U with over that many legit digital games. Really only using 800gb of my 2TB external drive.
Already figured this out but thanks NL!
@OorWullie @Anti-Matter That's not a "trick" that's fooling anyone - falsifying your location to pay a lower tax qualifies as Tax Evasion. I would strongly advise against doing that as it's definitely not worth the potential consequences.
@Urameshi
But, Georgia - USA has NO Tax from Beginning.
Also, there is NO Indonesia country name from Nintendo. My country will NEVER get any chance (Except Mario & Sonic 2014 Wii U). So, I choose Georgia - USA instead.
@BenAV Since when? Sticks/harddrives formatted by the Wii U are unreadable on PC.
The same applies for the Wii (apart from the SD card, but that's not where the games were stored), you could only read the Wii-formatted drives with specific software.
I haven't tried it yet but it would really surprise me if the microSD card in my Switch was just formatted in a standard format (like FAT, exFAT or NTFS).
“Hey, this system has a serious internal storage problem, how about using multiple micro SD cards as a workaround?”
The very opposite of practical.
@Urameshi I appreciate your concern but as a Scotsman living in Thailand with no connection to the US other then being previously engaged to one of it citizens,I honestly couldn't care, it saves me money and Nintendo have made it so easy to do. I'm sure there are thousands of others doing the same thing. If they want to chase me for a few bucks,they come and get me.
@shani Surprisingly it is. I have taken the SD card out a couple of times and put it into my laptop. You can have other files on the card and still use them if need be. Everything Switch related is in a Nintendo folder.
@OorWullie lol. True. Every switch owner I know has multiple accounts. Not just switch same goes for the ps4
@shani http://en-americas-support.nintendo.com/app/answers/detail/a_id/27595/p/897
Nintendo has a support article detailing it's possibility.
Guys. You seriously made an article for this. About swapping your sd card.
@Lord
A 200gb card isn't really 200gb. Because there's 1024 bytes in a kilobyte, and 1024 kilobytes in a megabyte, and so on. There are online calculators that tell you the usable space you get from any given size
@link3710 @OorWullie
Wow, I didn't expect this. I didn't even consider the possibility because I was so used to Nintendo using proprietary formats. Thanks for pointing this out to me, because my microSD is getting full and I was already contemplating what to do about that.
@Urameshi There are no potential consequences.
@erv Yeah I was thinking the same thing when I read the article.
But at least I actually learned something from the comments.
I was able to get a 256 gb card on sale so I should be good for a while, but good to know we can easily switch them out.
@Anti-Matter That's convenient for you, you have a few options then. My choices are limited in Thailand. Luckily there is a game shop near me that opened a couple of years ago. It's pretty great actually, they have loads of stuff,including limited edition stuff from Japan. New releases they have in stock within a day or 2 after it's release date.Theu are slightly more expensive but so be it, it's much cheaper than it would cost me having it sent over from the UK or US as I have to pay import tax to postal service on top of postage costs. What I've been doing for Switch is purchasing Eshop top up codes from Amazon.com. The region free of Switch has been great to me.
As for backing up your games I don't think you're able to do that. Only 1 copy is allowed. It's not really safe swapping out SD cards all the time anyway. Those Micro SD's are easily damaged if not careful,as I've found out in the past. It's safer just putting one in the Switch and keeping it there.
LOL, I thought this article was going to tell me I could somehow put two SD Cards in there!
But yeah, I already knew you just swap cards and keep on going. That's why I invested in my 128GB SD card so I won't be doing that anytime soon. That and I groom my data often too.
@BenAV
Unfortunately, it does NOT work that way on Switch. If you copy the games over, the Switch will NOT recognize the copied files on the new card, it just shows the cloud icon and forces you to re-download them anyway. It's not the same as the 3DS or Wii U.
@Anti-Matter It doesn't make a difference if the territory originally has a tax or not - it's providing a false location (especially one that pays a lower tax). However like you said Indonesia isn't even listed as a taxable territory according to Nintendo, so any consequence is practically non-existent.
@OorWullie Tax Evasion isn't specific to the U.S. If you live in a region that pays taxes, citizens are subject to their governing body's laws in relation to tax evasion. However my warning was admittedly with the U.S.' level of leniency in mind, Thailand is probably a lot more lax about it. Understandable if you don't care, I just wanted to point it out.
@shani Here in the U.S. the consequence is a letter from the IRS stating that you've committed tax evasion and that you are subject to pay the corresponding violation fine, and if you don't they will take legal action etc.. It's as simple as that in the U.S. Depending on where you reside however, the violation may be of no concern depending on the laws of your governing body and how lax they are.
@shani
Correct. The Wii U encrypts the volume. You can use utilities to see the files, but they are useless. The 3DS can be manipulated thanks to its Windows networking support though. If you figure out the file structure you can even copy individual saves, as long as they are keyed to your account.
You can see and copy the files on the Switch cards, but they are useless. The Switch will not use the files even if your system has the correct encryption key. It probably generates a new key based on volume serial number. So, it does not work to copy them, as you said. You have to re-download.
@link3710
This does not seem to work for me, or several others that have tried. I had the same issue detailed in this thread:
https://www.gamefaqs.com/boards/189706-nintendo-switch/75105371
Did it work for you?
Edit:
Ah! I just noticed in the Nintendo support article, this line at the very end:
"Any software that cannot be read on the system using the new microSD card can simply be redownloaded from the Nintendo eShop."
Which kind of negates the whole act of copying anything. Except screenshots, ETC.
@OorWullie
Do the files work when you copy them to a new card though? It will not work for me. And I've made sure I have the pathing and formatting correct. Others have experienced the same.
Can you guys do an article about how to turn the Switch on next? I'm having trouble figuring that one out. And maybe after that, do an article on how to inhale and exhale.
For fellow Canadians, 128GB microSD cards are regularly priced at $46 at Costco. Same card is $129.99 at Best Buy, which goes on sale for $99. It's a no-brainer.
@Thunder_Pilot I never worded that very good. I meant any non-Switch files you have on the card can still be accessed. As for Switch files, nope those are encrypted. You can view and copy your Switch screenshots on a laptop but that's it. On Wii U, once it was formatted to the console it was unusable.
@OorWullie
Oh, I see. Yeah, I'm not sure why it does not work the way that Nintendo support article details. It might have to do with changes to later or earlier OS updates too.
Thanks for clarifying.
@FNL lol. Thanks needed that
i got zelda on cart and got a 256GB sd.
i've downloaded quite a few games (nba playground being the largest at 9.xGB) but i don't see that it will be an issue. I don't think there are going to be many switch games I buy over that or less. 360 got away with basically 7GB dvds and this thing isn't much better on the graphics front so I don't see an issue.
i imagine the updated switch will probably have 128/256 or something.
now they need to fix the save data issues and the account issues (multiple accounts and following accounts to new systems). i guess those are pipe dreams though.
@Urameshi "Depending on where you reside however, the violation may be of no concern"
That's exactly what I meant. If you as a US resident create an EU/JP/AU account and buy something from those eshops, no one is going to care. Similarly, if someone from outside the US does the same with the US eshop, no one is going to care. So there are no consequences.
Furthermore, you don't even have to name an adress when you register a MyNintendo account. So I'm not even sure it's a violation of anything.
Especially since it's technically not tax evasion. You can't buy anything without paying taxes.
E.g. if I want to buy something from the US eshop, I have to buy a US eshop card, for example at planetasia. Let's say I pay with a Paypal account. That payment already includes taxes specific to the country I'm residing in.
So when I bought NBA 2k18 from the US eshop, I actually had to pay the according taxes in Germany.
And if someone wanted to buy directly at the US eshop, they would need a credit card or Paypal account that's tied to a real and verified US adress. So you can't even set up a US credit card or Paypal account with a fake adress.
I don't see how there's even the possibility of tax evasion when buying something from different eshops.
There's a reason why Nintendo allows it and the reason is that it's legal.
@Thunder_Pilot Oh okay, good to know. So it doesn't work after all. Thanks for the info.
@shani Yeah woops, just realized were talking about two different subjects due to a clumsy misread on my part - pay me no mind :3
Ah! I just noticed in the Nintendo support article, this line at the very end:
"Any software that cannot be read on the system using the new microSD card can simply be redownloaded from the Nintendo eShop."
Which kind of negates the whole act of copying anything. Except screenshots, ETC.
@JaxonH @Lord Yeah, it's basically manufacturers advertise that 1KB is equal to 1000 bytes (and 1MB is equal to 1000KB, etc), when under computer terms, 1KB is equal to 1024KB. So, take the number of GBs you have, convert it to MB by manufacturer's advertised size by multiplying by 1000, then to KB, then to bytes. Now, reverse it by converting to KB by computer terms by dividing by 1024, then convert to MB, then GB. 200GB is actually only ~186.26GB.
Good tip, but this won't work with my OCD. I doubt I'll run out of space though because I live in a physical media household
@Anti-Matter
Yes and no. You can copy the files but they will be useless on anything other than the first sd card you saved them to. (Which can come in handy for avoiding re-downloading them, but it won't save you if the card goes bad). The encryption is apparently generated from the sd card serial number. The Switch may also mark them as deleted if you use archive or delete on the Switch system OS, so you would have to re-download anyway. I have not tested the last scenario. So, unless you have slow internet, it's probably not worth it for the games, but might be for screenshots, and we really, really, really need a way to backup and transfer saves!
As far as this guide is concerned, it is a little cheaper per GB to get a 128GB card than it is per GB for a 200GB card (and far cheaper than a 256GB card), but one thing to also take into account is convenience of not having to swap cards, specifically 128GB vs 200GB. Personally at prices of $44.90 for a 128GB card and $78.57 for a 200GB, I'd choose the 200GB so I can put it in and basically forget it. Chances are I'm not going to purchase so many digital games that will fill up that card, and even if I do, by that time, card costs may drop.
And an off-note, chances are you don't have an internet speed that allows you to download as fast as the card can be written to, so those newer cards with 90MB/second write would go to waste. Read speed is all that really matters for the Switch.
@Dash000
Yeah, this seems super easy. I was looking at some larger SD cards, but the price was a little intimidating. I guess I’ll just start with a smaller one, and go up from there.
@Discostew
“Read speed.” Hmmm, didn’t even know that was a thing (I’ve never really used SD cards before). Thanks for that tip, though. I’ll look out for that.
@TomKnows
Wow! 😮 Right on!
@Mjoen it stays. I did it this way with BotW
@Thunder_Pilot I changed microSDs in my Switch and just copied the files over from one to the other like I'm used to doing with the 3DS. Worked no problem for me, all my games still worked perfectly.
@BenAV
Oh !
So, if I have multiples of Micro SD Cards, can I Re-Download the E-Shop games whenever I put a new Micro SD card, so I will have multiple of same E-Shop games ?
I'm still using internal storage. My MO is to download small or not-retail games only. The games I do download are usually just a few hundred MB, with the exception of certain ones like Snake Pass and Azure Striker Pack. For the big games like BOTW and Odyssey I just get the physical version because I want the box anyway.
I also really enjoy memory management for some reason. I always enjoy getting rid of stuff I don't need and clearing up space. If I do just run out of memory, I'll get a micro SD then, although I'll probably leave some space on internal storage for save data. I just don't want to repeat the situation with my Wii U where I foolishly got a 1TB hard drive, and now approximately 800GB are sitting unused. I really need to get a smaller hard drive to transfer my Wii U data over to so I can use my big hard drive for other stuff.
@Anti-Matter You could have it downloaded on multiple microSD cards but it'll only work in the Switch that downloaded them.
.....OHHH....(snaps fingers)..so that's why it's called SWITCH! ...
@BenAV
Oooh...
I see.
Thanks for the information.
For now my 200gb card will hold out until those 500gb cards get cheap enough. Then the 200gb goes into the phone, the phone's 128 goes into the 3DS, 3DS card goes into the tablet and tablet card goes for sale. Circle of memory replacement.
I have a feeling people know this already
@OorWullie
Are you based in Bangkok? Have you tried Mega Plaza?
Before I got a Switch I assumed MSD cards were cheap! I thought I could pick up like a 64gb card for £5-£9 max lol and pick up a 128gb for sorta £20 no more haha
Running low on my 128GB card. It won't last for Fire Emblem, Mario and Xenoblade (which are all Day 1 for me). And that's before I throw WWE 2K18, Skyrim and Doom into the mix.
Seriously considering the 400GB card.
Update: I literally just talked myself into getting the 400GB San Disc. I am digital only and really enjoy the ease of pick-up-and-play. I simply don't have time to be searching for micro SD cards while on the London Underground at rush hour. And with those 6 top-class games before Christmas getting a 200GB doesn't make sense.
I love my Switch so so much!
@Banksie 😂 I was just thinking that- my 32gb card is starting to get stretched. I was planning on buying a 64gb one to add to it but almost stopped when I saw this article as I thought I perhaps had the wrong idea about taking them out. 🤔
This were obvious even on 3DS, so i don't know why there is a article about a old common feature for anything with SD Slot.
Um, am I being dumb or was this obvious? Take one out, put a bigger new one in, redownload the stuff that's not on it. I'd be surprised if you couldn't. Limitless storage however...surely the save data will eventually take up the 32GB internal storage?
@OorWullie
I’m reside in Malaysia, physical cart bought from game shop here usually priced roughly the same as US ($59.99 = 259 MYR) if not cheaper. Mario+Rabbid (got it for $53.25)... Another route would be order online from Lazada.com (Thailand too), by using the promo code, I get 20% discount.
@shani
Buying from US eshop using my local (non-US) credit card without any issue, way cheaper than buying eShop credit from Playasia
So...basically do the same thing I did with the PSP?
For those confused, this article is just saying it is as easy as it should be. Nintendo could have made this a much more complicated process.
Except the whole point to downloading digital is so that you don't have to carry around multiple cards for games... So I just grabbed a 256gb and I'm good. That will take a while to fill up.
I buy everything I can physically. I don’t get the appeal of digital except for convenience. I can sell my games down the road for cash if I want by buying physical. It’s worth carrying a few cards with me. My case has spots for 12 cards, I think, and I’d take the case with me anyway if the Switch leaves the house. So far I’ve used 10 GB of system memory with a few retail games and indies. I’m sure a 128GB SD would last me quite a while.
Tidy, thanks Alex! Good to know I can use a smaller SD card as an interim solution until I get some monster sized games.
Laughable post. I’m a firm supporter of buying physical games in every circumstance possible. Not only for the tangible aspect of it, but when you consider how much space the downloads of these take, and it causes you to have memory issues, it just further emphasizes the practicality of buying physical games. It also saves you having to buy/change memory cards which essentially is the same as buying/changing physical games, isn’t it?! Well, except you only buy a license to play download games whereas you actually BUY the physical game, for keeps, forever and you can even sell it and get some of that money back, should you decide you don’t want the game someday down the road.
@Anti-Matter That’s awesome! How do you change address? I can’t find it on the Nintendo site?
@Banksie i love you 😂
What a dumb article. Particularly slow news week or what?
Next, "Charge Your Switch Anywhere Theres A Wall Plug!"
@mjnmixael
Except 256gb cards are stupid expensive. You are much better off with a 128gb.
If you fill that, well get another or, you know, delete games you dont play anymore.
@Lord The 200Gb cards are actually 192 raw binary gigabytes (128 + 64), which translates to approximately 183 binary gigabytes after formatting. kilo (10^3) = 1000 whereas a binary kilo is (2^10) = 1024, so there is descrepancy with numbers. Computers display binary data wheras harddrives and storage are measured in decimal so you lose a bit of capacity.
I got a "200Gb" card in anticipation for my switch. I paid $70 on Amazon for a namebrand Samsung (or was it Sandisk, I forget which). At the time, the 256Gb cards available were over $200, a huge markup for a wlight increase in capacity.
Currently I buy all my aaa titles as retail cards and still have tons of space left on my card.
@Banksie Exactly. I was half expecting to find the article was written by Captain Obvious.
It's a pretty ingenious move by publishers. Don't want to pay for larger cartridges? Let the consumer buy an SD card to hold our massive game instead!
@BenAV
Did you have digital or cartridge based games? After trying once again this weekend, just to see if anything has changed, it does NOT work. I called and confirmed with Nintendo support that digital games will not transfer that way, and have to be re-downloaded. And it does say so on the support page as well. Which is why this article says to re-download. Just copying the files like on 3DS does NOT work.
Here is another thread on the issue:
https://www.gamefaqs.com/boards/189706-nintendo-switch/75105371
@Thunder_Pilot Well, guess I just got lucky then? I have a ton of digital games and all of them worked perfectly fine after upgrading my microSD. I was using the same brand and type, just a bigger size. Not sure if that's got anything to do with it working.
@BenAV
I was using the same brand and type. Sandisk. Going from 200 to 256. Nintendo support says that you should have to re-download games. The encryption is generated from the SD Card serial number.
While I did not test all of the games, Zelda, Mariokart, ARMS, Rabbids, Blaster Master and Shovel Knight did not work.
Here is yet another thread saying the same:
https://www.reddit.com/r/NintendoSwitch/comments/5yp98l/upgrading_to_a_larger_sd_card/
@Thunder_Pilot I had a 128 GB Samsung Evo+ in my Switch and a 256 GB Samsung Evo+ in my phone. Decided I was better off with the bigger one in my Switch so used my computer to switch them around. Would have had 30+ downloaded games at the time and all still worked after swapping the microSD.
@BenAV
Unless it has to do with your region (Australia), it should not have worked, according to Nintendo.
I can't find any online references to it working, but plenty saying it won't. But, if it worked, there would be no reason to post I guess, so I don't know why it worked for you and won't work for us.
If anyone else has got it to work, please post here.
For those still looking for larger memory cards Amazon just dropped the price for the 200GB SanDisk cards. Normally $74-80 but on sale now with Prime shipping for $62
This kinda defeats the purpose of going digital though if you're going to be needing to carry around multiple cards to have your game library with you. You're really just changing the type of card you're carrying.
Does this take away any save data? Or will all your progress stay?
Show Comments
Leave A Comment
Hold on there, you need to login to post a comment...