Sometimes clever people take a creative idea and then lovingly wrap it in gaming nostalgia, often posting the results on YouTube. A fine thing it is too, as it all adds to gaming culture and, ultimately, the best examples can be hugely entertaining.
YouTube user roboband produced an excellent video in mid-August that's now being more widely spotted, in which NES music and sound affects are recreated by a self-playing piano and 'robotic' percussion. Utilising software on Raspberry Pi devices — these are incredibly cheap basic PCs that could revelutionise computer access around the world — and the instruments themselves, the end results are undoubtedly impressive. Here's what roboband wrote about it.
 Watch on YouTube
Subscribe to Nintendo Life on YouTube845k
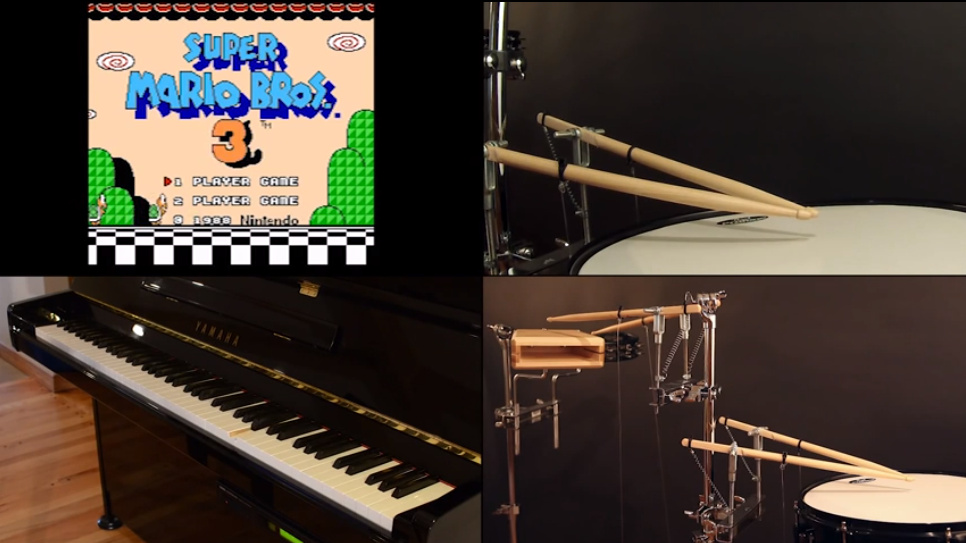
This system allows for Nintendo gameplay audio to be played through an acoustic player piano and robotically controlled percussive instruments. The piano and percussion play live during actual gameplay, mirroring the sounds that would normally be created electronically. All audio, including music and sound effects, is translated in realtime so that it is produced by the instrument most closely resembling the characteristics of the original electronic sound.
Playlist:
0:00 - Mario
0:53 - Mario 2
2:59 - Mario 3
4:06 - Zelda
6:02 - Mario 2 (End Theme)For those interested in the technical details, both the piano and the percussion use solenoids to drive their player mechanisms. The piano uses Yamaha's Disklavier system to strike keys, and the percussion uses a custom solution to strike the drum sticks. Both the piano and percussion are each controlled by Raspberry Pis which have custom software to control each instrument. The software is responsible for translating the gameplay audio to instructions which ultimately define which solenoid should be actuated. In full disclosure, there is normally a half-second audio delay that was removed in editing, but it's still very playable live. The piano is controlled through the Disklavier's MIDI interface, while the percussion's solenoids are directly controlled through the Pi's GPIO interface.
Check this out below, it's well worth anyone's time.
[source tay.kotaku.com]


Comments 18
Haha! That is pretty neat!
Great
That, is awesome. Way to go, Raspberry Pi! I just love that thing!
I found this about a month ago, pretty ingenious project you can pull of with MIDI. Raspberry Pi, what can't you do?
I much prefer human beings playing music and I hope instruments will never be played by robots in the future. I guess it turned out ok, not what I was hoping though.
So, if i got that correctly: This device automatically translates the game audio to commands for the automated instruments on the fly ?
That is pretty awesome
I liked the "twinkle toes" sound from Mario 3 being played by the piano like that.
@Nintonic This robot's purpose isn't to replace humans but to do something humans can't
Did anyone else get a little teary-eyed when the Mario 2 ending played, and it sounded -just- right? I know I did. Very inspiring, and actually a semi-decent way to see how to play the songs as well.
Totally revelant:
http://www.youtube.com/watch?v=3RBSkq-_St8
Saw this a month ago - still awesome, can't wait to see the next video(s) he makes.
I never knew how much I needed live-robotic music, screw surround sound!
Baddonkey.
It's like a live silent movie orchestra.
I didn't realise how awesome Nintendo music would fit into a old western saloon bar type scenario

I love the percussion.
Would've preferred the SMB3 ending music, but still this made my evening!
@Nintonic If it was just music, it would have turned out better. Trying to replicate the sound effects as well resulted in some pretty rough noises, but it was neat to see the full game audio replicated in real time nonetheless.
Also, if you're against machines producing music for you, I'm assuming you don't listen to music on the TV, radio, PC or some other electronic device that is reproducing recorded tones in real time? Because it's effectively the same thing.
@WaxxyOne of course, I really do enjoy music made by robotics. However, sometime in the future orchestras may cease to exist. If and when that time comes I will be sad because human emotions and teamwork are inside what those orchestras. I am still fascinated by robots and their ability to produce music at the exact time that is needed, which in this case may be necessary. But I still love the imprecision of humans playing more than robots. Wow I sound like a complete band geek.
Show Comments
Leave A Comment
Hold on there, you need to login to post a comment...