It's been no secret for some time now that the Switch, whilst lovely in so many ways, doesn't have the best relationship with the world wide web. Spotty WiFi, lag, it's far from perfect for many people, but there are a number of things you can do to improve it. Let's start from the top shall we?
Five is better than two
The very first thing you should do is make sure you’re on a delicious 5GHz signal. If you don’t know, there are two kinds of WiFi connection that you’ll generally find in your home, 2.4GHz, and 5GHz. 2.4GHz is better at penetrating walls and other solid surfaces, and was the tip-top standard for so many years it’s almost frightening. So why are we telling you to change that around if 2.4GHz is so lovely? Well, truth be told, almost all wireless devices use the same frequency, such as Joy-Con, Pro Controllers, wireless controllers for ‘other’ systems, your phone, anything with bluetooth, it’s all 2.4GHz, and that gets very messy very quickly.
 Watch on YouTube
Subscribe to Nintendo Life on YouTube847k
That many signals all on the same frequency can start to cancel each other out in small parts, or ‘interfere’. For the most part, it’s not an issue, but if you use a 5GHz connection, not only will you have faster speeds at your disposal, but you’ll also have your connection weaving in and around all the traffic jams in 2.4GHz like some fanciful, slimline, lightweight, two-wheeled motor car.
That not only means potentially more speed, but more importantly more reliability, and that’s the most important thing when it comes to gaming online. Realistically there’s very little data bounding around back and forth, but you do want it to get there as quickly and as completely as possible; 5GHz will help that.
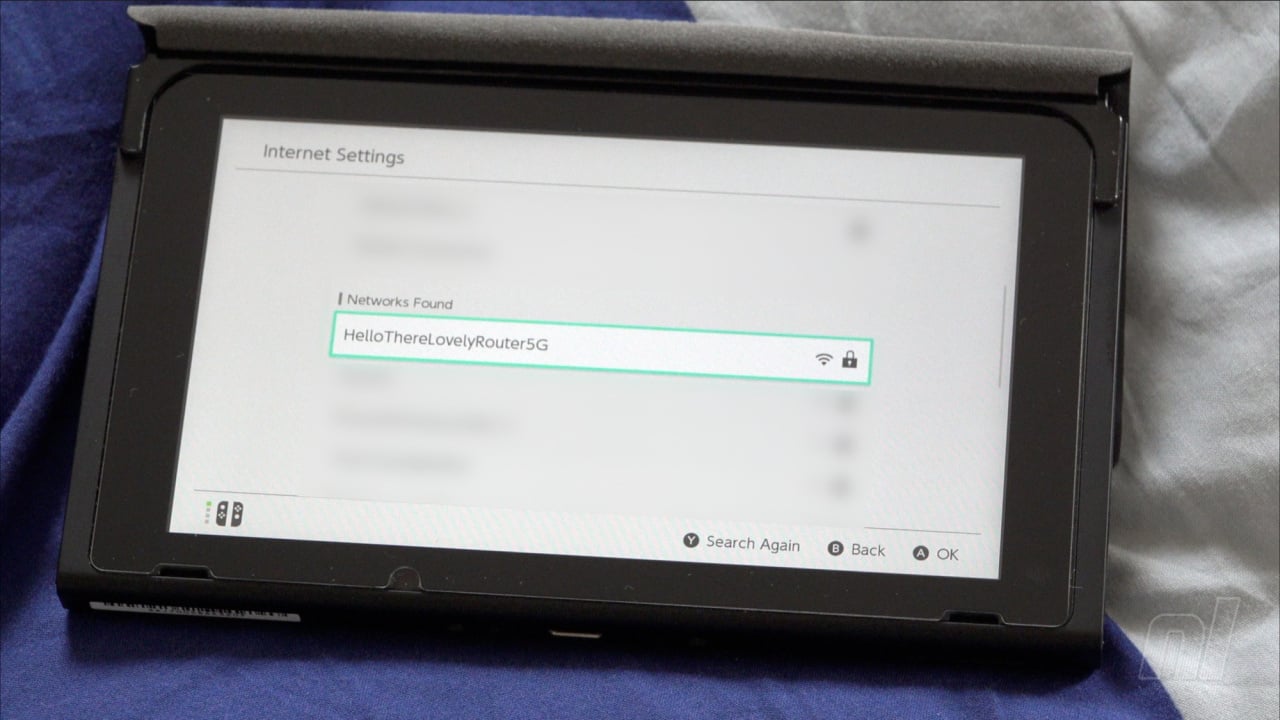
To do this, you just need to connect to your router’s 5G signal, which usually has the same name or SSID as your normal connection, but with ‘5G’ at the end as default. Some routers will use the same name for their 5GHz signal as their 2.4GHz signal, and these can die in a fire. If yours does that, you can probably change that in the settings, but we can't guarantee it as we don't know what router you have. If it came from your ISP it’s likely to be a bit rough in places.
You may find you have trouble getting as strong a signal if your home has a lot of thick walls or non-thick ones but with wire mesh inside, which is more common than you might think, but if you can get a good signal, 5GHz is always the better option.
Position is key
It sounds silly, but honestly the placement of your router is one daring donkey of a factor in how good your signal is. It can affect range, stability, basically it can make your connection better or worse than it should be. Now as should be obvious there are going to be some limiting factors in where you can place your router, but these will likely be unavoidable without rewiring. My router is placed next to the TV, and underneath my Switch, which is a terrible location, so what can we do about it?
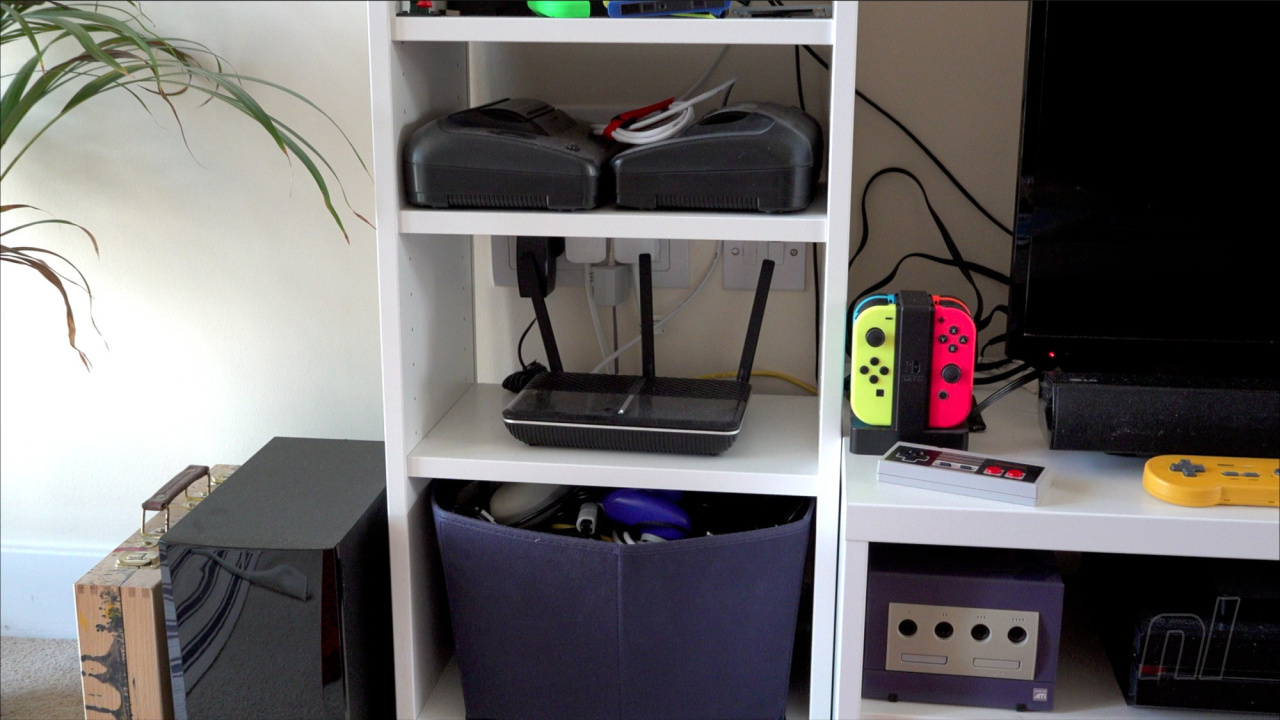
Placing it up high is a relatively sound practice, the antenna or antennae if you’re fancy like me spit the signal out in all manner of directions, meaning if it’s low down, all the signal that’s shot out on the lower 180º split is essentially wasted. Some of it might bounce off the floor a bit, but it’s almost always better to put your router somewhere high up.
What’s more your router should be as central to your home as possible. In an ideal would it would be slap bang in the centre with no regard for the convenience of others, but that’s rarely practical, as you’ve got to have power cables, the ADSL or coaxial in, and potentially some ethernet if you’re getting all wired on this router’s ass. Use your noggin, find somewhere that’s relatively central to your home as a whole, but is still within a sensible, clean distance of your required ports to the national grid and big underwater cables that deliver the hottest memes.
Also try and avoid placing it near any other electrical equipment if at all possible. TVs, consoles, and especially any of those or anything else that’s also spewing out wireless signals. Large metal sheets in these things can impair performance and make you a sad bunny. It’s not going to kill your internet entirely, but you might as well get the most you can out of it. Maybe even consider wall-mounting it if you’re crazy enough to do that.
As for the antenna or antennae, well if they’re internal you’ll just have to have it as it is, but if you’ve got external, wonky bad boys you can reposition them to better lob out internet to everything, including your Switch. Everyone has a different idea of what is best, but if you’ve got two or more storeys to think about, it’s probably a good idea to have at least one perpendicular to the other, or at least 45º away. Just fiddle around and see what’s tasty.
Do touch that dial
All routers run on different channels. These range from around 1-14 for 2.4GHz and around 34-161 for 5GHz. The numbers themselves don’t really matter, what matters is what’s on what channel. By default most routers are set to ‘Auto’, and this is a bit dire. It means one day your signal can be great, and then the next day it’s pants, as it’s decided to swap things around based on some factors no one be bothered to comprehend. We’ve had most success with just choosing a channel, and checking every couple of months or so to see if the landscape has changed, and it usually doesn’t.
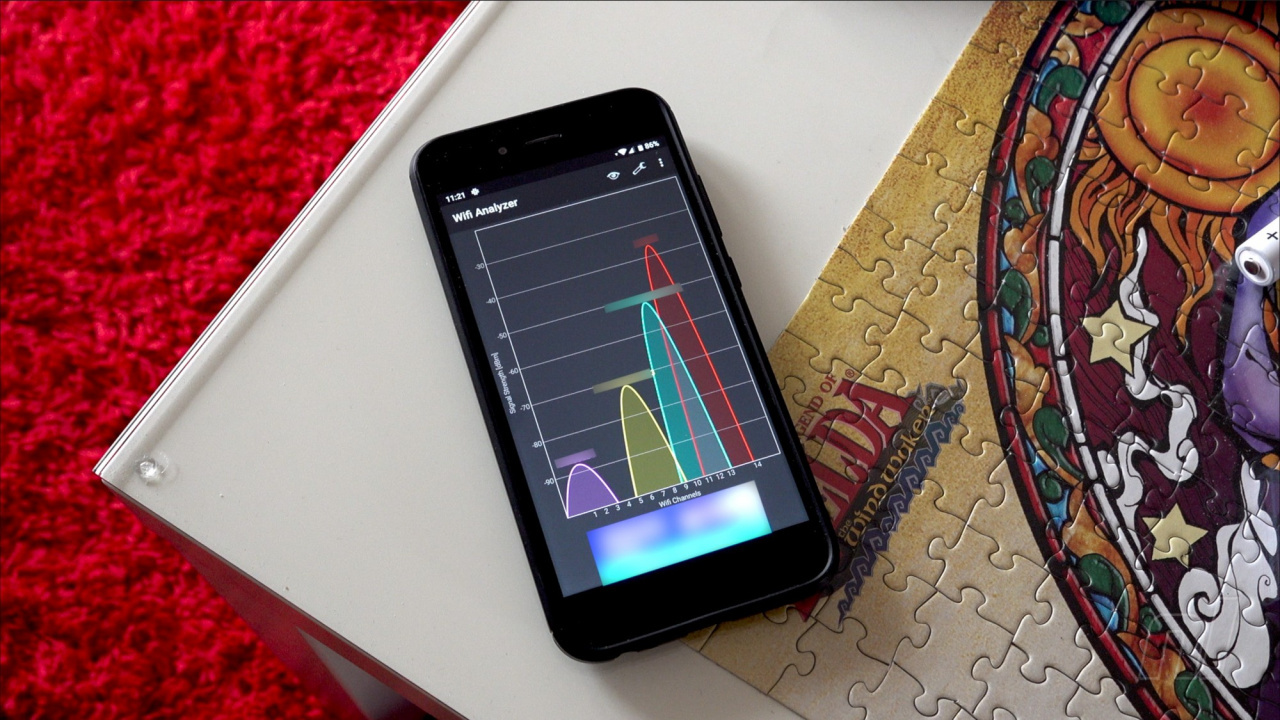
To do this, you’re going to need to go into your router’s settings. Every router is different, but you’ll usually find the settings you want to fiddle with in ‘Wireless’, ‘WiFi’, or something to that effect, and it’ll probably be in the Advanced section. Look for ‘channel’ and, hold on, what channel do you want to change it to? Well, you could just pick one at random but that is an unmitigatedly terrible idea, don’t do it.
Instead, download a WiFi Scanner app on your phone; if you're on Android, we recommend this one as it's free and has loads of useful features. If you’re on iOS, I’m sure you can find something suitable. If you’re on Windows Phone, you need a new phone. There are apps like this for Windows and macOS even has this functionality built in, but it’s much easier to use a mobile device. When you load it up it’ll scan the air for all and every WiFi signal, even those without SSIDs, and show you what channel they’re on. Just like real life, you want to avoid everyone else. Find a gap that no one’se using, and pick that number, it's as simple as that. If there are no gaps, just choose the channel with the lowest overall number of other networks on it. Go back to your router’s settings, slap in the channel number that’s the emptiest, ideally on the 5GHz connection but you might as well change both, and you’ll have a stronger, less populated channel to enjoy. Lovely.
Rinse and Repeat(er)
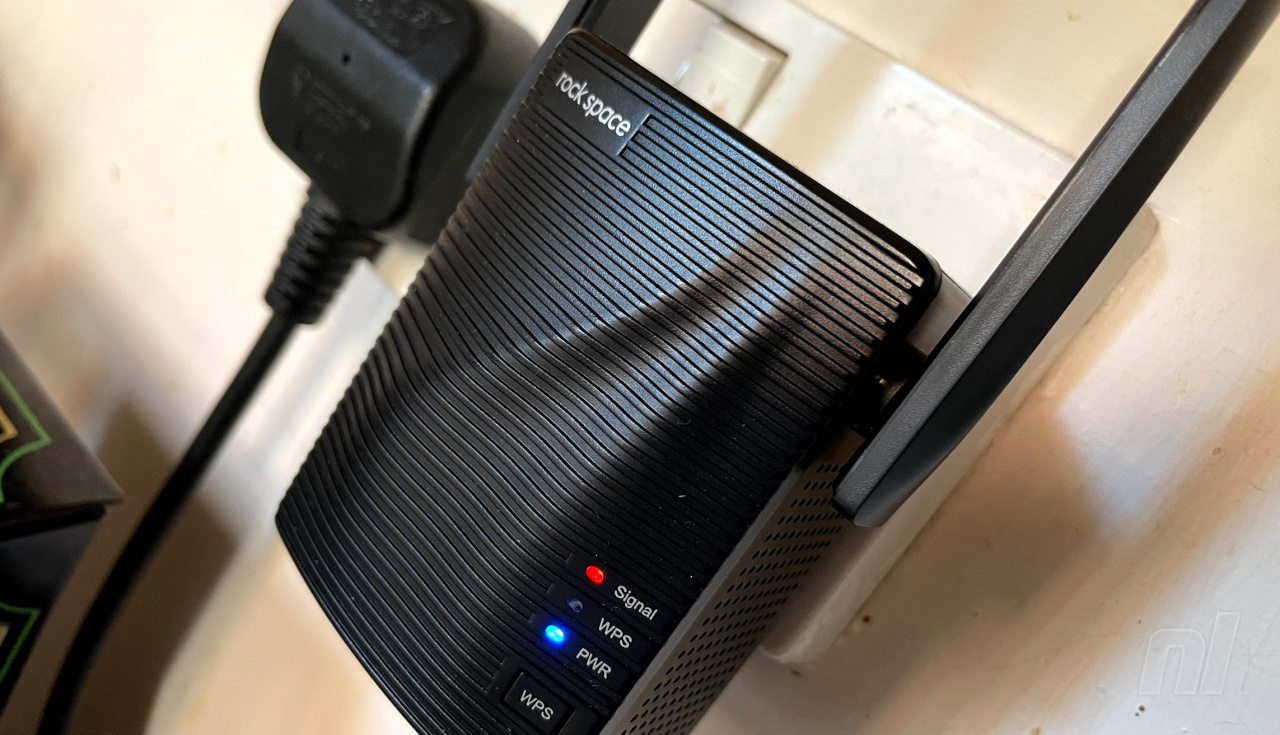
Even if your router is behaving itself and you've got the most solid of solid wireless connections, you might find that you live in a building that has "blind spots" that those lovely wireless signals cannot reach. Time to give up? Not quite! You can invest in cheap little devices called WiFi Repeaters, and position these around your humble abode.
The premise is simple enough; the "repeater" is placed around the maximum range of your existing WiFi router, but in a place where it's still getting a ruddy good signal strength. It then takes that lovey and robust signal and "repeats" it by creating its own wireless signal coverage. This allows you to spread the range of your existing WiFi router without having to invest in more expensive options, such as a "Mesh" router system. Their effectiveness in not dropping packets is heavily dependent on their quality, however.
We use the Rock Space AC 1200, which is a breeze to set up and gives us an incredibly strong signal over the entire house.
Please note that some external links on this page are affiliate links, which means if you click them and make a purchase we may receive a small percentage of the sale. Please read our FTC Disclosure for more information.
But what if you’re still not able to get a good connection? Then...
When in doubt, wire up
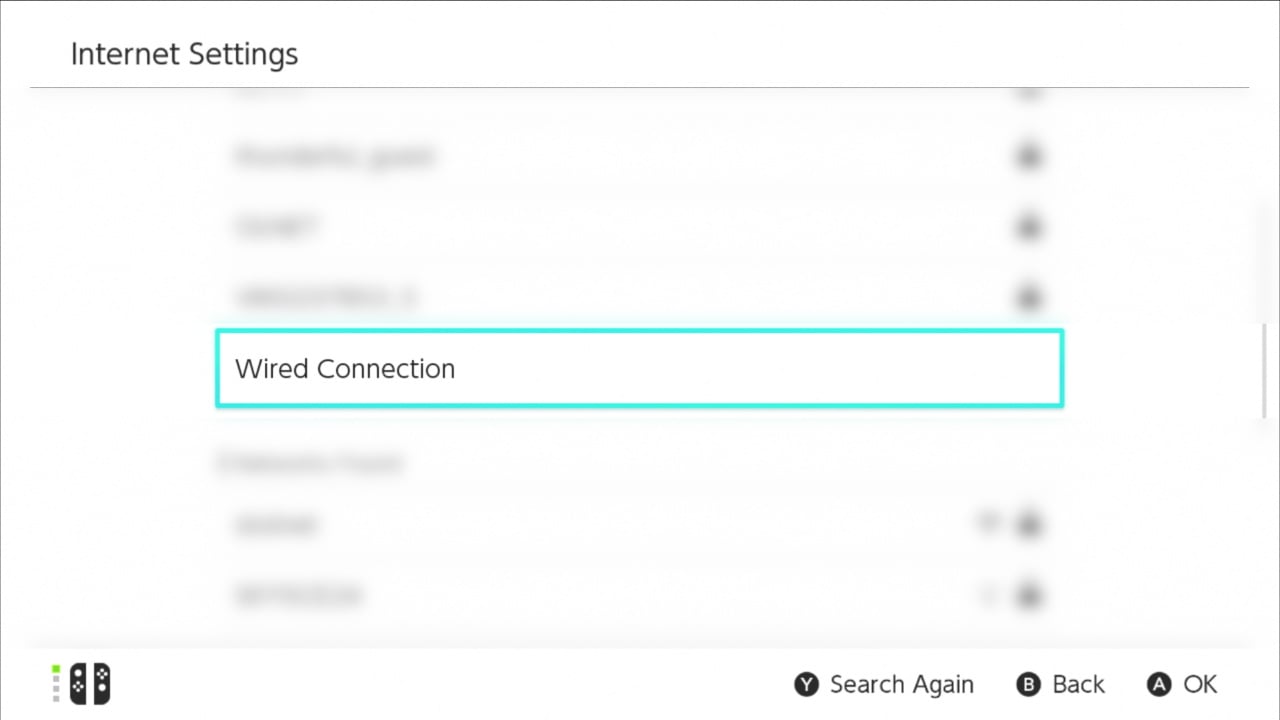
Wired connections. If you’re playing Super Smash Bros. Ultimate online or just generally playing something with a lot of precision over the internet, it’s best to use a wired connection. As Nintendo didn’t think it was worth it, there is no Ethernet port on the Switch (fair enough) or the dock (not fair enough). However you can buy yourself an Ethernet to USB adapter to solve all these woes and more. Just make sure it lists itself as being compatible with the Nintendo Switch as some aren’t for some bizarre reason. Plug it into the dock, slap an Ethernet cable between it and the router and hey-presto! Wired connection! Well, sort of. You may need to go into your Switch’s settings in order to tell it that you want to use a Wired connection and you’ve not just plugged in an Ethernet cable for aesthetic purposes.
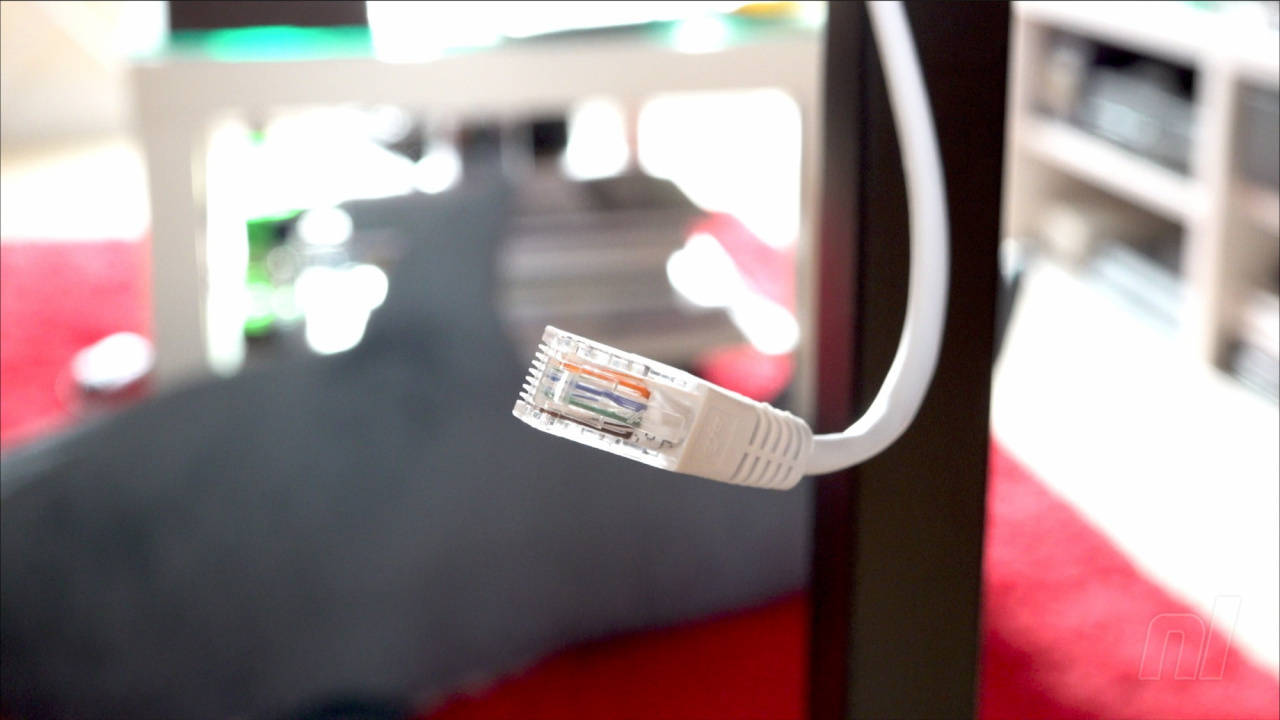
Thankfully, it’s easier than an easy lemon pie piece of walk in the park. Just go to System Settings, Internet, Internet Settings, and then scroll to the bottom of the Registered Networks list until you see ‘Wired Connection’. Select that option and it’ll run a test, should that go all tickety-boo (and it should) you’re done!
Now if you remembered what speeds you got if you ran a connection test over WiFi, you may be surprised to find that it may no longer be all that glamourous on your new wired connection. That’s because the USB-C connection that the signal is passing through has a lot of other gubbins going through it as well, and although it would probably have been possible to get more speed through it, Nintendo have limited it for some reason.
Don’t go undoing all your hard work just yet though, as although you may not be able to download things quite as quickly as before, you will have a significantly more stable connection, which is, as we said previously, what gaming online is all about. If you want to download something big quickly, just lift your console out of the dock and leave it to do so over Wi-Fi if your internet is especially speedy. But when actually playing nothing can beat a wired connection for reliability, at least for the moment, so it’s well worth doing. It’s also one less signal flying around and sucking all the internet out of the air for your other devices, which is just dandy.
But what if you really, really want that little bit extra speed? Well, we have one last thing for you.
Maximise the Maximum
The Switch, just like every internet-enabled device, downloads data in packets. These packets come in varying sizes, but if you want speed, then you won’t be surprised to know that bigger is better. I mean, we all want to do one trip from the car with all the shopping bags don’t we?
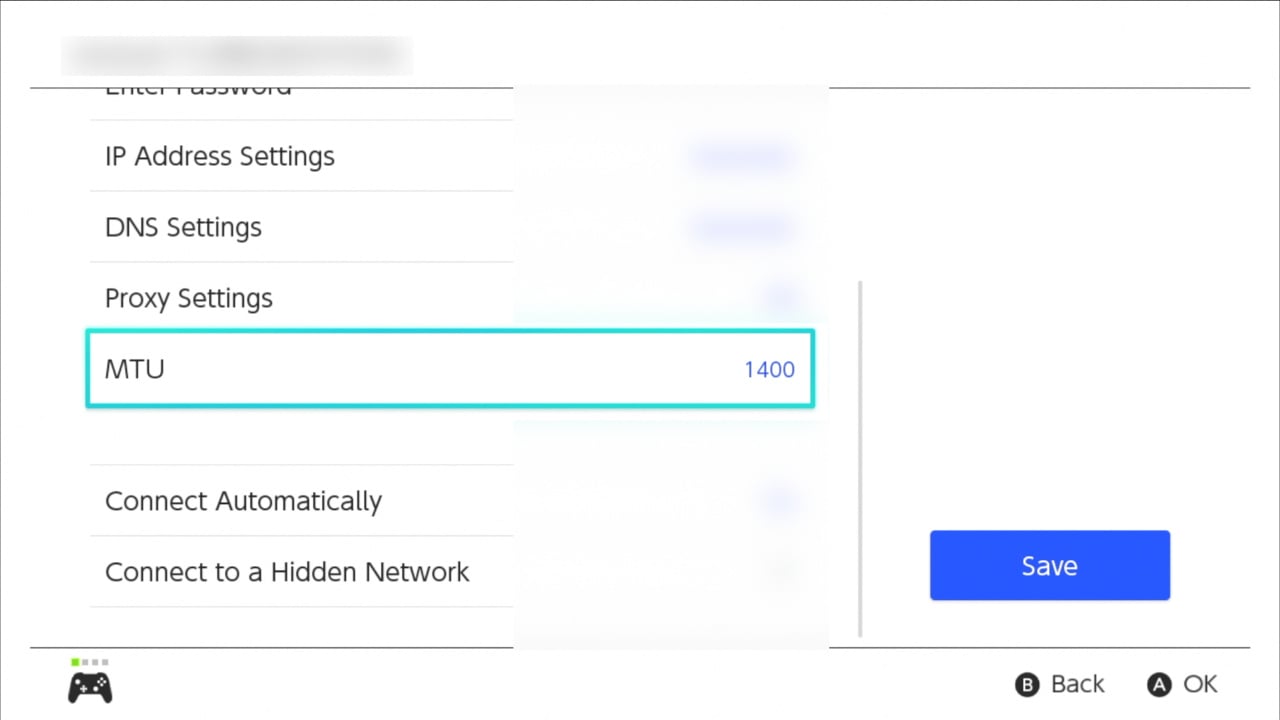
You can increase the Switch’s MTU, or maximum transfer unit, to allow for more data to be shipped back and forth every time it pings, most helpful indeed. To do this, you need to head back into System Settings, then Internet, then Internet Settings, select your Wired Connection, or WiFi connection if you couldn’t be bothered with Ethernet, go to Change Settings, scroll down and you should see that sweet, sweet ‘MTU’. Change that number from 1400 to 1500 (no, it won’t go any higher) and butter my biscuits, you’ve just increased your packet size by 6.666%.
If your Switch was already set to 1500, well then this last point is pointless. Sorry.
We hope you've found this guide useful. Do let us know if you have any tips of your own to get the most from your Switch's WiFi or wired connection in the comments below.


Comments 88
"If you’re on Windows Phone, you need a new phone."
Okay, that cracked me up!
Some good tips for all you lovely people
Missing one that had a huge impact for me (x10 faster downloads):
Edit you connection settings and specify manual DNS IP Addresses (I suggest 1.1.1.1 and 8.8.8.8).
Some Internet Service Providers have really bad DNS Servers.
This takes me back to when I got a Wii in 2008 my modem was wired only so I had no choice but to have a very long ethernet cable across from the middle front of the room all the way to the desk on the back.
I felt super lucky that in just a few weeks we went to a then dying circuit city and bought a wireless router. Which was excellent for Wii I never had any issues.
What's funny is that as the ISP upgrades my internet speed and they replace the router I would usually notice connection issues, at least when nintendo wifi was still working. I could always go back to the old router, but having two wireless signals 24/7 next to where I sleep sounded a bit off-putting... plus it's one less power outlet being used.
I got a chuckle out of the Windows Phone shade. But being one of the many that gave it an honest chance, it's a crime what happened to it. OS wise, it blew everyone else out of the water in terms of features and functionality. Nokia's WP were some of the best built phones quality wise I'd ever come across. My 820 was a tank.
But I digress. I've never noticed any problems with my Wi-Fi in regards to the Switch. But I will give these tips a whirl to see if they improve things for the better
This articlr is useless without touching the connection quality Type topic. Whenever you run a connection test, it will tell you which quality your connection is. Unless it's "A", you can have all the speed but still will face connecting problems. This is all due to the router and firewall settings.
Do not get a wifi enhancer, those will just close up your bandwith. Also its dependant on what your neighbors use if they send on 5Ghz and have wifi enhancers you are doomed. Also your -db should be around 50/60. Check with your ISP if they apply QoS on your internet connection and whether their MTU packet size through is sufficient enough for the likes of games and such.
Metal walls or any decent concrete structure with reinforced concrete (most apartment blocks) will severely inhibit your wifi range.
Microwaves/magnetrons also tend to close up your bandwith, and the same goes for 5.1 dolby digital(weird emp fields with that one) same goes for fridges and electric induction stovetops (ofc when turned ON)
Ye theres allot more to wifi then just the position of your device
@AlexOlney we have the same doors, mine don't have routers on top though....
Otherwise great article, will bookmark it for use on all devices, not just Switch!
Thankfully I've never had an issue with my WiFi and Nintendo products......except for the 1st major update with Splatoon on Wii U......since then, all gravy! Now the XBox.......that's another story.......maybe I can use these tips to help it. I think that is a Microsoft problem and not a me problem though
So, my router can die in a fire, huh?
I will not change a single thing. My up- and download speeds are more than solid, and even with multiple consoles and devices all on the same network, I absolutely NEVER had any connection problems whatsoever, so I'm perfectly fine, leaving all as it is.
The Switch's WiFi module is absolute garbage. I never had problems with my Wii, Wii U or my PC. My Switch is the only device that has trouble connecting to my network. I actually have to take the Switch out of its dock, walk downstairs next to the router, then when the connection is established, walk upstairs again, put it back in the dock and hope that it holds the connection. Absolutely awful hardware design. Nintendo really wants to make sure you spend additional money on one of their official LAN adapters. Easy profit for them.
They use the absolute cheapest garbage networking module in the Switch console! That is the real issue and no matter what you do, it ain't going to fix it.
It's just a complete roll of the dice if you get a good connection or not.
The absolute best and only good fix is to connect the dock with the network cable to the router, so you can avoid the garbage WiFi module in the Switch altogether!
But if you play mostly handheld or can't connect by cable. Well though luck! One thing that you could do is place the Switch dock not too close to the WiFi router and in handheld mode, stay at least 5 meters away from the router. Especially with 5GHz you want to have some space between the Switch console and the router for optimal signal.
Downloading Steam games on my laptop can take my internet connection's entire 100Mb bandwidth with ease but downloading the Wolfenstein Youngblood demo on my Switch took all night.
The WiFi module in the Switch is just horribly slow. I've even bought a USB-UTP dongle just to download large games while docked. There are one or two things mentioned in Alex's article that I haven't tried yet, but I'm not counting on miracles.
I guarantee none of this will help me because I have a super slow internet speed to start with, and my room is the furthest point from the router. But thanks, anyway.
Telling everyone to "set MTU to 1500" is a really good way to get people to fragment all of their packets making everything worse.
Fragmenting means the packet is split into two to get the whole thing sent rather than just one packet.
Nintendo has it at 1400 cause then that means nobodies packets are gonna get fragmented when playing online. Many ISPs do not have their MTU rate set to 1500. Hell, cell phones only use 1428! Things like DSL also only go as high as 1492.
Ethernet's max MTU is 1500 so only very specific ISPs will support such a thing.
Do NOT change the MTU unless you do the research to do ping tests on your PC with specific packet sizes to find out just how much your ISP actually uses on their pipeline.
Without looking at a tear-down my guess is the antennae on the Switch are badly placed or super short which affects the reliability of the signal attenuation. I lose connection all of the time and my Switch is on the next room normally to the router. On the Wii the signal was not bad but if you lost connection it was a pain to reconnect which is the another issue on the Switch. It must be a Nintendo problem based on the complaints from everyone.
regardless of what this article says, i am going to keep using the 2.4GHz network band because of how i have my network setup.
@LuciferOnReddit that only applies to 802.11n/ac which support both 2.4GHz and 5GHz. that issue doesn't happen with 802.11b; at least in my experience.
unfortunately @FrowningCoach, you are right about signal enhancers. they do suck. the last time i used one, i was using one to control the range, flow, current, and other aspects of the network signal. its great for eliminating interference and getting the most out of a wireless network, but not always worth the trouble and effort in takes to do so.
I used Wii, Wii U and Switch wired from day 1.
100% of my consoles is wired.
You can try a lot of solution but the main problem with the Wifi on the Switch is the Switch itself, in my house none of my device seems to have problem even my 3ds doesn`t have any problem connecting even far away from the router, but the Switch almost need to be fuse it with the router.
I think a little clarification in the first part would be nice. Is this trying to say if there's a wall or two between the Switch and the router that you should stick with 2.4GHz, or regardless you should switch to 5GHz? I realize this is about creating the most optimal connection, but I think it's worth mentioning in that section, for those who simply can't relocate their router, which connection type is best if there has to be a wall or two in between them.
Here’s the twitter version:
2.4ghz connection keeps you at kilobits per second.
5ghz connection awards you mind blowing supersonic speeds of 40 megabits per second.
If that is not satisfying, buy an Ethernet to USB 2.0 lab adapter to achieve breakneck speeds of 30 megabits a second....
Wired always, cable is king.
Wireless is for casual browsing, if you want any reliability whatsoever then cable it is.
Switch runs over Wifi. But for my PS4 and 2 PCs (where I do most of my online play) I ran cables.
Hard wire, Really is the best way to go.
I've never had any issues but then my MTU goes up to 11!
This was never an issue on PS4 and Wii U
I just tried changing the MTU and the address code, but it seems like my connection is best when I leave everything alone and let it do automatic. I use wired so I guess I can't get any better then that.
Not sure about others but my connection over wired is also pathetic - specifically with the Switch. Using the USB3 port and correct adapter, I get 40mb down vs 170 on my wired PS4 and 206 when using the same adapter on my laptop from the same cable.
If your switch is that close to your router, why not just plug it in?
Why is the Switch Wi-Fi so garbage? Too small of an antenna?
"Some routers will use the same name for their 5GHz signal as their 2.4GHz signal, and these can die in a fire"
Yeah, nah. You should have the same SSID on all radios and let your device decide which band to connect to. Giving each radio a different ssid is a hack and should only be done if you're having issues. And in any case 2.4Ghz is still better in some scenarios, if you are at the edge of your WiFi footprint you should be connected at 2.4Ghz
@Jeronan
Im not so sure about that. My Switch often gets connection when my phone does not get any over wifi (galaxy S7)
You cant really compare it to a stationary device like Wii U or PC, as those got much more room for multiple antennas.
@mjodotcom that's not a USB3 port.
while the hardware is USB3 capable, it's limited to USB2 specifications in software.
if your speed is 40 megabytes per second it's actually really good, close to the limit of what the usb port can handle.
if it's megabits per second it's quite slow.
No ethernet port on the dock is just weird
The WiFi on the Switch is really bad. My router is one floor above the living room, but I never had any issues with reception on my phone, PC, Blu-ray Player or WiiU. The Switch works OK when I am in the middle of the room in handheld mode, but as soon as I go to the corner of the room, where the TV (and therefore also the dock) is, it loses connection.
"Luckily" the WiFi dongle on my PC broke and I am using an old WiFi router to connect with the main WiFi and the PC is connected via cable. Now the Switch is the only device connected to that router's WiFi and everything works perfectly.
@Rohanrocks88 The "magic" word her is NAT. I realized, if I don´t have a "NAT Type A" conenction quality, all my bandwith is for nothing. Downloads work just fine, but online games on a NAT Type B-D connection is not very stable.
Here are some information from Nintendo directly: https://en-americas-support.nintendo.com/app/answers/detail/a_id/22455/~/troubleshooting-issues-related-to-nat#
And some more info how to fix it from reddit:
https://www.reddit.com/r/NintendoSwitch/comments/6ovkim/splatoon_2_connection_problems/dkl0sv9/?context=1000
For me, the first point of the reddit post was crucial: static IP from my IPS. I needed to call them and ask for it specifically, because in Germany (where I live) it is standard to have dynamic IPs since several years.
The next step was to set the Switch IP to DMZ (google how to do it on your router).
Finally, I bough a cheap USB-LAN Adapter so I don´t have to worry about Wi-Fi problems. The reason is, that my router is set to change the channels automatically to always give me the best connection speed, but unfortunately, the Switch does not "understand" all channels, especially on 5G. So at the time when I set up my network, the switch lost the Wi-Fi Connection from one day to another and couldn´t find even the network name anymore. I found out the channels are at fault (maybe they fixed this with an update? I´m on LAN since 3 years now).
Hope that helps a little bit!
Increasing your MTU will introduce lag to your games. Only do this if you want higher throughput (download games faster) and don't care about online.
Another important point is the USB port in the back of the dock is the only USB3 one, and as such is the only one taking advantage of gigabit ethernet adapters. (which by the way, get those not the megabit ones)
Use the connection speed test to see a rather significant difference between these ports.
@Rubbercookie In addition to that: a USB 3 port can be identified by color. If you look "in" the port, USB3 will be blue, as a standard USB Port is black.
Have a look at the USB port inside the dock, it's blue
As for the Gigabit adapter: you can only utilize it if you gigabit lan at home. Nevertheless it's more future proof to get a gigabit adapter regardless your network speed!
I've generally got no issues with my Wifi but my router isn't a crappy one that comes with your internet that most ppl have.
Mine cost more than my Switch did and i can use military grade equipment in the middle of nowhere with it.
@mazzel Oh you won't find find any router out there that doesn't support gigabit ethernet. Unless you mean your Internet service isn't anywhere close to that then don't worry, you'll see improvement in response time in spite of this.
Without getting technical, you benefit from having your local equipment being significantly faster than the performance you're looking to achieve.
~And the simplest way to get some insight here is to try it out in a peer to peer based game.
This was a very strangely written article.
"If you’re on Windows Phone, you need a new phone."
@AlexOlney never change, my friend. I love your humor and it's great that it translates over from the videos to your writing. Do you have a blog by any chance? I'm being completely serious here.
What really bothers me is that months ago I bought a USB to LAN cable adapter (one listed as the best NON official Nintendo adapter for Switch) and changed from WIFI to wired connection just to find that now my Switch connection sucks more than it used to be. I don't even know how is that possible, but I tried many times and no matter what, WIFI just seems to work better for me.
Usually if I test my connection on Switch while using wired connection, I'd have a max 60 Mbit/s download and roughly 100 something upload, and I have a 1.5 Gbit line at home. My PS4 is happily downloading at 600+ Mbit/s on the same line.
I really do hope one day Nintendo will just outsource everything that has to do with internet on their devices, it's embarrassing how bad it is.
@Rubbercookie Yeah sure, it's state of the art! But you also need the right cables. Especially if you have a cable infrastructure already installed in the walls, it is not given that the right cable and wall plugs were used (not every CAT 5 cable is gigabit compatible and not every RJ45 plug is 1 gigabit or higher).
Now it's already too technical, I think
I'm just branded by the experience I made in my apartment where I ended up making cables by myself and rewiring the wall plugs to make everything gigabit compatible
@berga89 check my reply above. It's not done by plugging in the cable into the switch. You need to do some extra settings for this little bad boy... Unfortunately it doesn't seem like the Switch is a "Network-Native"...
Plus, download speed is not everything. If you focus on online ging, you need a NAT Type A connection. Then you are safe. If you are just looking for download speed, switch back to Wi-Fi if it is faster!
@berga89 Refer to mazzel's responses. CAT 5E is the minimum requirement for cables just to elaborate.
Incidentally there is no Wi-Fi setup that won't introduce packet loss, even if you glued your Switch to your router - so suppose you stick with what you have as you have it today, wired will be better for games even if downloads are faster wireless.
Throughput versus reliability, I guess.
'Aight guys, I will try everything... but I just wish Nintendo did a better job in the first place since I am not so tech savvy.
Thanks a lot.
@patrickd DUDE UNDERRATED COMMENT OF THE YEAR!! THANK YOU SO MUCH FOR THE TIME YOUVE SAVED ME!!
@Cocoa678 glad it helped <3
Thanks for the tip on the wifi repeater, I needed one.
Amusing and informative, more from Alex please.
That feeling when your Pocophone F1 hotspot supports 5 GHz but Switch and other devices blatantly stop seeing it until you toggle back to 2.6.
My biggest problem is trying to get a wi-fi signal while docked. I'm no expert but I'm pretty sure the dock shouldn't be blocking the signal yet apparently it's causing issues. I have no trouble getting it going while in handheld mode.
I use wireless and the majority of my online gaming with the Switch has been Mario Kart, Splatoon and Tetris 99. Also done a bit on Smash and a few other games, but those three are the main ones for online play. Haven't had any issues.
Thanks! This was really helpful
@UmbreonsPapa
I agree! The jibe was still very funny though!
Win Phone 8.1 was an amzingly robust OS, ruined in the upgrade to Win Phone 10 and driven into the ground. That said most of the QoL UI features and under-the-hood reliability and security features that were stand out on WinPhone8.1 at the time are in iOS these days. Do miss how well it worked with Windows (but maybe I'd feel that way about iPhone if I had a Mac...)
I also have no issues with my connection personally (I'm a bit of a netwokring nerd due to my profession!), but this is a pretty good guide for the causal-Wi-fi-user-who-happens-to-be-a-less-than-casual Smash Bros/Splatoon player!
Also note that if your switch can't see your 5G connection is because of the channel your router are using. I have a Japanese switch and it wasn't able to see my 5g connection until I changed the band on the router. I also use a chinese software (I know, I know) which I select the game, and then I use the dns and IP they provide, then I get the best speed possible.
@Mince
Well i have been having strange connection issues in my bedroom where i play my switch. I have a PS4 in there also that's connected to wi-fi and it almost never loses contact. The switch on the other hand barely has one bar of strength most of the time undocked and when docked it's a total crap shoot. Sometimes it stays connected other times i can't get a signal for the life of me!
My room is kinda far from my router so maybe that's the problem.
Set MTU to 1500? Erm... Somebody hasn't done their research if they think that'll magically improve someone's connection. Don't do this, people. You'll end up with lots of fragmented packets and very likely a more unstable connection than you did before.
@Jack_Goetz
I tried that once on my switch and PS4. Didn't do a damn thing! Lesson learned.
@Mince
Thanks I'll try that. I've been toying with the idea of a range extender for months! Perhaps that's the fix i need.
Step 1: Don't put your router on the floor of your ground floor living room.
If it were up to me, it would be somewhere upstairs.
@superderper This is what people say when they don't know how to setup their router or better themselves on doing a better setup.
@Mince another un-quality mindset blame hardware when user can't setup properly or want to learn how to setup their router or get a better quality router. Garbage router get garbage results.
I was going to comment about how the "APs that group 2.4Ghz and 5Ghz" is BS but apparently this is an old article being pushed to the top for some reason and I said the same almost two years ago. Instead I'll just point out that the advice about repeaters is also crap, repeaters are not a good idea. Adding a repeater a lot of the time just means you're adding more wireless interference.
If you want a the highest quality WiFi setup what you want are wired, decent quality access points in optimal locations. You don't have to use your ISP's provided router's built in WiFi, disable that and instead grab a decent access point from someone like Ubiquiti. Run an network cable to a central, high location in your house, power over PoE. That'll solve 90% of people's poor WiFi. For house layouts where it doesn't? Use more than one access point.
@superderper
I have a NanoHD that covers pretty much the entire house and an AC Lite in the one corner of the house that had average coverage. Brick house so that makes it tricky but even then a single NanoHD just about covers the entire house.
If I was to buy one now I'd probably go with a 6 Lite instead but
@SwitchForce
I'm sorry but Nintendo's servers are not much faster than 30Mbps
My Switch's wifi signal is diabolical. Two bars when everything else is 4 or 5.
Am I the only one who is is sick of hearing the hello all you lovely people line?!
Nice article. Trying to figure out why I hadn't commented on it before then I saw it was a Sunday in July a year BEFORE the pandemic when people actually left their houses.
Good write up. My 2 caveats -
5Ghz has shorter range than 2.4Ghz (well it used too, new routers may have fixed that) so if you move from room to room a lot 2.4 may be the way to go. Docked it's 5Ghz.
Not all USB-to-Ethernet adapters are up to task. My olf Wii adapter, which I used on Wii U - works perfectly. Problem is I think it's USB 1.0 which means speeds up to about 12Mbps. Even the worst WiFi connection these days is going to be way faster than that. Though my son still says it's better for Smash online since less drops. He may be right about that, but I disconnected the slow adapter anyway b/c my new TV has a port and we need 25Mpbs to stream 4k.
My primary Wi-Fi issue with Switch is that it doesn't handle connections that require both a username and password. :-/
@patrickd 8.8.8.8 is a Google server, use 1.0.0.1 instead, it’s OpenDNS’ secondary.
No matter what I do, eshop videos have problems most of the time, is everyone seeing that too? I never have these issues with any other device
Thanks alot @AlexOlney ive been having major connection issues and fluctuations with my Virgin wifi lately. My kids do nothing but moan when i get home from work that the net is crap and they are both above the router. I will dig in to this list at the weekend and try some of it out 👍
"daring donkey"<3😁
@skywake I'm sorry but Nintendo's servers are not much faster than 30Mbps
How are you testing their servers? Switch doesn't have software to do that with.
The list is missing an important thing. Play around with your DNS numbers then test your connection speed, and refresh it a few times to make sure the speed is stable. It'll change between regions obviously so google up a YouTube video and try punching in numbers. It actually helps quite a bit. You can't ruin anything doing this and can default at any time.
@patrickd Yeah I'm east coast US and one of those DNS numbers is what I use - actually makes quite a difference.
A good router is the most important thing.
What I really want to know is, why does the networking seem so bad in the e-shop? I'm wired to ethernet and can play Rocket League for hours with no problems, but open up the e-shop and it struggles with every single interaction. Every scroll down to reveal the next 3 titles is a painful display of lag and loading.
Great guide, this will come in handy!
Back in the late 2000s I played so much Mario Kart online and my (weak) connection was quite good.
Now everything seems to be (or should be) better, but my Switch is a problem. Sometimes I'm a room away from my router and connection is ridiculously weak. All other devices work fine, but my Switch. Well, I have two Switches and both work terribly connectionwise
Well done and Thank You 💯
My brother got a Switch finally and we're playing Smash this evening.
Wired is SLOWER cus their USB3 port is locked to USB2?
That's the most nintendo thing I've ever seen.
i dont need good connection ive play zelda: botw, or else my connection is good enough.
TP-Link RE650 Wi-Fi Repeater - 2600 Mbps im using this now
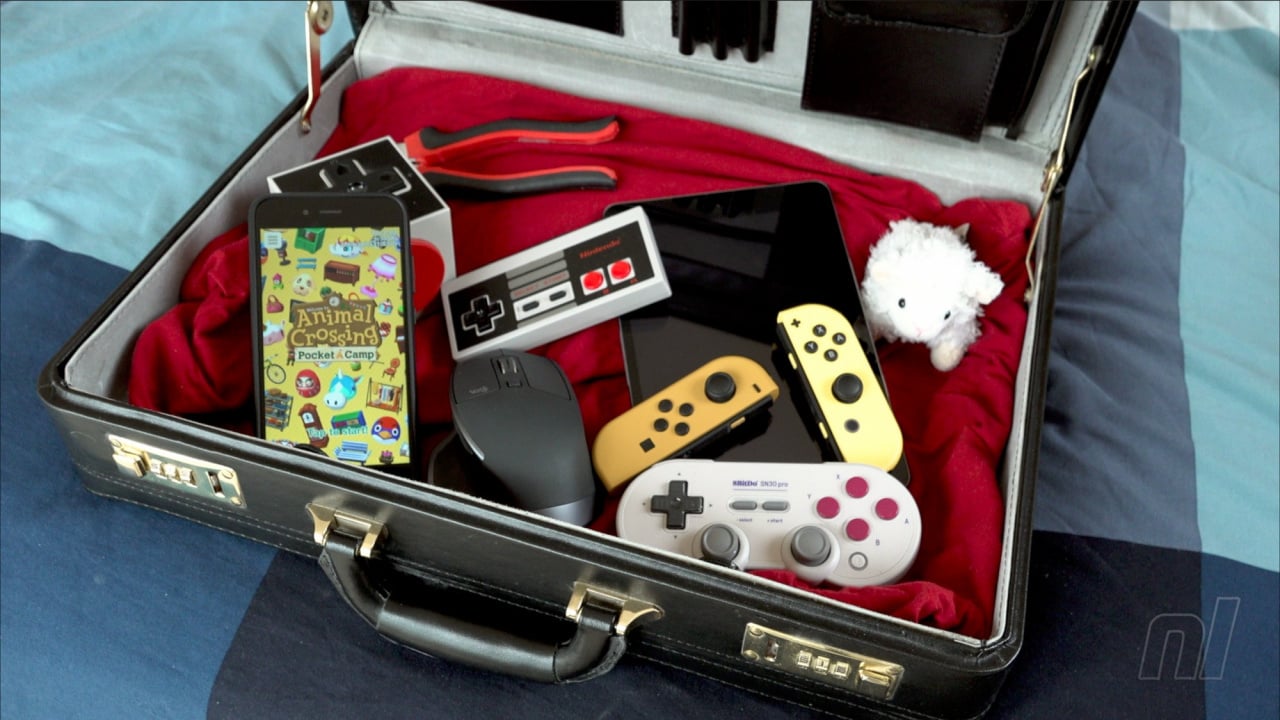
What's that NES controller like cube in the suitcase, under the phone?
@Nalverus
^You better listen to that one. Do NOT fiddle around with the MTU. This topic is by far not as easy as the writer wants you to think. In fact, it's pretty save to assume that he/she did not research the subject very carefully.
Lol fluff article. It makes it seem like it's a Switch specific tip.
5g
Placement
Router channel
If it still sucks f*** wifi go ethernet
😂👍
@superderper how one compares a downloading to streaming is beyond ludicrous. One runs from server and one is downloading. Nothing is to compare here.
the MTU one is incorrect!
you need to open CMD on PC, write "ping 8.8.8.8 -f -l 1500", and biggest chance is that it will say fragmented
you need to decrease the size by ten, (eg 1490, 1480,...) and when you find the number that doesnt fragment, you need to add by one to find the exact number that doesnt fragment
for me it was 1462.
then you need to add 28 to the number. so i must set the MTU to 1490
Improving your Switch's WiFi connectivity is less about any tweaks you can do in the system itself and more about simply improving the WiFi in your home. I was having problems with connectivity in some parts of my house and solved it with an inexpensive WiFi repeater. This benefitted not only my Switch but all of my WiFi devices.
Will my 1st party ethernet adapter for the Wii work with the Switch dock?
Show Comments
Leave A Comment
Hold on there, you need to login to post a comment...