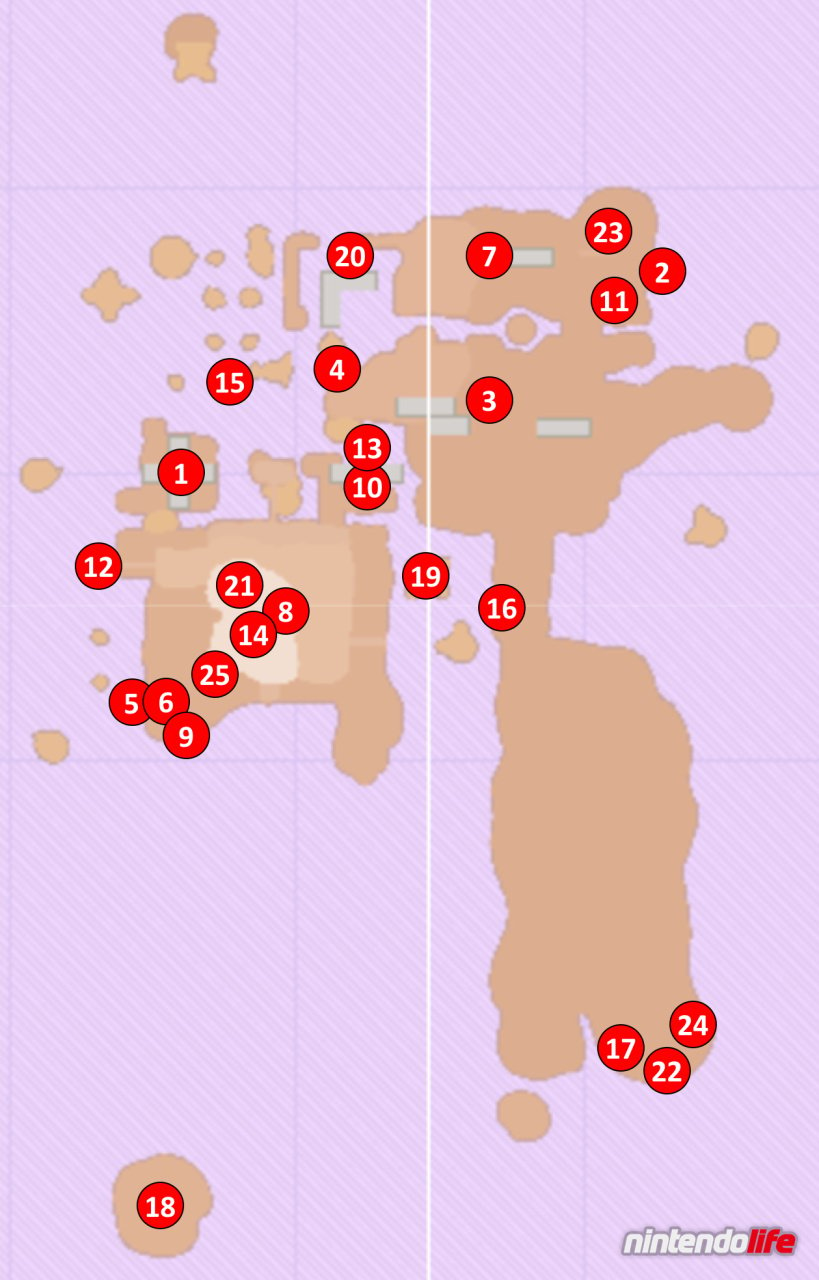
Welcome to our ultimate guide for collecting every Power Moon from the Lost Kingdom in Super Mario Odyssey! Below, you'll find maps detailing the exact location for all 35 of the Power Moons located in this Kingdom, as well as descriptions on how to get each and every one of them.
The numbers on the maps correspond to the relevant Power Moon listed below and, whilst most of them appear in that spot from the beginning (or after you've completed the story at least), it is worth nothing that sometimes you are required to perform a specific action to make it appear. Use a combination of our maps and walkthrough information to grab each of the Power Moons with ease. Enjoy!
Subscribe to Nintendo Life on YouTube847k
Lost Kingdom Power Moons (1-25)
1. Atop a Propeller Pillar: Head to the Swamp Hill checkpoint flag and capture one of the nearby Wigglers. Stretch over to the first spinning platform in front of you, and then over to the second, to find this Power Moon.
2. Below the Cliff’s Edge: Head to location number 2 on our map (to the east of the Swamp Hill checkpoint flag to find a small ledge sticking out of the cliff’s edge. Drop down onto this ledge to grab the Power Moon.
3. Inside the Stone Cage: You can see this Power Moon behind some bars just below the Swamp Hill area. Climb up the stairs just to the right of the barsand head left until you come across a tall pillar that can be ground-pounded. Perform said ground pound on the pillar to reveal an entrance to the Power Moon’s prison.
4. On a Tree in the Swamp: Head to the Swamp Hill checkpoint flag and capture the Wiggler nearby. Walk around the staircase on the right-hand side, travelling around the thin path until it bends around to the left. Stretch the Wiggler over to the staircase from here, use ‘ZL’ to release it, and then use Mario to ground pound the centre of the stairs. Recapture the Wiggler and stretch around the tree to grab the Power Moon.
5. Over the Fuzzies, Above the Swamp: Capture yourself a Wiggler and take it to the Mountainside Platform flag. You’ll see some moving yellow platforms in front of you. Stretch across the yellow platforms, using the tree stumps when needed, to reach the Power Moon floating above the second platform.
6. Avoiding Fuzzies Inside the Wall: Head to the Mountainside Platform checkpoint flag and throw Cappy at the red hat door on the wall beside it. Travel to the end of the 2D section that this reveals to grab a Power Moon.
7. Inside the Rising Stone Pillar: Warp to the Swamp Hill checkpoint flag and look to the east. You’ll see a staircase made up of four platforms just below the cliff’s edge. Use your ground pound on these steps to make the highest end sit nearest to the checkpoint flag where you started. Now jump off the steps (in the direction of the poison sea) and look at the pillar that is the tallest step. You’ll see the Power Moon tucked away inside.
8. Enjoying the View of Forgotten Isle: Just to the right of the Crazy Cap store, you’ll notice a palm tree. Climb to the top of this tree to grab the Power Moon.
9. On the Mountain Road: Head to location number 9 on our map to find a group of butterflies hovering over a patch of mud (this is near the thin gap in the wall that Mario can wall-jump in). Ground pound the floor in the centre of the butterflies to reveal the Power Moon.
10. A Propeller Pillar’s Secret: Jump onto the spinning platform closest to the Swamp Hill checkpoint flag. You’ll notice a group of butterflies hovering over the centre of the platform. Ground pound this spot to reveal a Power Moon.
11. Wrecked Rock Block: At location number 11 on our map, you should find a set of four blocks (near the staircase that takes you up to the Swamp Hill area). Near these blocks will be a Trapeetle (round, spiky things with big hands). Throw Cappy to the Trapeetle and jump onto the four blocks – the Trapeetle will come hurtling towards you and smash the blocks, one of which contains a Power Moon.
12. A Butterfly’s Treasure: At location number 12 on our map, you should spot a very narrow platform sticking out of the mainland. A butterfly is sitting at the end and you need to throw Cappy at it to get the Power Moon. You need to be careful, though – get too close and the butterfly will fly away, forcing you to leave the area and return later for it to reset.
13. Caught Hopping in the Jungle!: On the first spinning platform by the Swamp Hill checkpoint flag, you should spot a rabbit bouncing around. The easiest way to catch the rabbit is to use one of the nearby Wigglers and, when you do manage to make contact with it, the rabbit will give you a Power Moon.
14. Cave Gardening: Head to Talkatoo’s location and turn around to face away from him. If you follow the wall ahead of you on the right-hand side, you should eventually spot a small cave behind some plants. Throw Cappy around inside to make all of the flowers bloom at the same time (spin throws are useful here).
15. Moon Shards in the Jungle: For this Power Moon, you’ll need to find five Moon Shards which are all located on and around the tree stumps near location 15 on our map. Use the Wigglers in that area to travel from tree stump to tree stump, looking all around you to spot the shards.
16. Peeking Out from Under the Bridge: There is a Power Moon sitting underneath the bridge at location number 16 on our map. The easiest way to get there is to capture a Wiggler and stretch over from the area underneath the spinning platforms, using the roots of the nearby tree as mid-points.
17. Twist ‘n’ Turn-Up Treasure: Capture yourself a Wiggler and take it all the way over to the Odyssey in the south. Just past the Odyssey (at location 17 on our map) you’ll find an area that you can drop down to on the cliff’s edge. Jump down and stretch around to find a Power Moon tucked away inside the cliff.
18. Soaring Over the Forgotten Isle!: Head to the Crazy Cap store and capture Glydon who is sitting closeby. As Glydon, fly all the way over to location number 18 on our map to find a Power Moon on the island there.
19. The Caged Gold: Look over to location number 19 on our map from the mainland nearby to see a Power Moon inside a cage. You’ll need to throw Cappy to the Trapeetle nearby and put yourself directly in between it and the cage. The Trapeetle will launch itself at you and, if you dodge it, it will fly towards the cage and smash it. This may take a little time, and several goes, to line up correctly.
20. Get Some Rest, Captain Toad: Capture a Wiggler near the tree stumps at location 15 on our map and stretch your way over them to the north. When you reach the northeastern corner of these tree stumps, move the camera around to the right to spot a tunnel in the wall. Stretch inside this tunnel to find Captain Toad who will happily give you a Power Moon.
21. Shopping on Forgotten Isle: You can purchase this Power Moon from the Gold Coin half of the Crazy Cap store. It will cost you 100 coins.
22. Taxi Flying Through Forgotten Isle: Use the binoculars near the Odyssey and look up to the sky – if you look closely you’ll see a taxi flying through the air. If you zoom in on this taxi for several seconds, a Power Moon will fly out towards you.
23. I met a Tropical Wiggler!: Head to location number 23 on our map to find a Bonneter (one of the Cap Kingdom residents). He wants to see a Wiggler up close so, perhaps unsprisingly, you’ll need to capture a Wiggler and take it over to him for closer inspection, ground pounding the staircases when necessary. You’ll receive a Power Moon when you reach him.
24. Lost Kingdom Regular Cup: Head to location number 24 on our map to find a Koopa who will challenge you to a race. You need to win this race to get the Power Moon. The best advice here is to use a couple of attempts to study the path that the Koopas take, and then perform it quicker than them when you are used to it. You can also perform a Cappy throw and dive to jump around the area where the Trapeetles are needed to smash blocks if you’re struggling.
25. Peach in the Lost Kingdom: Warp to the Rocky Mountain Summit checkpoint flag to find Princess Peach hanging out near the Crazy Cap store. Talk to her to receive a Power Moon.
Lost Kingdom 'Moon Rock' Power Moons (26-35)

These Power Moons will become available to you when you have smashed the Moon Rock located in this Kingdom.
26. The Shining Fruit: Head to location 26 on our map (on the right-hand edge of the island just north of the Odyssey) to find a Power Moon hanging from a palm tree.
27. Jump Down to the Top of a Tree: At location 27 on our map there is a Power Moon hovering on top of a tall tree stump. An easy way to reach this is to capture Glydon (who is sitting by the Crazy Cap store) and glide down to that location from behind the store itself.
28. Line It Up, Blow It Up: Head to the Swamp Hill checkpoint flag and look towards the spinning platforms. Just before you jump over to the platforms you’ll notice a staircase that can be ground-pounded. Make sure that the right-hand side (the one nearest the spinning platform) is low to the ground and then jump on to the spinning platform. Keep travelling in that direction to find a Trapeetle and throw Cappy at it. You’ll need to jump down onto the ledge below the Trapeetle and line up its shot with some blocks that can be seen beyond the staircase you just lowered. When these blocks are smashed, you’ll receive a Power Moon.
29. Taking Notes: Stretch and Shrink: Warp to the Swamp Hill checkpoint flag and capture one of the Wigglers. Take the Wiggler over both spinning platforms to find a glowing treble clef hovering in the air beyond the second one. Touch the treble clef, and then use the Wiggler to collect all of the music notes that appear to receive the Power Moon. You’ll have to bend its body to match the curves of the notes.
30. Lost Kingdom Master Cup: Head to location number 30 on our map and talk to the Koopa to enter into a second race challenge. You’ll need to make use of a shortcut to stand any chance of winning this one. At the section where the opponent Koopas use the Trapeetles to smash through rocks blocking the path, you’ll need to dive off the cliff’s edge to the right, throw Cappy towards the path just after the troublesome blocks, and then dive from Cappy back onto the path. It can be tricky to pull off, but it will save you precious time and will give you a chance to match the leading Koopa for speed.
31. Lost Kingdom Timer Challenge: Head to location 31 on our map (easily accessed by jumping off the cliff from the Rocky Mountain Summit) and throw Cappy at the scarecrow standing there. Run along the blocks and long jump onto the palm trees below. Reach the Power Moon above one of these palm trees in time to add it to your collection.
32. Stretch and Traverse the Jungle: Head to location 32 (just north of the Odyssey) and enter the grey warp pipe. Inside, you’ll need to use the Wigglers to make your way to the end of this section, standing on the P-Switches when necessary to lower the poison geysers.
33. Aglow in the Jungle (see location 32): In the same area as Power Moon number 32, use the Wigglers to travel to the section with the fireball-spitting Piranha Plant. Break all of the bricks to the sides of the Piranha Plant, and then stand in between it and the torches to the left and right of the platform. When it spits a fire ball, move out of the way in time so that each torch becomes lit. You’ll receive a Power Moon when both are complete.
34. Chasing Klepto: Head to location number 34 on our map (just off the cliff behing the Crazy Cap store) to find a grey warp pipe. Inside, you’ll need to chase Klepto around to get Cappy back. When Klepto lands on a platform that has another ground pound-able platform beside, use that opportunity to send Klepto flying through the air to get Cappy back. Then use Cappy on the lever to open the gate to the Power Moon.
35. Extremely Hot Bath (see location 34): In the same area as Power Moon number 34, use Cappy to capture a Lava Bubble and make your way to the really tall blue pillar standing all alone – away from the main area. You’ll find this hidden Power Moon behind this tower.
We hope that you have found this guide on collecting all Power Moons in Super Mario Odyssey's Lost Kingdom useful. Let us know if you've managed to grab them all with a comment below.


Comments 4
These guides must take forever to put together. So far I've used them at least a dozen times. Thanks!
I love this kingdom. The first kingdom I 100%.
I've only just started Odyssey and I'm so glad they've finally given us true 360 degree camera control back. I've longed for that since Mario 64!
@JHDK Slowly but surely getting there!
Show Comments
Leave A Comment
Hold on there, you need to login to post a comment...