System transfers have been a thing for a goodly amount of time now for Nintendo consoles. Gone are the days when all your lovely gubbins was held on a game cartridge or (gasp) memory card. Now when you get a new version of a console — be a regular Switch, a handy Switch Lite or a Switch OLED model — you've got to ferry all that data over from your old system to your new one.
Fortunately, it's relatively easy to transfer everything from one Switch to another Switch, and to prove that fact we're going to tell you how in the article you lucky, lucky beggars.
 Watch on YouTube
Subscribe to Nintendo Life on YouTube848k
In this Switch system transfer guide we'll take you through all the steps to transfer all your data over to your new Switch OLED, Switch Lite, or regular Switch from another Switch console.
Looking to transfer your Animal Crossing: New Horizons island to your new Switch too? You'll want to check out our guide on just that topic, too:
Nintendo Switch System Transfer Guide - Switch to Switch OLED, Switch Lite, or standard Switch
The instructions below should work for transferring between any two Switch systems, whether it's from a regular Switch to a Switch OLED model, a Switch Lite to a regular Switch, or any combination of the three available Switch models.
Getting Started
The first thing you'll want to do is make sure both your new and old console are fully set up. You can perform a system transfer when setting up a new console, but it's a bit more straightforward to do it after you've put in your WiFi information and all that good stuff. As long as you can see the Home Screen and you've got an active internet connection, you're ready to transfer between Switch systems.
Unlike the 3DS, the Switch does not require any tools to complete the transfer, it's all handled in software and is a much more straightforward process, so let's dive right into things.
The Actual System Transfer Bit
- Connect an official Nintendo Switch AC Adapter into each of the two systems.
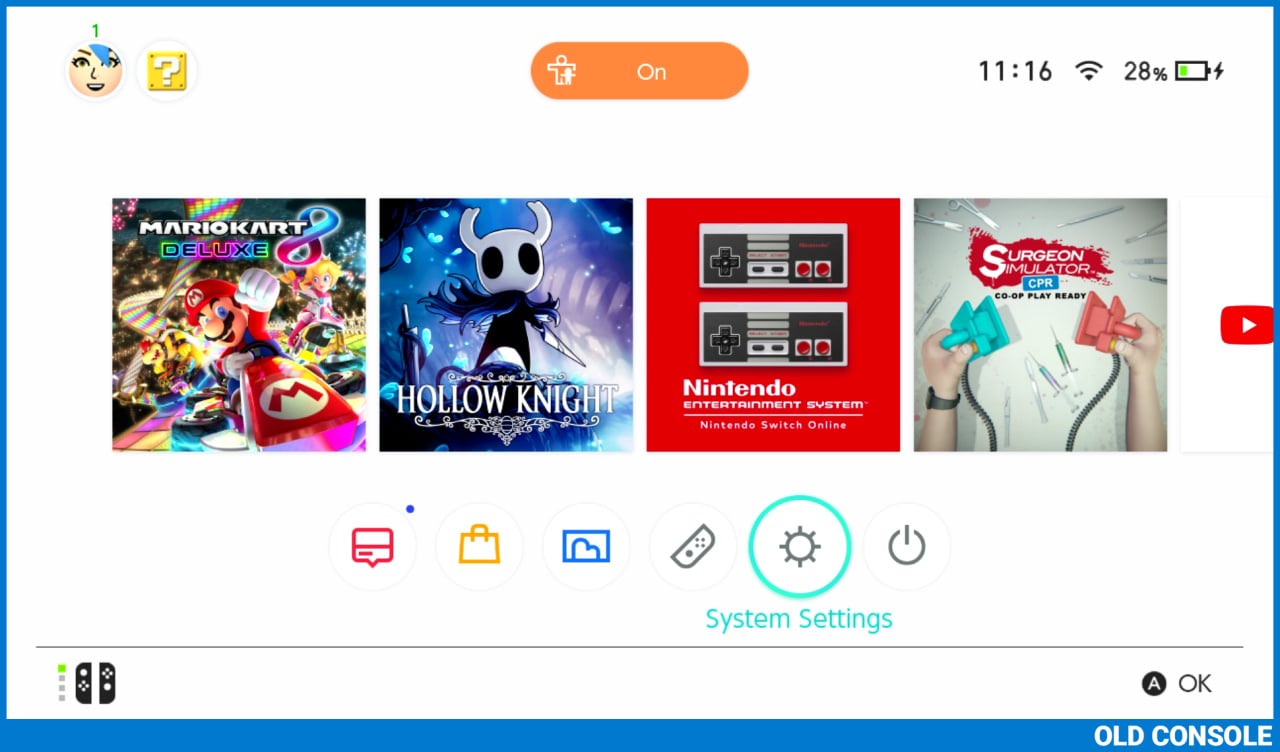
- Select System Settings from the Home Menu on both consoles, indicated by a gear on the lower row of circular icons.
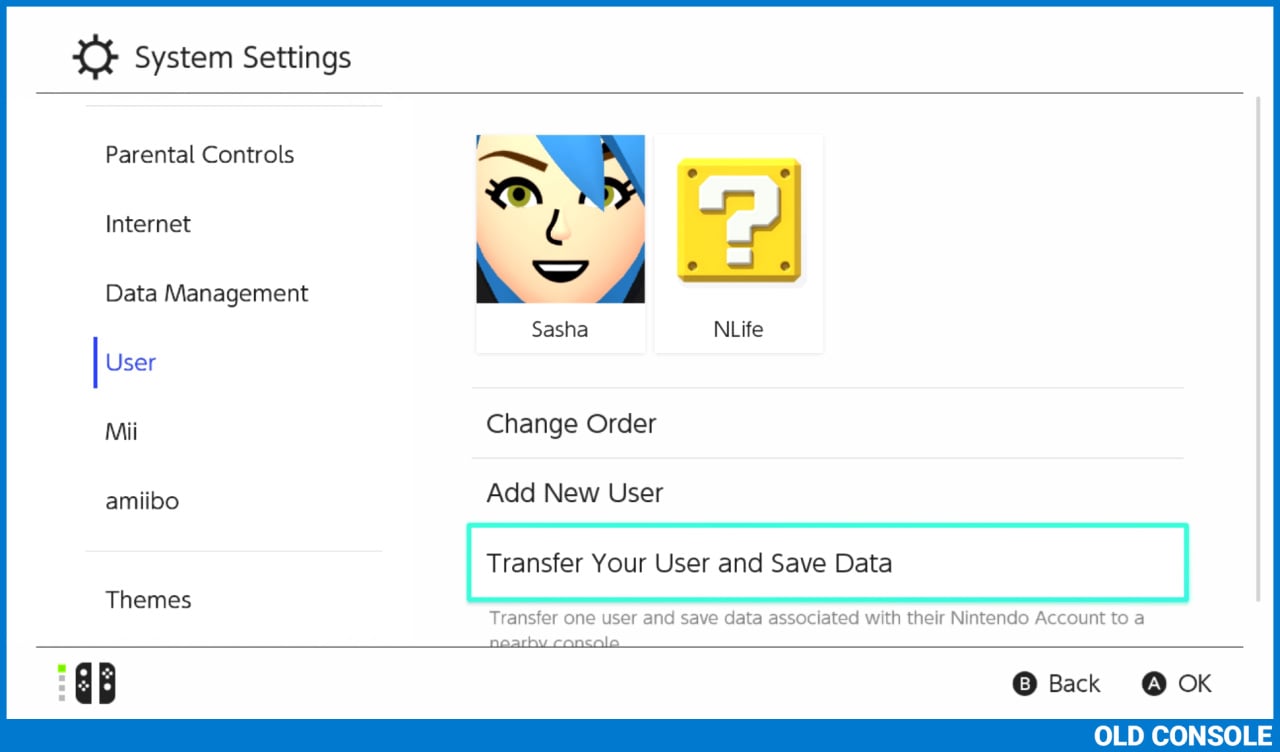
- Scroll down on both consoles and select User from the menu on the left hand side of the screen.
- Select Transfer Your User and Save Data on both consoles from the right hand side of the screen.
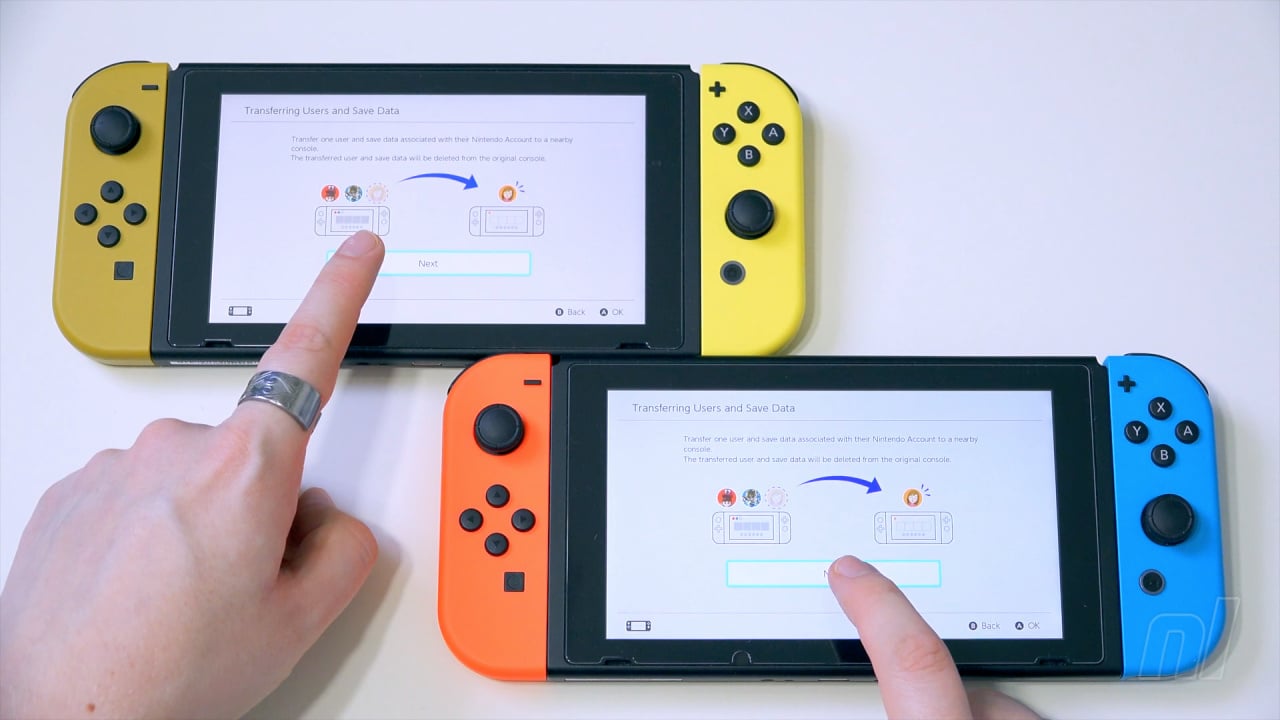
- Read the information on screen and select Next on both systems.
- Once again, read the information on this screen as well and select Next on both systems.
- If you have Parental Controls activated on either system, enter the PIN required. If you do not know the PIN, consult the individual who set up Parental Controls.
- If you are prompted to insert a power supply into one or both of your consoles, ensure the AC adapters are properly plugged in.
- You will now see a screen asking you to select which unit will be the Source Console and which will be the Target Console.
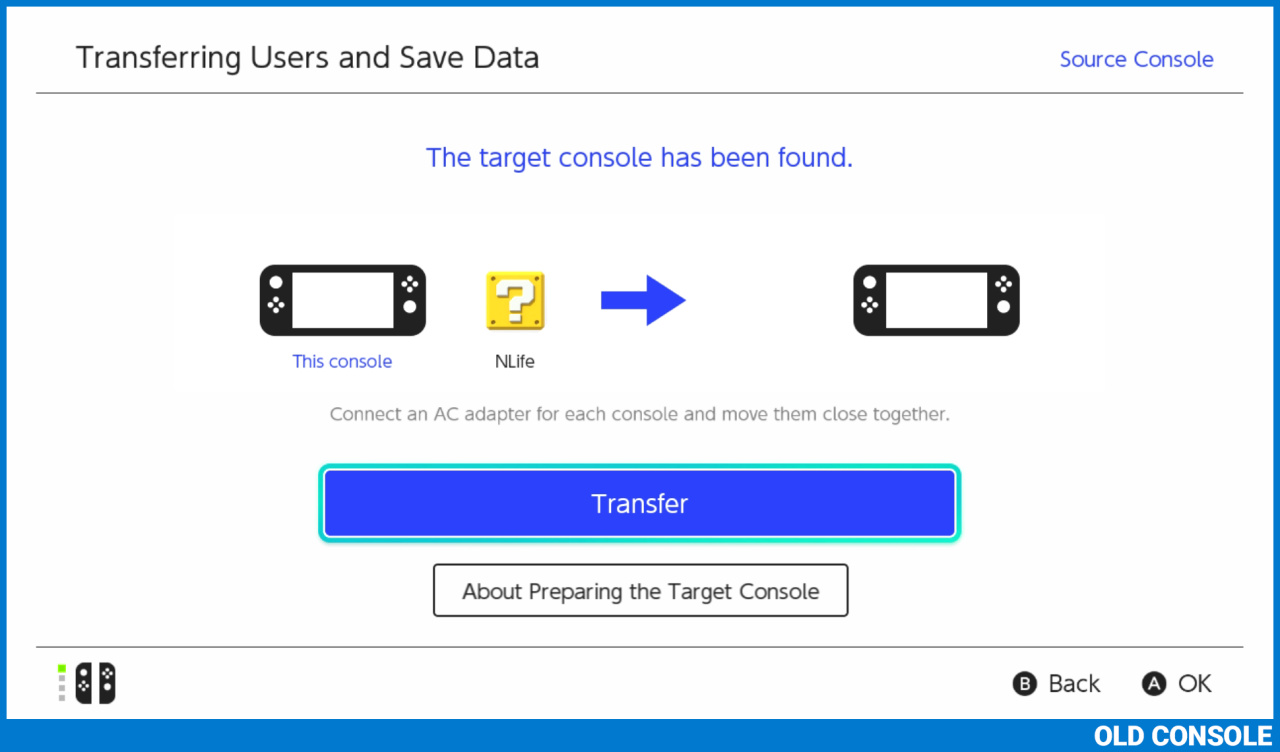
- On your old system with the User Profile(s) you wish to transfer, select Source Console.
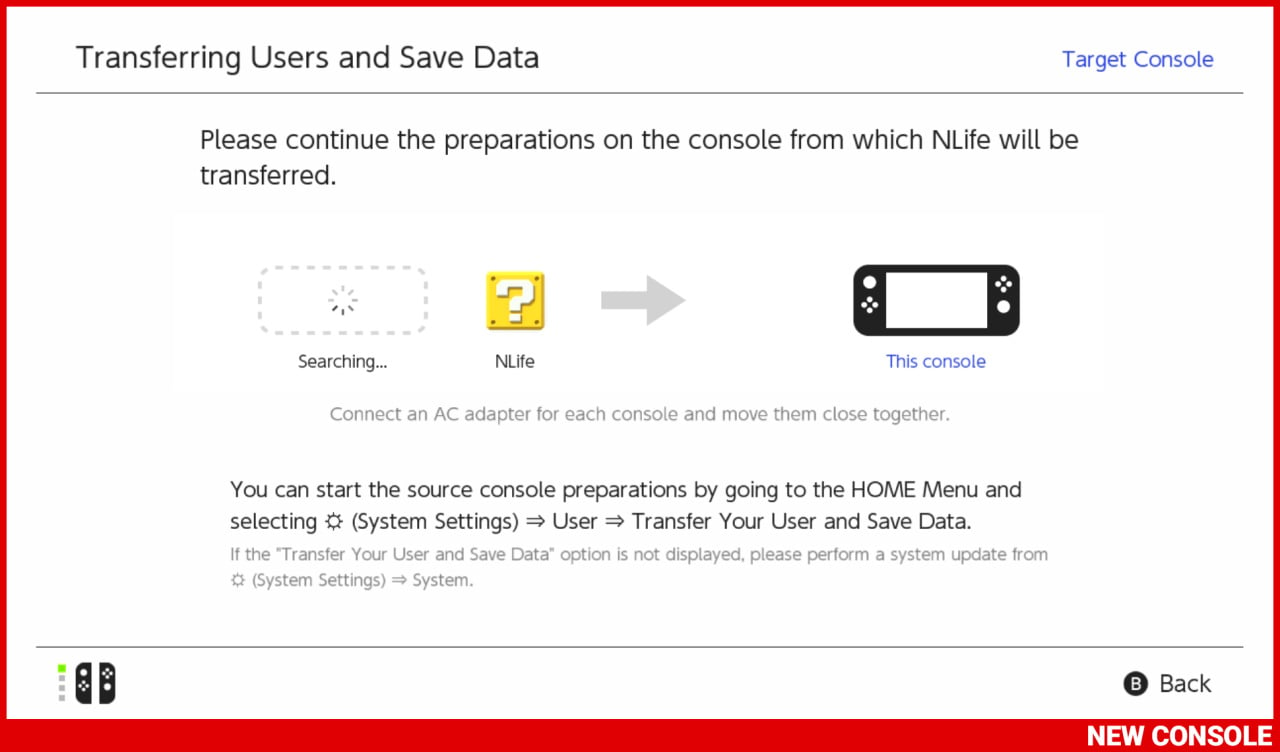
- On your new system, select Target Console.

- Your old system will ask you which User Profile you wish to transfer. Select the icon of the User Profile you wish to send to your new system.

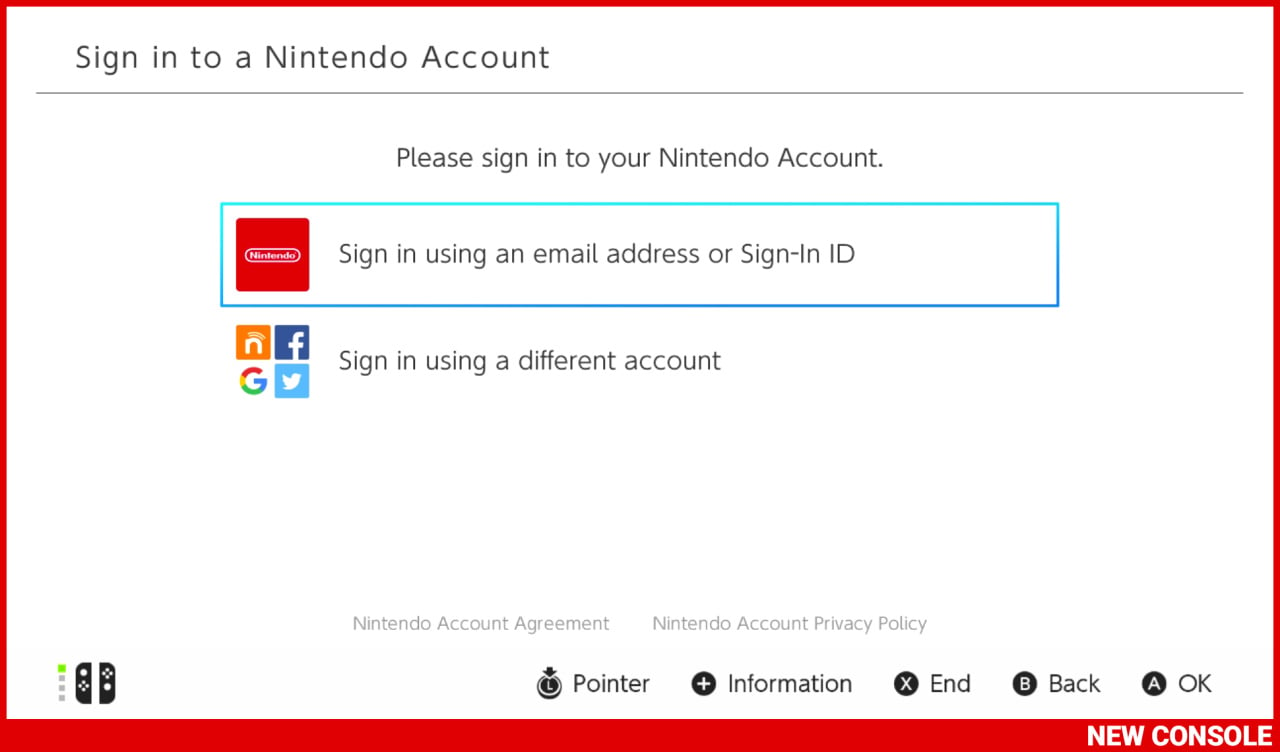
- Your new system will ask you to sign into the Nintendo Account that is associated with the User Profile you wish to transfer. Select Sign In and then choose the method you used to initially create your account, which is usually Sign in using an email address or Sign-In ID. enter the email address and password that you chose when you set up the User Profile you selected on your old console, then select Sign In.
- Provided you signed in successfully, you will now see the icon of the User Profile you wish to transfer on both consoles, along with some text that will differentiations between them.
- Select Continue on your old console.
- Select Next on your new console.
- Both consoles will now attempt to discover one another, which shouldn't take longer than 10 seconds. Make sure the consoles are close together to ensure a rapid discovery.
- Once both systems have discovered each other, select Transfer on your old console.
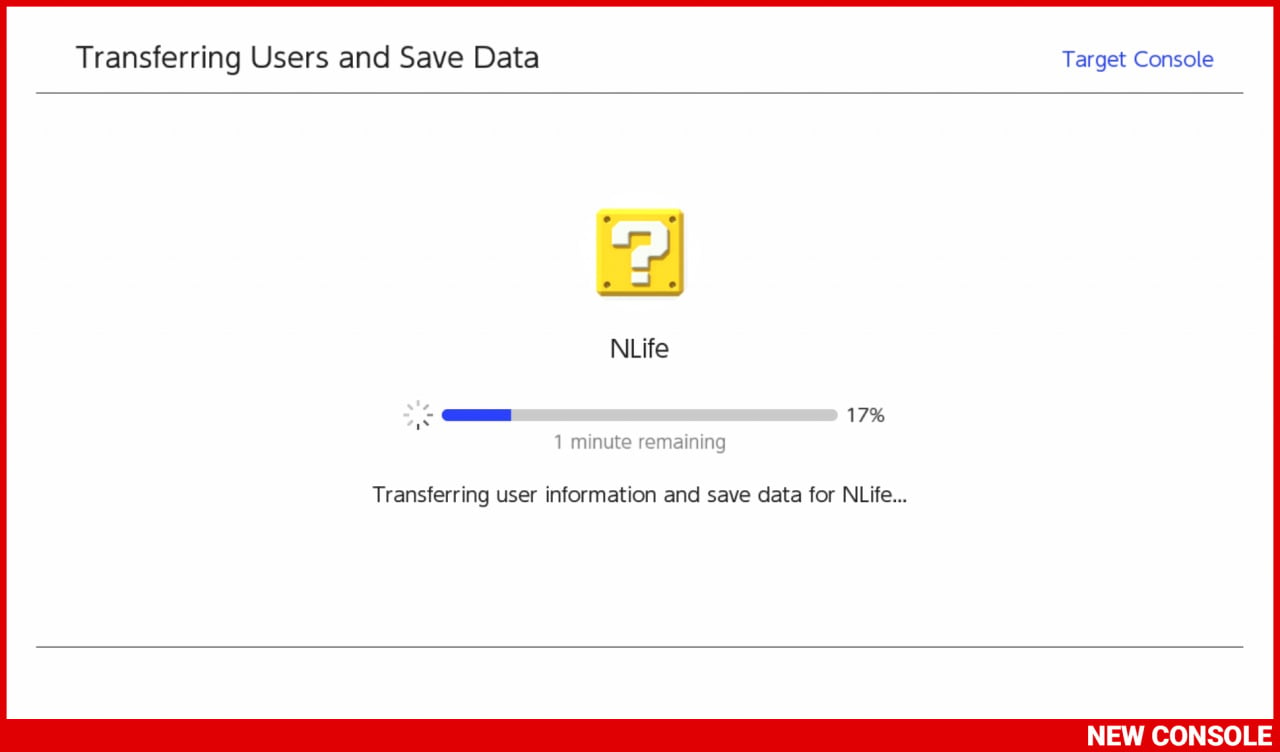
- The systems will now begin exchanging data, which may take up to or over 30 minutes depending on the amount of save data you have. Make sure both consoles are plugged into an official power supply for the duration of this transfer.
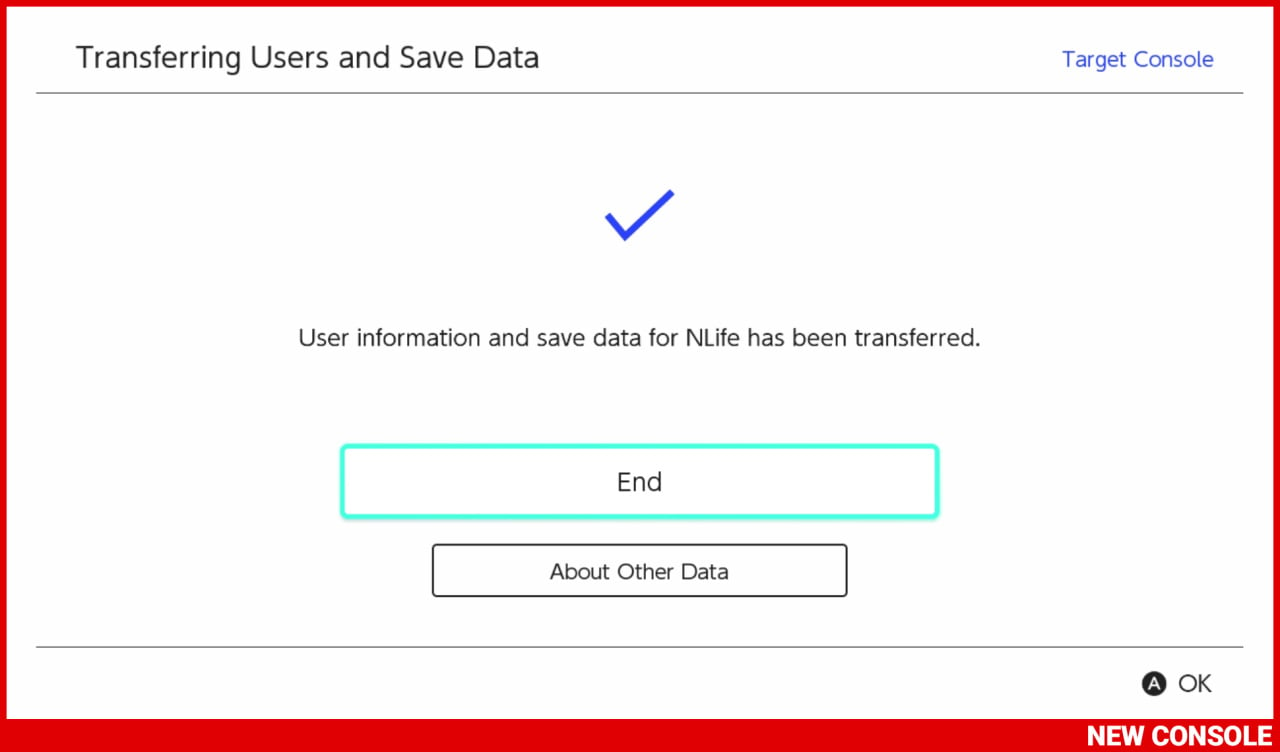
- Once the transfer is complete, your old system will tell you that your User Profile has been successfully transferred. Your new system may take a few moments longer to also declare that the process is complete
- Once both systems have finished the transfer and display a blue tick icon, select End on both consoles.
The system transfer is complete. Your profile, all your save data, and eShop purchases have been transferred to your new console. Woohoo!
Where Are All My Games?
Whilst your save data has been sent over, your games themselves haven't, because Switch games are mighty massive and if you've ever done a system transfer for the 3DS or Wii U you can understand why Nintendo thought "nuts to that" with the Switch.
Instead you're going to have to re-download them from the eShop, but thankfully it's not as painful a process as you might think.
Getting Those Games Back
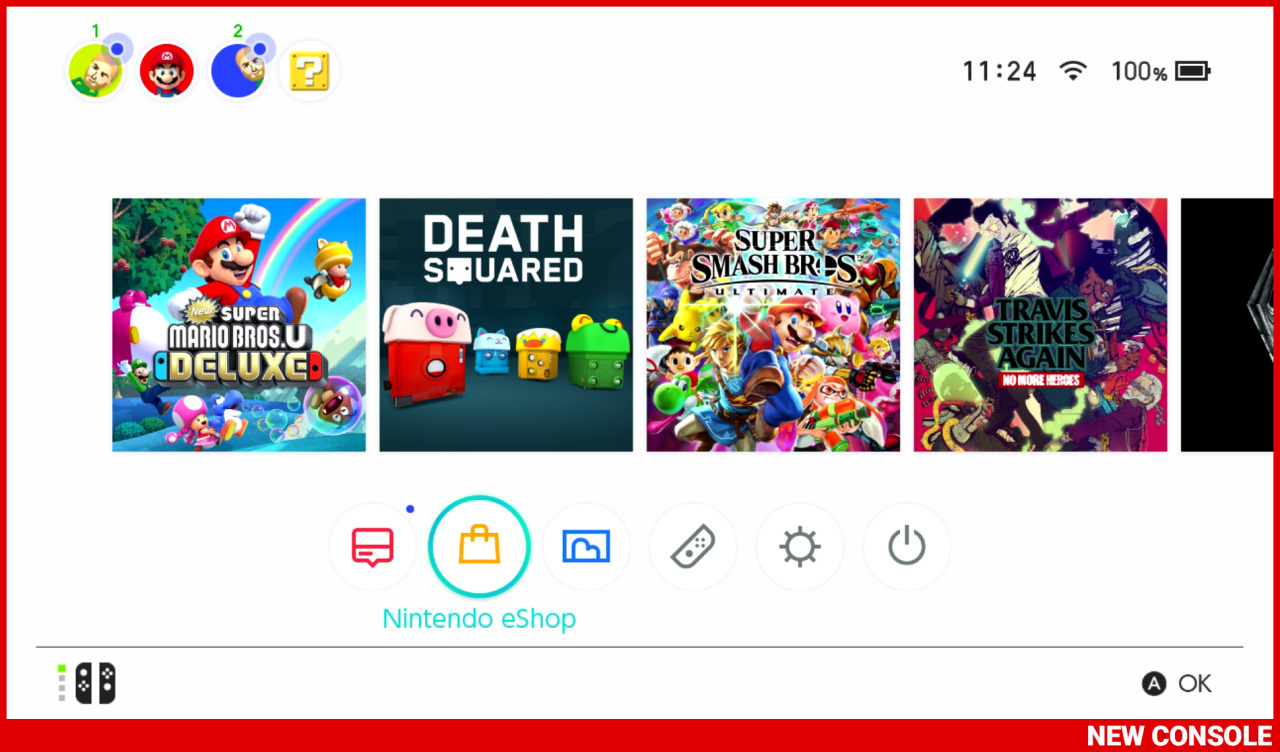
- From the Home Menu on your new console, select Nintendo eShop, indicated by an orange shopping bag on the lower row of circular icons.
- If prompted to select a User Account, select the User Account that made the purchases you wish to re-download.
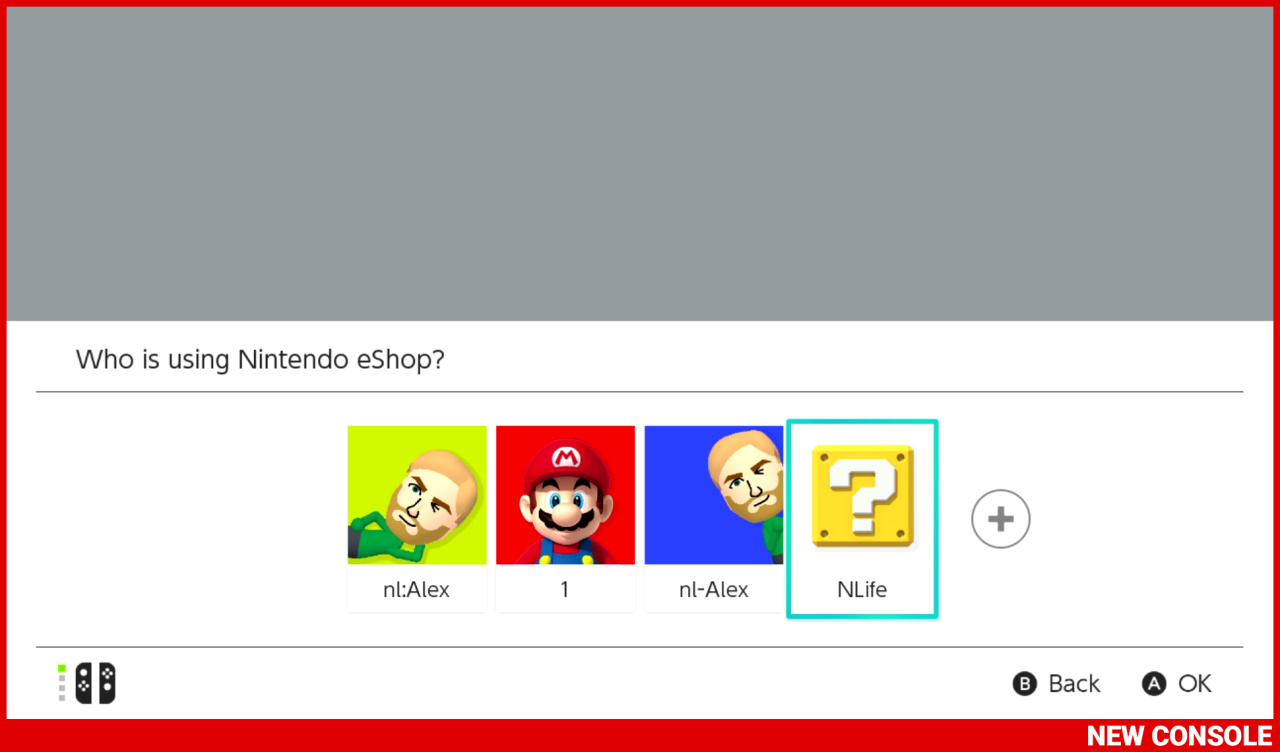
- If prompted to sign in with your email and password for your User Profile, enter your email and password associated with your User Profile and select Sign In.
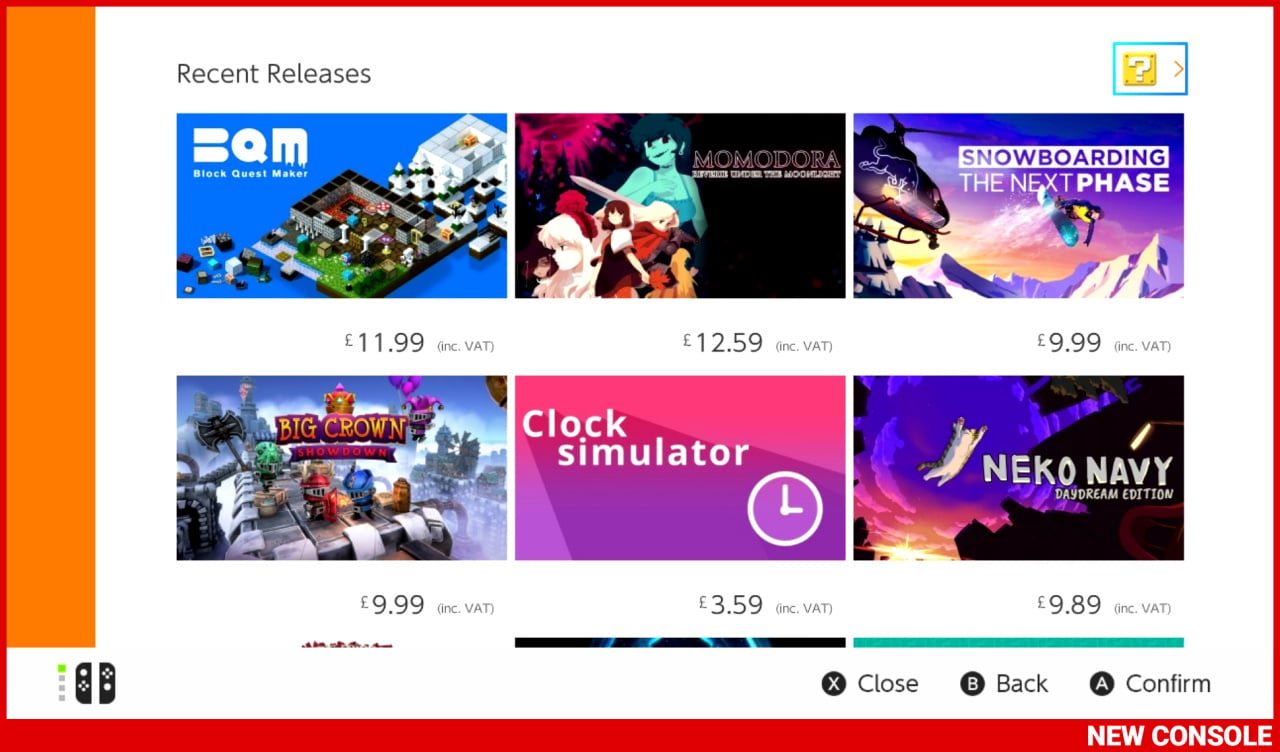
- When the eShop has loaded, select the small version of your User Icon in the top right hand corner of the screen.
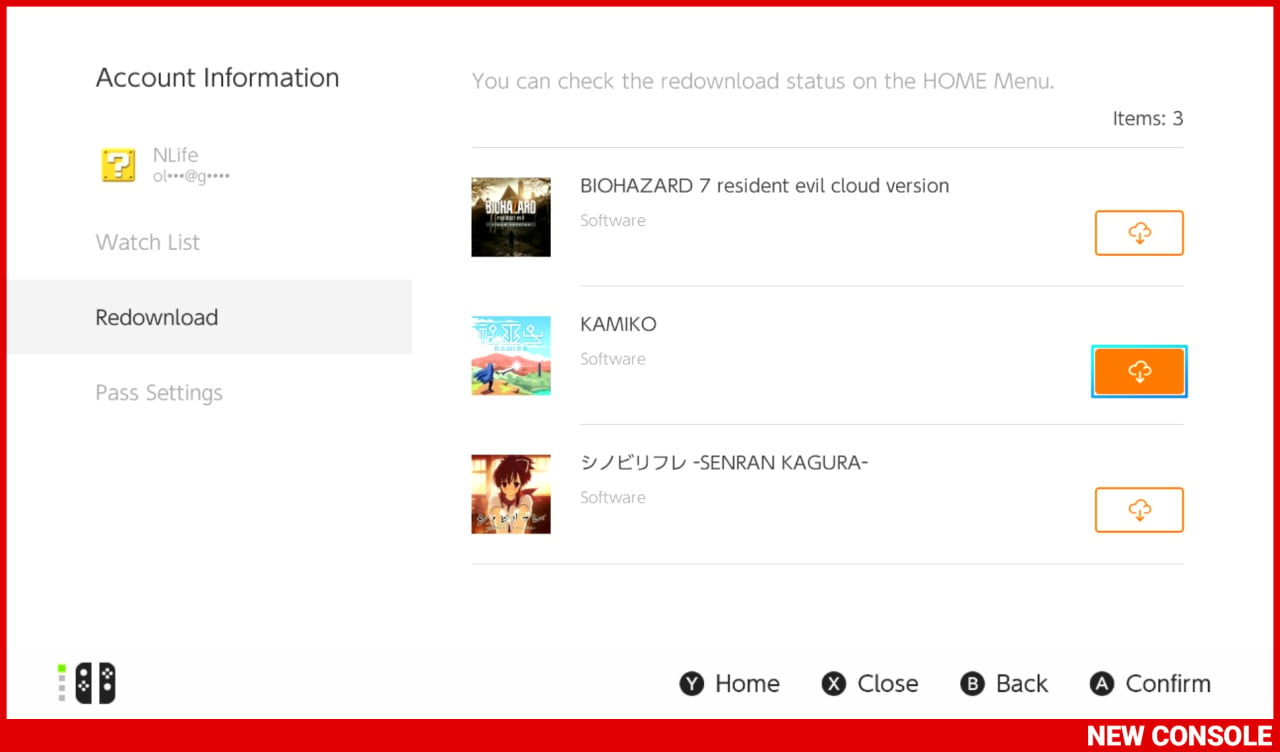
- Scroll down and select Redownload from the menu on the left side of the screen.
- From here on the right side of the screen you will be presented with a list of the games you have purchased on this account.
- Select the orange cloud icon to the right of each previously purchased game you wish to download onto your new console. You will not be charged again for any downloads from this menu.
- Once you have selected the orange cloud icon next to all the games you wish to redownload, press the Home Button to return to the Home Menu.
- Your games are now downloading onto your new system, which may take several hours, but will continue even when the Switch is in Sleep Mode (providing you have the appropriate option enabled in the System Settings menu).
That's it! Once they're finished you can dive right back in as though you never left, thanks to all your save data being transferred over earlier.
Frequently Asked Questions
Can I just move my Micro SD Card with all my games on it to my new console rather than downloading them all again?
Sadly not, due to the particular jiggery pokery Nintendo has opted for, this just doesn't work.
Can I perform a System Transfer for more than one User Profile?
Absolutely! Simply repeat the steps listed above for every user you wish to transfer.
Do I need a Nintendo Switch Online subscription to do all this?
Mercifully, no. You do not need any kind of subscription to transfer any of this info, even your precious Breath of the Wild save data.
What about all the screenshots and videos that I've captured?
As long as you take the Micro SD Card out of your old console and slip it into your new one, you should be able to keep all your old screenshots and videos. Just follow the onscreen prompts and you'll be golden.
Can I transfer between two Switch OLEDs or two Switch Lites?
As long as they're Nintendo Switches, you can transfer between two Lites, two OLEDs or two regulars, no problem.
Can I not just transfer my profile by rubbing both consoles together and chanting?
If you try it, please send us a video.
How do I transfer my Animal Crossing: New Horizons island over to my new Switch?
Glad you asked — we've got a guide for that:
We hope you found this guide helpful. Let us know below if you've got any questions and we'll do our best to answer them.


Comments 87
"Can I not just transfer my profile by rubbing both consoles together and chanting?
If you try it, please send us a video."
Dang it! I would do it, but I only have one switch.... maybe when my friend comes over...
I can't believe Nintendo is still doing this nonsense...
The save games are handled by the cloud, the accounts are not tied to a piece of hardware anymore - so what's holding them from making this procedure as easy as it is on other consoles??
Before selling the console: erase everything; after buying a new one: login to account.
THAT SHOULD BE IT.
Most people don't hold onto their old console after buying a new one. And why should they? (They usually pay for the new one mostly with the money from the old one..)
While it's nice this process exists, it doesn't help most people who actually have to get a new Switch (because their old one was defective or got stolen).
Barely anyone is going to buy a new Switch if they still have their old one.
Only people who can't access their old system will buy a new one.
They should've considered this and offered a solution where you only have to log in to your profile on the new Switch and download everything from there.
Where are the pikmin?
It's a lot better compared to the 3ds, but it still baffles me I can just login into a PS Vita, PS4, PS3, Xbox One, Xbox 360 not mention Steam and have by doing that directly acces to all my games (and saves if PS Plus on PlayStation) on multiple systems but not with the switch.
I hurts me as a Nintendo fan they don't look at how the others handle such a simple thing, being different doesn't mean being better, this is just being stubborn even while it's miles better compared to the 3ds method.
(I know you can have your games on multiple Switch systems, but the method works bad in my opinion because by not having almost constant internet access on the second switch then digital stuff won't work.)
@alexolney? Will this transfer the save data of Splatoon. (or other games that don't support cloud saves)?
not powered by pikmin = there will never be a pikmin game on switch confirmed
@Balta666 Yep, all of it. It's not restricted by the same limitations of NSO.
This is total rubbish. How are you going to do this if you have to send the Switch in or don't have the second Switch to transfer yet? This Guide is just a total cluster F*&&^&. Just make a PC based connection software so the USER can determine when and where to backup and restore the Switch. What this Guilde FAILS utterly is how do you backup a Switch if you don't have the Second one and if your selling the first one. This is talking as though you got the second but most can't just toss 299.99+tax before transferring everything over.
No method will ever be foolproof. There will always be the argument that your account can get hacked into, or properly accessed by someone who has your login details. Under this scenario, anyone could download your games, game saves, and disable your copies of those items, even from another Switch.
It reminds me of installing Windows 7. As long as I have the installation media, and the matching product key, I can continue installing legitimate Windows 7 on different machines. With a non-commercial license, only 1 machine can be that license, and that is the machine that most recently connected to the Microsoft servers. However, I'm talking about personal use, and most of the time, the other installation was an older pc, or one that broke. Therefore, there were never any fights/conflicts over which machine was the legitimate licensed install, since I never used the other machine again.
Back to Switch, as I said, no method will be considered foolproof.
Edit: I'm all for an account system, allowing you to redownload all digital purchases (games, & dlc), as well as game saves. That's easy enough, as your purchases are just a list tied to an account name/number. Most game saves can be small enough in size, that it really doesn't take up too much space on a server. This option allows people to access their data that I listed above, if their console was damaged, or stolen.
I'm also for being able to transfer game saves, & media (photos/videos/music/etc.) via SD card, as well. This allows convenience for the user, and it doesn't require server space, which itself would require a subscription service.
Implementing both methods I mentioned would probably be best.
RIP anyone who wants to trade their Switch after owning Splatoon 2 and Pokemon Let's GO.
@AlexOlney Good.
Um, I made a thread about this earlier, but @AlexOnley, do you know if there is a way to transfer game ownership to other users on the same console? (I share a Switch with my family)
Can someone explain to me why you’d buy another Switch if the one you’ve got is functioning?
@BigMac1204 Nope, not at the moment anyway.
@HollowGrapeJ Splatoon 2 and Pokémon Let's Go data can be transferred using this method.
@alexolney I have read this article and watched the video, and since I can't put in the microSD Card, because it'll wipe all save data, is it possible to just do the normal system transfer with the same sized SD Card in the new system, and redownload everything including the save data/games from the SD Card via eShop as well as screenshots/videos?
Has anyone done this migration from Switch to Switch rev. 1? What happens if the other two accounts don't have a email or login associate to them? What happens to them when you try to transfer?
I started playing Animal Crossing on my roommates switch not realizing I couldn’t transfer the data once I got my own switch. But now I do I have my own switch, can I transfer all my roommates data/games to the new console and keep only AC on the old console?
Do downloaded game updates transfer? Or if not, what about game icons? Every time I insert a cart into the Switch it creates a game icon. Will I have to insert each one manually into the new Switch to get the game updates again?
This is one of those situations where being able to just move the SD card would have been nice. It's not like game updates represent a piracy issue so I don't understand why they don't allow them to be copied like that.
What is removed from the old console? I get that the saves and the profiles would probably be removed, but what else? Would the old console have to have all of it's game updates downloaded again?
why does it take longer than 10 minutes to transfer my old switch to a new switch and the transfer button grayed out please help
@moodycat Apparently you cannot just move your micro SD card from your old Switch to your new one, you must re-download everything. I have a 1 terabyte micro SD with only 100 gigs still free. So I'm looking at re-downloading over 800 gigs of games. This is ridiculous, almost regretting my Switch OLED pre-order. This process is going to literally take days to complete for someone with as many digital games as us, not to mention use my entire months internet data allowance. As a fan since the NES I say to Nintendo, Come on figure out an easier way!
So if I'm reading this correctly I can't move my micro SD card from my old Switch to the new OLED. Instead I must re-download every game. I own over 800 gigs worth of Switch games. Is Nintendo going to pay Comcast for me going over my data cap? Oh, and I suppose I'll get a refund for NBA Playgrounds since it cannot be re-downloaded.
EDIT
So after a chat with Nintendo it seems that even games which are not available for purchase on the eshop anymore can still be re-downloaded if you owned it before it was removed from the shop. So the transfer won't cause you to lose any games but will take a lot of time and data depending on your collection.
@AlexOlney
What about all the screenshots and videos that I've captured?
I read that the MicroSd will be immediately formatted if inserted in the new system. So how will you not LOSE EVERY SCREENSHOT/VIDEO?
please let me know! thank you
My use case is that I'm keeping my old Switch, giving to my daughter (we are on the NSO Family Plan) and making my OLED one the Primary. I appreciate any advice on how to manage that part.
Agree with most of the complaining. Was hoping to upgrade at GameStop but that won’t work if I have to have the old switch to transfer data to the new one. Very disappointing.
So any games that are on my micro sd card will NOT transfer, even though they were purchased by the same Nintendo ID that I just transferred over from the source console? Only screenshots/video? That’s…disappointing and is gonna take forever! I guess it’ll free up space from games I don’t play anymore. Ugh oh well
@riChchestM are you trying to keep the same profile on both the switches, so you and your daughter can both play games you purchased? From what I understand, that can theoretically work but I don’t believe you’ll be able to have them play games simultaneously. Can anyone else confirm this?
So it sounds like I should remove the Micro SD card from my old Switch before the transfer and then slot it in the new one. You say screenshots and videos will be readable but what about games on the Micro SD card? Do I need to delete them from the card and redownload them? Also I hope all saved games are stored on the console; better do a cloud save first.
It's easier using Tinfoil. The irony.
Paying customer always suffered on Nintendo console.
Q: Do your Friends get transferred over? @AlexOlney
@AlexOlney Oh thank goodness, i've played splatoon 2 far more than any other game I own
Does this transfer your play time for all games or does that start over?
Last time I got a new Switch I did not do this and lost all of the play time for every game so hoping this save that.
Love how ot says more straight forward than 3Ds transfer and the article then proceeds to detail like 25 steps, xD
One question: have bought a 400gb micro sd card for my new switch. Is it important to install this pre-transfer?
Thanks
Ha! What if you want to sell your current Switch in order to finance a rather good chunk of the new one? You can't transfer files with the two units together...
@shani doesn’t NSO take care of everything in this scenario?
"Select the orange cloud icon to the right of each previously purchased game you wish to download onto your new console. You will not be charged again for any downloads from this menu."
For me, this raises a question. It seems to be implied that an attempt to access previously purchased games from the Switch e-shop rather than the redownload menu, will or could result in the user being charged again for those games. Is this the case, or has this happened to anyone?
Is there a way to keep saved data on both switches?
Does this also make the new switch the primary account? I’m keeping my old switch for tv use but want the OLED to be the primary for all my digital games in case I use it places without a net connection.
@Gasarakii Yes, system transfer is the only way to keep your play activity hours. With the system transfer that information is transferred to the other Switch an the play time continue counting.
Generally the system is identical to other systems and if you subscribe to NSO there's no reason to do these transfers rather than just let the cloud saves handle everything.
Except....Splatoon 2, Pokemon, ACNH, Machina, and a handful of others. It's ridiculous that they actually allowed those games to escape cloud saves.
With Splatoon 3 coming soon, I probably will just let my Splatoon 2 data rot on the old machine which will become a backup. Might not bother with the transfer.
@Dan420 Heck for a lot of PC/PS/XB games, 800GB is "patching 2 games." If it's Call of Duty, it's just the vanilla install size before patches!
So I’m trying to read through all the comments for the best answer but I have about 350GB worth of data used on my micro SD (500 in total on card). Do I remove it before I transfer? Do I need a new one? Any help would be appreciated
OMG I just read through the ACNH transfer article. That's just inexcusable.
@TDRsupserstar My understanding from what I'm reading, is that you can just swap the card from the old machine to the new, but nothing other than screenshots and videos will be visible on the new system, game data will have to be re-downloaded.
@Rayquaza2510 Yeah. Only Nintendo do it hard for people, but also Sony sometimes.
Sony is not perfect as some content is locked to hardware like on Switch. Protected save games can't be backed up either unless you pay for PSN+.
Microsoft is the only one who have cloud backup 100% for free for everyone with no paid sub required.
On VITA you can backup games directly to a PC with Windows with official Sony software. You can restore/backup one by one game too if you want. My VITA Backup on PC is 6-700.GB.
3DS/Switch games can be easily backed up to PC too. Just use a card reader on PC and copy whole SD cards to PC.
Screenshots and videos included.
They should make a computer PC transfer system not a Wifi system transfer so you can offload your data before trading your Switch in.
If I want to reuse the SD card in the original system, can I just put it into the new system after the transfer or does it have to be wiped clean?
so i’m getting my oled tomorrow - i assume i do the whole system transfer , then re download acnh on the oled (i have digital copy) then do the acnh transfer tool? is that the right order? when do i do my sd card? if i lose my acnh i’ll go insane !!!
@STAGGLY https://en-americas-support.nintendo.com/app/answers/detail/a_id/53668/~/how-to-transfer-animal-crossing%3A-new-horizons-save-data
What i'd like to know: I want to have my Switch OLED as let's say "my primary Switch" and my old one as my secondary (for travelling with it). Is this possible? Or can I just have one Switch at a time?
I can imagine many have a Switch at home and use a Swich Lite for travelling. (If it's possible of course...)
@Yosti. yeah thabks i know how i’m still just not totally clear in what order i need to do things - do i download the acnh tool before transfer to oled? i just really want an idiots guide to new switch and animal crossing
@Coxula You can do that. But make your Switch OLED the secondary Switch. The secondary Switch has to be online to play games from your account. The primary Switch can play games from your account without an internet connection which is great for travelling.
@STAGGLY That is the idiots guide. just follow the steps and you will be fine.
so before i even think about acnh i do the system transfer ? when do i move my as card ? this article is just moving acnh - which seems simple but it’s not in context of a system transfer . when do i download the tool ? when do i re download acnh in the new system etc etc
@STAGGLY The SD card is only for game data (games and updates, not save data) and photo and videos (make sure if those are on the SD card if you want to move those over.
You can move the SD card in any order. Game data has to be downloaded again on the new Switch, game data from you old Switch does not work on the other Switch.
@YoshiTails this makes me want to skip on the new system all together. So, I have to redownload all my games, even if on the memory card?
ok cool but if i do system transfer first where is my acnh data? i assume stays on the old switch? but as i have digital copy can i then re download on new switch? then without opening it on new switch get acnh tool in both and then do that ? it’s just not obvious and the two guides - system and acnh dint in anyway mention each other -
Got a question about Minecraft Worlds.
So I gave my original Switch to my kid, she played Minecraft on my profile.
I want my profile back for my saves on OLED.
How can I get the world's from my profile over to her new profile?
@STAGGLY I think the system transfer and ACNH transfer tool transfer can be done in any order. Afterwards you connect the user account to the right villager.
If you log in on your account on the OLED Switch you can download your purchased games.
@eltomo You can't copy save data from one user account to another account. I don't know if there are other ways to share your world as I am not familiar with the game Minecraft Worlds.
cheers seems backwards to do a change first and as you say you think…. i just can’t lose my island.
@STAGGLY return your OLED Switch tomorrow
@FX102A I sold my V1 Switch in the summer, and bought the v2. From memory this is what I did… (bear in mind I have nso).
I backed up my Switch to nso cloud. I then unlinked the switch and erase/format the switch to factory with sd card removed ( not that it matters ) it took about 30min to reformat- something to factor if you have a potential buyer coming to test the switch.
When I received the new switch v2 , I input my old sd card and signed into my account on the new switch. Console then says it cant read sd card, so you have to reformat. Once all that’s done, it’s just a case of going into eshop and cloud data settings to redownload games and save data. Done!
Then i had to do it all again, as I returned the v2 switch to pre order the Switch OLED😉
@riChchestM are you trying to share games between Switches? If you are Make your old switch ( the one your daughter is using) your primary switch. Then add your Nintendo account to your new switch. If you set it up like this you can share the games that YOUR account has purchased and both play them simultaneously. The caveat is that you have to be online to play any digital game on the Switch you will be using ( not the primary).
@WhiteUmbrella Usually it's nothing to worry about, but some games have been replaced with new versions, and you can't find the old version searching normally anymore, only through the redownload list.
So in some rare cases you would be asked to purchase again if you tried to find them normally. (For example, Nicalis games which managed to free themselves from Nicalis.)
To actually be charged, you'd have to ignore the button saying 'Purchase', currency amounts being shown, paying for the game again... etc, though.
Well I followed the guide and everything is going to plan. I'm just downloading ACNH and the transfer tool onto my OLED now so hopefully that goes smoothly as well. But I did back up my island just in case.
Cheers for the easy to follow guides NL.
EDIT: Yep, smooth sailing. Got my island onto the OLED no worries. A bit convoluted but quick and painless.
@Yosti Although, wouldn’t the OLED Switch be the best one for travelling what with the far superior screen and battery life?
@JimiVall If you ask me, yes. I use my current Switch and soon OLED Switch for everything and find the superior screen and battery life the better factors for portability. Other people like to have the smaller size and weight of the Switch Lite.
I had to do a console setup without my original Switch. A foster kitten killed it and a point of sale warranty was invoked. I had to go dig around and deregister my console. Then, I started the downloads. Cloud saves. Cartridge updates. Eshop games. 1.5 days worth of data. I luckily played none of the cloudless games so it was really more of an annoyance than anything.
OK, I'm currently going through this process from an original launch day switch to an OLED switch and unfortunately the process bears very little resemblance to this guide and is a complete nightmare
Primarily because you HAVE to create a user on the new switch as part of the setup and once you have done, you can't do the transfer process.
There's a thread on the forum about this and I'll post how I did it once I figure it out.
But I haven't yet
@norwichred no you don't. You can transfer both your user info and save data at the same time, straight after connecting it to the internet.
After performing the system transfer, can I move my SD card across? I presume you can
@LEGEND_MARIOID You can move your micro SD card to the new system and all pics and videos will still be on it, however the new system will force you to delete any games on the card and you will then have to re-download them from the eshop. I'm about 3 hours into the process and have transferred all my saves, moved over my island from Animal Crossing and am currently still on letter "A" of the re-downloading process. I'm guessing I'll have all my games on my new Switch sometime late tomorrow. This process is ridiculous if you own more than a few games.
Wanted to add something to Nintendo Life's answer in the FAQ about SD cards and your data on said card when you pop it into your new Switch OLED. Now especially those with an SD card that is 512GB or larger you're going to want to pay attention to my instructions here as it might save you some time. What I'm about to propose as a different solution to getting your games data on your SD card into your Switch OLED. Also, this procedure will need a PC with at least a 1TB size storage drive with about 200GB free minimum (this number though depends on what you loaded on your SD card and how much) and a micro SD card reader. The procedure should take if all goes right about 4-5 hours if you have a reasonably powerful PC. Better than 12-24 hours though downloading everything from the eShop 1 download by 1. Here's what you do:
Step 1: Power down your old Switch and remove the SD card.
Step 2: Insert your MicroSD card into your SD card reader. Some will have their SD card natively on their machine as a drive. Others will have it as a USB device. If it is a USB device insert the card into the USB device and then load that into your system.
Step 3: Make a new folder off of the route of your storage drive. Call it say "Nintendo Switch Backup"
Step 4: Go to the Micro SD card on your reader and copy the "Nintendo" folder. Do NOT open the folder and copy the contents. Just the "Nintendo" folder alone will do. Paste that to your Nintendo Switch Backup folder.
Step 5: Once the backup finishes, safely remove SD card reader (or card). Insert it into your new Nintendo Switch OLED. It will delete the data and reformat the card. That's okay. That's why you made the backup in steps 1-4.
Step 6: Power down the Switch OLED completely. Then remove the SD card and load it back into your SD card reader. Keep the Switch OLED turned off for now.
Step 7: Go to your Nintendo Switch Backup folder. Highlight the "Nintendo" folder, right-click and select Copy. Go to your SD card in Windows File Explorer (which should now be completely devoid of data), right-click and select Paste. Let your backup load back onto the card.
Step 8: Once the restore finishes, safely remove the SD card and/or reader and load the SD card back into your Switch OLED. Power it on. If all went well your data is now safely and effectively on the card again.
Hope this helps some people. Thanks and until next time I am out!
@RareAir23 Won't the New Switch refuse to play the games on the micro SD if they aren't re-downloaded from the eshop?
If this works I really wish I'd known about it sooner. Not only would it have saved time, but it would've saved my data plan with Comcast. I'm only halfway through the letter "B", going alphabetically, and I've used over 10% of my entire monthly data allowance. I'm literally going to have to spread this out over several months to not go over my cap.
@Dan420. A good question. My guide is based off of what I've done with Switch MicroSD cards when I've upgraded from a smaller one to a bigger one. The 2 things that I believe make my method work are 1. The way you backup the data which taking the folder marked "Nintendo" and just copying that directly to the storage drive without copying the folder contents after opening the Nintendo folder. In fact, Nintendo themselves recommend when you create a backup of a Switch MicroSD card that exact method. 2. When you switch MicroSD cards (or install a new one unless you are installing a card with no data for the first time) ALWAYS power down the system completely before removing/inserting a new MicroSD card. If you attempt to "hot swap" the card by inserting it even in Stand By Mode the Switch will always force the user to format the card. If you power cycle it while inserting the MicroSD card (power down, insert card, power back up) you'll have greater success of allowing the Switch to accept the card for what it is and what's on it and it'll just work. Thanks and until next time I am out!
@RareAir23 For some reason I thought the games were tied to the system for copyright protection. Oh well I'm doing it the hard way now. Hopefully your post helps someone avoid re-downloading everything. I really wish Nintendolife had mentioned your method, it's taking forever re-downloading every game.
@Dan420 The last reason I think the method I posted will work is because once the MicroSD card is deleted/formatted on the new Switch OLED that primes the card for the new system. Then, you can restore your backup to the MicroSD card after removing it again from the new system after deletion/formatting and again, as long as you power down the Switch completely, then insert the restored card, then power it back on it should then work. Out!
1 last update to my adventure in the comments on this one. Surprisingly, my strategy for moving an MicroSD from an older Switch to a new one...didn't work. The Switch OLED I have just wouldn't accept the data from my backup on my older Switch V2. This to a degree coming from someone who's worked in IT Tech Support for now 20+ years like I have I find very disappointing and kind of defeats 1 of the key purposes of backing up your Switch's MicroSD card to your PC: taking the data from an older Switch to a newer one and then just having it work when you insert the Micro SD. Nintendo likely has some kind of absurd security policy in place on hardware to not allow this and I find the policy as absurd as actually enforcing it and I'll leave my thoughts at that. Out!
@Dan420 Good Lord. I have a 1TB microSD card (I got as a present) & few hundred GB of games! That'd take me forever too!
@LEGEND_MARIOID It really does take a long time. My internet is 800mbs and my OLED was downloading all night as I slept and I'm only up to "N". Mercifully I think "O", "P", and certainly "Q" will go by quickly. Then the dreaded "R", "S", and "T" will take all day. I'll repeat myself again, this process sucks.
@RareAir23 Oh man I'm sorry to hear that. I had a feeling there was some kind of anti piracy witchcraft going on that wouldn't allow this to be done in an easier manner. Nintendo needs to tie the games to the user not the system, seems it's too late for this generation, maybe next gen Nintendo will finally get it right.
To everyone, I know my posts sound very critical of Nintendo, but I'm actually a huge fan for over 37 years. Nintendo just makes some really wacky decisions sometimes. As I mentioned in previous posts this ridiculous transfer process is now going to push me over my data cap with Comcast costing me real money I have to work for. It's bad enough when you don't get to play your new system for days after release because the transfer process takes so long, but to have it end up costing the consumer money is unforgivable. I'll say it again, Nintendo needs to pay my overage charges to Comcast.
Anyone else having a problem transferring their user data to the OLED? When I try to do this, the OLED finds my old Switch in two seconds but the old switch won't detect the OLED. I have a couple long time saves for Pokemon I don't want to lose so this is super annoying.
@Deserteagle17 I did not run into that issue, transferring over my save data was actually one of the easier steps for me. Maybe try initiating the process on your old Switch first then having the OLED connect. Also make sure your old Switch isn't in airplane mode and has wifi and they should connect.
@Dan420 same.
I have bought a switch oled and giving my niece my v1 switch. She wants to keep the acnh island data, I don't want it for my oled. Can I still transfer all my data to my new oled and leave acnh data on the v1 for her? The game is a physical copy, I no longer play it so she can have it
@Sfoste25 I know your posted question is now over three years old, but I was hoping you found some sort of answer. I have the one Switch, an original, wife got Animal Crossing on it, but with us sharing she never got to play it much. I recently got a new Zelda OLED Switch and I would like to make that my new primary. Want to transfer all the save data and profile and get all the games over to it. And I want to keep the original switch. Like you, it sounds like to me, I want to be able to leave AC on the original console and my profile that it’s attached to, even if the profile is hindered by not being primary and just a copy of sorts of my profile. Keep old Switch, only have AC and profile, all else transferred. Were you able to do this? Or found any useful information? Please, any help. Your post is the only even remotely close thing I’ve found similar to my question.
Thank you.
Hi @BaronZemo, yes I was able to transfer all the game data to the new switch and leave AC on the old. You have to transfer game by game not necessarily all data at once.
'Whilst your save data has been sent over, your games themselves haven't, because Switch games are mighty massive and if you've ever done a system transfer for the 3DS or Wii U you can understand why Nintendo thought "nuts to that" with the Switch.'
Sony let's you back up/restore all your physical games AND their corresponding updates/dlc - to an external hard drive, in its great menu system. Sony by giving your more control, freedom and trust I feel actually reduces piracy.
Good article FYI 👍
Nintendo failed on this one.
Show Comments
Leave A Comment
Hold on there, you need to login to post a comment...