
Welcome to our ultimate guide for collecting every Power Moon from the Moon Kingdom in Super Mario Odyssey! Below, you'll find maps detailing the exact location for all 38 of the Power Moons located in this Kingdom, as well as descriptions on how to get each and every one of them.
The numbers on the maps correspond to the relevant Power Moon listed below and, whilst most of them appear in that spot from the beginning (or after you've completed the story at least), it is worth nothing that sometimes you are required to perform a specific action to make it appear. Use a combination of our maps and walkthrough information to grab each of the Power Moons with ease. Enjoy!
Moon Kingdom Power Moons (1-27)
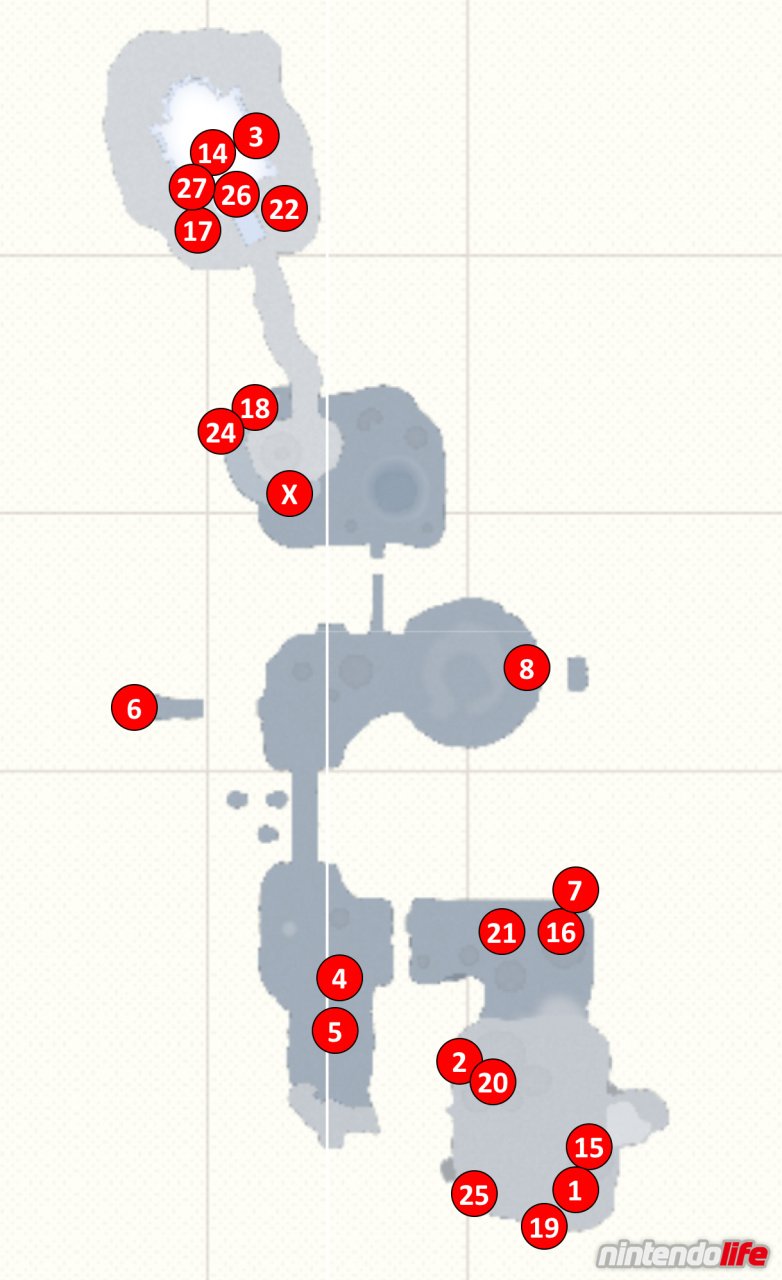
1. Shining Above the Moon: Just behind the Odyssey to the right-hand side you should find a small crater with a shadow in the middle. Stand on this shadow and jump directly upwards to reveal a hidden block - if you jump up onto this block, and then directly up again, you should also reveal a second one. Jump up onto that one and do the process once more to find a Power Moon floating high above you.
2. Along the Cliff Face: Head to location 2 on our map and spin the camera around to view the cliff face below and find a large 2D section inside the wall. You'll find a small ledge with a green pipe to enter this section - head inside and make your way to the end for a Power Moon.
3. The Tip of a White Spire: For this Power Moon you'll need to jump up onto the roof of the Wedding Hall. If you're facing the hall from the front, head around to the right-hand side and jump up onto the roof, looking out for the white spires that are dotted around the structure. One of them on this side of the building will be glowing and, if you throw Cappy at it by holding down the 'Y' button for a few seconds, a Power Moon will pop right out.
4. Rolling Rock on the Moon: Search around location number 4 on our map to find a small rock in the middle of a crater. If you kick this rock around - you'll need to do this for quite some time - it will eventually burst open to reveal a Power Moon.
5. Caught Hopping on the Moon!: At location 5 on our map you'll find a rabbit bouncing around. As always you'll need to capture the rabbit for a Power Moon, using Cappy to stun it if necessary.
6. Cliffside Treasure Chest: Way out to the west you'll spot a treasure chest sitting on its own distant platform. Capture one of the Rocket Flowers sitting on the mainland nearest the platform and use the speed it generates to perform a super-long long jump. Open up the treasure chest for this Power Moon.
7. Moon Kingdom Timer Challenge 1: At location 7 on our map you'll find a scarecrow sitting on a slightly lowered ledge. Throw Cappy at the scarecrow, and then perform a series of long jumps over the platforms that appear, to grab the Power Moon waiting for you.
8. Taking Notes: On the Moon’s Surface: Head to location 8 on our map on the eastern side of the middle part of the Kingdom to find a glowing treble clef. If you touch this treble clef, a series of music notes will appear - you'll need to collect all of these before the timer runs out to get this Power Moon. If you can execute two perfectly positioned long jumps, you should be able to collect all of the notes with two swift movements.
- The next five Power Moons are all located in the magma-filled section just beyond the Quiet Wall checkpoint flag. The location for this area is marked as 'X' on our map above. As this area has no map within the game, we'll guide you through these ones with descriptions alone.
(X) 9. Under the Bowser Statue: As you drop into this area right at the very beginning, look closely at the Bowser statue on the right and you'll notice that it can actually be captured. Jump up to its head and throw Cappy at it to take control, moving it forwards slightly to reveal a Power Moon underneath.
(X) 10. In a Hole in the Magma: On the lowest level of the area, capture any of the Parabones flying around and fly to the far end with the Spark Pylon inside a cage. To the right of this cage you should be able to spot a round hole in the magma on the floor - fly down this hole to collect a key which will unlock a Power Moon right beside the cage.
(X) 11. Around the Barrier Wall: In the area with the Banzai Bills, capture the first one that appears and fly to the right, following the golden rings until you make it past the first long wall. If you quickly turn to the left here to examine the back of the wall you just flew by, you'll notice a Power Moon sitting on a small ledge.
(X) 12. On Top of the Cannon: In the area with the Banzai Bills, capture the first one and follow the path through the golden rings and breakable walls until you come across the second Banzai Bill cannon. Crash directly into this cannon, making sure to land Mario safely on the top. If you perform a ground pound in the centre of the top of this cannon, a very sneakily hidden Power Moon will pop out.
(X) 13. Fly to the Treasure Chest and Back: Whilst standing at either of the Bonzai Bill cannons, look over to where you first entered the area (made obvious by the large green pipe and Bowser statues). You'll notice an alcove that is exactly level with the height of the Banzai Bills. Capture one and fly over to this alcove, using the boosts available to ensure you make it in time. Break open the treasure chest in the alcove for a Power Moon.
14. Up in the Rafters: For this Power Moon, you'll need to climb all the way to the very top of the Wedding Hall building from the outside. You can achieve this by using backflips, wall jumps, and Cappy dives, or alternatively you can capture the frog sitting behind the hall in the northwest for added height in your jumps. Make your way up to the giant golden bell and drop through the hole in the floor directly underneath it. You'll find yourself on top of some rafters inside the hall - walk over these rafters to collect the Power Moon in plain view.
15. Sneaking Around in the Crater: If you look in the large crater near the Odyssey (at location 15 on our map) you should notice a glowing bump moving around in the ground. Stun the bump with Cappy, and then perform a ground pound on it, to reveal a Power Moon.
16. Found on the Moon, Good Dog!: Right next to the Crazy Cap store in this Kingdom you should spot a dog in a space helmet (as you do). Befriend this dog by playing with it and get it to follow you. As you walk around it will find hidden goodies underground - usually within craters. Eventually it will dig up a Power Moon for you - it found ours at location 16 on our map in the northeast corner of the section with the store.
17. Moon Shards on the Moon: At location 17 on our map you'll find the first of five Moon Shards that you'll need to collect for a Power Moon. The other four are all located in various places on the roof of the Wedding Hall. Jump up onto the roof - using the frog sitting behind the hall in the northwest if necessary - and explore every nook and cranny to find them all.
18. Moon Quiz: Amazing!: To get this Power Moon you'll first have to complete the task for Power Moon 24. When you've done that, return to the Sphynx to answer a series of questions. If you answer of all the Sphynx's questions correctly, it'll reward you with a second Power Moon. The answers to the questions are: Sheep, Moon, Below the bell, Floating on airship sails.
19. Thanks, Captain Toad!: Just to the south of the Odyssey, you'll spot a whole bunch of characters from various Kingdoms all hanging out together to look at the Earth. Just behind them, and behind a small ridge, you'll also find Captain Toad - chat to him for a Power Moon.
20. Shopping in Honeylune Ridge: You can purchase this Power Moon in this Kingdom's Crazy Cap store for 100 gold coins.
21. Walking on the Moon!: At location 21 on our map you'll find a Koopa who will offer you a walking challenge for a Power Moon. The trick to being successful is to use the scenery to remember the walking path - make sure to memorise the parts of the ridge on the right hand side where you'll need to cross over, and also remember that you'll need to walk directly around the top-left edge of the crater on the opposite side as reference points.
22. Moon Kingdom Regular Cup: At location 22 on our map (just in front of the Wedding Hall) you'll find a Koopa who will challenge you to a race to win a Power Moon. The race isn't too much of a challenge if you make sure to consistently use long jumps to travel - they can help you to dive from higher sections to lower ones very quickly, and are also much quicker than running on flat sections.
23. Doctor in the House (see location 14): For this Power Moon, you'll first need to be wearing the Doctor Headwear and Doctor Outfit (if you need help with this, check out our Super Mario Odyssey Outfit Guide). When you have this complete outfit equipped, head inside the main room of the Wedding Hall and talk to the Shiverian who mentions that he's feeling ill. Seeing you in your doctor's outfit will magically make him feel better and he'll give you a Power Moon for your troubles.
24. Sphynx’s Hidden Vault: Warp to the Quiet Wall checkpoint flag and run around the structure in front of you to the right to find a Sphynx. If you answer its question correctly, you'll gain access to a treasure vault containing a Power Moon. If you're struggling, the answer you need is 'Rocket Flower'.
25. A Tourist in the Moon Kingdom!: For this Power Moon, you will first need to have spoken to the Tostarenan in the Sand Kingdom who was hoping for a taxi. If you have done this, you may have noticed him (and his taxi) sitting in obvious spots in various Kingdoms. Each time you talk to him, he'll move to a different Kingdom (giving you a hint as to which one each time) and eventually, he'll wind up here. If you've found him enough times, he'll be waiting for you at location 25 on our map.
26. Peach in the Moon Kingdom: For Peach to appear in the Moon Kingdom, you will first need to make sure that you have already found her in every one of the previous Kingdoms. If you have, she'll be waiting for you beside the giant golden bell on top of the Wedding Hall. Use backflips, wall jumps, and Cappy dives, or alternatively capture the frog sitting behind the hall in the northwest to jump up there and chat to her for a Power Moon.
27. Found with Moon Kingdom Art: You'll find this Kingdom's hint art wall inside the Wedding Hall. When you enter, look to the right of the door ahead of you which takes you to the main room and check the art on the wall. You'll recognise the Wooded Kingdom - fly there and warp to the Iron Road Entrance checkpoint flag. From there, head up the steps and walk around to the left of the red metal structures. You should come across the scarecrow in the picture and, if you ground pound the exact spot that is indicated, you'll reveal the Power Moon.
Moon Kingdom 'Moon Rock' Power Moons (28-38)
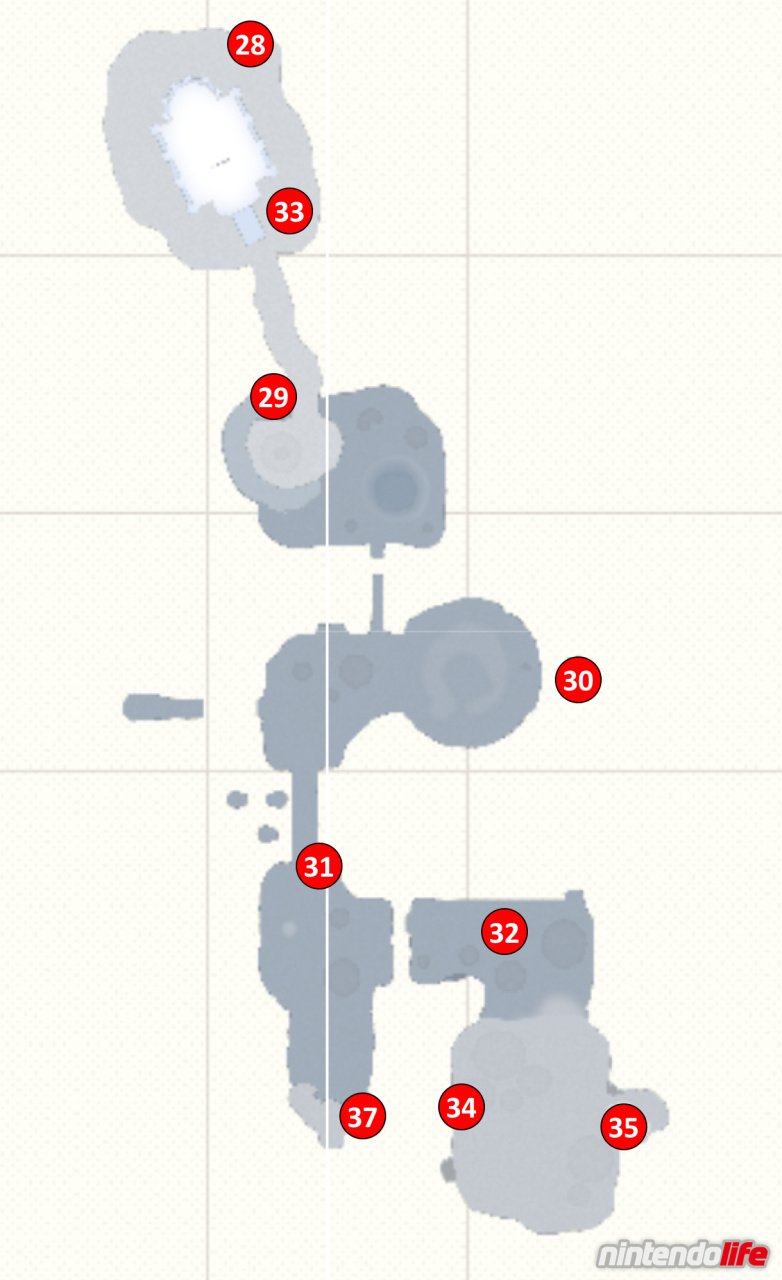
These Power Moons will become available to you when you have smashed the Moon Rock located in this Kingdom.
28. Mysterious Flying Object: Head beyond the Wedding Hall to the northeast to find a glowing UFO. You'll need to sneak up close to the UFO and hit it with Cappy to get the Power Moon - it can be incredibly tricky to find the exact location from which to throw Cappy, so you may need some patience for this one. If the UFO flies away, simply walk a few steps away from its original location and move the camera away from it, then look back again to reset everything and try again.
29. Hidden on the Side of the Cliff: Warp to the Ever-After Hill checkpoint flag and walk directly northwest. If you look over the cliff here, you'll see a Power Moon floating above the Sphynx below. If you can, jump down to make contact with the Power Moon from above - don't worry if you fail, though; you should be able to jump up onto the Sphynx's head, backflip, and then wall jump from the wall behind it to make contact from the ground.
30. Jumping High as a Frog: Your first step for this Power Moon is to capture the frog that is sitting behind the Wedding Hall in the northwest. When you have your frog, make your way south, and then east, until you reach location 30 on our map. In this location, a Power Moon is hovering high up in the air over a platform that is slightly separated from the mainland. You'll need to shake the controller to make use of the frog's highest jumping ability to reach it.
31. Moon Kingdom Timer Challenge 2: Head south along the bridge from the Ringing-Bells Plateau checkpoint flag to find a scarecrow at the other end. Throw Cappy at the scarecrow and then perform long jumps to make it across the slanted platforms to the Power Moon.
32. Walking on the Moon: Again!: Head to location 32 on our map and chat to the Koopa there to start a second walking challenge for another Power Moon. As before, the trick to being successful is to use the scenery to remember the walking path - make sure to memorise the parts of the ridge on the right hand side where you'll need to cross over, and also remember that you'll need to walk directly around the top-left edge of the crater on the opposite side as reference points.
33. Moon Kingdom Master Cup: Head to location 33 on our map (just in front of the Wedding Hall) and talk to the Koopa there to enter a second race to win another Power Moon. The key to the race is to consistently use long jumps to travel - they can help you to dive from higher sections to lower ones very quickly, and are also much quicker than running on flat sections. When you are travelling up the wall-jumping section, make sure to turn your body at the top, using a Cappy dive to throw you towards the goal rather than loitering in the air for several valuable seconds.
34. Taking Notes: In Low Gravity: Enter the green pipe that is sitting on a ledge just over the cliff to the west of the Odyssey. Make your way over to the left side of this section and, from there, turn around and jump up to get yourself on top of the rock that is at the very top of the screen. You'll notice that a treble clef has appeared there - touch it, and then collect all of the music notes that appear, to receive a Power Moon.
35. Center of the Galaxy: Run around to the back of the tall column to the east of the Odyssey to find a flower trampoline that will take you to the area above. When you get there, enter the grey warp pipe and make your way around the circular, gravity-based 2D section. Right in the centre, you should spot a Power Moon.
36. Edge of the Galaxy (see location 35): In the same area as Power Moon 35, make your way to the ledge that you would use to drop down to the first Power Moon (at the top of the circle) and then jump upwards to spot two spinning planets above. There is a Power Moon in between these planets and, if you can make clever use of the gravitational force between them, you should be able to jump in a path that takes you directly through the Power Moon.
37. Navigating Giant Swings: At location 37 on our map (on top of a tall section that requires wall jumps to access) you'll find a grey warp pipe. Enter the pipe and make your way right to the end of this area, timing your jumps so that the moving platforms come to meet you as you land, to find this Power Moon.
38. A Swing on Top of a Swing (see location 37): In the same area as Power Moon 37, make your way through the room until you pass by the second Astro-Lanceur enemy (space-octopus-things). A Power Moon is sitting just above the blue swinging platforms just beyond this enemy. To reach it, you'll have to jump up onto the first blue platform and then perform a backflip at just the right time to land safely on the upswing of the platform above it. When you manage it, hop over to the gold platform nearby to collect the Power Moon.
We hope that you have found this guide on collecting all Power Moons in Super Mario Odyssey's Moon Kingdom useful. Let us know if you've managed to grab them all with a comment below.


Comments 15
This was one of my favourite kingdoms, the Music & the physics reminded me of the galaxy games
@Marios-love-child Same! I also liked that the moon had the hardest levels! My brother kept on complaining about how easy Mario odyssey was so I had him fight the broodals in the moon kingdom, and he couldn’t do it!
@SimplyCinnamon53
It's not the most difficult of games in fairness but I don't think I've ever played any game before that's made me smile so much as this one.
I've only done about 220 Power moons so far so barely scratched the surface.
Part of me just wishes I'd held back on playing it and that I'd put it away until Christmas day as a present to myself.
The Moon Kingdome was honestly a bit of a letdown for me. Don't get me wrong the game is amazing. I just wished the Moon Kingdom was more challenging or something.
Christ's sake I need to start completing games quicker, didn't even know there was a moon kingdom until now lol. Can't blame NL for posting spoilers this long after the game's launched but that has definitely ruined the surprise of a portion of the game for me
@-DG Wait until you get more moons. It drastically ramps the difficulty after that.
Mario can breathe in Space ??
Same like Mario Galaxy, eh....
@Anti-Matter
There are Pirate ships flying in space (with sails!)....and you question breathing😉
@PorllM Yeah... Luckily I 100% completed the game two weeks in, ( Couldn't put the game down honestly ) but it is a little disappointing that NLife is going about the walkthrough this way. They could have easily said "Mario Odyssey Walkthrough Cont." with a spoiler tag on there so that people don't see the image right on the front page.
@SimplyCinnamon53 Oh I got them all two weeks in, lol. There were a couple moons that were tough but as a whole the game was still pretty easy in my eyes. Not that that's a bad thing! I just felt like other Mario games had tougher 100% challenges. ( Looking at you Champion's Road... )
@-DG I’m still stuck on the last moon challenge, no matter what I do I can’t beat that. How did you do it? My biggest problem is the fork people at the end.
@SimplyCinnamon53 If you mean the fork people over the lava, ( Only ones I remember right now. ) you can actually fly right over them with Glidon. Just shake the joycons and catch all the updrafts, you should be able to skip them and get right into the green pipe that leads to the second half of that stage.
If you want to do it the intended way, use your homing ability with cappy by shaking the joycon after throwing him at your target.
Also if you aren't using the Joycon for this game, you should, the motion control gives you a ton of extra versatility and on this stage specifically you can skip that whole platform maze type section with a downward cappy throw > homing attack.
@SimplyCinnamon53 ***SPOILER ALERT***
Darker Side? That's currently the last moon I have left too (other than the ones you buy). I got tripped up with that too but it looks like one has to do hat dives to reach the forks.
Darker Side really isn't too hard; just a lot of learning about what's going on at certain segments. I thought parts like Vanishing Road (without Cappy) was much harder.
@-DG yeah those ones. I’ll try it and hopefully I make it . @Iacobus yeah I found those parts really hard too. The difficulty is there, you just have to find it.
The hardest moon is the 100 beach volleyball. They didn't make the last moon the hardest (darkest side). I found the dark side moons more challenging
Tap here to load 15 comments
Leave A Comment
Hold on there, you need to login to post a comment...