Welcome to our ultimate guide for collecting every Power Moon from Bowser's Kingdom in Super Mario Odyssey! Below, you'll find maps detailing the exact location for all 62 of the Power Moons located in this Kingdom, as well as descriptions on how to get each and every one of them.
The numbers on the maps correspond to the relevant Power Moon listed below and, whilst most of them appear in that spot from the beginning (or after you've completed the story at least), it is worth nothing that sometimes you are required to perform a specific action to make it appear. Use a combination of our maps and walkthrough information to grab each of the Power Moons with ease. Enjoy!
Bowser's Kingdom Power Moons (1-22)
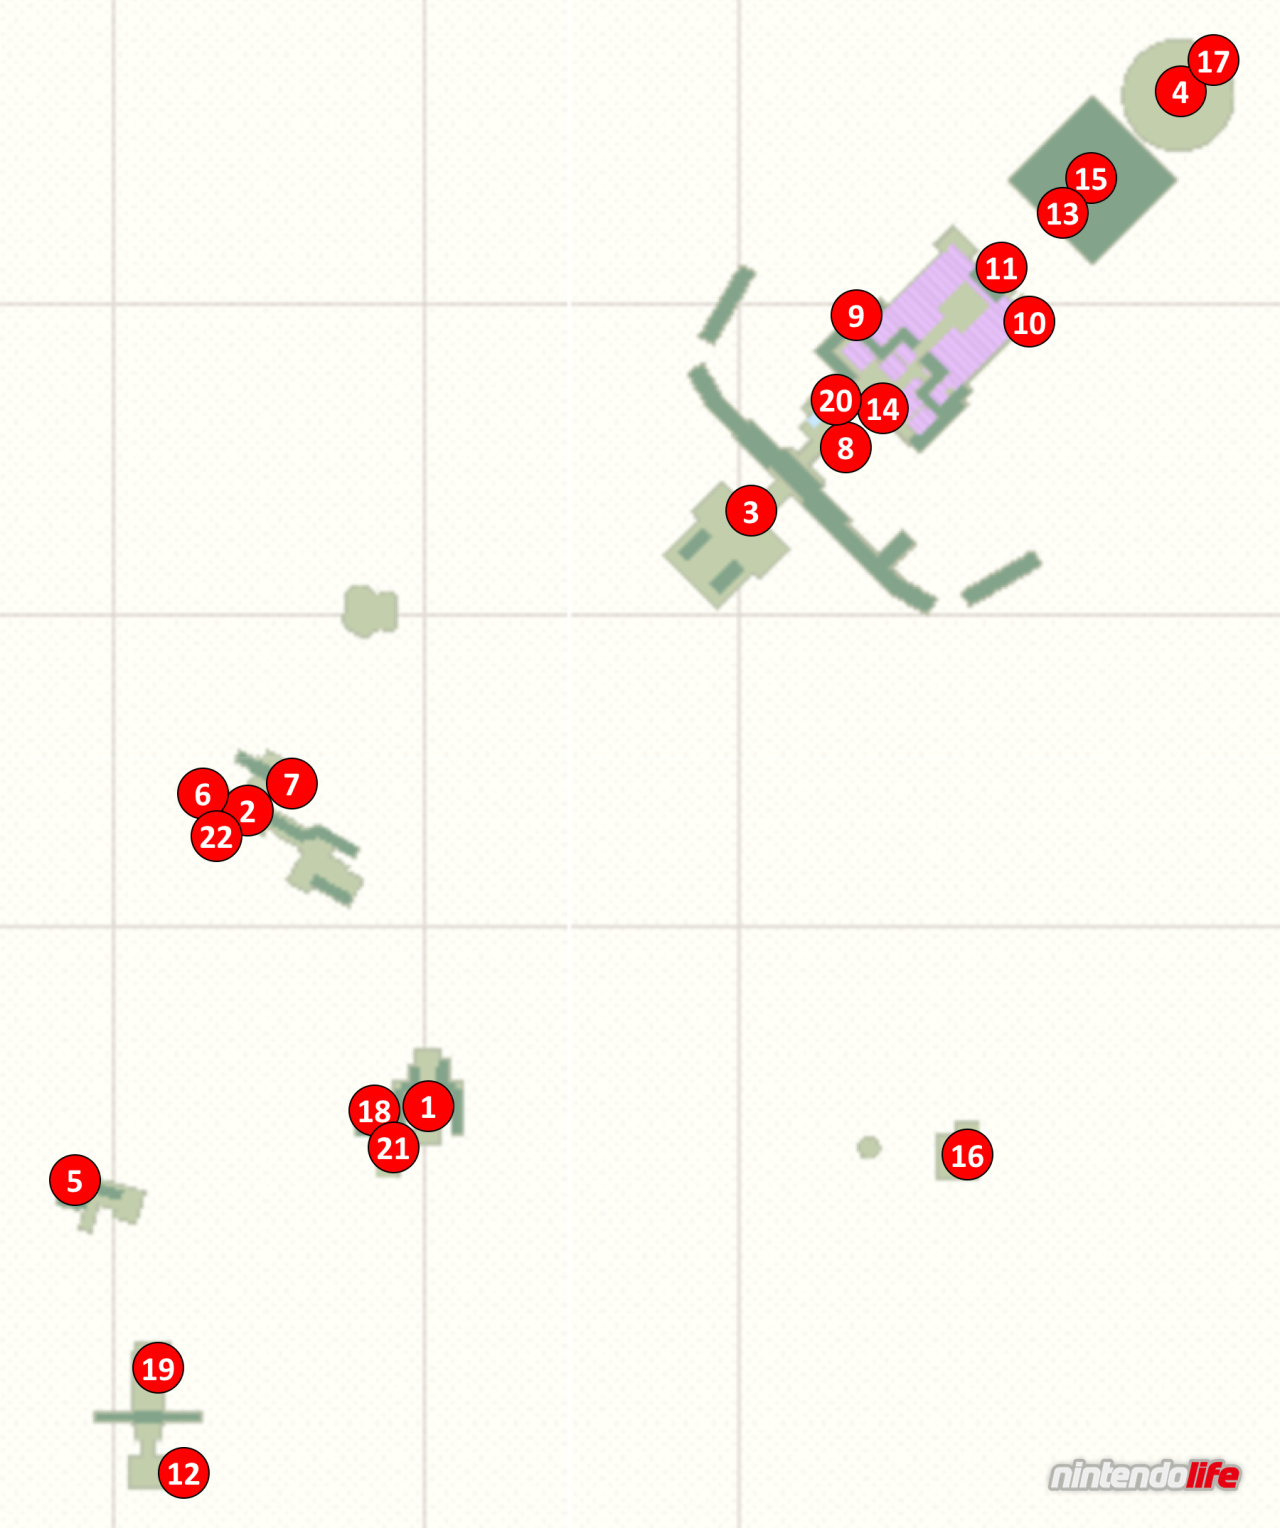
1. Infiltrate Bowser’s Castle!: You'll receive this Power Moon by defeating the Stairface Ogre near the Third Courtyard (Rear) checkpoint flag. Simply allow it to stamp down, dodge quickly, and climb up onto its head to perform a ground pound.
2. Smart Bombing: When you reach the Second Courtyard area, you'll need to collect five Moon Shards to get this Power Moon. They are all close by, although one of them requires you to capture a Pokio in order to flick yourself along the wall.
3. Big Broodal Battle: Defeat the Broodals at the Main Courtyard Entrance for this Power Moon.
4. Showdown at Bowser’s Castle: You'll have to defeat the Broodals a second time for this Power Moon, although this time they'll be in a giant mech robot suit. Use a Pokio to poke bombs towards the legs of the suit, and then climb up to where a Broodal is sitting as the suit falls down. Peck furiously at the glass surrounding each Broodal until you've beaten all of them.
5. Behind the Big Wall: In the Third Courtyard area, capture a Pokio and use it to climb onto the roof. Walk around the roofs on the western side and tilt the camera to look down in a birds-eye view. You'll see a Power Moon sitting in plain sight.
6. Treasure Inside the Turret: Warp to the Second Courtyard area, capture a Pokio, and drop down to attach yourself to the wall to the left (and beneath) where the bombs are rolling. By flicking yourself over to the left along this wall, you should spot some gold coins, regional coins, and eventually a vertical bit of wall taking you to a Power Moon.
7. From the Side Above the Castle Gate: In the Second Courtyard area, jump up onto the green roof located just before the electrical wire that will take you to the next area. On this roof, at location 7 on our map, you should spot a Power Moon waiting for you.
8. Sunken Treasure in the Moat: Warp to the Main Courtyard area, make your way over the bridge, and jump into the water on the left. Dive all the way down to the bottom (ground pounds will help here), and then move along through a small tunnel to find an underwater Power Moon.
9. Past the Moving Wall: Warp to the Beneath the Keep checkpoint flag and look to the southwest; you should spot a roof that has yellow spikes on top. Climb up, and head to the gap in its yellow spikes to drop through the golden rings leading downwards. From this area (a poison swamp with a Stairface Ogre), you'll need to jump down again to the south, using Cappy's momentum to land on an area with a Pokio. Capture this Pokio and use its ability to make your way across to the left. A Power Moon is waiting for you inside a cage at the other end.
10. Above the Poison Swamp: Warp to the Beneath the Keep checkpoint flag and capture the Lakitu who is fishing in the southeast corner of the swamp nearby. Fly under the bridge and over to the northern edge of the swamp to find a catapult. Take this catapult to a nearby rooftop - you should spot a Power Moon down below to your southeast (location 10 on our map).
11. Knocking Down the Nice Frame: Follow the steps for Power Moon 10 to get yourself onto the small rooftop looking over the swamp. When you are on the roof, walk over to the front side of this roof to spot a sign hanging loosely - it should be glowing. Throw Cappy at it to knock it off and reveal a Power Moon.
12. Caught on the Iron Fence: Directly behind the Odyssey, look out for the small iron Bowser heads that line the fence. Throw Cappy at them (by holding down the 'Y' button so that he can hover for a while) to test them out - one of them will start to shoot out fire as Cappy spins on it. After a short while of fire-breathing, the chosen Bowser head will shoot out a Power Moon.
13. On the Giant Bowser Statue’s Nose: If you warp to the Beneath the Keep checkpoint flag and look up directly in front of you, you should spot a giant golden Bowser face. To get this Power Moon, you'll need to ground pound a glowing spot on its nose. Take the electrical wire just in front of you to the next section of the Kingdom, and turn around to drop down onto the statue.
14. Inside a Block in the Castle: Right near the Outer Wall checkpoint flag, you should spot some metal boxes surrounding a Stairface Ogre. One of these blocks is glowing and, to get the Power Moon inside it, you'll need to coax over the Ogre so that it smashes it open for you.
15. Caught Hopping at Bowser’s Castle!: Warp to the Beneath the Keep checkpoint and take the power line up to the next area of the Kingdom. Immediately in front of you are two rabbits - you'll need to use Cappy to slow them down and make contact with them (which is easier said than done in this area) to see what they're holding. One will only have coins, but the other is holding a Power Moon.
16. Exterminate the Ogres!: In the Main Courtyard Entrance area, jump up onto the roof of the building to the right to find a second power line. Take this power line to an area far off to the east. In this area, you'll need to defeat all three Stairface Ogres to get the Power Moon - simply lure them into smashing down to the ground, and them climb up the stairs they create to ground pound their heads.
17. Bowser’s Kingdom Timer Challenge 1: Return to the far northern area of the Kingdom (quickly accessed by the Showdown Arena checkpoint flag if you have unlocked it). At the far end of this area you'll find a scarecrow - throw Cappy at it, and climb your way up the platforms that appear, to get this Power Moon.
18. Taking Notes: Between Spinies: In the Third Courtyard (Rear) area, look out for two Spinies walking around inside a small fenced-off section. Touch the glowing treble clef to the left of this area, and then grab all of the music notes that appear in their pen, to net yourself another Power Moon.
19. Stack Up Above the Wall: In the first area of the Kingdom (most easily accessed by returning from the second area via a power line if you've completed the main game), you'll find ten Goombas waddling around on some steps. Capture one of the Goombas, and then keep jumping on the others to make a complete tower of ten. With your complete tower, walk around the edge of the wall at the northern edge of the section to find a Goomba button. Stand on this with ten Goombas to reveal a Power Moon.
20. Hidden Corridor Under the Floor: Warp to the Main Courtyard checkpoint flag and capture a Pokio. Jump over the platforms that take you over the water, and then make your way up the wall to where the Spinies are waiting for you. If you tilt the camera around when you reach this point, you should spot a Power Moon behind bars below you. Line yourself up with the crates blocking the entrance and jump down, making sure to poke the boxes at just the right time. Once you've made your successful poke, you'll have to act quickly to either poke again to stick to the wall, or release the Pokio to land inside the hidden area as Mario.
21. Poking Your Nose in the Plaster Wall: Warp to the Third Courtyard (Rear) checkpoint flag and head to the northern edge of the area to find a low roof that allows you to access the higher roofs above. Walk along the roofs, heading for the southwestern corner of them. Below you, you should spot an area with some gold coins a lone Pokio. Capture this Pokio and poke its beak into the hexagonal hole in the wall to reveal a Power Moon.
22. Poking the Turret Wall: Capture a Pokio in the Second Courtyard area and make your way to the western wall where two bombs are being shot out towards you. Poke one of these bombs so that it makes contact with the metal boxes to the left, revealing a small hexagonal hole in the wall. Poke your beak into the hole to receive a Power Moon.
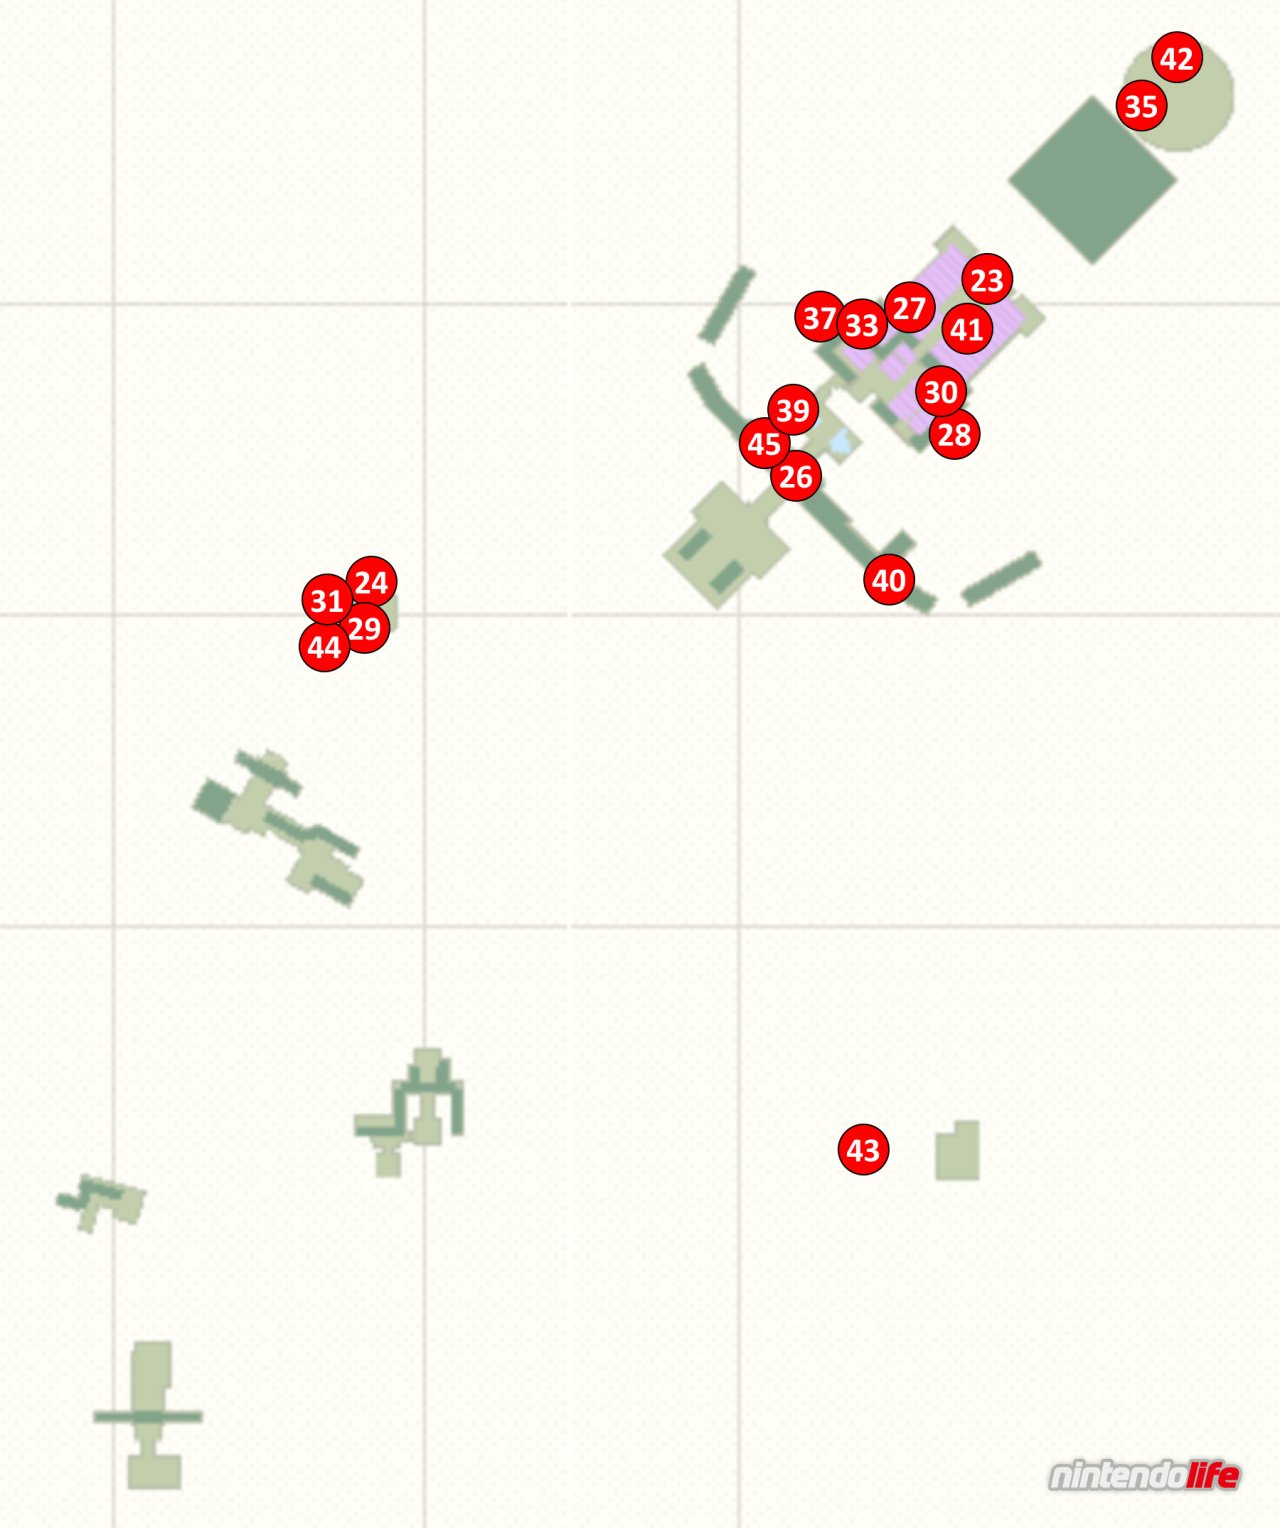
Bowser's Kingdom Power Moons (23-45)
23. Poking Your Nose by the Great Gate: Capture the Pokio near the Inner Wall checkpoint flag and use its ability to climb up the wall to the area above. Keep control of the Pokio and make your way past Talkatoo, towards the power line that takes you over the next area. Instead of heading there, though, walk around to the side of the stairs to find a small path that takes you to a pile of boxes. Smash the boxes with your beak, and then poke inside the hexagonal hole that is revealed for a Power Moon.
24. Jizo All in a Row: Near the Souvenir Shop checkpoint flag you'll notice a row of Jizo with one missing. Capture the statue near the shop and walk over with it to that place to receive a Power Moon.
25. Underground Jizo (see location 24): Near the Souvenir Shop, capture the statue and walk over to the east to find a small square in the ground of weakened stone. Step on this square as the statue to fall through the floor, revealing a second area to place to stand. Place the statue on the spot to reveal a Power Moon.
26. Found Behind Bars!: Warp to the Main Courtyard area and walk towards the camera so that you are in front of the arch. Climb up onto the roof on the east and keep running along until you come across a power line. Capturing this power line will take you to a Power Moon that is locked away behind bars.
27. Fishing(?) in Bowser’s Castle: Warp to the Beneath the Keep checkpoint flag and head to the southeast corner of the swamp to find Lakitu. Capture Lakitu, and fly over to the southwest corner of the swamp (underneath the bridge) to find the largest shadow under the poison. Cast your line into the swamp, and reel in the shadow to receive a Power Moon.
28. Good to See You, Captain Toad!: From the Outer Wall checkpoint flag, jump up onto the rooftops to the southeast. Follow the roofs around until you see Captain Toad on a slightly lower roof just around a corner. Talk to him to receive a Power Moon.
29. Shopping at Bowser’s Castle: Simply purchase this Power Moon for 100 gold coins at this Kingdom's Crazy Cap store.
30. Bowser’s Castle Treasure Vault: Warp to the Beneath the Keep checkpoint flag and look to the southwest; you should spot a roof that has yellow spikes on top. Climb up, and head to the gap in its yellow spikes to drop through the golden rings leading downwards. If you head to the southwest corner of this swamp area, you'll spot a catapult on some red carpet just below you. Take the catapult to the other side of the area and capture the nearby Pokio to clear your path through the Spinies. At the end of the section with the Spinies, use the Pokio to climb the rotating sections of wall, eventually getting to a secret room with a Power Moon and a whole bunch of coins.
31. Scene of Crossing the Poison Swamp: If you haven't already, purchase the Samurai Armor and Samurai Helmet from the purple half of the Crazy Cap store, and then head around to the door at the back of the shop to enter a secret room. Make your way through the awesome 2D section inside until you reach the Power Moon on the final screen - you'll need to use the shell to break the bricks.
32. Taking Notes: In the Folding Screen (see location 31): In the same room as Power Moon 31, make your way through the 2D section until you come across the screen with a treble clef. Touch it, and then collect all of the music notes that appear to get a Power Moon.
33. On Top of the Spinning Tower: Warp to the Beneath the Keep checkpoint flag and look to the southwest; you should spot a roof that has yellow spikes on top. Climb up, and head to the gap in its yellow spikes to drop through the golden rings leading downwards. Defeat the Stairface Ogre nearby to open a giant door, taking you to a secret area. Capture the Pokio inside, and use its ability to climb to the top of the tower to find this Power Moon.
34. Down and Up the Spinning Tower (see location 33): Inside the same area as Power Moon 33, capture the Pokio and use its ability to latch on to the tower. You'll need to use a spinning section to take you around to the back of the tower - from here, if you look down, you'll see a small opening at the very bottom of the tower. Fall down and head inside this opening to collect a key which will unlock a second Power Moon at the top of the tower.
35. Jizo’s Big Adventure: Warp to the Showdown Arena checkpoint flag and enter the warp pipe nearby. Inside, you'll need to capture Jizo statues and place them on the P-Switches to open new paths - your eventual goal is to get three in the centre area. By placing one statue on the switch in the middle here you can take the other two to the switches at the end of the area, revealing walls which allow you to perform wall-jumps to the Power Moon above.
36. Jizo and the Hidden Room (see location 35): In the same area as Power Moon 35, follow the steps above until you have two statues at the end to create the two walls, and the other statue in the centre. From this point, take the centre statue back to the very beginning of the area and place it on the P-Switch there to reveal a second Power Moon. Now make your way back over to the end, jumping across the gap to the wall-jumping section, to collect it.
37. Dashing Above the Clouds: Warp to the Beneath the Keep checkpoint flag and look to the southwest; you should spot a roof that has yellow spikes on top. Climb up, and head to the gap in its yellow spikes to drop through the golden rings leading downwards. From the western side of this swamp area, jump down to the area below with the Spinies and a seed. Throw this seed into the plant pot nearby and climb the beanstalk to enter a secret area. Inside, simply use the Rocket Flowers to run along the pathway, sticking to the centre and jumping when necessary to reach the Power Moon at the end.
38. Dashing Through the Clouds (see location 37): In the same area as Power Moon 37, make your way through the room until you see a path that splits off to the left with a second Power Moon on it. Touching the Power Moon slows you down, so just make sure to make contact with it and you'll be safe from falling off.
39. Sphynx Over Bowser’s Castle: Warp to the Main Courtyard checkpoint flag and head forwards - you should spot a set of green binoculars on the left. Capture these and look up into the sky - you'll see a Sphynx flying over the Kingdom and, if you zoom in on it for a few seconds, you'll receive a Power Moon.
40. I Met a Pokio!: Capture one of the Pokios near the Main Courtyard area and climb up onto the main archway near the entrance to the area. Once you're on the roof, follow it along to the east until you come across a Bonneter from the Cap Kingdom - it'll give you a Power Moon for showing it a Pokio up close.
41. Bowser’s Kingdom Regular Cup: Warp to the Beneath the Keep checkpoint flag and walk forwards to find a Koopa who will challenge you to a race for a Power Moon. The key to winning this race is to long jump from as many rooftops as possible (especially in the first half of the race), and even over gaps in paths when you can. Then, when you reach the parts of the Kingdom that are spread far apart, use long jumps to travel to the power lines that will take you closer and closer to the goal.
42. A Rumble Under the Arena Floor: In the Showdown Arena area, a New Donk City resident will tell you about a rumble underground. The one you need to find for the Power Moon is directly opposite them in the north - look out for two birds sitting at around location 42 on our map, and then use the rumble in your controller(s) to find the spot that you need to ground pound.
43. Secret Path to Bowser’s Castle!: For this Power Moon, you'll need to enter the area through a warp painting from a different Kingdom. The warp painting you need is in the Cascade Kingdom so fly there, and jump into the water directly in front of the waterfall in front of the Odyssey. If you swim through the waterfall, you'll find the warp painting you need - head inside to be transported to this Power Moon.
44. Peach in Bowser’s Kingdom: You'll find Peach right next to the Crazy Cap store. Talk to her for a Power Moon.
45. Found with Bowser’s Kingdom Art: Warp to the Main Courtyard and walk immediately left to find some hint art on the wall of the main archway. The art depicts an area in the Sand Kingdom so fly there and warp to the Moe-Eye Habitat checkpoint flag. From there, walk over to the western side of the swamp and look out for the cactus that is in the picture - by lining it up with the area to the south, you should be able to use the unique structure of the distant area to judge your position. When you've found the area indicated by the artwork, ground pound that spot to reveal a Power Moon.
Bowser's Kingdom 'Moon Rock' Power Moons (46-62)
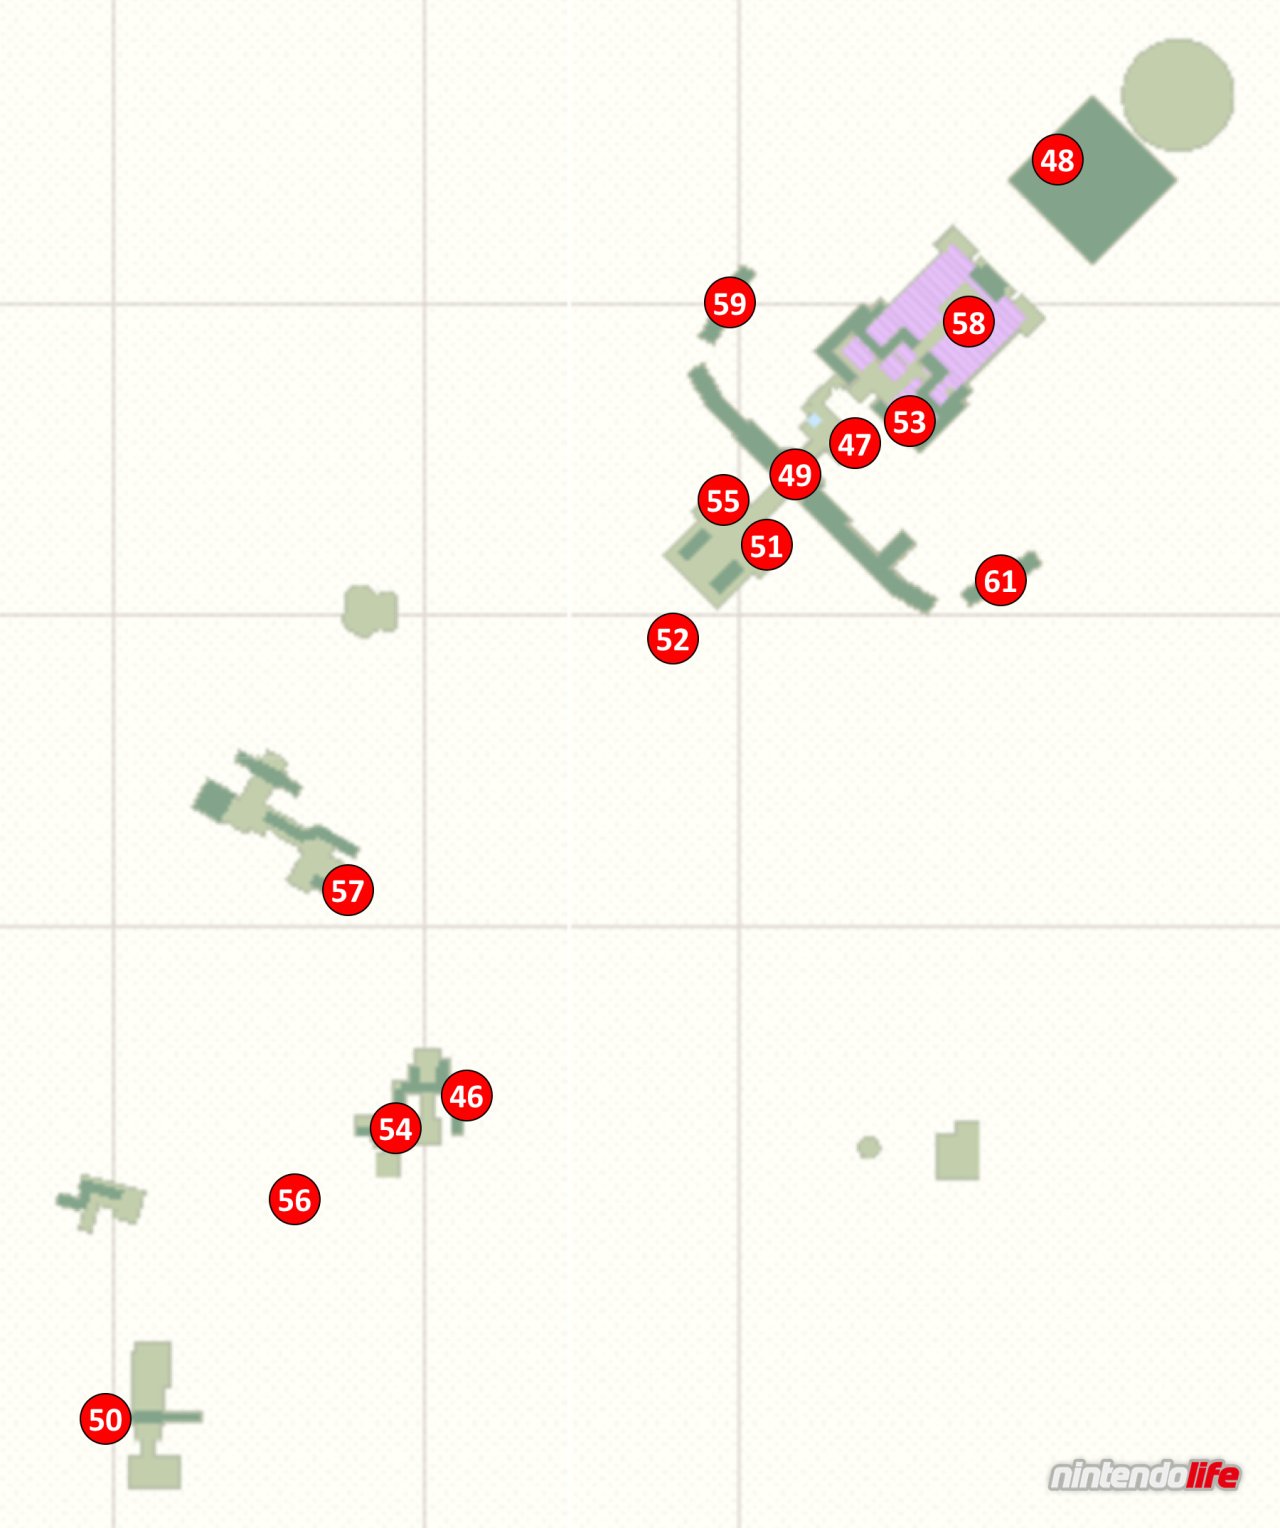
These Power Moons will become available to you when you have smashed the Moon Rock located in this Kingdom.
46. Behind the Tall Wall: Poke, Poke!: Warp to the Third Courtyard (Rear) checkpoint flag and head to the northern edge of the area to find a low roof that allows you to access the higher roofs above. Walk along the roofs, heading for the southwestern corner of them. Below you, you should spot an area with some gold coins a lone Pokio. Capture the Pokio, climb up the tallest wall to return to the roof above, and make your way over the roofs to the eastern side of the area. On the side of the furthest eastern wall, you'll need to drop down as Pokio to poke its beak into a hole and reveal a Power Moon.
47. From Crates in the Moat: Warp to the Main Courtyard checkpoint flag, head forwards, and jump into the water on your right. At the bottom of the moat you'll find several crates - use ground pounds or Cappy throws to smash the crates and reveal a Power Moon.
48. Caught on the Giant Horn: Warp to the Showdown Arena checkpoint flag and look to the southwest - you'll see a rooftop with large golden horns on either side. To get this Power Moon, you'll need to throw Cappy at the horn on your right (just make sure to hold down the 'Y' button so that he hovers on it for a moment).
49. Inside a Block at the Gate: Capture a Pokio near the Main Courtyard checkpoint flag and make your way across the platforms that take you over the water. Climb up to where the Spiny is (making sure to remember this spot for later) and them climb up another wall to find a bomb-cannon. When the bombs start rolling your way, return to the area we just mentioned and look to the southwest to find some metal crates just beyond the checkpoint flag underneath the archway. You need to poke a bomb so that it flies down to this area below, lining it up perfectly with these crates to reveal a Power Moon.
50. Small Bird in Bowser’s Castle: For this Power Moon, start by heading up onto the roof at location 50 on our map (the area where the Odyssey is sitting). At the very end of this rooftop you should be able to see a glowing bird - if you can hit it with Cappy it'll release a Power Moon. Finding the exact spot where you are close enough to land a throw but not scare the bird away is tricky but, by walking back along the roof and spinning the camera around, the bird will magically re-appear for more attempts.
51. Invader in Bowser’s Castle: Warp to the Main Courtyard Entrance checkpoint flag and look for the giant, spinning purple hat on the right hand side. You'll need to build Goomba towers, and then release them, to allow Mario to land on its top to defeat it. Once its been beaten you'll receive a Power Moon.
52. Jumping from Flag to Flag: Warp to the Main Courtyard Entrance checkpoint flag and turn around, heading to the southwest. You'll need to jump across the flagpoles hovering in the sky on the left until you eventually reach the Power Moon at the end. Play around with the camera to find which angle works best for you to make the jumps.
53. Bowser’s Kingdom Timer Challenge 2: Warp to the Beneath the Keep flag and head to the south to find a scarecrow on the roof to your left. Throw Cappy at it, and then jump off the building so that you land on the green platform below with the key. From there, long jump over to the Power Moon that appears.
54. Taking Notes: On the Wall: Warp to the Third Courtyard (Rear) checkpoint flag and head to the northern edge of the area to find a low roof that allows you to access the higher roofs above. Walk along the roofs, heading for the southwestern corner of them. Below you, you should spot an area with some gold coins a lone Pokio. Capture the Pokio and touch the glowing treble clef - you'll need to touch all of the music notes that appear to get the Power Moon. The best advice here is to start by quickly climbing up the right hand side and then, when you're at the top, move over to the left and drop down to touch them all quickly.
55. Taking Notes with a Spinning Throw: Warp to the Main Courtyard Entrance checkpoint flag, head up the steps, and look for a glowing treble clef on the left. Touch it, and then use a combination of running and Cappy throws, to collect all of the music notes that appear for a Power Moon.
56. Third Courtyard Outskirts: Warp to the Third Courtyard (Front) checkpoint flag, capture a Pokio, and use it to climb up to the roof in the southwestern corner. Take the power line across to the previous area and, as you approach the gold coins travelling into the air, hammer the 'Y' button so that you travel through the coins and collect the Power Moon.
57. Stone Wall Circuit: Warp to the Second Courtyard checkpoint flag and head up the staircase. Turn to the right and capture the power line just beyond the Spinies - this will take you to an area with a key. To get the key, release the capture when you are zipping along directly above it, and then quickly throw Cappy to return to the power line. Now just follow it back to where you started to collect the Power Moon.
58. Bowser’s Kingdom Master Cup: Warp to the Beneath the Keep checkpoint flag and walk forwards to find the Koopa - you'll need to challenge him to a second race for another Power Moon. As before, the key to winning this race is to long jump from as many rooftops as possible (especially in the first half of the race), and even over gaps in paths when you can. Then, when you reach the parts of the Kingdom that are spread far apart, use long jumps to travel to the power lines that will take you closer and closer to the goal.
59. Searching Hexagon Tower: Warp to the Main Courtyard checkpoint flag and climb up onto the main roof by jumping on the lower section to the east. Capture the catapult at the end of the roof on the western side to land at location 59 on our map. Enter the grey warp pipe here and use a Parabones to collect all five Moon Shards within the room. Some of them are very cheekily tucked away underneath sections that don't seem to contain anything - so make sure to hunt thoroughly. When you have all five you'll be rewarded with a Power Moon.
60. Center of Hexagon Tower (see location 59): In the same area as Power Moon 59, capture a Parabones and float down to the bottom of the green edge that has several sets of gold rings. Fly under the small ledge at the bottom to find a key which will unlock a second Power Moon at the top of the tower.
61. Climb the Wooden Tower: Warp to the Main Courtyard checkpoint flag and climb up onto the main roof by jumping on the lower section to the east. Capture the catapult at the end of the roof on the eastern side to land at location 61 on our map. Enter the grey warp pipe here and use the Pokio to climb your way to the very top of the room. A Power Moon will be waiting for you.
62. Poke the Wooden Tower (see location 61): In the same area as Power Moon 61, capture a Pokio and spin the camera around to look at the back of the tall tower. Down below you should notice some boxes blocking the entrance to a secret area - use Pokio to carefully flick your way down there and smash open the boxes to reveal a Power Moon.
We hope that you have found this guide on collecting all Power Moons in Super Mario Odyssey's Luncheon Kingdom useful. Let us know if you've managed to grab them all with a comment below.


Comments 6
Samurai Mario !

This Kingdom surprised the hell out of me. What a cool theme. The woodpeckers take a bit to get the hang of but they are very fun to use once you get good at them
Prob among my least favorite kingdoms tbh. The japanese castle idea is brilliant but I wished it wasn‘t just little islands and walls but more a connected area like all the other kingdoms.
Too spoiler-y for me now. Why is it necessary to give literally all informations on homepage?
They reused this theme from 3d world. One of the worst worlds. Not much challenge, or area to explore
for all those complaining, can we at least all agree the snow kingdom is the worst?
Tap here to load 6 comments
Leave A Comment
Hold on there, you need to login to post a comment...