Welcome to our ultimate guide for collecting every Power Moon from the Lake Kingdom in Super Mario Odyssey! Below, you'll find maps detailing the exact location for all 42 of the Power Moons located in this Kingdom, as well as descriptions on how to get each and every one of them.
The numbers on the maps correspond to the relevant Power Moon listed below and, whilst most of them appear in that spot from the beginning (or after you've completed the story at least), it is worth nothing that sometimes you are required to perform a specific action to make it appear. Use a combination of our maps and walkthrough information to grab each of the Power Moons with ease. Enjoy!
Lake Kingdom Power Moons (1-33)
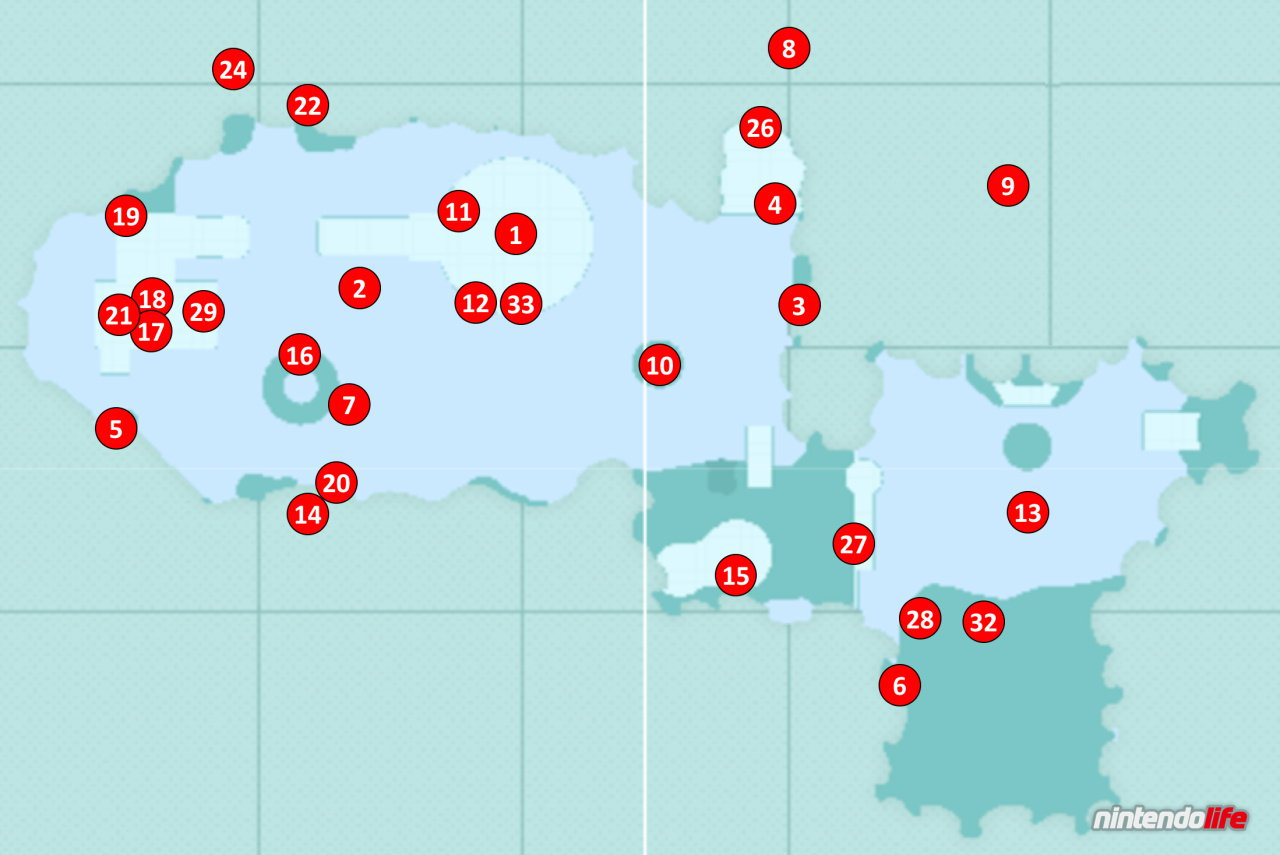
1. Broodals Over the Lake: You'll receive this Moon by defeating the Broodals boss.
2. Dorrie-Back Rider: In the lake (underneath the boss fight area) you'll notice Dorrie - a large, blue, and exceedingly cute creature swimming around. There is a Power Moon floating on its back.
3. Cheep Cheep Crossing: As you exit the tunnel passageway containing Cheep Cheeps, turn around and look up to find six small alcoves. The middle alcove on the top row contains a Power Moon.
4. End of the Hidden Passage: Head to the Courtyard area (where you can see a Lakitu and a whole bunch of Goombas) and use the spinning flower that acts as a trampoline to jump up onto the ledge above the water on Mario's right hand side. Use Cappy to unzip the wall if you haven't already and follow the passage it creates all the way to the end. Turn left and you'll find yourself in a small hidden section containing a Power Moon.
5. What’s in the Box?: If you haven't already done so, go up through the water shaft to reach the surface of the Water Plaza to find a P Switch sitting next to a barrier. Stand on the switch to lower the barrier and reveal a flower which you can now use to fly over to a stack of crates just in front of you. Smashing the crates will reveal a Power Moon which will fly across to a new platform - use the various flower trampolines to travel your way across to it.
6. On the Lakeshore: There is a glowing spot of sand near the binoculars in the first area of the Kingdom (near the Odyssey). Ground pound this spot to reveal a Power Moon.
7. From the Broken Pillar: If you head to location number 7 on our map you should find a broken pillar underwater. One section of the pillar is still standing upright from the ground and, if you ground pound on top of it, a hidden Power Moon will pop out.
8. Treasure in the Spiky Waterway: Early on in the spiky underwater tunnel you'll have the option to turn either left or right (you can see a coin in a bubble directly in front of you at this point). Turn right and follow this path until you come across a treasure chest on a raised platform. Throw Cappy at the chest to receive the Power Moon.
9. Lake Gardening: Spiky Passage Seed: After defeating this area's boss, return to the spiky underwater passage to find a seed near the entrance. You'll need to pick up the seed, take it all the way through the tunnel, and work your way to the bottom floor of the Water Plaza. On the left hand side of this floor you'll see a plant pot - throw your seed into the pot and wait for it to grow. Eventually, you'll be able to throw Cappy at the fully grown plant and claim your Power Moon.
10. Lake Kingdom Timer Challenge 1: Head to the tiny island indicated on our map by the number 10 and throw Cappy at the scarecrow waiting for you there. Some platforms will appear going out into the water but the Power Moon is actually underneath them. Either jump across the platforms and ground pound through the hole in the final one, or just dive underwater and swim towards to the Power Moon from the scarecrow location.
11. Lake Kingdom Timer Challenge 2: You'll find a scarecrow sitting on the circular boss fight area. Throw Cappy at it and use backflips to jump up the platforms that appear. If you do this quickly enough, you'll be able to grab the Power Moon waiting at the top.
12. Moon Shards in the Lake: There are five Moon Shards to find underwater in the main lake area. Capturing a nearby Cheep Cheep should help you to track these down. One shard is just to the left of the Underwater Entrance checkpoint flag with another floating on top of the building inside the small dome on the southern wall. If you swim right down to the floor and travel towards the Underwater Entrance, you should see the next shard in a tunnel in front of you. From there, turn left from the tunnel and smash through the wooden blocks in the wall - you'll find a shard inside after the blocks and some seaweed. For the final shard, look towards the northern wall to find it floating underneath a ledge.
13. Taking Notes: Dive and Swim: At location number 13 on our map you'll see a glowing treble clef sitting underwater. Touch this, and then collect all of the music notes that appear in the pool, to net yourself a Power Moon.
14. Taking Notes: In the Cliffside: On the water's surface at the southern wall of the main lake area, you should see a flower trampoline that can take you up to a green pipe in the wall. Head into the pipe and touch the treble clef within this 2D section. Collect all of the music notes that appear to grab yourself a Moon.
15. Lake Fishing: Capture the Lakitu who is hovering over the pool at location 15 on our map and use his fishing rod to lure in the largest silhouette under the water. By reeling in the silhouette at the right time, you'll uncover a Cheep Cheep who will reward you with a Power Moon.
16. I Met a Lake Cheep Cheep!: Talk to the Lochlady on the top of the circular platform (location 16 on our map). She talks about wanting to see a Cheep Cheep up close so jump into the lake and capture one. Swim up to the surface and jump into the small pool of water in the centre of the platform to make the Lochlady give you a Power Moon.
17. Our Secret Little Room: On the bottom level of the Water Plaza you'll notice some alcoves lining the back wall. Enter the one that is second from the right and turn left when you reach the end to find a Lochlady inside a hidden room. Talk to her to receive a Power Moon.
18. Let’s Go Swimming, Captain Toad!: Capture a Cheep Cheep and swim into the bottom floor of the Water Plaza, quickly flopping yourself over to the circular pool. Swim all the way down to the bottom of this pool tunnel to discover Captain Toad sitting inside a small underwater dome (you can do this without a Cheep Cheep by using multiple ground pounds to travel down the tunnel but you need to be almost perfect in your movements). Talk to him to receive the Power Moon.
19. Shopping in Lake Lamode: You'll find this Kingdom's Crazy Cap store inside the Water Plaza dome. This Power Moon will cost you 100 Gold Coins from the gold half of the store.
20. A Successful Repair Job: Head to the dome on the southern wall of the lake (location 20 on our map) and enter the door inside. You'll face a puzzle where you need to capture a piece of rock to create a symmetrical image. Move the piece around until it sits perfectly in the gap next to the already existing piece to grab the Power Moon.
21. I Feel Underdressed: Make sure you're wearing the Swim Goggles and Swimwear (available from the Crazy Cap store) and head to the left side of the Water Plaza's second floor. If you talk to the Lochlady near the locked door - and if you are wearing the clothes that we just mentioned - she will let you inside. Throw Cappy at the top of the mannequin inside (holding him place with the 'Y' button) to reveal a Power Moon.
22. Unzip the Chasm: Head towards location number 22 on our map and look underwater to find a zip on the northern wall. Use Cappy to unzip the wall, creating a square-shaped hole with a door inside. When you're inside, simply unzip all of the available sections to create walkways which will take you to the key at the end. Then return to the start of the area to grab the Power Moon that appears.
23. Super-Secret Zipper (see location 22): In the same area as Power Moon number 22, you'll see some steps on the right hand side that cannot be reached by the unzipped sections. Use a long jump (and a Cappy throw and dive if necessary) to reach the steps from the nearest available point. Climb the steps and unzip the section of wall that you can reach to create a walkway - then unzip the smaller section you couldn't reach before to discover this Power Moon.
24. Jump, Grab, Cling, and Climb: On the water's surface at location number 24 on our map, you should find some platforms with flower trampolines on them. Use these trampolines to reach a small tunnel in the wall above them and enter the door inside. Travel to the end of this area by jumping, grabbing to ledges, and using the trampolines to collect the Power Moon waiting for you at the end.
25. Jump, Grab, and Climb Some More (see location 24): Near the end of the secret room from Power Moon number 24, you'll find yourself holding onto a ledge that moves up and down as you avoid making contact with the Fuzzys. When you get off this section, wait where you are until the platform comes back down the wall again and walk back onto the top of it. As it rises again you'll find a flower trampoline that will take you to a treasure chest containing a Power Moon.
26. Secret Path to Lake Lamode!: The 'Secret Path' Power Moons can be incredibly complicated and this one is no different. To get this Power Moon, you'll need to travel to the Lake Kingdom through a warp painting from one of three Kingdoms. The Kingdom the corresponding warp painting will appear in depends on the choices you made in the main story.
If you went to the Wooded Kingdom before the Lake Kingdom, the portrait will be in the Metro Kingdom, just behind the Odyssey.
If you went to the Lake Kingdom before the Wooded Kingdom and also chose to go to the Snow Kingdom before the Seaside Kingdom, the portrait will be in the Seaside Kingdom. Here, you'll need to ride the water arches into the glass in the centre, dropping down to the bottom to find the painting.
If you chose to go to the Lake Kingdom before the Wooded Kingdom and also chose to go to the Seaside Kingdom before the Snow Kingdom, the portrait will be in the Snow Kingdom. Capture the Ty-Foo (the big cloud-like dudes) located on a thin path not far from the Odyssey and fly in a north-easterly direction until you find some wooden blocks that can be blown to the side. Blow them as far as they can go and use Mario to jump up onto them - and then the snow platform - to find the warp painting.
27. Found with Lake Kingdom Art: You can find the hint art for this Kingdom on the wall near the newly constructed stairs accessible from the opening section near the Odyssey. The art depicts a location right next to the Odyssey's location in the Cascade Kingdom. Use the T-rex in that Kingdom to smash the fossil closest to the Hint Toad and Uncle amiibo and then ground pound in that area until you find the hidden Power Moon.
28. Taxi Flying Through Lake Lamode: Use the binoculars near the Odyssey and look up into the sky. You should be able to find a flying ship - zoom in on this to discover that is actually a Metro Kingdom taxi. If you keep the camera zoomed in on this for a few seconds you will be rewarded with a Power Moon.
29. That Trendy “Pirate” Look, Near the top of the Water Plaza (location 29 on our map) you'll find three Lochlady sisters who want to see you in certain outfits. For the next three Power Moons, you'll need to wear the complete Pirate, Astronaut, and Cowboy outfits and talk to the sister that wishes to see that particular costume. If you need help tracking down the clothes that they want to see, check out our complete guide on outfits in Super Mario Odyssey.
30. Space Is “In” Right Now (see location 29): See Power Moon 29.
31. That “Old West” Style (see location 29): See Power Moon 29.
32. Lake Kingdom Regular Cup: Near the Odyssey you should find a Koopa who will challenge you to a race - defeat him to be rewarded with a Power Moon. You can win this by going the same way as your competitors at first (through the zipped-up tunnel) and then capturing a Cheep Cheep as soon as possible to take you towards the platforms necessary to reach the goal.
33. Peach in the Lake Kingdom: In the Lake Kingdom, Princess Peach is standing in the area where you originally fought the boss - you can find her at location 33 on our map. Talk to her to receive the Power Moon.
Lake Kingdom 'Moon Rock' Power Moons (34-42)
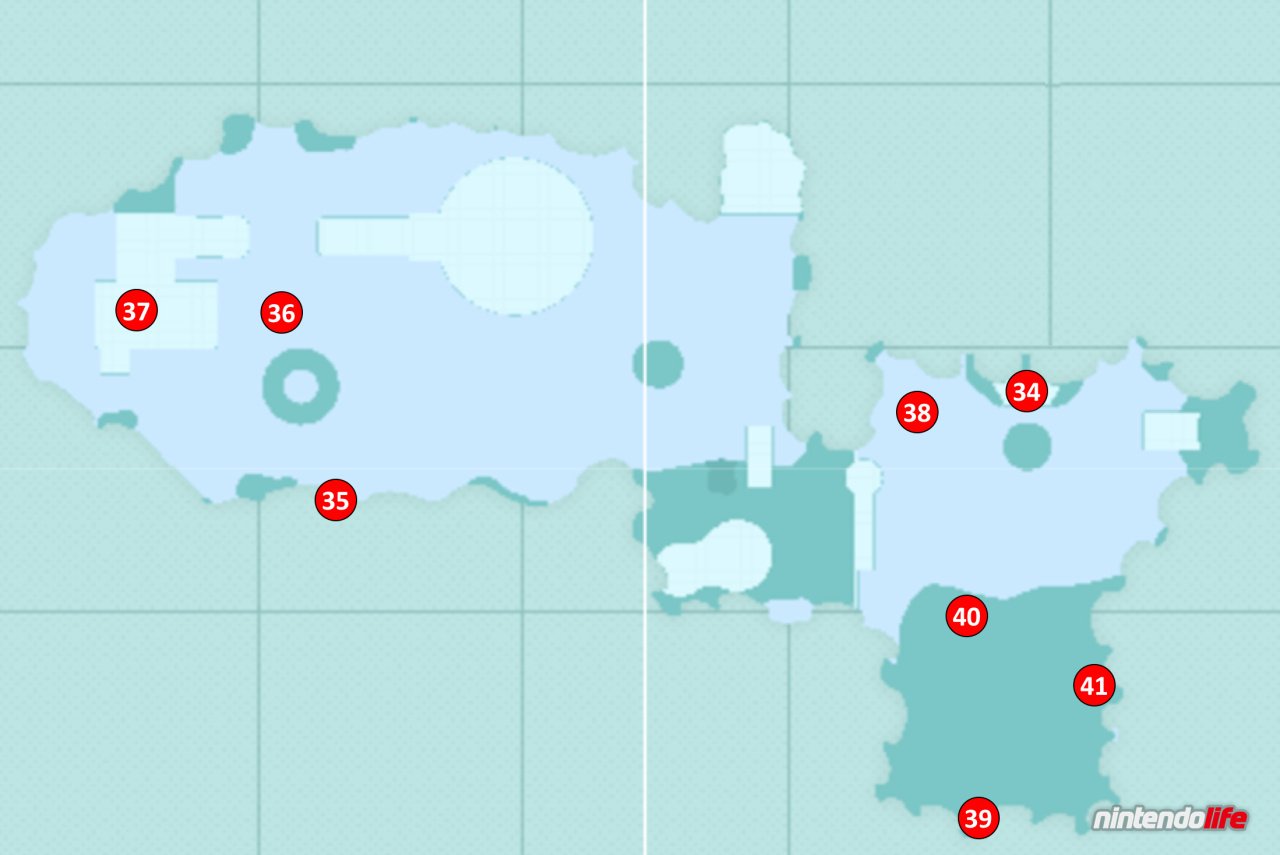
These Power Moons will become available to you when you have smashed the Moon Rock located in this Kingdom.
34. Behind the Floodgate: If you make your way up to the place where you originally unzipped the underwater tunnel (location 34 on our map) and then jump down as you usually would, you should be able to turn back on yourself and locate this Power Moon next to a barrier.
35. High-Flying Leap: From the Water Plaza Terrace checkpoint, turn to face the southern wall to see a Power Moon floating not too far away from a platform with a green pipe. Head over to the flower trampoline just below this platform and use it to jump up and reach the Power Moon.
36. Deep, Deep Down: Refer to Power Moon number 18 above to reach the area with Captain Toad. Instead of entering Captain Toad's little dome, turn around to see a Power Moon floating directly opposite.
37. Rooftop of the Water Plaza: Head to the Water Plaza and make your way up onto the roof until you come across a circular pillar structure that seems to be broken. Climb up the pillar that doesn't have any rubble stuck to the top of it and flip yourself over to one of the other sections. You'll notice that one of the two pieces of rubble has a glowing spot - ground pound this spot to reveal a Power Moon.
38. Bird Traveling Over the Lake: In the area of the Kingdom where the Odyssey lands, you'll see a glowing bird flying around. It likes to perch itself on a small pillar at location 38 on our map and you'll likely need to run over to it to scare it into flying. Find any suitable area in its new flight path where you can be standing close enough to the bird to throw Cappy at it, revealing a Power Moon.
39. Love by the Lake: Capture one of the Goombas at the top of the staircase near the Odyssey and take it down the stairs - jumping from them to the platform where the Lochlady is standing with a shake of your controller. From here, travel behind the Odyssey to take the Goomba to a Goombette, receiving a Power Moon in the process.
40. Lake Kingdom Master Cup: Talk to the Koopa near the Odyssey to enter a second racing competition. Winning this one can be quite tricky as it requires a successful and hard-to-pull-off jump. There may be other ways of managing to do this but we found this way to be the easiest. Instead of following the Koopa contestants, head towards the wall where the staircase is usually located on the left. You'll need to jump into the air, throw Cappy by holding down the 'Y' button, jump onto Cappy hovering in the air and bounce off him to make contact with the wall. From there, wall jump and throw Cappy back towards the wall, then use a dive to lurch forwards in Cappy's direction - hopefully managing to make it over the wall. This can take numerous attempts but it will see you skip a large section of the course and win with ease.
41. Waves of Poison: Hoppin’ Over: Head to location 41 on our map to find a grey warp pipe. This can be a rather tricky platforming section to complete but getting to the end will reward you with a Power Moon. You'll need to capture a frog and patiently wait to watch the poison waves - only jumping onto a new platform when it is safe to do so.
42. Waves of Poison: Hop to It! (see location 41): In the same room as Power Moon number 41, make your way all the way to the end of the room where the main Power Moon is floating in the air. Jump over the platforms to the left of this area to reach a key, and then come all the way back to collect the new Power Moon.
We hope that you have found this guide on collecting all Power Moons in Super Mario Odyssey's Lake Kingdom useful. Let us know if you've managed to grab them all with a comment below.


Comments 3
I just started my adventure a few days ago. I've managed to stay spoiler free up to now and outside of what was shown in the trailers, I don't know the names or themes of any of the kingdoms. If possible could you not have the names of the kingdoms in the headline?Just having 'part 3', 'part 4' etc would be enough for those who want it, at least for now. Otherwise I've no way of avoiding spoilers unless I stop coming here for a few weeks which I don't want to do. The game is still fresh so I'm sure there are plenty others in my position too. If not, it's cool, I understand. Just thought I'd ask
I'm going to stop visiting the site until I get to all the Kingdoms now. I've been spoiled enough from youtube suggestions.
Just done no. 23 and wanted to point out, if you throw your hat over the gap towards the single square ledge it reveals some hidden blocks to walk across
Tap here to load 3 comments
Leave A Comment
Hold on there, you need to login to post a comment...