To describe Xenoblade Chronicles 2: Torna ~ The Golden Country as DLC is a bit misleading. There are tons of fully fledged games on Nintendo Switch that offer far less in terms of content, and some of those are even JRPGs themselves.
Expansion is closer to the truth but standalone prequel is closer still. Torna takes place 500 years before the events of Xenoblade Chronicles 2, and tells a brand new story that fills in some of the gaps. We learn more about various characters, their motives, and the events that led them to where they are 500 years later.
And it really isn't short on content. The story itself can probably be finished in around 20 hours if you really rush, but there's a wealth of side content that's way more than just filler. This generally involves increasing your community level, which requires you to get to know the citizens of Gormott and Torna intimately.
It's really a collection of quests with their own intriguing stories, and many of them interlink. For the first time ever in a JRPG, by the end of the story we almost knew the supporting cast as well as we did the protagonists.
In this guide, we're going to help get you up to speed with the new combat system and various changes so you can hit the ground running in Torna. We'll also help you complete some of the tougher quests, lead you towards secret areas, and help you increase that all-important community level. Let's get right to it.
Torna ~ The Golden Country: The New Combat System Explained
If you've played Xenoblade Chronicles 2, you'll be familiar with many of the features that make up the action-packed combat system in Torna. Given that this can act as a standalone game though, we'll go through everything in this mini-guide so you won't have any gaps in your knowledge.
If you don't recognise any of the terms in any of the subheaders before, chances are you need to brush up on this crazy new system.
Combat Basics
Combat might feel a little overwhelming at first for newcomers, as it isn't really like anything we've seen before in a JRPG – barring perhaps Final Fantasy XII: The Zodiac Age. Let's simplify the structure a bit for you though. On a base level, you automatically attack the current enemy you're targeting (using R) as soon as you draw your weapon (A while targeting) – much like in an MMO.
Arts
On the bottom right of your screen, you should see a bunch of icons. These are your Arts, special abilities that deal increased damage and can affect the party or your enemies in a variety of different ways. You can't just use these immediately from the get-go though. Instead, you have to charge them by successfully hitting the enemy with auto attacks.
When an Art is charged, you can unleash it by using the corresponding button. There's no cooldown period for using an Art, though you will have to charge it with auto attacks to use it again.
Specials
Using Arts in combat allows you to perform a Special, which is an even more powerful version of an art, basically. You charge a Special in the exact same way as you do an Art, except a Special requires Art usage to charge instead of auto attacks. You can charge a Special four times to increase its power.
Action Canceling
Action Canceling involves using an Art at the exact moment that an auto attack connects with the enemy. If successful, a blue aura will appear around your character and you'll hear an audio prompt.
You can cancel auto attacks into Arts and Arts into Specials. Later on, you can pull off special moves like cancelling an Art right into another Art.
There are a few reasons why you'd want to pull off an Action Cancel – the most important of which is that it's much faster than waiting for the auto attack to finish. The second important reason is that it fills your Special gauge much faster, allowing you to pull of Specials faster or charge a much more powerful version easily.
It's important to note though, that Action Cancelling only works when used on the last strike of an auto attack or Art. Lora, for example, typically attacks twice during an auto attack, and if you try and Action Cancel on her first strike, it won't work. The same goes for cancelling Arts into Specials – you have to wait until the entire Art animation has completed before pulling off an Action Cancel.
You can also Action Cancel a variety of different ways that you might not have considered before. You can Action Cancel to switch between Drivers and Blades (more on that later), to switch Blades in the midst of combat, or to pull off your character's unique skill. Try it out between every single action in combat to see what happens.
Vanguard Switching
Vanguard Switching is a system new to Torna, and one that allows you to switch between controlling your Driver or Blade in the midst of battle. To pull it off, you simply have to wait until the Rear Guard gauge is full and then press up on the dpad.
This will not only allow you to take control of your Blade directly, pulling off their Arts for various uses, but it will also perform a Switch Art. This is a powerful move that has a variety of different effects. You also don't have to charge a Blade's Arts for first use, as they fill completely following a Vanguard Switch. Second time uses require a charge though.
You can also Vanguard Switch to heal your character in certain circumstances. Take, for example, when you receive a chunk of damage from an enemy's attack. If you're quick, you can Vanguard Switch to heal this instantly. Recoverable HP displays as red on your HP bar.
Blade Switching
You can also switch between your two different Blades while in combat or generally exploring by pressing left on the dpad. You can switch them any number of times while outside of combat, but inside it has a cooldown.
Different Blades generally suit different needs, so once you've learned their strengths and weaknesses, you'll have a better idea of how to adapt to suit your current needs.
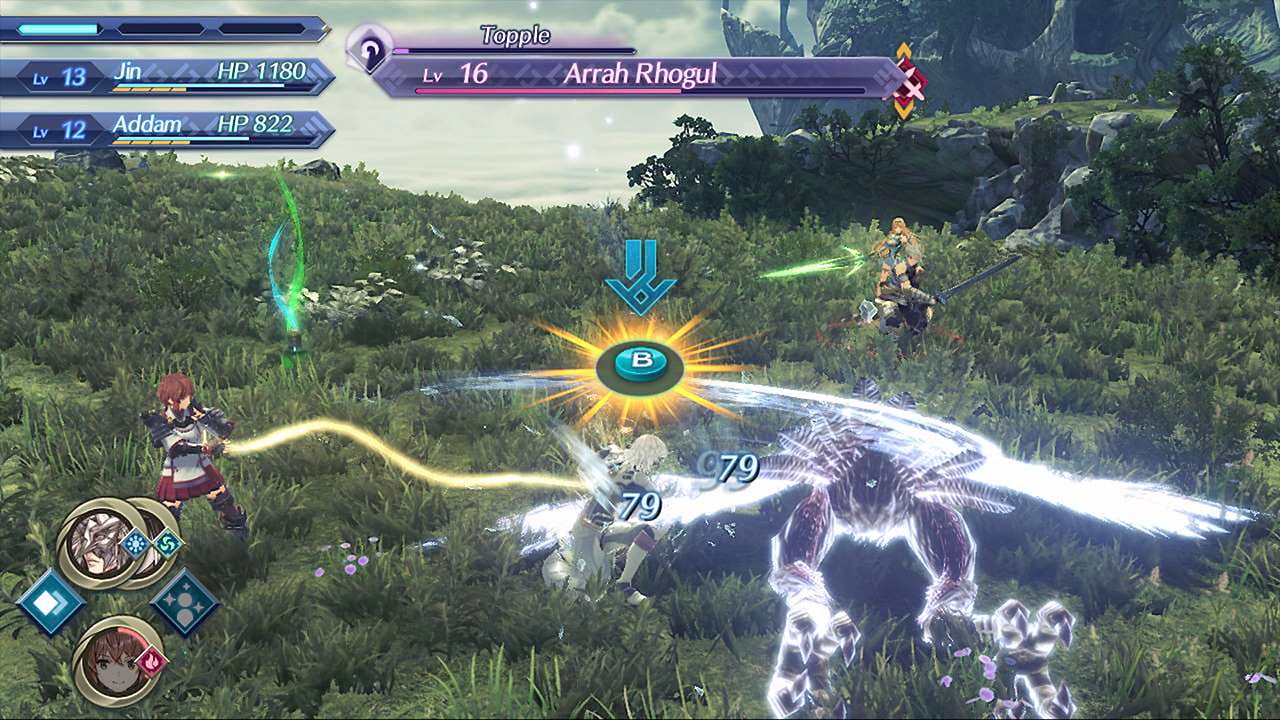
Affinity
You see that trail of light between your Driver and Blade? That's their Affinity. You can increase it by fighting close to each other and following up on each other's attacks to Topple or Launch an enemy, for example.
When this light turns gold, your Affinity is high, which increases your movement speed in battle and the rate at which your Arts recharge. Basically, fight well and you will perform better in battle.
Strategy
You can issue orders to other party members by holding down R and pressing a direction on the dpad. The orders are as follows:
| Left | Right | Up | Down |
|---|---|---|---|
| Prioritise Driver Combos | Prioritise Blade Combos | Focus attacks on the enemy you're targeting | Fight close to your party |
Talent Arts
Talent Arts are Arts that you can perform at any moment in battle, and usually trade a negative for a positive. As an example, Lora can halve her HP at any time in exchange for a full Arts recharge.
Each character's Talent Art generally lets them perform their specific combat role much better.
Driver Combos
Driver Combos are nothing new to Torna. In fact, they've made an appearance ever since the first Xenoblade on the Wii. They basically involve inflicting a sequence of negative status effects on the enemy, while providing your team with HP potions and increased damage.
The sequence is Break - Topple - Launch - Smash. If you check each of your party member's Arts in the menu, you'll see that many of them are capable of performing a variety of these effects. Learn them and you'll have no problem pulling off Driver Combos in battle.
Blade Combos
Blade Combos involve pulling off a sequence of three Specials against a single opponent. However, the Specials do have to increase in level over the course of a Blade Combo.

To pull it off, you have to first use a level one Special, then a two, and finally a three to finish it off. Your party will request a Blade Combo as soon as their Specials are charged, and require only a tap of the corresponding bumper to pull them off.
You can use any Specials to pull off a Blade Combo, providing they increase in level each time, but there are also critical routes you can learn to pull off a special Blade Combo. These generally involve chaining certain elements together, like Fire - Fire - Light or Water - Water - Water.
Pull one of these babies off and you'll get a lovely animation and deal a bunch more damage to your enemy. It's well worth learning as many as you can.
Chain Attacks
Pull off Blade Combos and you'll charge yet another gauge that allows you to pull off Chain Attacks. On the top left of the screen, you'll see three bars. This is your Chain Attack gauge. When all three bars are full, you can press + to pull off a Chain Attack.
This allows your party members to take it in turns unleashing Arts against the enemy, which can't retaliate. You'll also have a number of elemental orbs to destroy, and you can do so by using Arts with the opposite element to that orb. Destroy an elemental orb and you'll extend the Chain Attack, raise the damage bonus, fills the Full Burst gauge, and recharges characters you've already used during the Chain Attack.
Basically, Chain Attacks are made up of a number of different rounds. Each round, a member of all three of your teams can unleash an Art against the enemy. For each elemental orb you destroy, you'll gain another round of attacks to unleash.
Which is a good thing, as a recharged character will be able to unleash a more powerful (or, in other words, a levelled up) Special. It's a bit of a complicated system, but in practice you'll quickly get the hang of it.
Full Burst Gauge
The Full Burst Gauge is yet another gauge that you can fill by destroying elemental orbs during a Chain Attack. It sits in the same place as the Chain Attack gauge, and appears as soon as you initiate a Chain Attack.
Fill the Full Burst Gauge completely, and you'll pull off – you guessed it! – a Full Burst. As you can probably guess, this deals even more damage.
Oh, and we should mention that if you defeat an enemy during a Chain Attack, you'll enter Overkill. During this, any extra damage you deal will increase the EXP, WP, and SP you get for defeating the enemy.
Enraged & Awakened Enemies
Let a fight drag on too long and you might come up against an Enraged or Awakened enemy. These are two status effects that increase the power of your enemy, which is never a good thing.
Enraged happens after you've dealt a certain amount of damage to a particular few enemy's HP, and boosts their stats. It's best to try and finish these guys off as quickly as possible when this happens as they'll start hitting like a truck.
Pull off a Blade Combo against an enemy and an element orb will orbit an enemy. This boosts their stats and reduces the effect of Blade Combos. You remember how to destroy elemental orbs, right? Yep! By using Chain Attacks. If you find that the enemy has randomly grown considerably more powerful, unleash one of those to break the elemental orbs.
Torna ~ The Golden Country: Barney Stones, Slate Pieces, & Unique Monsters Locations
Barney Stones, Slate Pieces, Unique Monsters, and Old Machines are the essential collectibles in Torna. Below, we'll help you find every single one of each of them.
Barney Stones Locations
There are four different Barney Stones in Torna, and they can be found as follows:
- Torna, Lasaria Region: South of Secluded Boneway
- Torna, Lasaria Region: North east of Yanchik Harbor
- Torna, Aletta Region: Millennium Grotta, north of Ossum Magnum
- Torna, Dannagh Region: Titan's Ulcer, east of Dannagh Desert
Slate Piece Locations
Slate Pieces allow you to access the Cavern of the Seal in Torna, and are all found in the Kingdom of Torna. They're located as follows:
- Indigo Slate Piece: Lasaria Region - Porton Village
- Dawning Slate Piece: Lasaria Region - Mernes Falls
- Crimson Slate Piece: Lasaria Region, Feltley Village
- Rusty Slate Piece: Lasaria Region - Yanchik Harbor
- Purple Slate Piece: Aletta Region - Aletta: Militia Garrison
- Chestnut Slate Piece: Aletta Region - Tirkin Cliff Colony
- Cinnabar Slate Piece: Aletta Region - Cavern of the Seal
- Scarlet Slate Piece: Aletta Region - Hyber Village
- Navy-Blue Slate Piece: Aletta Region - Hyber Village
- Inky Slate Piece: Tornan Titan Interior
- Cherry Slate Piece: Dannagh Region - Verdant Fairylands
- Peach Slate Piece: Dannagh Region - Loftin Nature Preserve
- Dark-Grey Slate Piece: Auresco, Royal Capital - Sachsum Gardens
- Leaden Slate Piece: Tornan Titan Interior
- Moss-Green Slate Piece: Auresco, Royal Capital - Orem Storage Ward
- Hollyhock Slate Piece: Aletta Region - Lake Sarleigh
Unique Monsters Locations
We've also got the locations for every single Unique Monster in Torna. These are extremely powerful monsters that have their own names. They're located:
| Name | Level | Location |
|---|---|---|
| Overaffectionate Murph | 18 | Lascham Cove |
| Harbinger Cavill | 23 | Haradd Hills |
| Handwringing Bigelow | 25 | Serene Springside |
| Scowing Quincy |
25 | Tirkin Cliff Colony |
| Sleepwalker Mork | 33 | Peln, Pilgrims Springland |
| Lunar Amaruq | 33 | Hyber Village (Night) |
| Everdark Erg | 36 | Lasaria Woodland |
| Gourmand Galgan | 38 | Wrackham Moor |
| Interceptor Grace | 40 | The Great Breaksand |
| Nomadic Rusholme | 44 | Behemoth's Roost |
| Erratic Goliante | 45 | Saints' Practice Grounds |
| Beatific Ophelia | 48 | Loftin Nature Preserve (Night) |
| Sequestered Ludd | 48 | Pulsating Passage |
| Inospheric Mitchell | 50 | Feltley Village |
| Ravine Bunnit | 50 | Hoary Weald Camp |
| Flying Fortress Desmor | 55 | Turqos Plateu |
| Sentinel Capathia | 65 | Feltley Village (Unlock Seal of Aletta) |
| Herculean Gibson | 75 | Wrackham Moor (Unlock Seal of Aletta) |
| Mesmer Tlaloc | 85 | Streamsand Corridor (Unlock Seal of Aletta) |
| Hurricane Anise | 100 | Pedestal of Stargazing (Unlock Seal of Aletta) |


Comments 13
very helpful.
ps: I love this game!
Super helpful! Thank you. Does anybody have a list of all of the members of the community. I can't find three people.
@MirachsGhost if you can wait that long, I’m planning on adding this on Monday
@MirachsGhost
Have you entered the final area yet?
There are three people you can't get until very, very near the end (with one related to the slates).
@FoxyGlen Awesome!
@Physis Thanks!
This is great. I have stopped playing Torna because I want to make it last longer. I am still on the sluggy Octopath last Chapter 4. This is going to be a great help and I get to prolong Xenoblade's gameplay. Thanks for the guide.
Xenoblade 2 is definitely one of my most favorite games ever.
@MirachsGhost Another community member is related to defeating unique monsters unrelated to the seal.
Cool... Showed up today. But been so busy with work not had a chance to open it.
UNPOPULAR OPINION ALERT BE WARNED. I hate Xenoblade 2. Anime style is just so uninspired, the menus are super long, confusing, and unnecessarily complex. Battles end with you winning but for no reason the cut scene says you lost. And don't get me started with the unnecessary sexualization of literally every female for no reason except to bait lonely weebs. Dont even get me started with the slow, clunky long, boring tutorials. Don't get me started with-you get the point
@I_Am_A_Geek THANK YOU!! While I don't necessarily "hate" it, it is EASILY the worst in the Xenoblade trilogy in my book and nowhere near as captivating as XCX. And you pointed out all the main reasons for it.
Still, I enjoyed it enough to get Torna, which arrived this morning.
Speaking of which, to those still wondering, I can happily confirm that the European physical edition of "Torna the Golden Country" is a cart for Torna and a code for the Expansion Pass.
@I_Am_A_Geek Then why are you here?
Not looking at this to avoid spoilers.
Tap here to load 13 comments
Leave A Comment
Hold on there, you need to login to post a comment...