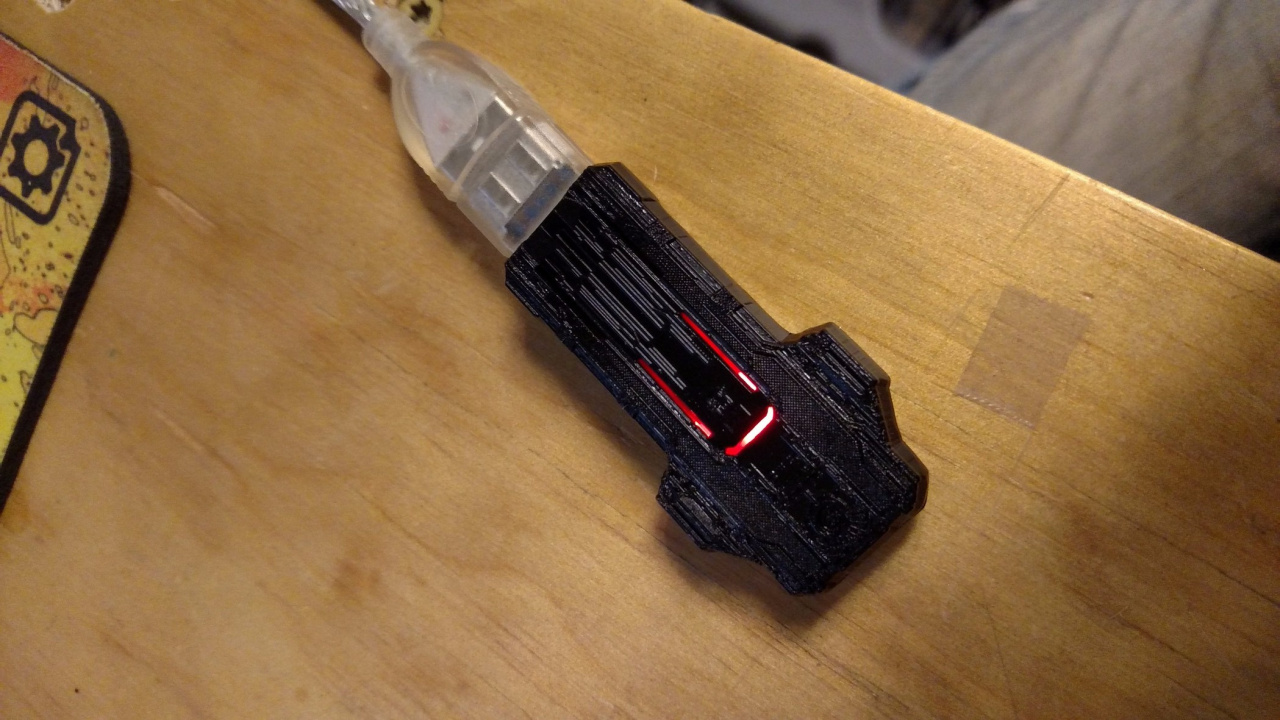
The North American collector's edition of Xenoblade Chronicles X comes with a USB drive containing 10 tracks from the game itself. It's a neat little extra, but largely useless once you've listened to the music - which is why Nintendo Life reader Ben "mikey64" Barger has come up with this handy little hack which allows you to turn it into a fully-fledged USB drive with some useful storage capacity.
Obviously, if you do this it's at your own risk, and if you're unsure of how it works then seek some further assistance.
With that said, over to you, Ben...
The following tutorial allows you to "upgrade" the otherwise useless USB key that comes with the Collector's edition of Xenoblade X. The upgrade just allows you to boost the available memory on the device from the undesirable 1GB to whatever size you want by swapping out the chip with another one. It's really pretty straightforward, but some people may find it useful.
There are two methods for installing this mod:
Easy but effective (USB 2.0, no LED):
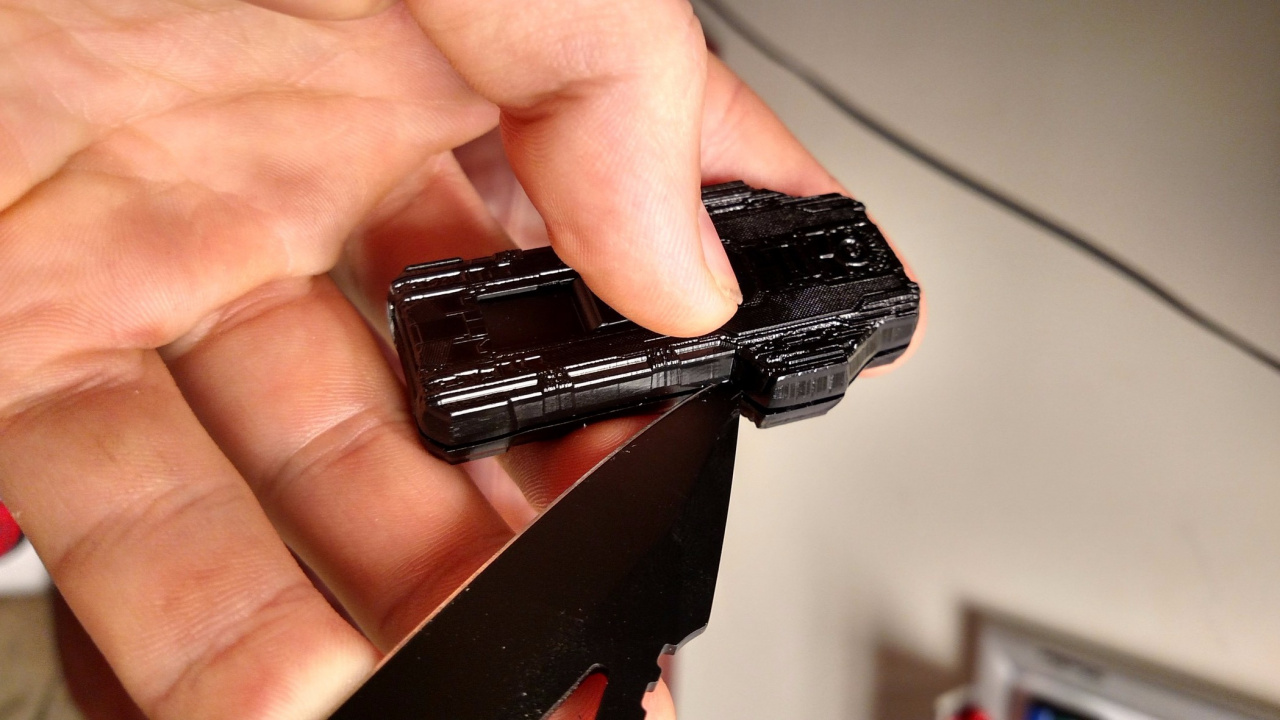
Firstly, you have to break apart the Xenoblade flash drive. You can do this by carefully inserting a very thin screwdriver or knife blade (whatever you feel most comfortable using) into the widest crack you can find around the edge of the drive and pry it open. It's not very hard to get apart. You find a "USB-on-a-chip" inside. This is the part you swap out for another (be careful with the original though, as you may want it later in order to listen to the soundtrack again). I used a "PNY Voyager mini" thumbdrive, but there are other brands that use these chips (IMPORTANT: look for the "mini" type of thumbdrive, as some of the bigger ones still use big circuit boards). Once you get the new USBoaC out of your selected "mini" thumbdrive, you simply swap it for the Xenoblade USBoaC (being sure to reapply some double-sided tape or hot glue) and put it back together.
NOTE: You will lose your blue LED with this method if your replacement USBoaC does not have an LED already attached.

Harder option, but rewarding (USB 3.0 and/or w/LED):
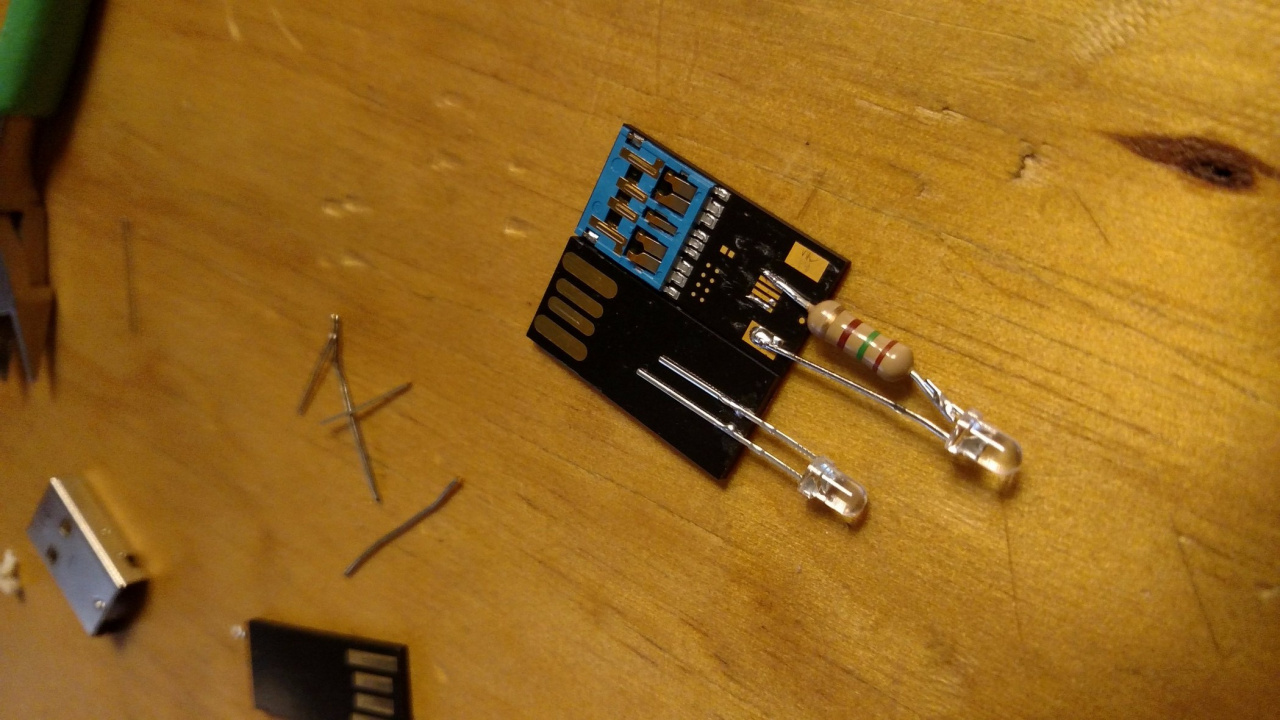
Items needed:
- An LED (colour of choice)
- A resistor (chosen here)
- A soldering iron (or a friend with one - best option)
- A Dremel tool or similar sanding/grinding tool (if upgrading to USB 3.0)
1: Assuming you are upgrading to USB 3.0, and you have power contacts to solder to, solder the cathode (the shorter leg) to the large "ground" contact and the anode (the other side) to the resistor and then to the far right smaller contact. To confirm this, you can connect your USB drive and test the voltage across these two contacts with a multi-meter. It is always better to "tin" the contacts (pre-melt some solder to them) before soldering two objects together. To do this, simply set the soldering iron on the contact, then apply solder. The solder should melt on the iron then run onto the contact, making a nice tinned layer.
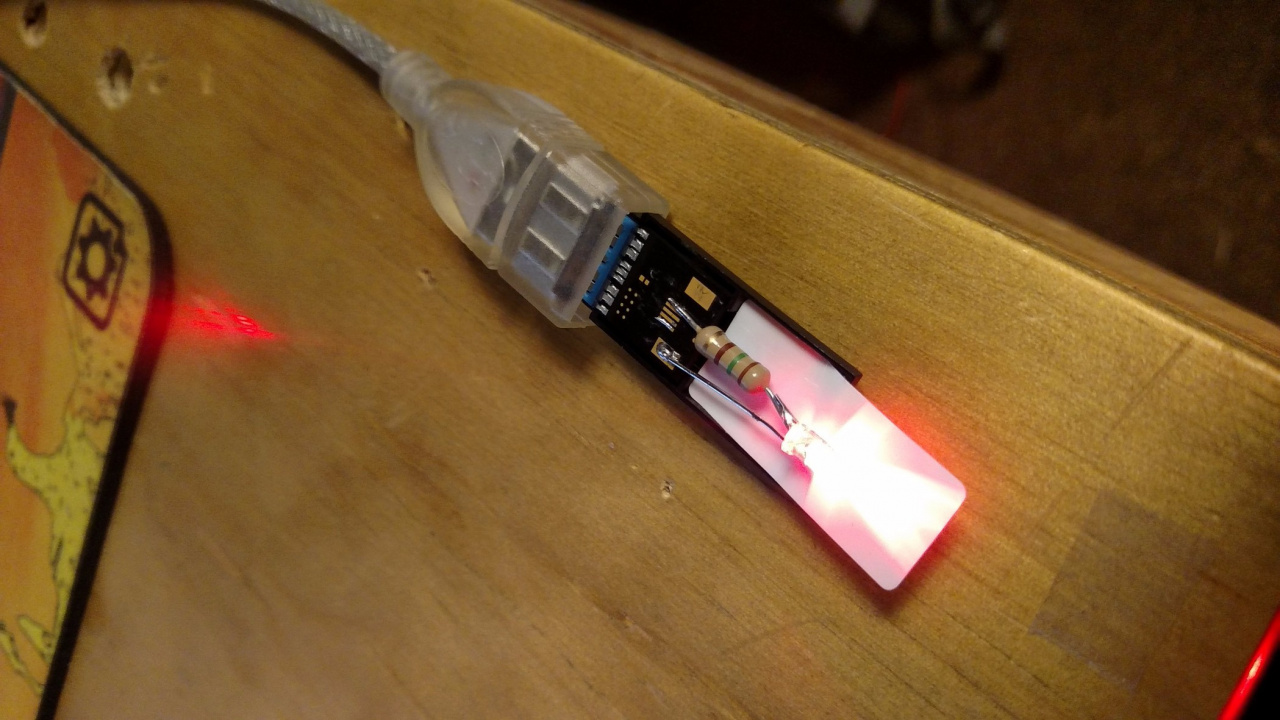
The resistor is necessary since the USB device sends out ~5 volts DC, and most 3.5mm LEDs can only take about 2-3.3 volts before frying (they will melt). There are 5 volt LEDs out there, but I added this bit just to be safe. Again, use this site to figure out what resistor you need. Just as an example, my setup used a 3.5mm, red LED that had a forward voltage of ~2 volts DC and needed a 150 ohm (brown, green, brown) to safely use the USB power.
2. Dremel or sand away the small lip that obstructs the new, thicker USB 3.0 interface. Doing this with gloves and eye protection is a MUST, as small metal flakes will be flying everywhere and grinding small objects is difficult. You could also clamp the casing in a vise with wooden pads to keep your hands out of the equation.
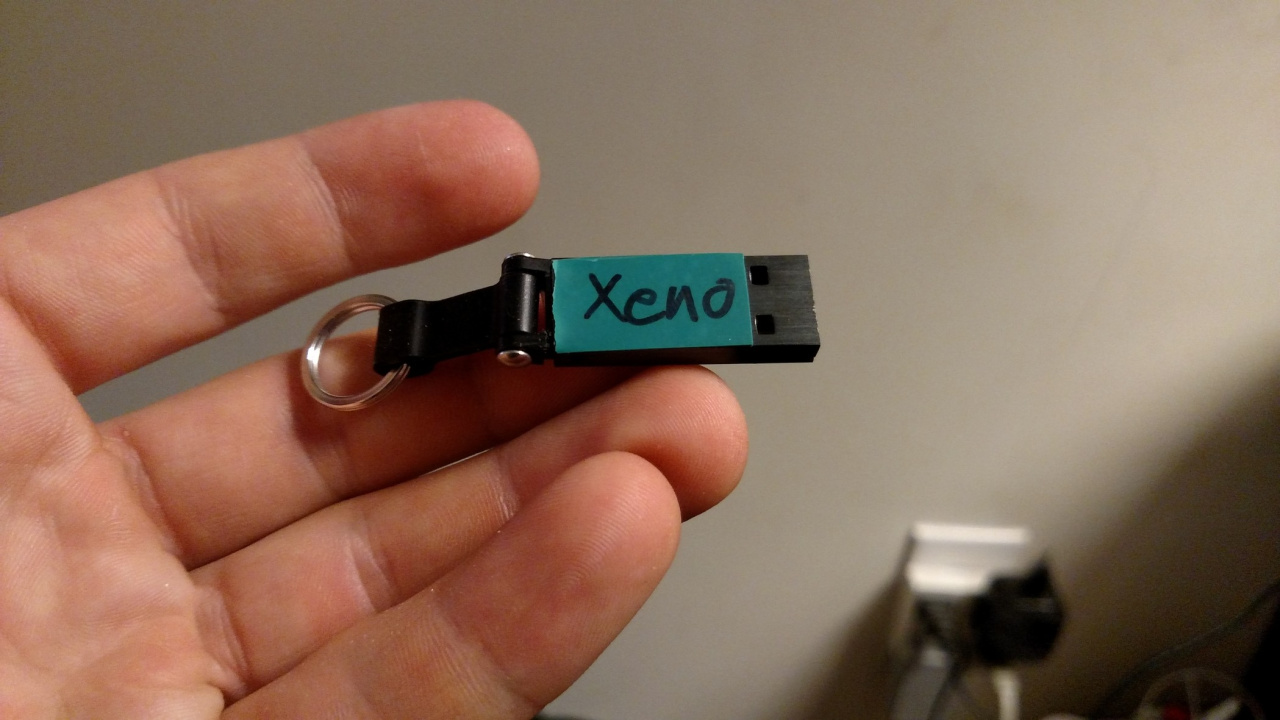
You'll want to keep the original drive if you want to listen to the music again. I tried backing the files up, but they didn't seem to work when not on the thumbdrive. My solution to this was to be careful with the casing for the new drive when extracting the new USBoaC and just swap the Xenoblade USBoaC back into the new drive's shell, after snipping the LED off so it would fit. I then sharpied "Xeno" onto it to label its permanent purpose. It works just as it did. Unfortunately, to my knowledge the only way to get actual MP3 or similar files of the sound track is to obtain them elsewhere. The "soundtrack.exe" that comes on the drive is pretty well protected and essentially useless.
Did you find this guide useful? Let us know by posting a comment below.


Comments 29
cool!
Looks too complicated. I'll probably end up screwing it up if I attempted this.
Here is a better idea
Just buy a usb drive and use that .
Very cool but I live in the UK so we couldn't get this even if I did have this I wouldn't do this as I wouldn't want to harm the USB drive/ make a mark on it as I'd treasure it ahah!
Too much work. I'm just going to burn the XCX music files onto my computer, compress them if need be, and then copy them over after I format the drive.
I'm still not sure about the intricacies of the expandable storage on the Wii U, but I imagine I could use the USB to store XCX's data packs.
@Snargledon Sadly not.
As stated above, the drive's actual size is 1GB; 0.7GB smaller that the smallest of the data packs.
https://www.nintendolife.com/news/2015/04/xenoblade_chronicles_x_will_use_downloadable_data_packs_to_expedite_loading_times
@HeCaster101 If your wanting to use the drive for something else, in Windows 7 just left-click the drive, click Properties, and then Format. A quick format is good enough. Be sure to copy the music files off to something else first (a folder on your hard drive will do) if you're wanting to keep them.
@HeCaster101
You can certainly do what @Nico07 said. Just remember that the drive is only 1GB as it comes, so you won't be able to store very much data on it as-is.
Also, the "audio" file that comes on the drive is actually just a Windows executable file (.exe) that opens a protected file viewer containing the audio files. While there may be a complex way of "extracting" these files, as it stands there is no simple way of moving the individual audio files from the "soundtrack.exe" file, e.g. you can't just "copy-paste" them to your computer or phone. You just have to open it and play songs from your computer. :-/
@Snargledon Once you upgrade it to a larger size, then yes, this would be a perfect use for it!
That USB 3.0 mod sounds very nice. It's almost enough to consider getting the CE of XCX just to try it... Maybe give the ugly thing a new paint job, too. LifeHack stuff is awesome.
@DJKeens .WAV files are essentially computerized digital versions of PCM (pulse code modulated) sound developed for digital phone lines. The quality will be a bit lower in an AAC or MP3 format, so it's a lossy backup, but they're more readily supported formats. Have to make it FLAC for a quality backup, but not all programs support that.
In any case, using a free trial of a program like DRM-Removal (shareware), or finding a freeware like myFairTunes (they're abandoned, though) can eradicate this particular form of DRM, just bypass the .exe process. WAV files aren't hard to crack with the right software, and it's not illegal either, since it's not a proprietary format!
Or, to be cheeky, use a recording program like Audacity while playing each track, then save the recordings using the format of your choosing.
Is it really too much for NOA to do to make this a regular usable usb? It's dumb that we have to go through all this trouble to get any use out of the darn thing...And we can't even move the music to our computer without being tricky and using loopholes(which I don't understand how to do, being computer illiterate...). Still disappointed in this whole special edition...The artbook isn't even that good. It's chock-full of regular screenshots. I should have just bought the regular copy of the game and saved the extra $38.
@Snargledon LOVE your Avatar! I'm a huge MJ fan, & after reading the reviews that character was the sole reason I bought Ghost Trick! Luckily I loved the game too lol
@mikeyman64 @DJkeens @HeCaster101 actually there is a very simple way of removing the music from the device! Just use a file recovery tool! There are plenty of free online tools that will recover the music files from the usb stick. The one I used was Recuva. I had my music off the USB stick in less than 5 minutes. Also you will be removing the actual file in its original form. No loss what so ever!
I would take it on the chin n leave as it is rather than mess up like I would lol.
Hmm...I wonder if there's a microUSB drive that has a 256 GB capacity yet? Or maybe even a TB? I'd love to be able to use the XCX flash drive as a sort of decal to store more of my Wii U games. The 128 GB I got a few months ago has served me well. I have about 3 dozen games on it - retail and indie - but I'm running out of space.
@Crimzonlogic Maybe you should've watched an unboxing video before taking that risk. Many game developers are banking on impulsive consumers these days, and I was no different when I picked up my Juggernog Edition of Black Ops III.
Difference there was I never opened BOIII and I ripped open XCX mere seconds after I got it. Why? Because I knew what was in both, and I knew what I would like more. Sorry to hear the CE of XCX didn't float your boat, but if you feel like you wasted your money, you don't have anyone to blame but yourself.
@kensredemption You really think I should have expected the usb to not be any good? I had every reason to believe it would be a regular usb that works like any other. Why wouldn't I? Who programs a usb to not work? And artbooks usually have concept art and drawings, not loads of screenshots. What unboxing videos show how the usb worked and showed the inner pages of the artbook? I also don't think unboxing videos were done when preorders went up unless somebody had a time machine. I don't see how it's my fault that the items aren't as good as advertised...
I'd have bought the Ltd Edition pack of X if they had included the USB drive into the UK version of the game, I really didn't want another 'steelbook'! Theres not even one on ebay to try and get hold of.
1GB isn't a great amount, but it would still be useful for music tracks in the car
@Bludy_Edge I didn't even think about recovery software. Good idea. I just wish the files were of better quality. As @PlywoodStick mentioned, they are of a pretty low quality.
A music CD would have been so much better than a soundtrack.exe.
wow thats really stupid, why not keep this relic as it should? with great music
@PlywoodStick that's completely wrong, WAVs are not worse than mp3, they are uncompressed and uncoded files.
@andrew20 lol, the simplest solution is usually the best.
It would have been awesome if the drive also came with the data packs.
@vonseux Normally I would agree as WAV has the potential to be loss-less (being a raw format), but in this case they are very poor quality WAV files.
Method 1 is useless since the best thing about it is the LED.
@HeCaster101 This would be the best way to get the files, since playing the .exe file requires the disk to be mounted to a drive (usually the Y: drive). with the 7zip method you can extract them without having to use the .exe file.
Tap here to load 29 comments
Leave A Comment
Hold on there, you need to login to post a comment...