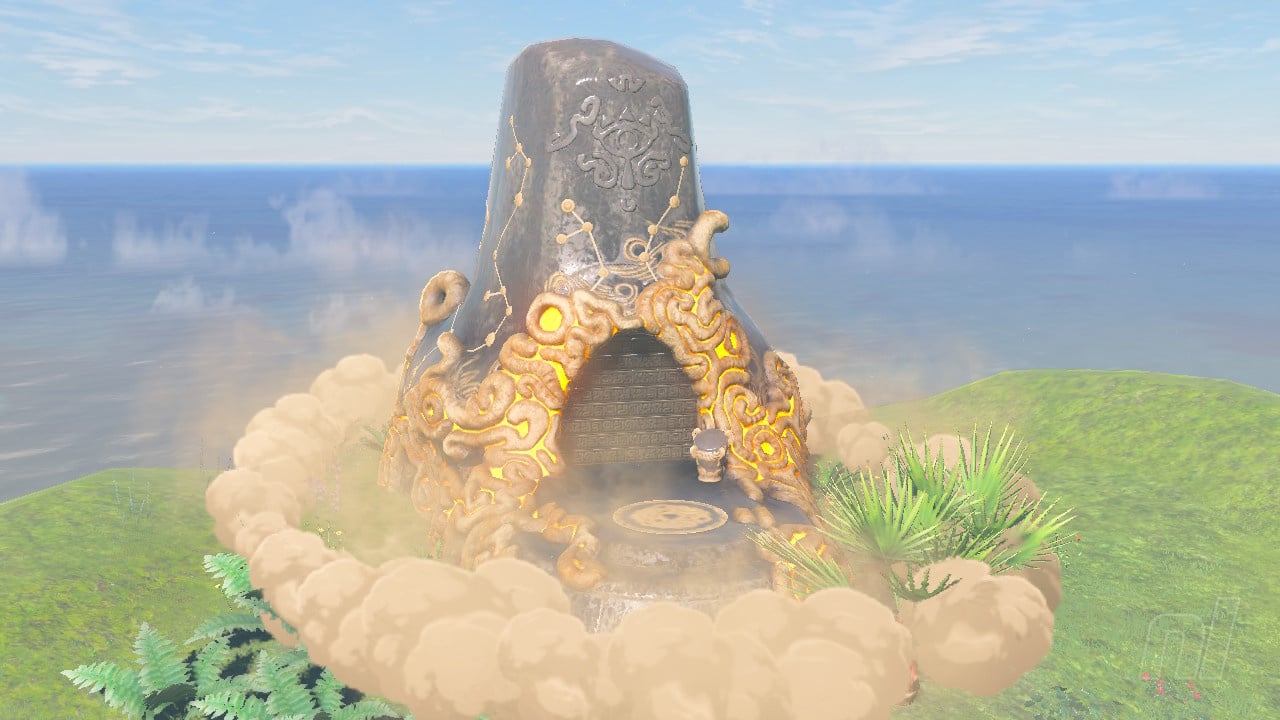
If you're trying to get all of the Shrines in The Legend of Zelda: Breath of the Wild then you may well have hit a brick wall with the Korgu Chideh Shrine, which lies on Eventide Island in the south-east part of the map. Set apart from the mainland and therefore quite tricky to get to, Eventide is the biggest and more difficult Shrine to complete as it requires you to survive the island's threats without much of your gear. As if this isn't challenging enough, you can't save your game during this quest - if you die, you return to the mainland have to start all over again.
With that in mind, we present to you a guide on how to survive Evertide Island and uncover its elusive shrine.
How to Get to Eventide Island
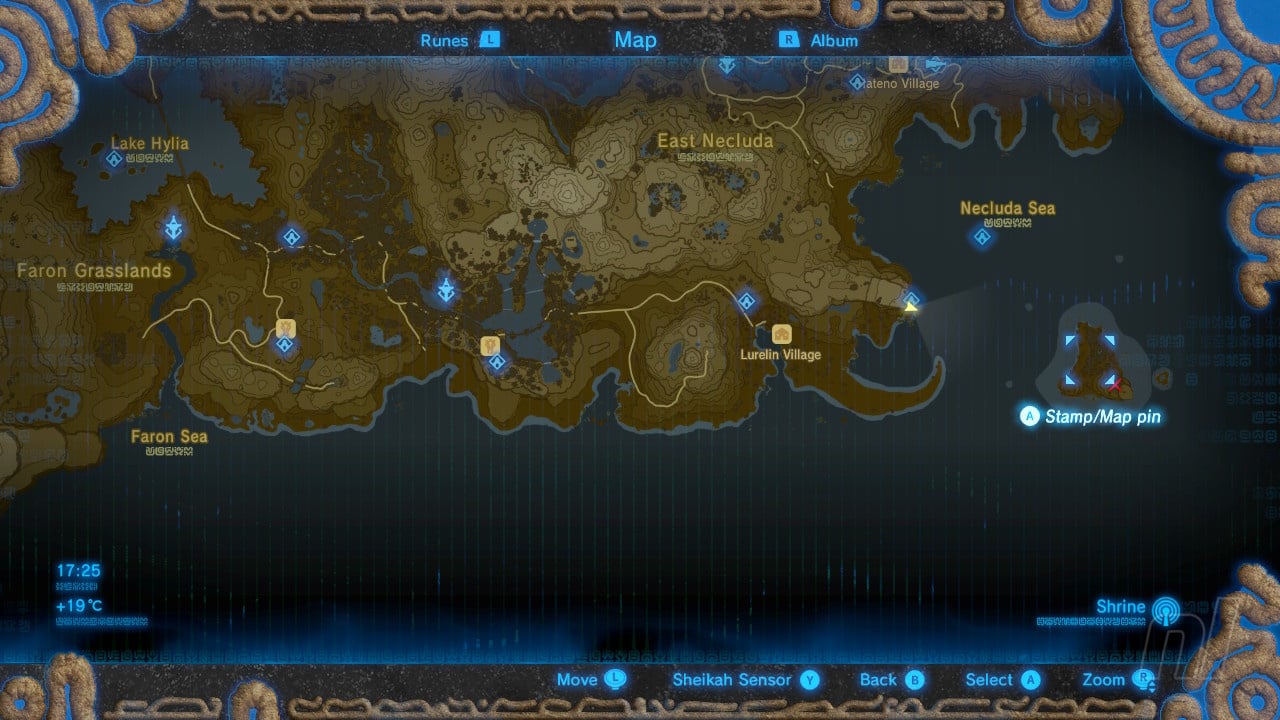
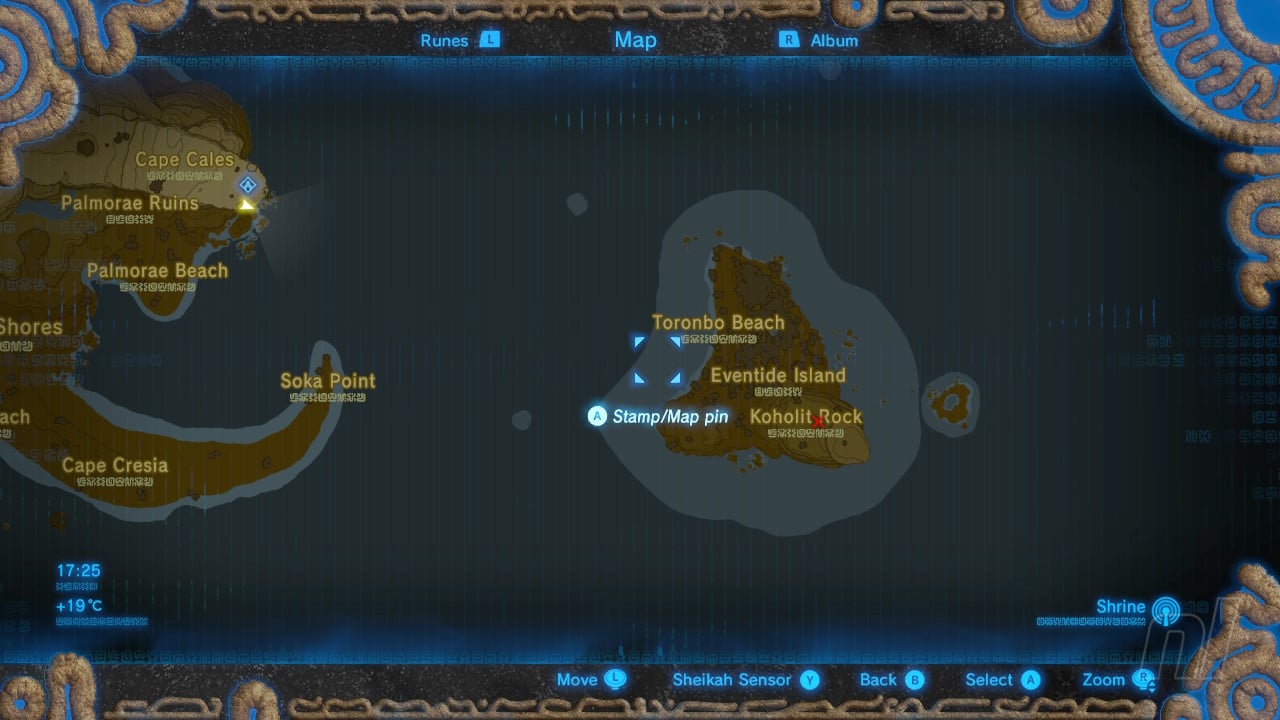
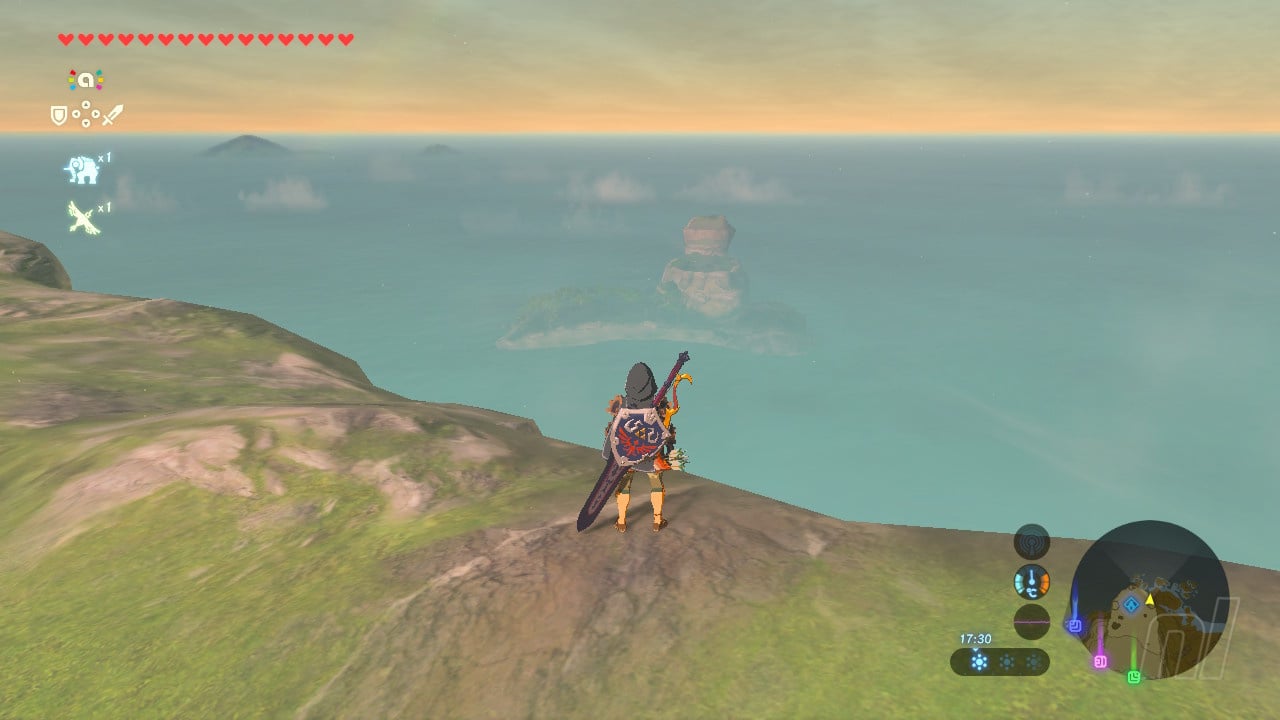
Eventime Island lies far away from the mainland of Hyrule so you'll need to paraglide over the sea to get to it. Start out from Cape Cales (next to the Muwo Jeem Shrine) and you'll find there's a steady wind which will help you. Even so, unless you've totally upgraded your stamina wheel you'll need to bring stamina-restoring food with you as it takes quite a while to get all the way over.
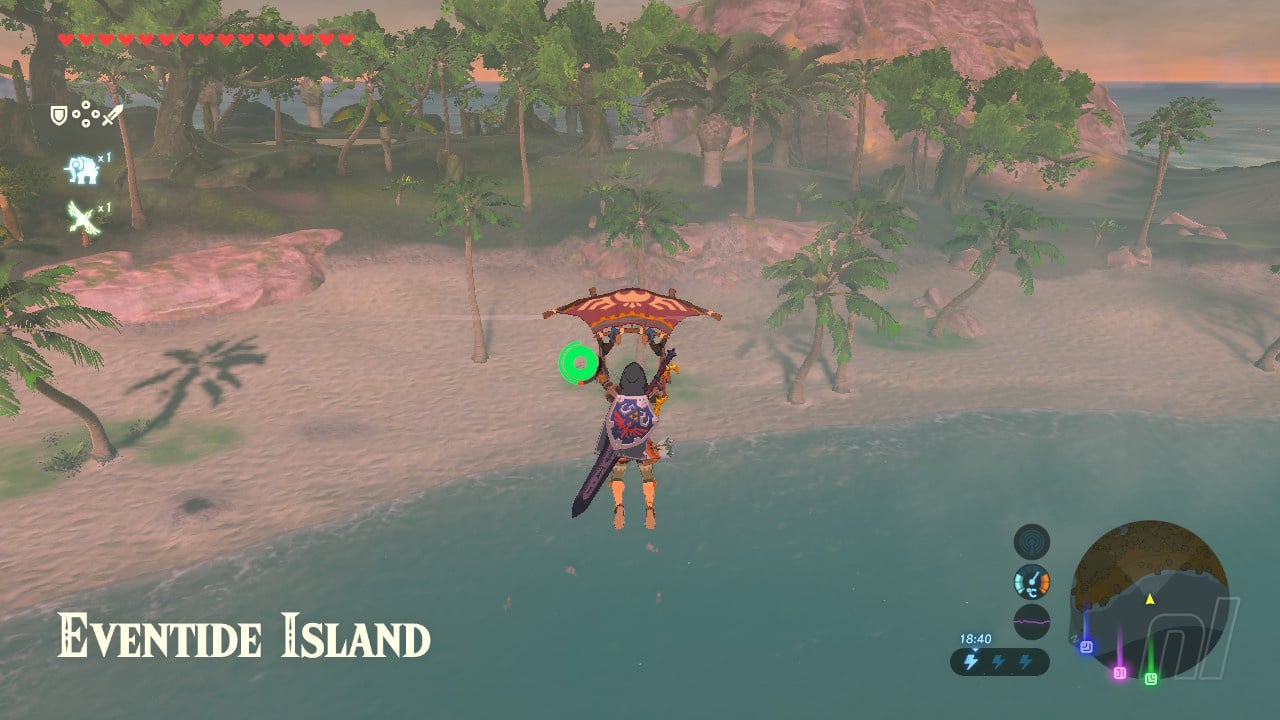
Eventide Island: Basic Tips On How To Survive
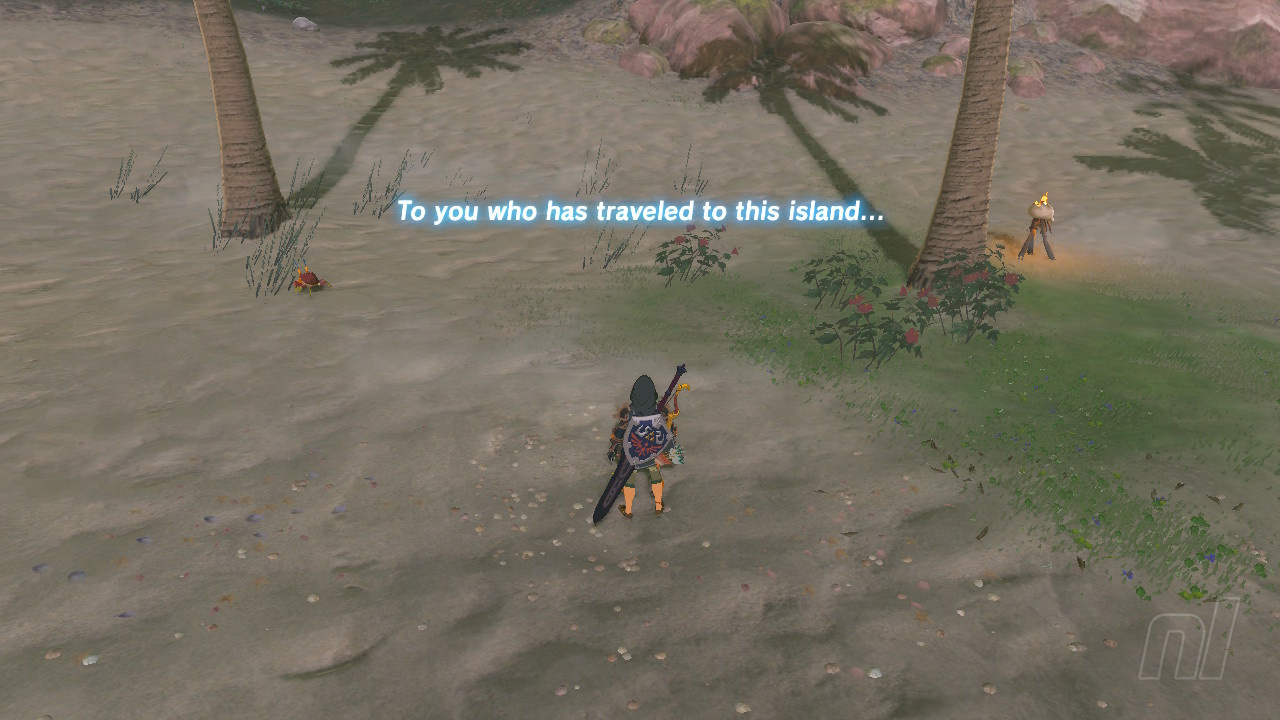
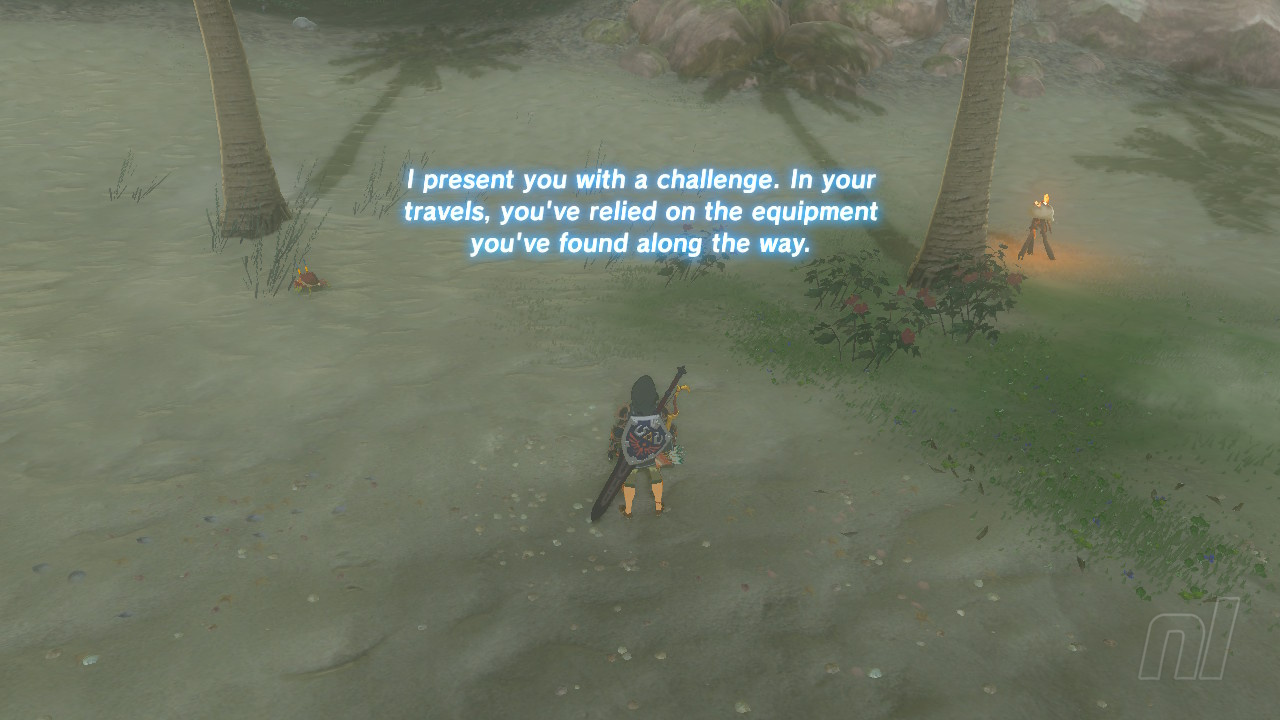
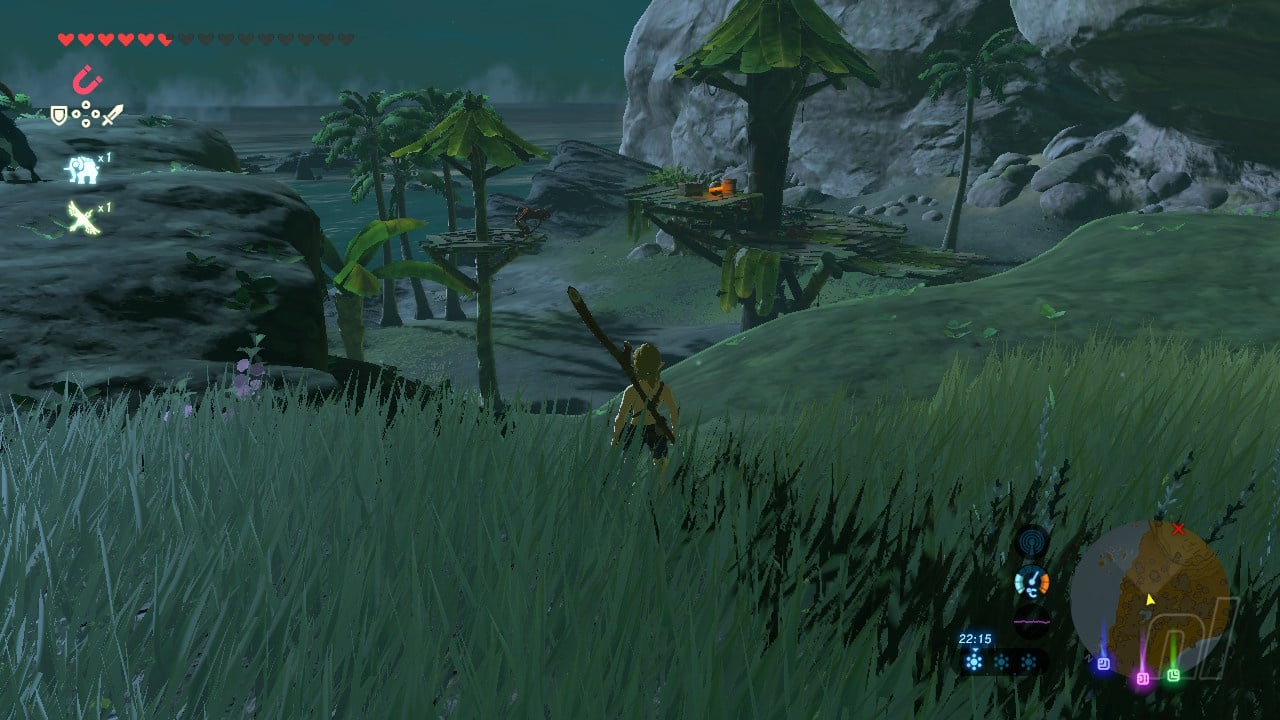
As soon as you touch down on Toronbo Beach you'll be told that the island itself is a proving ground of sorts, and that you must pass the test without your equipment. You'll be stripped of everything apart from your runes and your paraglider.
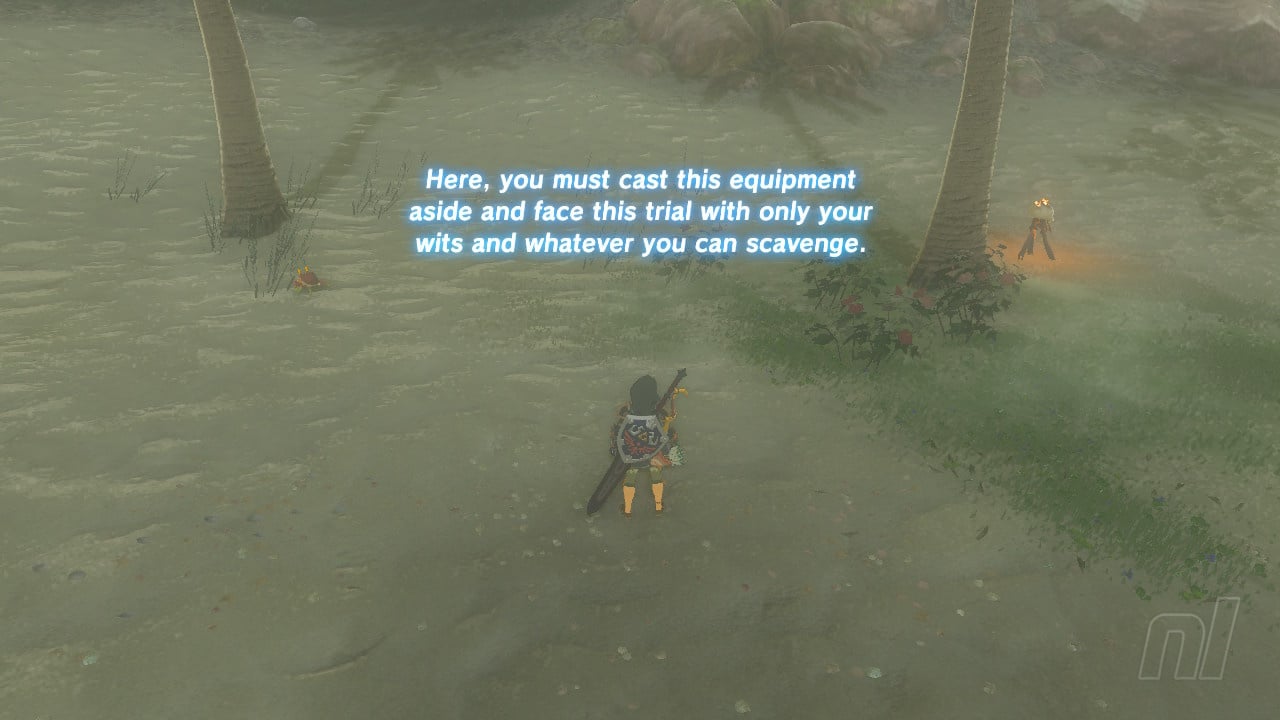
Because you're starting with nothing, the most basic rule of Eventime Island is collect everything. Every stick, food item and weapon should be collected without fail, as you never know quite how much you're going to need to survive the tasks ahead. You'll get the chance to cook items at several points so try not to eat food raw unless you're desperate.
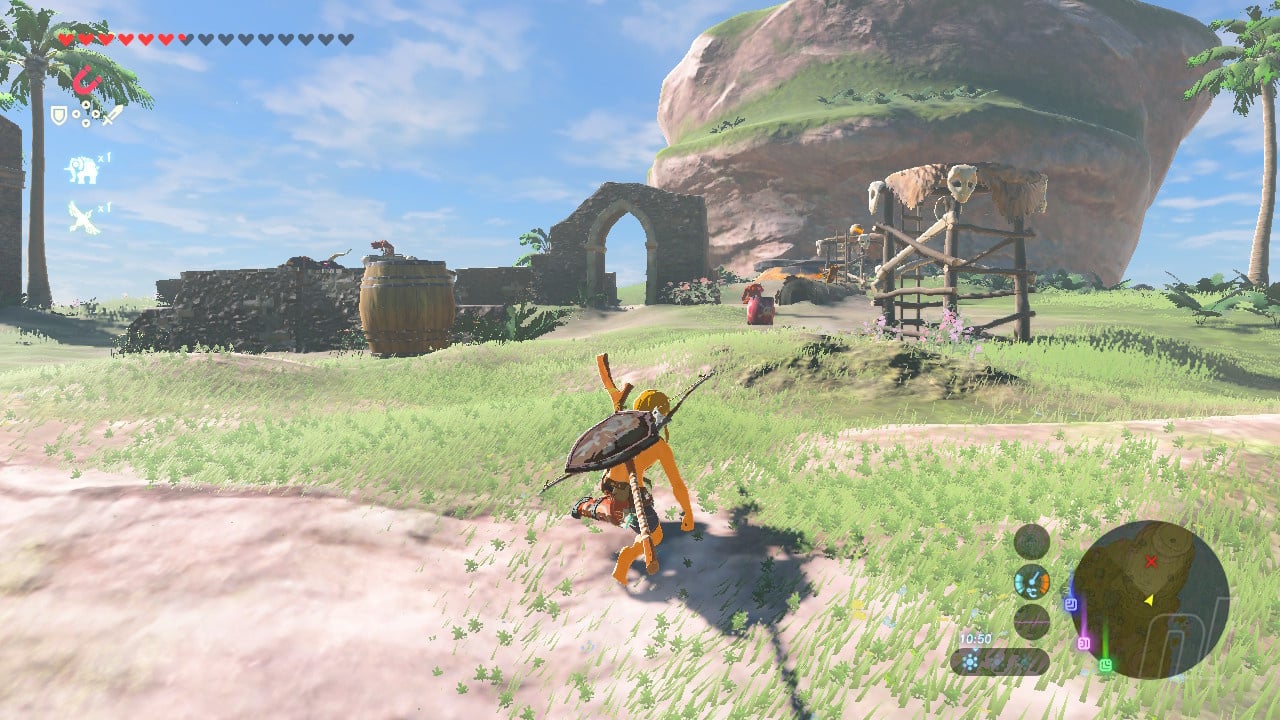
The First Orb: The Bokoblin Camp and the North Beach Pedestal
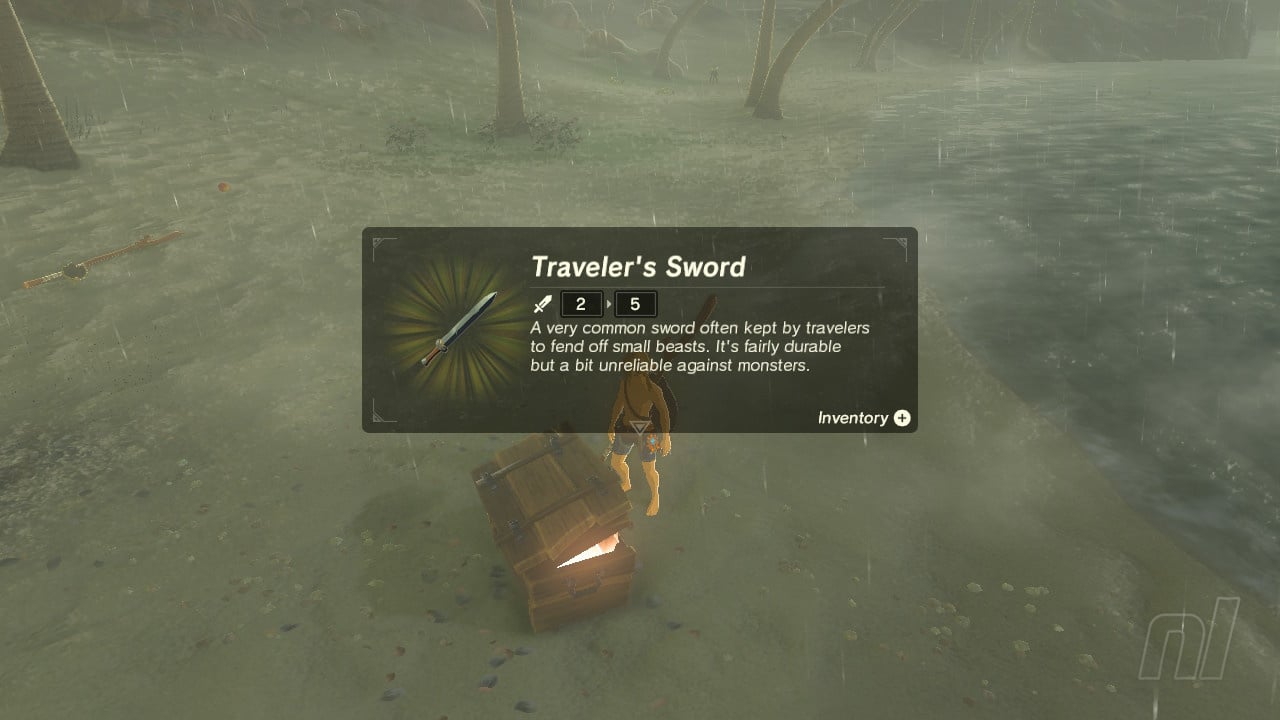
As soon as you arrive on the island keep a look out on the beach for Rusty Broadsword - it's not the best weapon but you can't be picky. Head left and you'll come across a group of Bokoblins roasting fish around a fire. Use Magnesis on the metal boxes nearby and you can use them to smash these enemies. There's a Rusty Shield lying nearby and several Boko Spears. In the chest there's a Traveler's Sword. Also, make sure you collect all of the fruit lying on beach, too.
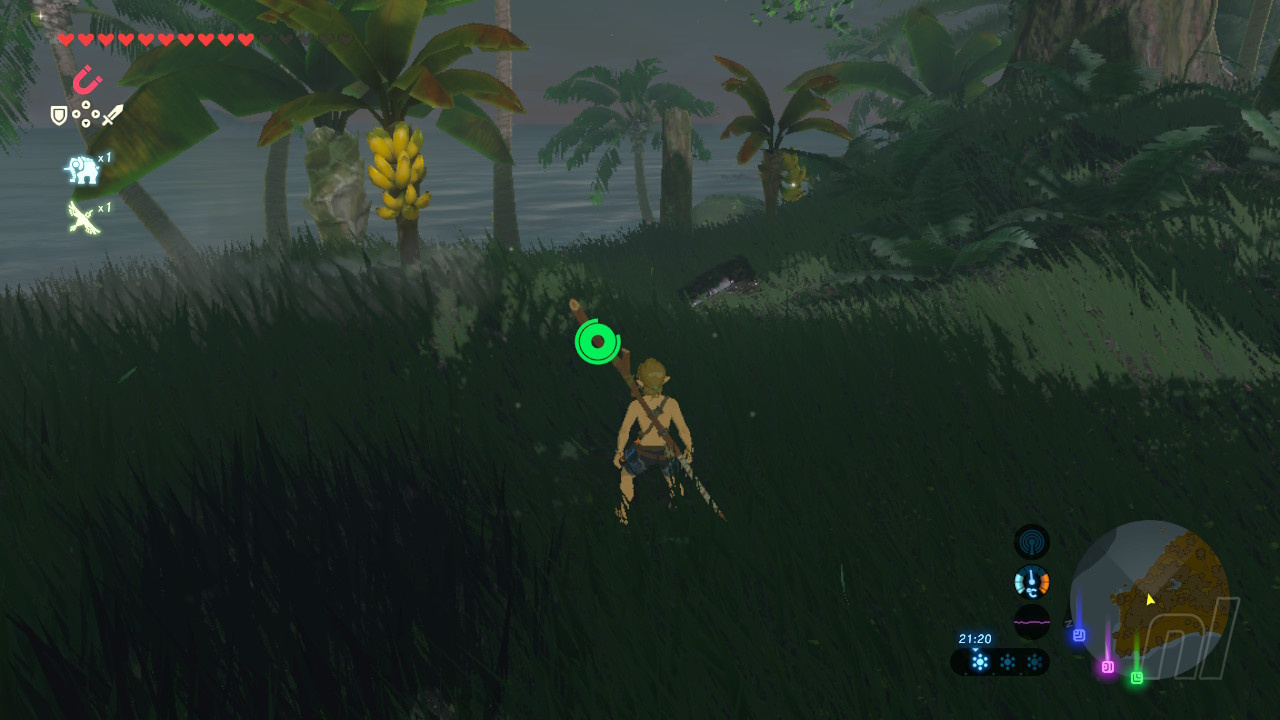
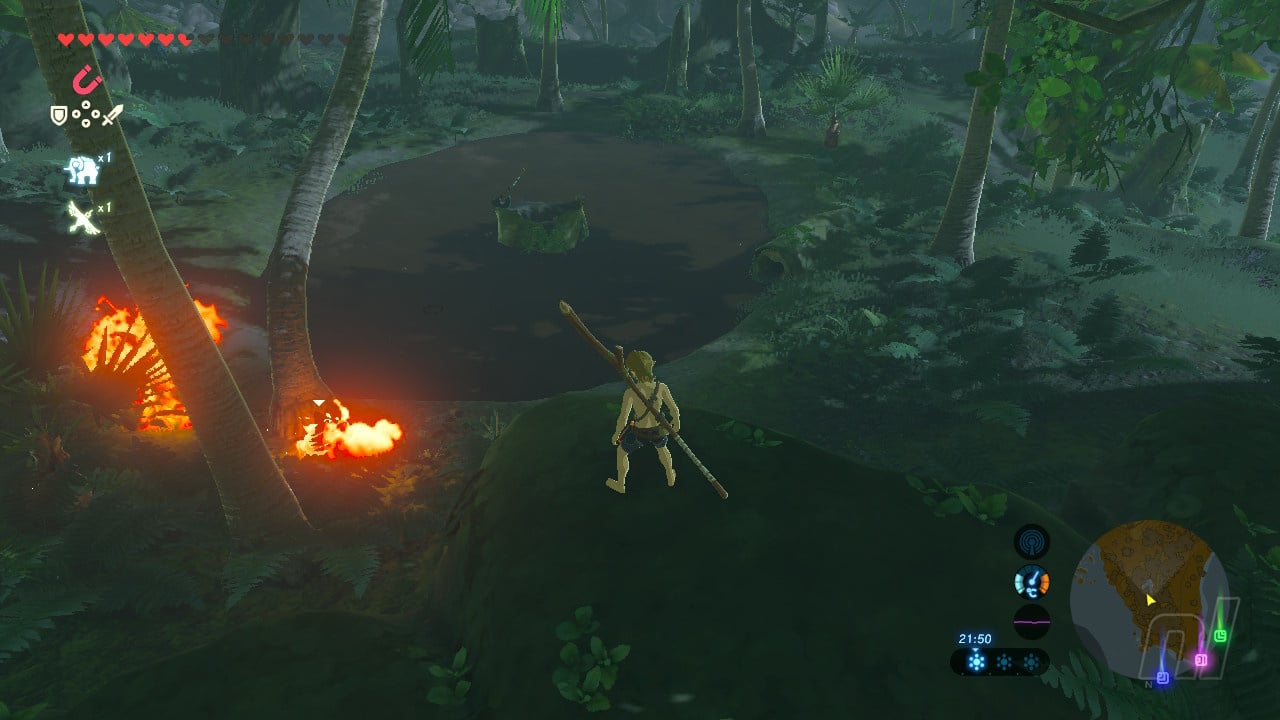
Once you're done here, head north down the beach, being sure to collect crabs, fruit and any other food you see. Once you reach the end of the beach you'll see a small island with a glowing pedestal on it - make a mental note of this and head to the right and up the slope - there are several banana trees you can pillage here. You'll eventually come to a small swamp with a hollow stump in the middle and an axe - paraglide from the high ground to grab the axe, then head right where the swamp is shallow to avoid getting sucked under.
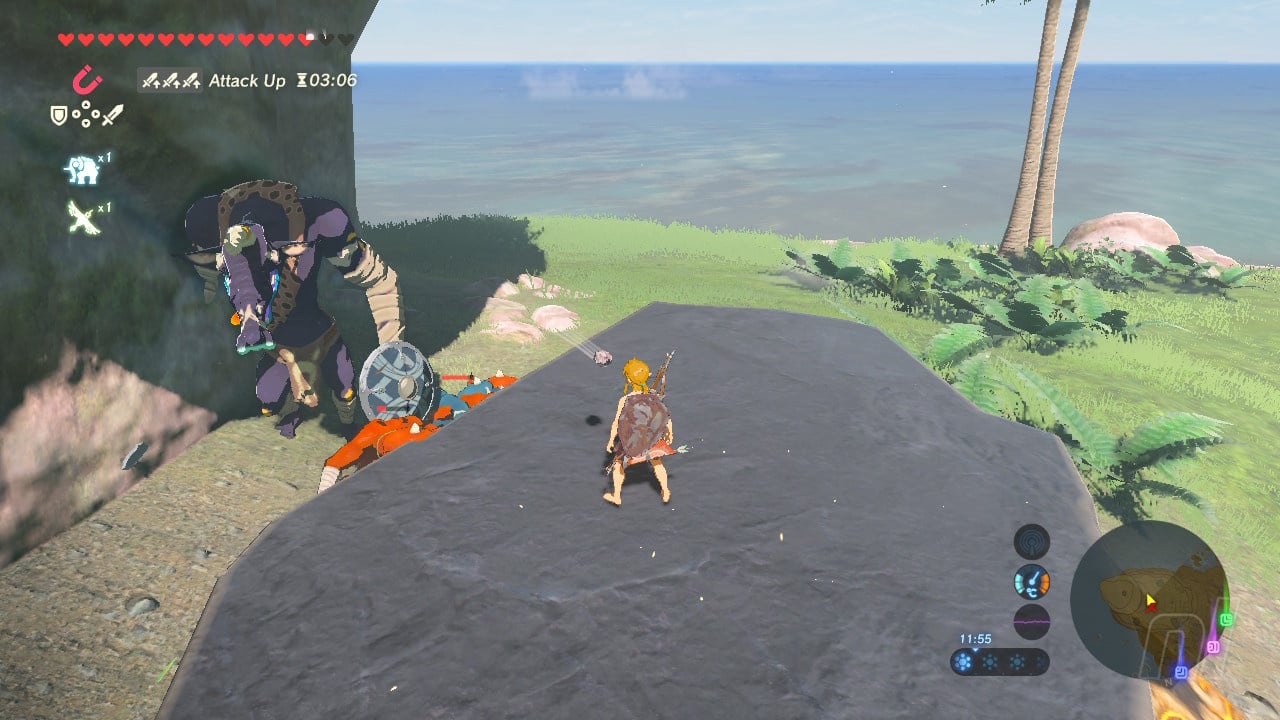
Head sound from the swamp and you'll arrive at the first Bokoblin camp. Paraglide onto the lookout and take him out before he has chance to spot you, then glide down and take out the other two Bokoblins at your leisure. You can score Boko Bow and Soldier's Bow here, plus some arrows if you tempt them to shoot at you. The best option is to sprint up the ramp and knock the red and blue Bokoblin off, which allows you to take them out separately on the ground.

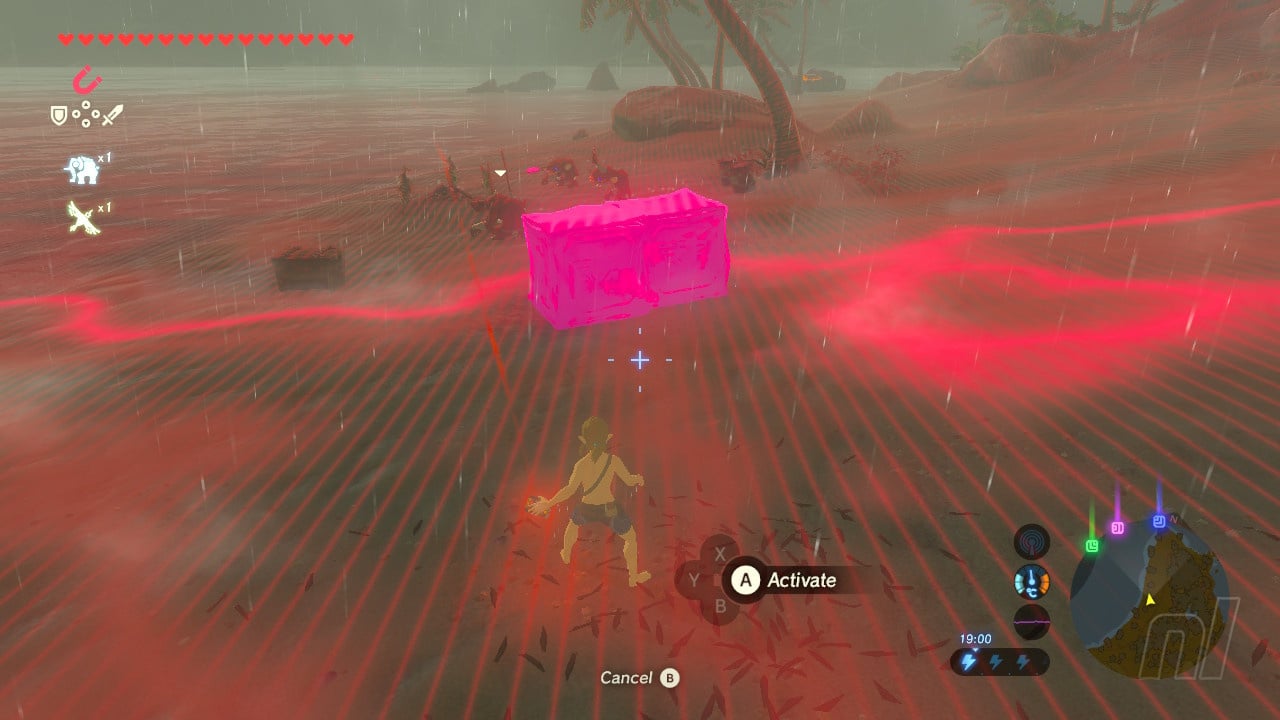
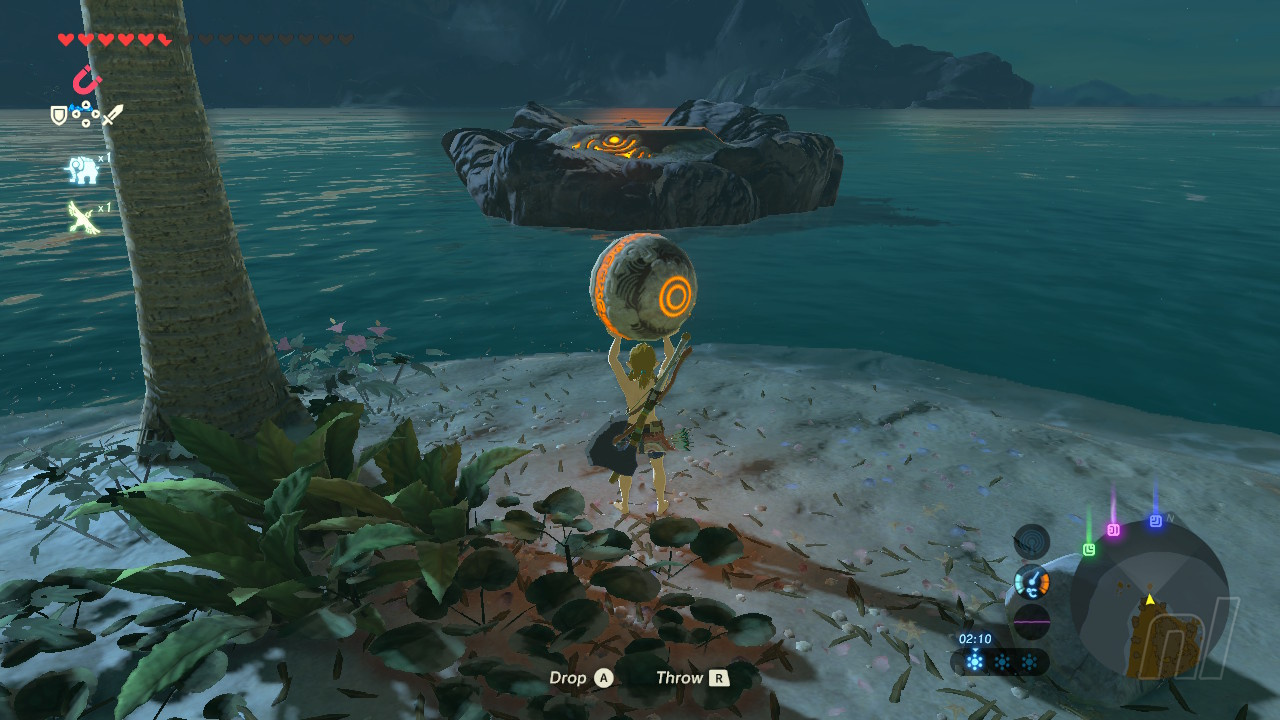
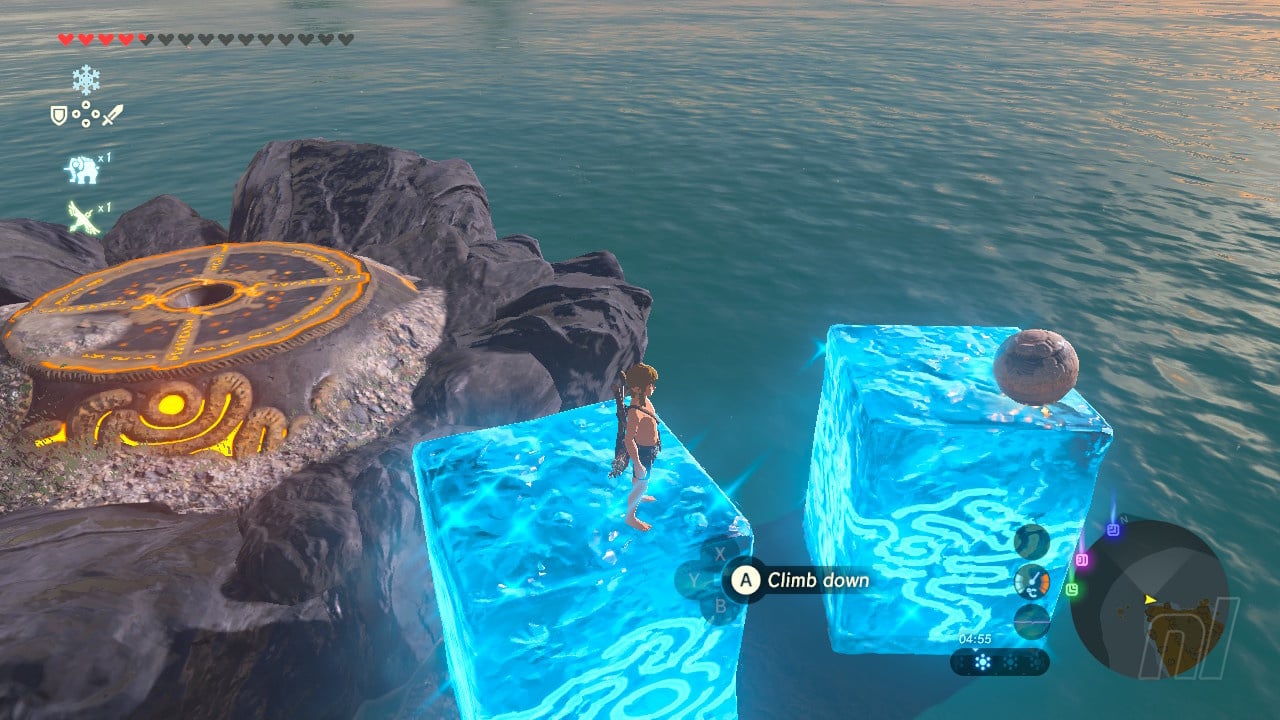
Grab the orb from the base (there's a second Soldier's Bow in the chest and some Shock Arrows in the barrel, too) and return to the north beach and its pedestal. Throw the orb into the water and then use your Cryonsis rune to freeze a column underneath it. Climb the column, pick up the orb and jump onto the pedestal. If you find you can't reach with a single jump, create another pedestal next to it.

The Second Orb: Eventide's Hinox and the Hilltop Pedestal
Next, head to the middle of the island towards the slumbering Hinox - but don't go too close yet. Skirt around the right-hand side and head towards the hilltop camp on on the south tip of the mountain, where the pedestal lies.

Here you'll find a few enemies which, using the Magnesis / metal box combo, can be dispatched without too much bother. You'll find several weapons here, as well as some meat cooking on the fire and a few fruits. Take this chance to light the pot nearby with the torch, cook some items and replenish your health before turning your attention to the Hinox.
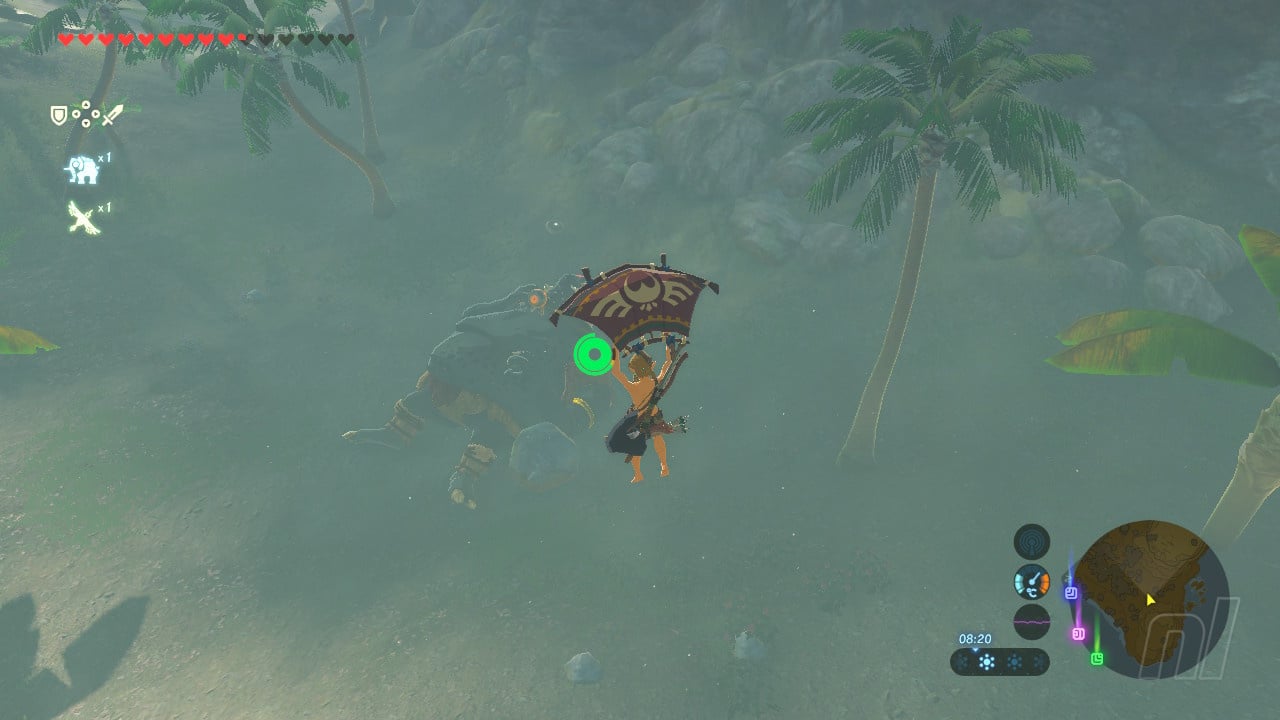
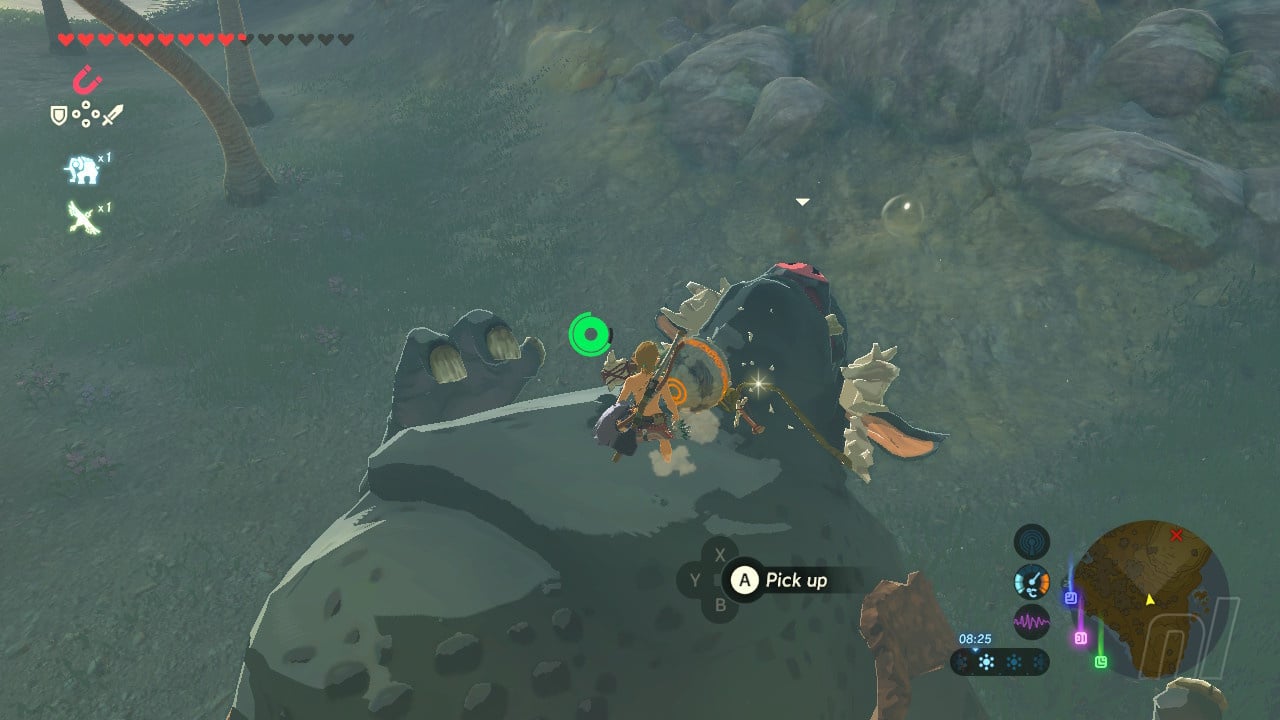
On the surface this seems like the hardest orb to get, but unless you've very confident - or you have Urbosa's Fury - then don't try to fight this monster, which makes things much easier. From the hill paraglide down and land on the Hinox's chest, grab the orb and then run before it has chance to get to its feet. It's really slow so you won't have any bother outrunning it. Head back to the pedestal on the hilltop and deposit the orb.
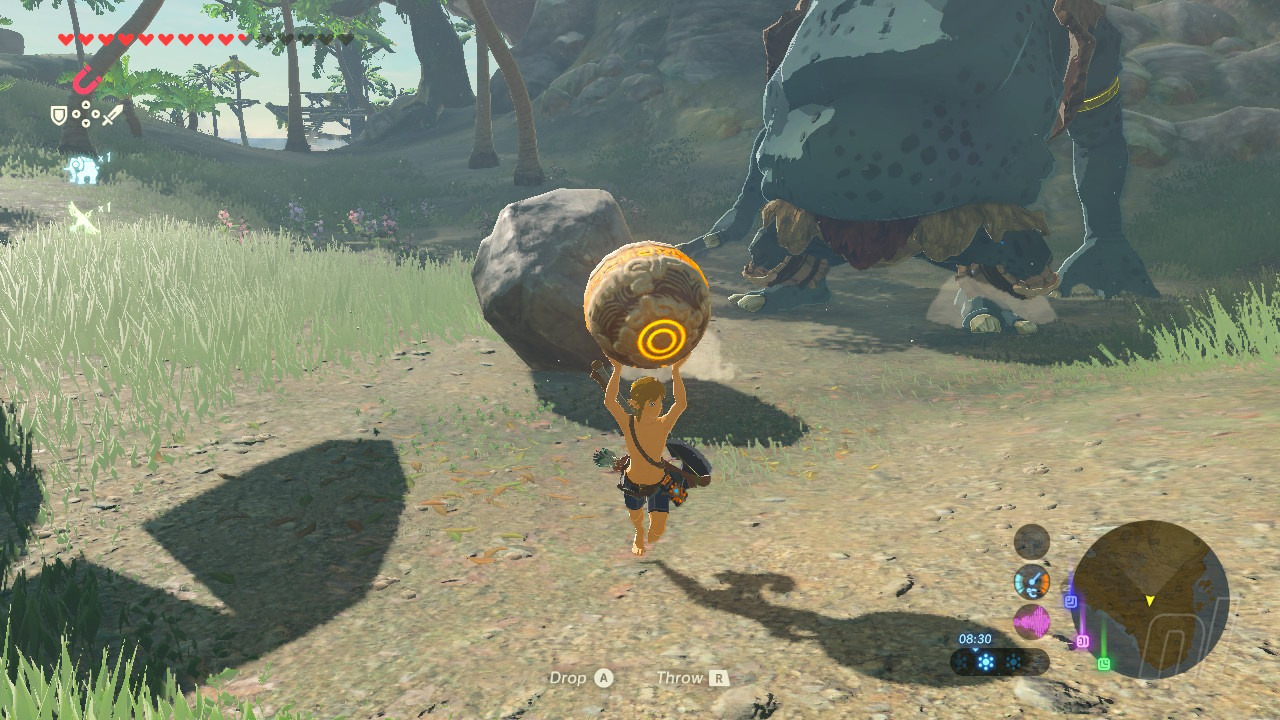
The Third Orb: Raiding the base on Koholit Rock
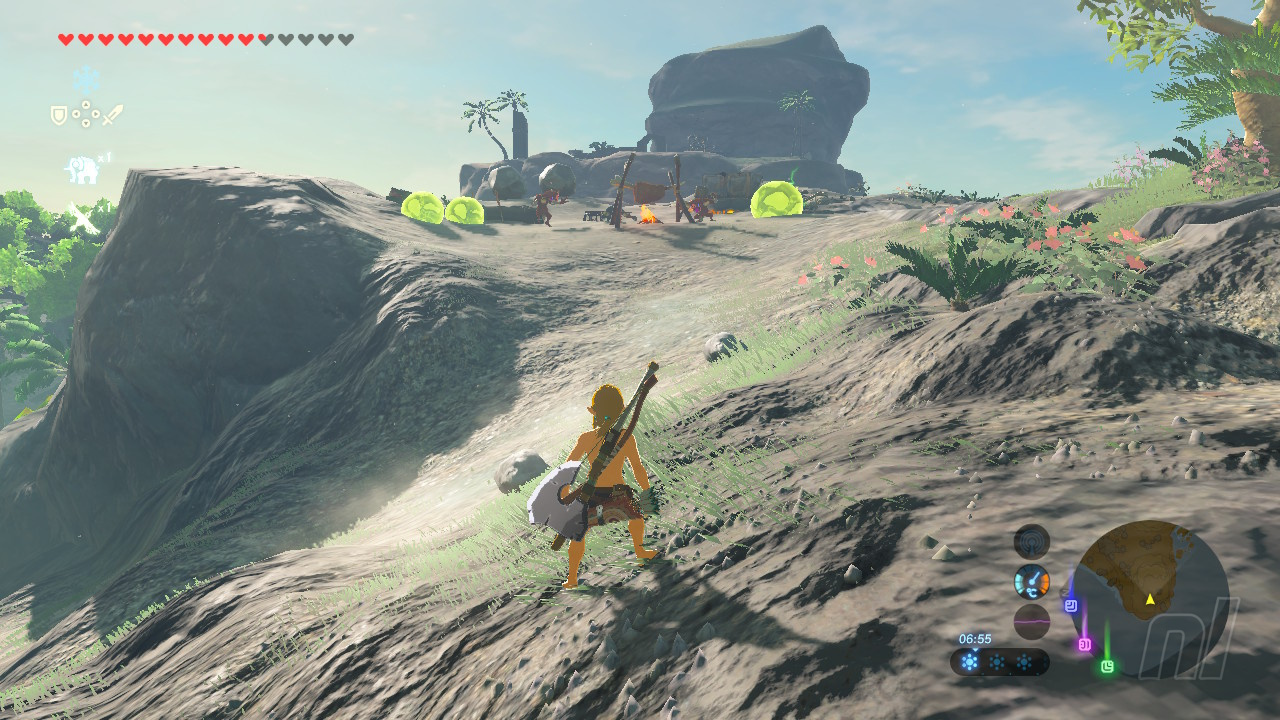
Now for the third and final orb - this one is a challenge purely due to the large number of enemies involved. It can be found in the large enemy base on Koholit Rock, highest point of the island, and if you don't plan ahead then you can get taken out very quickly.
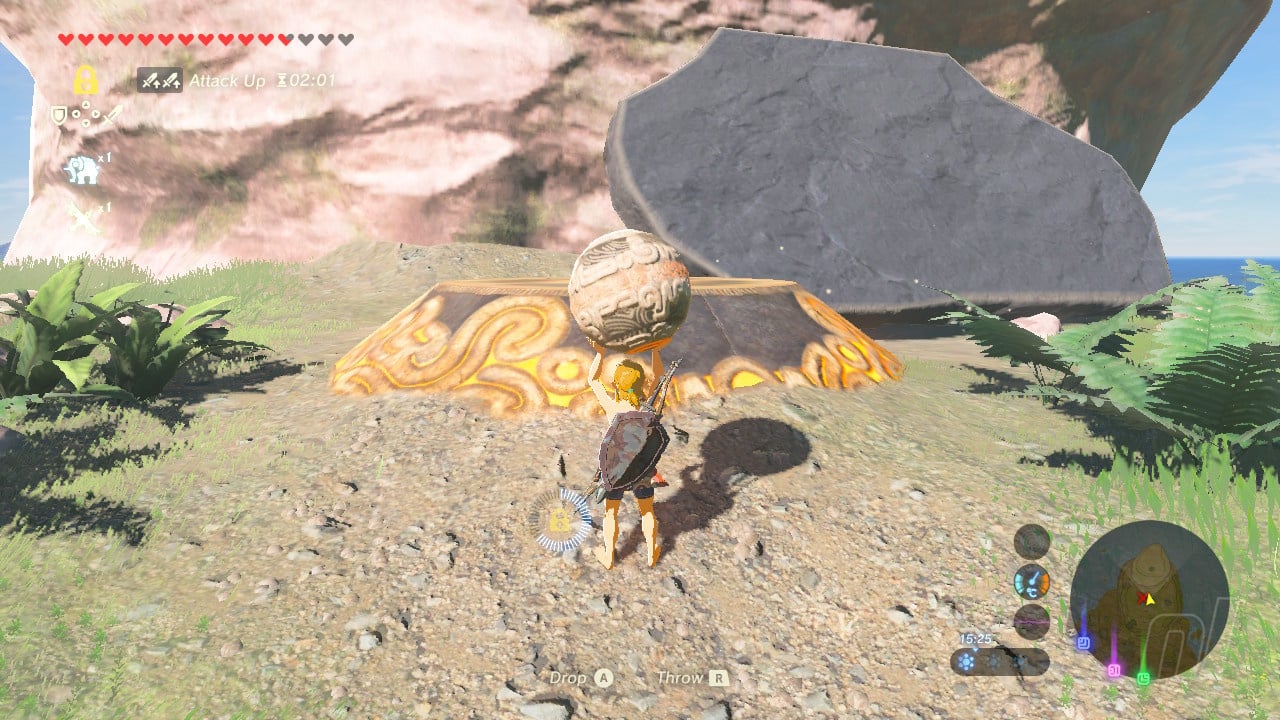
Ascend the hill from the side where the Hinox is sleeping and take out the lookout to the right with an arrow, then crouch and move slowly to the right so you have a clear shot on the three Bokoblins dancing around the campfire. If you're quick enough you can take out at least one (if not two) with an arrow headshot before they have time to reach you. Once the others are alerted sprint north to the pedestal - it has a large slab resting on top of it which makes the ideal defensive base as the enemies can't climb it.
Take out the remaining lookout with an arrow to stop him shooting at you then pick off the surrounding enemies at your leisure, being sure to hop off the slab to collect up their weapons as they drop them - you'll need as many as possible to survive the onslaught. If you find yourself getting overwhelmed run away from the pedestal to pull the enemies away, then return and continue picking them off. Once the coast is clear, use Statis on the slab and hit it to remove it and reveal the pedestal. The remaining orb is on a high platform in the base.

Once you've dropped the final orb into place, Korgu Chideh Shrine will appear on the peak above and you'll have all your items returned to you.
This is part of our Zelda Breath of the Wild walkthrough, which includes All Shrine Locations And Maps and help with specific shrines, including the Keo Ruug Shrine Puzzle Solution, Mirro Shaz Shrine Puzzle Solution, Sha Warvo Shrine Solution, Shae Loya Shrine Puzzle Solution, Eventide Island - How To Beat The Hardest Shrine Quest, and Shee Vaneer And Shee Venath Shrine Answers and Solutions.
If you're just starting out, Getting Started And Beginner Tips will be useful. We also have BOTW guides to help you with the Tarrey Town Quest, how to get equipment such as the Hylian Shield, the Master Sword, the Green Tunic, and the Radiant Set, plus advice on the Best Clothing And Armour Sets and How To Find Every Item in the Master Trials DLC. We can help you find key places such as All Captured Memory Locations, All Great Fairy Fountain Locations, and Where to find The Lord of the Mountain, too.
If you're looking for general advice on various topics, you might want to check out the Best Recipes And How To Cook Food, How To Farm Star Fragments, How To Farm Dragon Parts, How To Defeat Guardians, How To Shield Surf Like A Pro, and How To Get Unlimited Korok Seeds. And if you're wondering what amiibos work with the game, our guide to All amiibo Unlocks lists them all.


Comments 119
Hardest shrine? I had more trouble with the various labyrinths and the combat trials than with this one. You just need to think outside the box and not rely too much on your equipment
It wasn't really that hard, but it was a nice little challenge.
There's a better way I hear, just drop some of your gear as soon as you land then after your equipment is taken from you, just run back there and pick them up.
I beat that thing by having enough hearts and eating food that gave me 15 extra hearts and some extra stamina
The Divine Beast abilities helped a lot too
Maybe it is due to how punishing the game was early one, but I really had no problem with this one. That or I'm just good at this because only a few shrines have stumped me.
Funny enough getting to the island was harder for me.
If you have all 4 divine beast abilities, it's really not too hard. That lighting one really is OP. I didn't even have to sneak to get that orb from the Hinox. I actually killed him.
I didn't think of stealing the orb from the Hinox. After several failed attempts I realized that the metal boxes do quite a bit of damage if you hit them in the eye with it. So on my next attempt I salvage the two boxes on the beach, along with the two boxes near the altar and used them to take him down.
Also, for the camp with the third orb, I climbed up to the hilltop where the shrine appears and threw bombs down. The bokoblins crowd around it trying to figure out what it is and you can easily clear the camp by just throwing more bombs.
You beat it by pausing your game and playing through Link's Awakening and then going back to it.
I love how there are so many different ways to do beat it and how everyone approaches it slightly differently.
I just did this one last night. Took a few tries. One of the favorite shrines.
I manned up and took down the big cyclopes guy with the dinky island weapons
You're putting way too much effort into getting to the island. The paraglider is way too involved. Theres literally a boat and a korok leaf on the island with a shrine north of Eventide.
The only frustrating thing was that if you die, you'll have to do the other two pedestals all over again. I died twice to that Hinox and it was the very first time I wasn't enjoying my time with the game - which made beating this challenge and being returned my stuff oh so sweeter. I just threw bomb after bomb at him until he died.
@Evenmoresteven Didn't even use that power at the time I did the shrine. I ran around in circles from bombs at him all the time.
@A01 - Just noticed your comment. We did the same thing XD
I thought this one was pretty easy actually. Different than the other shrines, but easy nonetheless.
I had a lot of fun with this one, but hardest? Nah.
Shirtless Link ? Armorless ?
Gosh... the Challenge looks so cruel.
From my understanding, you can also bypass the weapon/armour requirement if you just drop your stuff before starting the island trial, since your equipment doesn't disappear. It would most likely make this a cake walk though.
Also, another method of getting to the island is simply abusing the ice power and building pillars all the way from either the west mainland or the northern shrine.
I can't confirm it but from what I have heard if you drop your gear and then pick it up again after the quest has started you will lose it all. When the quest finishes it takes everything you picked up o the island away from you before giving you your original gear back.
What? This was the hardest? I beat this one last night, and thoroughly loved it. I was hoping for more like it.
It was fun and I had to be creative but it definitely wasn't the hardest shrine quest.
I did do it fairly late and had the zora and goron divine abilities though.
If you actually need a guide to beat it you can apparently land in the water next to the raft, drop your gear on the raft then go on the island and the stuff on the raft will still be there.
Would kinda ruin the fun I guess however.
Yeah, as has already been said earlier there's a much easier way to beat this.
There is a raft and leaf you can use to sail to the island directly from the mainland (I forget north/south, but it's directly in a straight line from the island)
As soon as your raft comes to the shore make sure you do the following- open up your inventory and drop all your best swords, and shields. Then before you drop your bows make sure you fire 10 arrows into the sand and then drop the bows.
Once you step onto the island your gear, clothes etc will be taken from you and you'll start the mission. Now just go back to the sand, pick up the arrows, then go back to the raft and pick up the bows, swords and shields.
You'll still have to be careful as you don't have armour, but otherwise this mission is actually quite easy!
@Ernest_The_Crab I discovered that on my third try. Frustratingly, I only threw a cheap weapon over, in case it vanished.
@A01 I killed it with bombs too. I was wondering if anyone else did the same haha
And yes I can confirm that you'll lose your good gear if you're holding it when you finish the mission, but this is an easy problem to solve.
Just before you finish the mission drop all your good weapons etc and once you've been given your items back you'll be able to go pick up your things as you did when you started the area!
Hey, this article should be marked as spoiler.
At least put a warning!
It can appear as a discussion of a typical shrine (albeit a difficult one), when in reality it is a BIG surprise, one of the best of the game! I wouldn't have wanted to have it spoiled, luckily I had already found it by myself.
Just yesterday I refrained from telling to a friend about it (I want him to discover this by himself), and here I find it splashed on the front page!
(SPOILERS, I guess...) The easy way to beat the Hinox is to lure him over to the tree house. He can't reach you on the platform, but his eye is right there and an easy target. Then you just glide down, hack away until he gets up, then you run back up on the platform. Repeat!
I got the blood moon when I did Eventide. Fortunately, it was also thundering so I dispatched the last horde of monsters by Magnesis-ing my metal weapons over them.
I lucked out with the Hinox. I took out the higher Bokoblin encampment before I fought the Hinox. I took an explody barrel down to blow him up all sneaky-like. I shot it with a couple arrows and only succeeded in waking him up. I started attacking it then noticed the it was about to do it's ground pound move.
Lucky for me the barrel had rolled directly underneath him and i ran away. The Hinox ground pounded the barrel and it exploded (of course) and burnt off his shin guards.
He still had a lot of health left, but it was basically over at that point. I had a couple decent weapons and a fair amount of arrows.
I beat this with 5 hearts and no divine powers on the first go. It is all about patience. Also, beating the Hinox with metal boxes using Magnesis is super effective!
Those shrines looks terrible. I want the old dungeons back! nuff said
i used bombs for the hinox too... it took me a while though lol
Definitely not the hardest, only a little hard, but one of the most interesting ones for sure. I wish the island was bigger though. That alone makes it easier.
@Juma009 Be careful, as you loose all gear you 'acquire' during the challenge upon completion, so you can lose a lot of your good stuff if you're not careful.
Or:
Load up the amiibo rune and scan a ton of figures in. Presto! Tons of food and maybe some decent weapons from the Zelda set.
I feel awesome. Had no idea this was the "hardest" shrine quest. I stumbled upon it randomly and beat it in one go without knowing what to expect. NOOICE!
I'm just gonna put it out there and say that when I was trying to get to Eventide Island I used Cryonis to get across the sea instead of paragliding or using a boat or anything like that..yeah, lol
On the plus side though, I caught a lot of fish on the way. XD
This challenge wasn't that hard at all. The island practically throws weapons at you, so the bokoblins aren't much harder than usual. The only hard part was the Hinox, which was really more grindy than challenging, since I just ran away from it and threw bombs at it until it died. I liked the challenge quite a bit, though. The island has a sort of Castaway/desert island vibe, and it required more strategy than usual near the end of the game, since by the time you get high-end gear you can basically kill most stuff with mindless button mashing.
When doing this I knocked the third orb off the cliff and spent the best part of an hour trying in vain to carry/octo balloon it back up before giving up and starting again. This was after spending ages using bombs to finally murder the Hinox (before I realised I could of just stolen it).
I went there with only the zora healing power and pretty low hearts. I tried landing on the Hinox and stealing the orb but the pick up option never showed for me, so I assumed you couldnt take it. I was able to take the bow and club off his neck though, which, combined with the high attack from my banana recipe and a few boat oars, were enough to finish him.
I spent several hours attempting in vain to beat this only after completing 19 or 20 shrines and I had very few hearts and stamina wheels. Not a fun time.
@RadioHedgeFund You can't use amiibo on Eventide
all i did was bomb everything to death with no death's.
edit: it didn't take long at all either.
This wasn't the hardest shrine quest.
@Juma009 That's basically what I did. Take a raft right up to the beach and then drop a good weapon, bow, shield, and good raw food on the raft, shoot some arrows into the deck, and eat some hearty food. Step onto the beach to trigger the mission, then go back to the raft and get your stuff. Makes the mission significantly less tedious.
And before anyone jumps on me for cheating- I only did it that way after I did ALMOST the entire mission the "right way" and then lost the third and final sphere to the bubbling mud pit, from whence it is impossible to retrieve. So I had to start the mission over. And I was very put-out over it. Pro tip: when using stasis to hit the slab off of the final sphere platform, be careful to NOT send it flying into the final sphere, because it will launch the sphere off of the cliff, where it will land next to the Hinox, and then when you go to pick it up the Hinox will wake up and chase you into the woods, where an Octorok will shoot you, at which point you will stumble and drop the sphere into a bubbling mud pit, from whence it is impossible to retrieve.
This Shrine was way too fun than difficult, I had a Blast (the only difficult part for me was getting there, i paraglided there like an idiot.)
I did that island pretty early, before I did any divine beasts. It took awhile, and I ended up killing the hinox by getting him stuck on the cliff and repeatedly bashing him in the head with a metal box!
@BAN You can also attach octo balloons to those slabs instead of using stasis on them, saves weapon durability and time.
Hey @Damo, it isn't actually necessary to fly over there. There's an island right where that shrine marker is on your first map image, right under the words "Necluda Sea". That island has a shrine, as well as a raft. All you need is that raft and a Korok Leaf and you're on your way!
Still have a ways to go through the game but if this was the hardest it had to offer then I'm already disappointed. I did this ridiculously early, even beat the Hinox (not that hard, it's so slow it's easy to dodge and whittle it down). And oh don't need upgraded stamina to get there at all, I found a raft on a nearby beach and used that to get over.
I also tackled this with no Divine Beast powers, getting there via Cryonis blocks and saving just before hitting the quest barrier. Did the third listed in this guide first, blasting near everything with bombs. The Hinox I led up to the hillside camp, using a combination of bombs and Stasis. At one point it ground pounded the cooking pot, setting itself on fire. The third was easy after that. Didn't cook anything, barely used any gained weapons. Did take a number of tries though.
@RedMageLanakyn Oh, I know. I actually did that first. Used the two or three balloons I'd acquired from the mission to lift the slab. But it was storming and the wind drove the slab back, and when the balloons finally popped, the slab landed basically right where it had previously been, right on top of the ball receptacle. It also crunched me on the head and I almost died. I really just derped the mission hard. Basically this was the Murhpy's Law run. I'm not what you would call a lucky man.
This shrine and all shrines are pretty easy I'm over 100 shrines and I've probs with like 2-3?
Why didn't I think to use cryonis to get the orb to that island pedestal. I cut down the palm tree and threw it from there.
I succeeded on my third attempt. The Hinox is the hardest to beat, but if you can sneak to the top of the island and rain bombs on the gang of moblins below, their weapons make the Hinox much easier to beat.
@BAN That sucks! I tend to get hit by lightning even without metal on, like every single storm. Lynels seem to be able to spot me from far away and snipe at me too.
Holy crap! I JUST did this one yesterday. Took almost an hour but it honestly wasn't that hard. Makes you put yer thinking cap on.
@A01 same strategy here. Thought it was never going to die
@bstoppel Same! Though I used a raft to get the ball there. It was annoying and I was afraid of knocking/blowing it into the ocean.
I need to remember to use cryonis and stasis more often!
Now that Link is stronger, I don't brute force enemies with bombs as much as I did earlier in the game.
I thought it was simple. Took a while to chip away at the Hinox... just stood on an out-of-reach rock and repeatedly bombed him for 15 mins, more of a chore than anything! Rest was simple!
Ugh, I completely forgot about Cryonis. I chopped down a tree and used it as a raft bridge to get the ball on to the northern-most pedestal. That took at least 15 minutes to orchestrate.
I took down the Hinox. Took multiple attempts. Amazing how there is a multitude of ways to get through this Shrine - no 'correct' way as such.
Was annoyed it didn't leave me keep all the stuff I collected on the Island.
@FatherChesz I used the raft on the other side of the beach after trying the tree method multiple times.
Just a use the exploit and bring heavy weapons, shields and byes with you. Sure you lose what you bring with you after you complete the challenge but makes it a whole lot easier.
How to to the exploit?
You do always start with nothing each time. But if you stand in the water and drop gear right next to the shore but still with your feet in the water, you can ouch up said dropped gear after you have walked on land to officially start the challenge.
This exploit I would guess was not intended by the developers but it sure works well.
I killed the troll with bombs as well the first try, and after basically finishing the entire island, I blew "myself" up by accident. Second try: I killed it with weapons. There's plenty available on the island.
@Englishpsycho87 I had tried this quest a few times and yes, all gear picked up in the quest is lost afterward. Anything you had prior is returned upon completing or failing the quest. It's a fun diversion to see how well you can survive without all of your gear and items. I've died half a dozen times now mainly because of a stray hit from an enemy I didn't anticipate. But I agree and had found that fighting the Hilox is not recommended. Getting his orb isn't as challenging as it might seem. My biggest issue was the Moblin and a few hits from them even with having 13 hearts.
@the8thark LOL, will have to try that for a speed run after completing it normally.
And here I thought that labyrinth in the north was the hardest one (not the Labyrinth itself, but finding the entrance).
I saw Eventide Island on the map but didn't think it would be that interesting. Minor spoiler, but I don't care. I'll visit it soon.
I only have one Divine Beast power, the elephant thingy, but I did manage to beat this one last night without dying. What really helped me was sailing off a cliff, landing on the chest of the sleeping dude, grabbing the special ball and running away. It was a fun time, kind of like Survivor: Hyrule.
@arsoneycad Ya I did that and it took forever because blowing your sail and adjusting when the wind pushes you back is so annoying i'm totally paragliding over next time since i died and have to go again lol.
I actually just beat it this morning. Took me quite a few tries. The Hinox got me mostly. I tried climbing on top of him, or going up on his hand, and I got the weapons and stuff on his neck, but never the orb.
I remember one time, the orb came loose from his neck once. I looked over and the moblin skeletons were throwing the orb at me. I grabbed it and RAN! Then something else killed me...
@the8thark
Well damn... why didn't I think of that?
This was my favorite shrine by far, though I don't see it as being all that difficult. I loved the back to basics appraoch tho, it forces you to think.
I really liked this shrine, though it was one I did early on with no power-ups and only 5 hearts so I made it harder than I should have for myself. Took me 2 days of play. The Hinox was a problem until I realised you can just slash the rope or shoot it with arrows and steal away with the orb.
The combat training shrine was way harder for me. I had to watch a video to see how to do it because at first, I was pressing the buttons but getting nowhere.
I got there a few hours into the game by making ice blocks all the way
I really enjoyed this challenge, but I've enjoyed reading all these different strategies even more. As an aside, to those complaining about spoilers; it's safe to assume that any article which starts with "Guide:" contains massive spoilers. How is that not totally obvious?
Hardest? Ha.
Just spammed the heck out of the Bombs. Might take awhile as well as finding the perfect place to throw them (Plus the upgrade helps tons), but its more then doable.
I'll await and see what the Hard Mode from the DLC Pack does to this challenge.....
Glad to see I wasn't the only one that used bombs on the hinox. I figured I could glide down and just swipe it, but I wanted the loot. lol.
Also gliding to the island? Wow. I used ice to make my way to the nearby shrine island, then used the boat that was parked next to that shrine to make my way to Eventide. Then I used the spare boat that was near the hinox to get to the pedestal in the water.
I haven't done this shrine yet but I have listened to my friend do it over Discord as we played together and the funniest part was when he said, "You know, it would really suck to get a blood moon while I'm out here," and then not five minutes later he went, "Oh crap! It's a blood moon!" I laughed so hard. He hadn't done any of the Divine Beasts yet or a lot of shrines so he found it really hard and he told me to stay away. I'll do it in a few days, I guess. That's the only section of map I haven't uncovered.
I guess I sort of cheated? Found out you can drop the items tot he shore before triggering the message that removes your items...
There is a hill to the south overlooking the Hinox with a couple of perfectly placed boulders ready for a nudging. Put a nice dent in his health for me.
In the water near this hill is a wooden raft which had a rusty weapon right next to it. With that, a nicely timed thunderstorm and some strategic weapon dropping he went down without too much trouble.
I find it fascinating hearing how others are finding all the different ways of tackling things in this game and the stories people are telling, I don't think i've ever been this drawn into a game like this before.
I just threw weapons on the island and dropped some shields before I activated the trial. After beginning, I picked up these weapons and had them help me greatly during the shrine quest. Though, this comes with a price of the game removing any gear you used/found during the trial.
I wouldn't call this the hardest shrine quest at all. I beat it with 3 hearts and Link was still in his underwear.
@GoldenGamer88 Yeah, that was my tactic! I love that there's more than one way to approach this and so many other parts of this game. I mainly read this guide to compare it to how I managed it.
Just done this... utterly hilarious.
An insanely easy way of doing it... wait for a thunder storm... a lot of the tougher enemies are holding metal weapons, so they get hit by lightning and are killed instantly... then the others pick up their dropped weapons and the same thing happens.
Did this shrine with 5 hearts, two stamina upgrades and managed to kill the Hinox while I was at it.
@Englishpsycho87 I tried this a couple of times, but the boulders kept missing the extremely large target asleep on the ground.
Took me hours to beat this trial! Very very hard, but doable. Don't cheat and throw all your good weapons on the island beforehand... Do keep in mind though, there are a lot of hearty veggies on the isle, so use those to your advantage!
You can just use a raft to reach the island if you lack stamina.
i died about 20 times and almost completed the island, except i mixed up the orbs, taking the one from koholit and dropping down the side to a bottom platform, which meant i couldn't get any other orb back up onto the rock :/ Then i tried the dropping a few weapons whilst in the water glitch, so i was able to start the island with a few good weapons and finally got through. But afterwards i feel i cheated myself, i would rather have the more difficult challenge and sense of accomplishment, then a quick victory.
All the enemies except for the Hinox have metal weapons, and there are pretty frequent thunderstorms, so I just let nature do the selecting while I casually stood by.
I loved the idea of the Eventide quest! It was a nice surprise.
But they should've gone one step further and disabled the Paraglider as well as the Runes for the duration of the Island visit!
Already done this, and it was pretty fun. If it is the hardest shrine, ill be a little disappointed.
I had 3 hearts (sunk every upgrade into stamina) and had no idea this was a trial when I set foot on the island. It took a little over an hour but it was fun and a bit of a surprise. I somehow glitched/stuck the Hinox on the rocks near the plateau with the electric chuchus were and lobbed bombs down. In the middle of it though, I tried to speed up the process using stasis on the boulders and trees but only managed a couple good hits before losing them in the sea, so I went back to bombs. It wasn't hard, it just needs more patience and planning.
Oh, yeah. If you go back to the island, there's a Rito who sets up a paraglider mini game where you fly through rings (kind of like Pilotwings). He gives you rupees for your efforts.
Difficult, but not that hard. Although I did it with a lot of hearts.
When I entered, I immediately went to deal with the Hinox and enemies on the hill. I just killed the enemies with bombs as it was easy, especially with the Chuchus. Hinox I used bombs with too. From a high place, I threw both Square and Round bombs, switching between the two. At some point, he continues to stay in one place which made it easier to deal with. With that he died, got orb and first one completed.
Second was the one nearby. Due to my hearts, I just stormed in, used Stasis and got orb in. Obviously took the weapons from Hinox before attempting this.
Treehouse orb was easy, but when I tried to get to the spot in the water, didn't think of freezing. Used Stasis and hit it too much, which made it flew way too far in the sea. If I swam that far out, I would've exited the challenge. However it was my last orb and I was determined to get it back. So I than used freezing to knock the orb back, which took a while and finally completed the challenge.
Forgot about the chest in the swamp that has a claymore.
I stood on a cliff on the mountain, just out of reach of a flying rock, and threw bombs at the giant until he died. I loved this one, it was a throwback to the beginning of the game (except for the vast amount of hearts I had at the time). I didn't think it was particularly difficult, just annoying that there was a lightning storm halfway through it.
Can't be that hard- PB&Jeff did it two-player co-op, with each one using one of the joycons. Yes, it took me forever to beat the Hinox on the bridge myself though, and it had only one shin/ankle guard.
@AlexOlney Really? I figured you could just drop the stuff on the ground again before the final orb. I could be wrong though, as I never tried the whole exploit method.
This was one of my favorite trials thus far in the game (and I've done most of them). Wasn't hard, just long. I took Hinox down by first luring him over to the hill with the lightning chu chus and tossing explosive barrels down the hill on him (the boulders missed regrettably), then I did my usual hit-and run tactics on him that I normally pull on a Hinox. Halfway through I noticed the dragonbone weapons on his neck, so I hit him in the eye, then ran up and grabbed them off his neck to help finish him off. At the time the only champion blessing I had was Mipha's, and that wasn't even necessary.
The tricks I used for beating him are to save up as many arrows on the island as you can, be patient when attempting an eye shot, so you don't waste bow durability or arrows, and don't attempt anything too reckless against him.
Carpenters reference and ain't no way it ain't.
There's no need to swim from the west; an island north from the island is more accessible, and more importantly has a raft you can use to get to the island, provided you have a Korok Leaf.
As for the Hinox, I was in no way prepared to face him head on, so I climbed the nearby cliff and threw bombs at it instead, making sure I did so from a position where he couldn't see me. Takes about a day in-game to finish him off, but hey, it works.
Finally, you can drop your stuff on the shore as long as you do so before touching dry land. Just remember to drop precious items before placing the third orb in its altar, or they're gone forever.
It's not hard at all once you figure out how to do it properly. Simply dump all stuff you need into the water before setting foot on the island and collect it again after the trial starts.
Don't fight the Hinox but just glide onto his belly and grab the orb.
Take shelter by the fire under the rocky overhang close to the Hinox at night and skip to morning to avoid the incessant thunderstorms.
Those are the most important ones. Everything else, just be careful and take your time. And don't forget your runes as they're all still available. Should be pretty easy.
Hardest Shrine? Did you even play the game? Every Shrine with forced motion controls is WAY harder for obvious reasons.
This one was a little harder for me since I only had one champion power. But luckily it was the best one for dealing with monsters. Though most of my deaths on the island was because I kept accidentally bombing myself.
@Smegmapoo69 Welcome to the site. Please read the rules. No profanity, thanks.
I didn't have much issue with this quest
Hardest!! For real? Thanks for the spoiler i was hoping to find something even hardest than this i don't even on my 30th shrine lol i killed the big guy first with bombs and a help from an octo lolz after that it was an easy stealth quest.
Also you can get there easy with a koroko leaf and a boat no need to get more stamina weels or nice wind
Cleared the super early on with one extra heart and one stamina upgrade.
My favourite part of the game. Just superb.
I found this shrine pretty early on, before any divine beasts, I think I had 4 hearts and a Stamina upgrade.
I didn't intentionally kill anything lol, I just ran around and grabbed the orbs and dropped them where they went. I did die a couple times but given how early in the game I was it was expected.
@Destron
Same, I went directly after visiting Hateno Village for the first time.
Got my butt handed to me.
Instead of gliding in, I came in on a raft and blew up the first camp on the beach with arrows before landing. It made the beginning much easier IMO.
Camp on the beach This is one of the easiest shrines. Blow up the camp on the beach and grab a few spears and a litle bit of food.
Kill a mob to get at least one balloon
For the Hilox. Climb up the cliff by its head. And throw bombs at it. It will throw things at you but can't reach. It does take a while so make a game. Try to roll the bomb between its toes.
Next camb, climb up and bomb it. To get the orb bomb the camp with it. You can fly down to the top. and rolloff bombs.
For the third orb. Climb arround and come from the side behind the orb. Bomb the group. If you grabbed a bow and arrow take out the towers. Other wise just drop down.
Place a balloon on the slab., climb the tower to get the orb. ( or go ahead and climb the cliff again and glide down.)
Presto your done. You don't need a weapon, and you don't need food.
Raft is the best way to come in. If you are worried about dying stop at the rock on the way in. Its not on the island so you will come back there if you die.
Did it with 4 hearts, and no stamina upgrades
Yo, I know its hella late for this to be added or for anyone to pay attention to this, but there is absolutely a reason there are rusty weapons lying around. The Octork up on the rocky cliff near (right side when approaching hinox) will suck up a rusty weapon if you time a throw correctly. When he spits it back out you get a refurbished weapon that vastly out performs pretty much everything else found on the island.
Also I'd like to brag that I did this island with only like 2 heart upgrades, but that was just my Dark Souls attrition perking up.
The hardest?! Ehhh, no! I beat it in my first try. Just used a lot of bombs (especially against the Hinox) and I was lucky that in the area with the stone-slab, the hardest enemy got struck by lightning.
As many people already said: The beginning of the game is the hardest. But when you obtain hearts, stamina, other powers, the game becomes easier and easier!
@Englishpsycho87 I tried dropping some stuff on the rocks to the East of the island that are aparently not part of the island, but when I swam back to get it, it asked me if I was quiting. I may try throwing a couple things in the water next time, but you can get everything you need on the island, so this seems like an unnecessary cheat/hack even if it works.
@RidoKilos Good to know. I have to attempt this level at least once more. I was sooooo close last night, but the Hinox got me. I'm going to try to kill it. The landing on it didn't work for me.
中国玩家到此一游
"Chinese player visiting".
Please use English in all your posts. -Meowpheel
Tap here to load 119 comments
Leave A Comment
Hold on there, you need to login to post a comment...